A-1 Miller's Performance Enterprises Webstore
of Conventional Ignition Parts and Custom-Made Electronic Ignition Conversion
Kits
A-1 Miller's Performance Enterprises Webstore
of Conventional Ignition Parts and Custom-Made Electronic Ignition Conversion
Kits
A-1 Miller's Performance Enterprises Webstore
of Conventional Ignition Parts and Custom-Made Electronic Ignition Conversion
Kits
A-1 Miller's Performance Enterprises Webstore
of Conventional Ignition Parts and Custom-Made Electronic Ignition Conversion
Kits
Nowadays, prices are subject to change without notice. Click
Refresh to see any
changes or updates. Optimized for 1152 x 864 computer screen resolution.
To search for a word or phrase in any of my websites, press the CTRL
 and F
and F  keys on
your keyboard simultaneously to open the Find or Search dialog box in your
web browser. Scroll down this website or click/tap the links below to
jump down to..
keys on
your keyboard simultaneously to open the Find or Search dialog box in your
web browser. Scroll down this website or click/tap the links below to
jump down to..
| FYI - All aftermarket parts offered in this website are of very high quality and come with an unconditional guarantee. As a matter of fact, the aftermarket parts are just as good or better quality than most OEM Kohler parts. However, certain OEM Kohler and aftermarket parts are no longer available, but might still be available from a source in new old stock. | |||||
High-Output 3-Wire Inductive/Hall Effect Proximity Sensors, and Magnetic Pickup Coils | Electronic Ignition Control Modules (for use with flywheel- and crank-trigger ignition systems) | Reliable and Durable Tachometers and Hour Meter |
FYI - Being we haven't had any Onan or Wisconsin engines in our shop for repairs, we have no experience with working on them. Apparently, these engines are rare in our area (mid-Missouri). Therefore, we do not offer a custom-made electronic ignition conversion kit for these engines. If someone is willing to bring their Onan or Wisconsin engine to us, we're sure we can fabricate and install an electronic ignition system on it. |
||||
Kill Switch and Conventional (Points and Condenser) Ignition Parts -
  SAFETY FIRST!
Break-Away / Grounding-Type Safety Kill Switch with
Pull-Pin. Use for competition pulling only; mount on rear of tractor.
When the pin pulled, it grounds the ignition coil from producing spark. If
using with a self-energizing magneto or electronic/solid state ignition systems:
Connect one wire to the chassis ground, and connect the other wire to the
points/condenser wire or to the kill terminal on the solid state ignition
coil/module. If using with a battery-powered ignition system: Connect one
wire to the chassis ground, and connect the other wire to the coil negative
(–) terminal. NOTE: With battery-powered ignition, as soon as pin
is pulled (engine will die), manually shut off ignition switch right away
to prevent possible damage to the ignition coil and electronic ignition module
if equipped with crank trigger ignition. This type of switch does not
disable power to the
electric fuel pump on a pulling tractor. It must be
shut-off manually by the ignition switch or an OFF-ON toggle switch.
[Return to previous section] SAFETY FIRST!
Break-Away / Grounding-Type Safety Kill Switch with
Pull-Pin. Use for competition pulling only; mount on rear of tractor.
When the pin pulled, it grounds the ignition coil from producing spark. If
using with a self-energizing magneto or electronic/solid state ignition systems:
Connect one wire to the chassis ground, and connect the other wire to the
points/condenser wire or to the kill terminal on the solid state ignition
coil/module. If using with a battery-powered ignition system: Connect one
wire to the chassis ground, and connect the other wire to the coil negative
(–) terminal. NOTE: With battery-powered ignition, as soon as pin
is pulled (engine will die), manually shut off ignition switch right away
to prevent possible damage to the ignition coil and electronic ignition module
if equipped with crank trigger ignition. This type of switch does not
disable power to the
electric fuel pump on a pulling tractor. It must be
shut-off manually by the ignition switch or an OFF-ON toggle switch.
[Return to previous section]
|
|
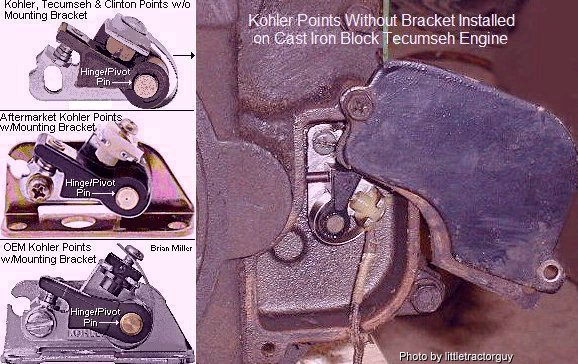 Ignition
Points for Kohler, Tecumseh and Clinton engines. Fits Kohler engine models
K90/K91, K141, K161/K160, KV161,
L160/L161, L181,
K181, K241, K301, K321, K330/K331, K341, K361, KT17 (first design), KT17
Series II, KT19 (first design) KT19 Series II, KT21, K482, K532 and K582
with magneto or 12 volt battery ignition (use with mounting bracket). Also
fits Tecumseh cast iron block engine models HH80, HH100, HH120 with magneto
or 12 volt battery ignition (use without mounting bracket); and Clinton engine
models 414, 418, 420, 422 (use without mounting bracket). Also, use this
part when converting from Breakerless Ignition to points and condenser ignition.
IMPORTANT: Sometimes oxidation will form on new points contacts from sitting
in storage, even when sealed in plastic. This happens A LOT with all types
of ignition points. Therefore, do not use sanding material, such as sandpaper
or emery cloth, to clean any electrical contacts! These will leave a gritty
residue between the contacts, causing a faulty connection. Instead, while
the points is installed and the contacts are closed under pressure, use a
[preferably clean]
ignition points file (professional use) or
metal fingernail file (use in a pinch) to remove any
oxidation/debris between the contacts, then drag a piece of [preferably clean]
lint-free paper through the contacts to remove any left-over residue, and
use
brake parts cleaner,
electrical/electronic contact cleaner,
cleaning solvent or
paint thinner (these leave no oily residue) and then use
150± psi compressed air with an
air blow gun nozzle to clean any remaining debris and metal
filings from the contacts. This will guarantee 100% connection with the points.
Also, lubricate the hinge/pivot pin in the points with clean motor oil to
prevent from wearing due to dry friction, which will eventually effect the
ignition timing. Or improve engine performance and longevity with virtually
any engine and eliminate regular maintenance on conventional ignition components
with an Electronic Ignition Conversion
Kit! Ignition
Points for Kohler, Tecumseh and Clinton engines. Fits Kohler engine models
K90/K91, K141, K161/K160, KV161,
L160/L161, L181,
K181, K241, K301, K321, K330/K331, K341, K361, KT17 (first design), KT17
Series II, KT19 (first design) KT19 Series II, KT21, K482, K532 and K582
with magneto or 12 volt battery ignition (use with mounting bracket). Also
fits Tecumseh cast iron block engine models HH80, HH100, HH120 with magneto
or 12 volt battery ignition (use without mounting bracket); and Clinton engine
models 414, 418, 420, 422 (use without mounting bracket). Also, use this
part when converting from Breakerless Ignition to points and condenser ignition.
IMPORTANT: Sometimes oxidation will form on new points contacts from sitting
in storage, even when sealed in plastic. This happens A LOT with all types
of ignition points. Therefore, do not use sanding material, such as sandpaper
or emery cloth, to clean any electrical contacts! These will leave a gritty
residue between the contacts, causing a faulty connection. Instead, while
the points is installed and the contacts are closed under pressure, use a
[preferably clean]
ignition points file (professional use) or
metal fingernail file (use in a pinch) to remove any
oxidation/debris between the contacts, then drag a piece of [preferably clean]
lint-free paper through the contacts to remove any left-over residue, and
use
brake parts cleaner,
electrical/electronic contact cleaner,
cleaning solvent or
paint thinner (these leave no oily residue) and then use
150± psi compressed air with an
air blow gun nozzle to clean any remaining debris and metal
filings from the contacts. This will guarantee 100% connection with the points.
Also, lubricate the hinge/pivot pin in the points with clean motor oil to
prevent from wearing due to dry friction, which will eventually effect the
ignition timing. Or improve engine performance and longevity with virtually
any engine and eliminate regular maintenance on conventional ignition components
with an Electronic Ignition Conversion
Kit!
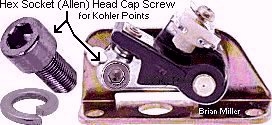  Hex Socket (Allen) Head Cap Screw w/split lock washer and
flat washer. Replaces OEM slotted or aftermarket Phillips head adjustment
screw in points for easier setting of the point gap and/or ignition timing
with a
9/64" hex (Allen) L-wrench. Fits points used on Kohler
engine models K90/K91, K141, K161/K160,
KV161,
L160/L161, L181,
K181, K241, K301, K321, K330/K331, K341, K361, KT17 (first design), KT17
Series II, KT19 (first design) KT19 Series II, KT21, K482, K532 and K582.
Ideal for garden tractors with a
longitudinal engine, such as IH Cub Cadet, Economy Power
King, Ford, hydrostatic-drive John Deere, MTD Farm King model 960, Pennsylvania
Panzer, Meteor, Copar, etc. No need to use this Allen head screw for garden
tractors with a
transverse engine, such as older Bolens, belt-drive John
Deere, Massey Ferguson, Sears Suburban, Wheel Horse, etc. NOTE: Threads for
adjustment screw in aftermarket points may need to be rethreaded with a 8-32
UNF TAPER [preferably]
hand tap. And due to risk of stripping threads in the thin metal points
bracket, do not over-tighten this adjustment screw! Hex Socket (Allen) Head Cap Screw w/split lock washer and
flat washer. Replaces OEM slotted or aftermarket Phillips head adjustment
screw in points for easier setting of the point gap and/or ignition timing
with a
9/64" hex (Allen) L-wrench. Fits points used on Kohler
engine models K90/K91, K141, K161/K160,
KV161,
L160/L161, L181,
K181, K241, K301, K321, K330/K331, K341, K361, KT17 (first design), KT17
Series II, KT19 (first design) KT19 Series II, KT21, K482, K532 and K582.
Ideal for garden tractors with a
longitudinal engine, such as IH Cub Cadet, Economy Power
King, Ford, hydrostatic-drive John Deere, MTD Farm King model 960, Pennsylvania
Panzer, Meteor, Copar, etc. No need to use this Allen head screw for garden
tractors with a
transverse engine, such as older Bolens, belt-drive John
Deere, Massey Ferguson, Sears Suburban, Wheel Horse, etc. NOTE: Threads for
adjustment screw in aftermarket points may need to be rethreaded with a 8-32
UNF TAPER [preferably]
hand tap. And due to risk of stripping threads in the thin metal points
bracket, do not over-tighten this adjustment screw!
   Phillips Head
and Hex Socket (Allen) Head Screws with split lock washers to fasten ignition
points and/or points cover on Kohler engines. Fits Kohler engine models
K90/K91, K141, K161/K160, KV161,
L160/L161, L181,
K181, K241, K301, K321, K330/K331, K341, K361, KT17 (first design), KT17
Series II, KT19 (first design) KT19 Series II, KT21, K482, K532 and K582.
These type of screw heads make for easier fastening of points and points
cover to engine block in hard-to-reach places than the OEM slotted head screws
on garden tractors with a
transverse engine as listed above. Each screw replaces
discontinued Kohler part # X-131-1-S. Phillips Head
and Hex Socket (Allen) Head Screws with split lock washers to fasten ignition
points and/or points cover on Kohler engines. Fits Kohler engine models
K90/K91, K141, K161/K160, KV161,
L160/L161, L181,
K181, K241, K301, K321, K330/K331, K341, K361, KT17 (first design), KT17
Series II, KT19 (first design) KT19 Series II, KT21, K482, K532 and K582.
These type of screw heads make for easier fastening of points and points
cover to engine block in hard-to-reach places than the OEM slotted head screws
on garden tractors with a
transverse engine as listed above. Each screw replaces
discontinued Kohler part # X-131-1-S.
High Quality Adjustable Chevy (GM) Ignition Points with Stiff Spring for Quick Reaction at open RPM. Use on Kohler K-series K241, K301, K321, K341, K361 competition pulling engines only. NOTE: Not recommended for use on lawn and garden equipment engines due to long exposure to dust and debris, which can contaminate points contacts and cause a misfire. IMPORTANT: Sometimes oxidation will form on new points contacts from sitting in storage, even when sealed in plastic. This happens A LOT with small engine and automotive ignition points. Therefore, while the points are closed under pressure, use a clean steel fingernail file or ignition points file to remove any oxidation/debris between the contacts, then drag a piece of clean lint-free paper through the contacts to remove any left-over residue, and use brake parts cleaner, electrical/electronic contact cleaner, cleaning solvent or paint thinner (these leave no oily residue) and then use 150± psi compressed air with an air blow gun nozzle to clean any remaining debris and/or metal filings from the contacts. This will guarantee 100% connection with the points. Do not use sanding material, such as sandpaper or emery cloth, to clean any electrical contacts! These will leave a gritty residue between the contacts, causing a faulty connection and possible engine misfire. Or improve engine performance and longevity with virtually any engine and eliminate regular maintenance on conventional ignition components with an Electronic Ignition Conversion Kit! $15.00 each, plus shipping & handling. TIP: To prevent small Phillips- or slotted-head screws from falling out of the screwdriver tip when installing in a hard to reach place, first of all, use the correct size screwdriver that fits the screw head, and for ordinary steel screws, temporarily magnetize the screwdriver by rubbing a magnet several times along the length of the shank, or for stainless steel screws, apply a dab of automotive grease in the head of the screw. |
|
 Ignition Points
Pushrods. NOTE: New OEM Kohler K-series engine models points pushrods
are 1.265" in length, and a used pushrod must be no less than 1.205" in length.
Measure yours accurately with a
dial or
digital caliper to determine if it needs replacing. Or
improve engine performance and longevity with A-1 Miller's custom-made
Electronic Ignition Conversion
Kit! Ignition Points
Pushrods. NOTE: New OEM Kohler K-series engine models points pushrods
are 1.265" in length, and a used pushrod must be no less than 1.205" in length.
Measure yours accurately with a
dial or
digital caliper to determine if it needs replacing. Or
improve engine performance and longevity with A-1 Miller's custom-made
Electronic Ignition Conversion
Kit!
Ignition Points Pushrods. NOTE: New OEM Kohler points pushrods are 1.550" in length, and a used pushrod must be no less than 1.500" in length. Measure yours accurately with a dial or digital caliper to determine if it needs replacing. Or improve engine performance and longevity with A-1 Miller's custom-made Electronic Ignition Conversion Kit!
NOTE: If the points lobe on the camshaft is severely worn and the ignition timing cannot be fully advanced to the factory setting of 20º BTDC, and completely disassembling the entire engine to install a threaded-on stainless steel nut on the end of the OEM points pushrod (from inside the crankcase; as shown to the right) or to replace the camshaft with one that's in better condition (if one is available) is out of the question, then the alternative is to convert the engine to A-1 Miller's custom-made flywheel-triggered 12 volt electronic ignition.
|
|
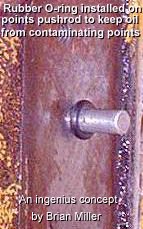  3/16" I.D. Neoprene Rubber O-Ring. Installs on points pushrod
close to engine block, allowing any seepage of crankcase oil to drip down,
staying off points contacts. Fits Kohler engine models K90/K91, K141, K161/K160,
KV161,
L160/L161, L181,
K181, K241, K301, K321, K341, K361, K482, K532 and K582. But if the ignition
points pushrod hole is excessively worn, this will effect the ignition timing
as well, and the block will need to be machined for installation of a bronze
sleeve bushing, or the hole can be plugged, and solid state or a custom-made
flywheel- or
crank-trigger electronic ignition system
can be installed. (The translucent silicone rubber diaphragm seal (part
# 220074-S) is no longer available from Kohler.)
[Return to previous paragraph, section
or website] 3/16" I.D. Neoprene Rubber O-Ring. Installs on points pushrod
close to engine block, allowing any seepage of crankcase oil to drip down,
staying off points contacts. Fits Kohler engine models K90/K91, K141, K161/K160,
KV161,
L160/L161, L181,
K181, K241, K301, K321, K341, K361, K482, K532 and K582. But if the ignition
points pushrod hole is excessively worn, this will effect the ignition timing
as well, and the block will need to be machined for installation of a bronze
sleeve bushing, or the hole can be plugged, and solid state or a custom-made
flywheel- or
crank-trigger electronic ignition system
can be installed. (The translucent silicone rubber diaphragm seal (part
# 220074-S) is no longer available from Kohler.)
[Return to previous paragraph, section
or website]
|
|
 Ignition Points
Cover Gaskets. Fits Kohler engine models K90/K91, K141, K160/K161,
KV161,
L160/L161, L181,
K181, K241, K301, K321, K330/K331, K341, K361, KT17 (first design), KT17
Series II, KT19 (first design) KT19 Series II, KT21, K482, K532 and K582.
Protects points contacts from dust, dirt and water contamination. Also, use
this part when converting from Breakerless Ignition to points and condenser
ignition. Ignition Points
Cover Gaskets. Fits Kohler engine models K90/K91, K141, K160/K161,
KV161,
L160/L161, L181,
K181, K241, K301, K321, K330/K331, K341, K361, KT17 (first design), KT17
Series II, KT19 (first design) KT19 Series II, KT21, K482, K532 and K582.
Protects points contacts from dust, dirt and water contamination. Also, use
this part when converting from Breakerless Ignition to points and condenser
ignition.
|
|
 Grommet for
Ignition Points Cover/Wire. Fits Kohler engine models K90/K91, K141, K161/K160,
KV161,
L160/L161, L181,
K181, K241, K301, K321, K330/K331, K341, K361, KT17, KT17 Series II, KT19
and KT19 Series II, KT21, K482, K532 and K582. Prevents dust and dirt from
contaminating points contacts, and protects points wire from rubbing/chafing
against points cover or use to convert from Breakerless Ignition to points
and condenser ignition. FYI:
RTV Silicone Adhesive Sealant will serve the same
purpose. Grommet for
Ignition Points Cover/Wire. Fits Kohler engine models K90/K91, K141, K161/K160,
KV161,
L160/L161, L181,
K181, K241, K301, K321, K330/K331, K341, K361, KT17, KT17 Series II, KT19
and KT19 Series II, KT21, K482, K532 and K582. Prevents dust and dirt from
contaminating points contacts, and protects points wire from rubbing/chafing
against points cover or use to convert from Breakerless Ignition to points
and condenser ignition. FYI:
RTV Silicone Adhesive Sealant will serve the same
purpose.
|
|
 "Assemble It
Yourself" Points-to-Ignition Coil Wire Kit. Replace OEM wire with
frayed/cracked insulation and/or broken connector(s) to prevent a short circuit
and/or engine misfire. Or use this when converting from Breakerless Ignition
to points and condenser ignition. Fits Kohler engines with battery-powered
ignition, models K90/K91, K141, K161/K160,
KV161,
L160/L161, L181,
K181, K241, K301, K321, K330/K331, K341, K361, KT17 (first design), KT17
Series II, KT19 (first design) KT19 Series II, KT21, K482, K532 and K582.
Includes 22" length (cut to desired length) x #16 gauge (AWG) insulated stranded
copper wire and two uninstalled crimp connectors. Requires use of
electrical connector crimping pliers. High quality A-1
Miller's parts. Replaces Kohler part # A-230371-S. "Assemble It
Yourself" Points-to-Ignition Coil Wire Kit. Replace OEM wire with
frayed/cracked insulation and/or broken connector(s) to prevent a short circuit
and/or engine misfire. Or use this when converting from Breakerless Ignition
to points and condenser ignition. Fits Kohler engines with battery-powered
ignition, models K90/K91, K141, K161/K160,
KV161,
L160/L161, L181,
K181, K241, K301, K321, K330/K331, K341, K361, KT17 (first design), KT17
Series II, KT19 (first design) KT19 Series II, KT21, K482, K532 and K582.
Includes 22" length (cut to desired length) x #16 gauge (AWG) insulated stranded
copper wire and two uninstalled crimp connectors. Requires use of
electrical connector crimping pliers. High quality A-1
Miller's parts. Replaces Kohler part # A-230371-S.
|
|
  Ignition Points Covers. Fits Kohler engine models K90/K91,
K141, K161/K160, KV161,
L160/L161, L181,
K181, K241, K301, K321, K330/K331, K341, K361, KT17 (first design), KT17
Series II, KT19 (first design) KT19 Series II, KT21, K482, K532 and K582.
Protects points from dust, dirt and water contamination. Replace damaged
or missing points cover, or use to convert from Breakerless Ignition to points
and condenser ignition. Ignition Points Covers. Fits Kohler engine models K90/K91,
K141, K161/K160, KV161,
L160/L161, L181,
K181, K241, K301, K321, K330/K331, K341, K361, KT17 (first design), KT17
Series II, KT19 (first design) KT19 Series II, KT21, K482, K532 and K582.
Protects points from dust, dirt and water contamination. Replace damaged
or missing points cover, or use to convert from Breakerless Ignition to points
and condenser ignition.
|
|
  3/16" Steel Plug for Kohler
Ignition Points Pushrod Hole. Fits Kohler engine models K90/K91,
K141, K160/K161, KV161,
L160/L161, L181,
K181, K241, K301, K321, K341, K361, and K482, K532, K582 (with an unworn
points pushrod hole). Use this part (to prevent eventual oil leakage) when
converting engine to electronic ignition. (Listed in this website.) Remove
points cover, points and OEM pushrod, and install this plug in the pushrod
hole with a medium size hammer. Plug should fit tight in hole, but if it
fits loose, create knurled/raised ridges on the plug with a sharp, flat cold
chisel and hammer, and apply silicone sealant on plug when installing in
the block. No need to reinstall cover and points. NOTE: The alternative
to using this plug is to remove the ignition points and points pushrod, and
place the pushrod on a hard, flat surface, and use a hammer and sharp flat
cold chisel to lightly create knurled raised marks midway on the pushrod.
Then reinstall the knurled pushrod in the engine block with the hammer. Or
a
20 penny common nail cut off to 1/2" length and the end
ground to a bevel will serve the same purpose. The knurled ridges will retain
the pushrod in the hole. Replaces Kohler part # X-702-1 (brass welch
plug). OEM Briggs & Stratton part #'s 231143, 692882. $6.00 each,
plus shipping & handling. [Return
to previous paragraph, section or website] 3/16" Steel Plug for Kohler
Ignition Points Pushrod Hole. Fits Kohler engine models K90/K91,
K141, K160/K161, KV161,
L160/L161, L181,
K181, K241, K301, K321, K341, K361, and K482, K532, K582 (with an unworn
points pushrod hole). Use this part (to prevent eventual oil leakage) when
converting engine to electronic ignition. (Listed in this website.) Remove
points cover, points and OEM pushrod, and install this plug in the pushrod
hole with a medium size hammer. Plug should fit tight in hole, but if it
fits loose, create knurled/raised ridges on the plug with a sharp, flat cold
chisel and hammer, and apply silicone sealant on plug when installing in
the block. No need to reinstall cover and points. NOTE: The alternative
to using this plug is to remove the ignition points and points pushrod, and
place the pushrod on a hard, flat surface, and use a hammer and sharp flat
cold chisel to lightly create knurled raised marks midway on the pushrod.
Then reinstall the knurled pushrod in the engine block with the hammer. Or
a
20 penny common nail cut off to 1/2" length and the end
ground to a bevel will serve the same purpose. The knurled ridges will retain
the pushrod in the hole. Replaces Kohler part # X-702-1 (brass welch
plug). OEM Briggs & Stratton part #'s 231143, 692882. $6.00 each,
plus shipping & handling. [Return
to previous paragraph, section or website]
|
|
| NOTE:
If a small engine idles well, but fails to rev up or runs erratically at
higher speeds (like it hits and misses, pops and backfires), then chances
are, it needs a new condenser/capacitor. And always install a condenser with
the wire or terminal facing downward so rain water and/or when washing off
engine, water will not enter inside condenser, ruining it. With water inside
the condenser, this will cause the engine to run erratically when revved
up.
|
|
 High Quality
Copper Core/Non-Resistor Spark Plugs. Designed for Kohler engine models
K90/K91, smaller flathead Briggs & Stratton and Tecumseh engines, most
2-cycle small engines and most chainsaws. Copper core spark plugs provide
a stronger spark that allow the ignition coil to operate cooler and last
longer. For best engine performance and longevity of the coil, set gap at
.025" with a self-energizing magneto or solid state electronic ignition system,
.035" with a full size battery-powered ignition coil, and .060" with a
high-output/performance battery-powered coil. 14mm threads x 3/8" thread
reach, flat washer seat. Replaces Briggs and Stratton part # 802592S. High Quality
Copper Core/Non-Resistor Spark Plugs. Designed for Kohler engine models
K90/K91, smaller flathead Briggs & Stratton and Tecumseh engines, most
2-cycle small engines and most chainsaws. Copper core spark plugs provide
a stronger spark that allow the ignition coil to operate cooler and last
longer. For best engine performance and longevity of the coil, set gap at
.025" with a self-energizing magneto or solid state electronic ignition system,
.035" with a full size battery-powered ignition coil, and .060" with a
high-output/performance battery-powered coil. 14mm threads x 3/8" thread
reach, flat washer seat. Replaces Briggs and Stratton part # 802592S.
 High Quality Copper
Core/Non-Resistor Spark Plugs. Designed for Kohler opposed twin-cylinder
flathead engine models MV16, KT17, KT17 Series II, KT19 and KT19 Series II,
KT21, M18, MV18, M20 and MV20. Also designed for 1971-1989 Chevrolet and
GMC L4, L6, V6 and V8 engines. Copper core spark plugs provide a stronger
spark that allow the ignition coil to operate cooler and last longer. For
best small engine performance and longevity of the coil, set gap at .025"
with a self-energizing magneto or solid state electronic ignition system,
.035" with a full size battery-powered ignition coil, and .060" with a
high-output/performance battery-powered coil. 14mm threads x 15/32" thread
reach, tapered seat. High Quality Copper
Core/Non-Resistor Spark Plugs. Designed for Kohler opposed twin-cylinder
flathead engine models MV16, KT17, KT17 Series II, KT19 and KT19 Series II,
KT21, M18, MV18, M20 and MV20. Also designed for 1971-1989 Chevrolet and
GMC L4, L6, V6 and V8 engines. Copper core spark plugs provide a stronger
spark that allow the ignition coil to operate cooler and last longer. For
best small engine performance and longevity of the coil, set gap at .025"
with a self-energizing magneto or solid state electronic ignition system,
.035" with a full size battery-powered ignition coil, and .060" with a
high-output/performance battery-powered coil. 14mm threads x 15/32" thread
reach, tapered seat.
 High Quality Copper
Core/Non-Resistor Spark Plugs. Designed for most makes and models of
OHV aluminum block single- and V-twin air-cooled small engines. Copper core
spark plugs provide a stronger spark that allow the ignition coil to operate
cooler and last longer. For best engine performance and longevity of the
coil, set gap at .025" with a self-energizing magneto or solid state electronic
ignition system, .035" with a full size battery-powered ignition coil, and
.060" with a high-output/performance battery-powered coil. 14mm threads x
5/8" thread reach, flat washer seat. High Quality Copper
Core/Non-Resistor Spark Plugs. Designed for most makes and models of
OHV aluminum block single- and V-twin air-cooled small engines. Copper core
spark plugs provide a stronger spark that allow the ignition coil to operate
cooler and last longer. For best engine performance and longevity of the
coil, set gap at .025" with a self-energizing magneto or solid state electronic
ignition system, .035" with a full size battery-powered ignition coil, and
.060" with a high-output/performance battery-powered coil. 14mm threads x
5/8" thread reach, flat washer seat.
|
|
 Spark Plug
Grommet. Fits Kohler (Quiet Line) engine models K181AQS, M8, K241AQS,
K301AQS, K321AQS and K341AQS. Fastens directly on spark plug in air duct
shield (sheet metal) over cylinder head to help cool the head better. Made
of neoprene rubber. Spark Plug
Grommet. Fits Kohler (Quiet Line) engine models K181AQS, M8, K241AQS,
K301AQS, K321AQS and K341AQS. Fastens directly on spark plug in air duct
shield (sheet metal) over cylinder head to help cool the head better. Made
of neoprene rubber.
|
|
  Indexing
Washers for Flat Seat Spark Plugs with 14mm Threads. Positions spark
plug with the open/exposed gap facing the center of the piston in combustion
chamber of flathead engines for up to 10% more horsepower and torque when
using tractor under extreme conditions, such as heavy mowing, garden plowing,
pushing/blowing snow or competition pulling. To know exactly where the open
gap is when the spark plug is installed in the head, place a mark (line)
with a permanent ink marker
(Sharpie,
Magic Marker,
Marks-A-Lot, etc.) on the porcelain in-line with the open
gap at the tip of the spark plug as shown in the photo to the right ->.
Also, leave the original compression washer on the spark plug and add the
indexing washer(s) as required, tighten spark plug with ink mark on
porcelain/open gap facing near center of the piston. Made of hardened steel.
Available in the following thicknesses: .005", .010" and .015".
.75¢ each, plus shipping & handling. Indexing
Washers for Flat Seat Spark Plugs with 14mm Threads. Positions spark
plug with the open/exposed gap facing the center of the piston in combustion
chamber of flathead engines for up to 10% more horsepower and torque when
using tractor under extreme conditions, such as heavy mowing, garden plowing,
pushing/blowing snow or competition pulling. To know exactly where the open
gap is when the spark plug is installed in the head, place a mark (line)
with a permanent ink marker
(Sharpie,
Magic Marker,
Marks-A-Lot, etc.) on the porcelain in-line with the open
gap at the tip of the spark plug as shown in the photo to the right ->.
Also, leave the original compression washer on the spark plug and add the
indexing washer(s) as required, tighten spark plug with ink mark on
porcelain/open gap facing near center of the piston. Made of hardened steel.
Available in the following thicknesses: .005", .010" and .015".
.75¢ each, plus shipping & handling.
|
|
    High Quality Universal Switches. Designed for use with
Self-Energizing Magneto Ignition, Solid State Ignition, OEM Solid State
Ignition (SSI) for Tecumseh's Cast Iron Block Engines, or with OEM Kohler
Breakerless Ignition. These can be used on virtually any small engine
installed on lawn and garden equipment, garden tillers, go-karts, chainsaws,
log splitters, portable air compressors, portable generators/welders, portable
water pumps, etc. with a magneto or solid state ignition, and a recoil/rope
starter or a push button starter switch, if engine is equipped with an
electric starter.
Very durable, tough switches. High Quality Universal Switches. Designed for use with
Self-Energizing Magneto Ignition, Solid State Ignition, OEM Solid State
Ignition (SSI) for Tecumseh's Cast Iron Block Engines, or with OEM Kohler
Breakerless Ignition. These can be used on virtually any small engine
installed on lawn and garden equipment, garden tillers, go-karts, chainsaws,
log splitters, portable air compressors, portable generators/welders, portable
water pumps, etc. with a magneto or solid state ignition, and a recoil/rope
starter or a push button starter switch, if engine is equipped with an
electric starter.
Very durable, tough switches.
|
|
 High
Quality Universal Switches for Battery-Powered Ignition and Electrical
Accessories. Very durable, tough switches. Either can be used for
ignition, lights,
electric fuel
pump, electric PTO clutch, etc. When used for ignition, use with
push button starter switch (listed below). Terminals or wires on switches
listed below makes contact when in the ON position. Can be used on virtually
anything that have a battery-powered ignition or electrical system, such
as: garden tractors, go-karts, competition pulling tractors, small motorized
vehicles, mini-rods, hot-rods, farm tractors, automobiles, etc. Each can
be mounted in dashboard, instrument panel, engine control panel, etc. High
Quality Universal Switches for Battery-Powered Ignition and Electrical
Accessories. Very durable, tough switches. Either can be used for
ignition, lights,
electric fuel
pump, electric PTO clutch, etc. When used for ignition, use with
push button starter switch (listed below). Terminals or wires on switches
listed below makes contact when in the ON position. Can be used on virtually
anything that have a battery-powered ignition or electrical system, such
as: garden tractors, go-karts, competition pulling tractors, small motorized
vehicles, mini-rods, hot-rods, farm tractors, automobiles, etc. Each can
be mounted in dashboard, instrument panel, engine control panel, etc.
|
|
 High
Quality Universal Push Button Switches. Each can be mounted in pedestal,
dashboard, instrument panel, engine control panel, flywheel shroud, etc. High
Quality Universal Push Button Switches. Each can be mounted in pedestal,
dashboard, instrument panel, engine control panel, flywheel shroud, etc.
|
|
 High Quality Universal 3-Position OFF-ON-START MAGNETO
Ignition Key Switch. Designed specifically for Self-Energizing Magneto
Ignition, Solid State Ignition, OEM Solid State Ignition (SSI) for Tecumseh's
Cast Iron Block Engines, or with OEM Kohler Breakerless Ignition. Can
be used for various makes and models of riding mowers, lawn & garden
tractors, garden tractors and various small engine equipment with magneto
or solid state ignition. Identification of 5 blade terminals: B =
Battery (+); G = Ground (terminal is grounded to body of switch);
L = Lights (use a separate OFF-ON switch connected to this terminal
to power an electric PTO clutch); M = Magneto (Ignition); S
= Solenoid (small terminal). Key positions: OFF position makes contact with
M+G; IGNITION position makes contact with B+L; START position makes contact
with B+S. Each terminal identified for correct wiring connections. IMPORTANT:
Use with a starter solenoid/relay to crank the engine to prevent burning
out internal contacts in switch. NOTE: If engine is equipped with an
alternator/stator charging system, the center terminal on the voltage
rectifier/regulator connects to the positive (+) battery post. If using an
ammeter/amp gauge, connect the gauge/meter to the positive (+) battery post,
then to the B terminal on the switch. Trace the wires on your tractor/equipment
to see if they match the terminals on this switch. If they don't match, the
plug-in spade connectors/wires can be rearranged in the plastic connector
housing to match the corresponding terminals on the switch. To do this, use
a small flat blade screwdriver to depress the locking tab/tang so the plug-in
connector can be pulled out from the plastic connector housing. Bend the
locking tab/tang up slightly before reinserting it in the plastic connector
so it will be secured in place. Or for a universal application, use #250
slip-on female spade crimp-type wire connectors. Requires 5/8" diameter mounting
hole. High Quality Universal 3-Position OFF-ON-START MAGNETO
Ignition Key Switch. Designed specifically for Self-Energizing Magneto
Ignition, Solid State Ignition, OEM Solid State Ignition (SSI) for Tecumseh's
Cast Iron Block Engines, or with OEM Kohler Breakerless Ignition. Can
be used for various makes and models of riding mowers, lawn & garden
tractors, garden tractors and various small engine equipment with magneto
or solid state ignition. Identification of 5 blade terminals: B =
Battery (+); G = Ground (terminal is grounded to body of switch);
L = Lights (use a separate OFF-ON switch connected to this terminal
to power an electric PTO clutch); M = Magneto (Ignition); S
= Solenoid (small terminal). Key positions: OFF position makes contact with
M+G; IGNITION position makes contact with B+L; START position makes contact
with B+S. Each terminal identified for correct wiring connections. IMPORTANT:
Use with a starter solenoid/relay to crank the engine to prevent burning
out internal contacts in switch. NOTE: If engine is equipped with an
alternator/stator charging system, the center terminal on the voltage
rectifier/regulator connects to the positive (+) battery post. If using an
ammeter/amp gauge, connect the gauge/meter to the positive (+) battery post,
then to the B terminal on the switch. Trace the wires on your tractor/equipment
to see if they match the terminals on this switch. If they don't match, the
plug-in spade connectors/wires can be rearranged in the plastic connector
housing to match the corresponding terminals on the switch. To do this, use
a small flat blade screwdriver to depress the locking tab/tang so the plug-in
connector can be pulled out from the plastic connector housing. Bend the
locking tab/tang up slightly before reinserting it in the plastic connector
so it will be secured in place. Or for a universal application, use #250
slip-on female spade crimp-type wire connectors. Requires 5/8" diameter mounting
hole.
|
|
  Universal Wiring Harness with Plastic Connector Housing
and Slide-On Connectors. Replace damaged entire connector, terminals
and wiring, use as new wiring harness on a custom-made project, or use this
part when converting from Breakerless Ignition to battery-powered
points/condenser ignition. Fits universal OFF-ON-START key switches listed
above and other key switches with same terminal configuration. Three terminals
in this part will also fit the OEM Cub Cadet garden tractor OFF-ON-START
key switch listed above. 18" length color-coded wires for easy identification.
$13.00 each, plus shipping & handling. Universal Wiring Harness with Plastic Connector Housing
and Slide-On Connectors. Replace damaged entire connector, terminals
and wiring, use as new wiring harness on a custom-made project, or use this
part when converting from Breakerless Ignition to battery-powered
points/condenser ignition. Fits universal OFF-ON-START key switches listed
above and other key switches with same terminal configuration. Three terminals
in this part will also fit the OEM Cub Cadet garden tractor OFF-ON-START
key switch listed above. 18" length color-coded wires for easy identification.
$13.00 each, plus shipping & handling.
Electrical Plastic Connector Housing Only. Replace damaged connector housing when the brass slide-on spade crimp wire connectors (listed below) are in good condition. Fits universal OFF-ON-START key switches listed above and other key switches with same terminal configuration. Three slots in this part will also fit the OEM Cub Cadet garden tractor OFF-ON-START key switch listed above. Requires 1/4" width slide-on brass spade crimp wire connectors with locking tab/tang below. $8.00 each, plus shipping & handling.
|
|
FYI - Magneto Coils - To test for
continually of an ignition coil (to see if it's in good condition), use a
multimeter set on the ohm ( ) resistance. To test
the secondary winding (this is the one that usually burns out), insert one
of the multimeter's probes into the spark plug terminal of the coil, contacting
the metal inside the terminal. And touch the second probe of the meter to
the ignition coil's negative (–) terminal. (This is the one not connected
to the primary winding and resistor.) Depending on the type of coil (magneto,
compact, standard size or high output/performance), the meter should read
6,000 to 15,000 ohms. If it does not, the secondary winding is faulty and
the coil needs to be replaced. ) resistance. To test
the secondary winding (this is the one that usually burns out), insert one
of the multimeter's probes into the spark plug terminal of the coil, contacting
the metal inside the terminal. And touch the second probe of the meter to
the ignition coil's negative (–) terminal. (This is the one not connected
to the primary winding and resistor.) Depending on the type of coil (magneto,
compact, standard size or high output/performance), the meter should read
6,000 to 15,000 ohms. If it does not, the secondary winding is faulty and
the coil needs to be replaced. |
|
 Magneto Armature
Ignition Coil. Fits Kohler engine model K91 with self-energizing magneto
ignition. May not fit model K90 with magneto ignition. Spark plug wire (not
included) inserts into front/outward curvature of coil. Reuse OEM spark plug
wire. 1.0 ohm internal primary resistor. NOTE: This coil should produce
a stronger spark when used with the Universal
Solid State Electronic Ignition Module. Or the engine can be
converted to battery-powered
ignition. Dimensions: 1.700" O.D. x 1.080" length x 1/2" x 1/2" square
hole. How
magneto coils generate a spark. IMPORTANT: Use a new copper
core/non-resistor AC Delco, Autolite or Champion spark plug of the correct
type gapped at .025" for longer coil life. Use of a
resistor type spark plug
will void warranty. New Old Stock. Discontinued OEM Kohler part # 220435-S.
$144.00 each, plus shipping & handling. Magneto Armature
Ignition Coil. Fits Kohler engine model K91 with self-energizing magneto
ignition. May not fit model K90 with magneto ignition. Spark plug wire (not
included) inserts into front/outward curvature of coil. Reuse OEM spark plug
wire. 1.0 ohm internal primary resistor. NOTE: This coil should produce
a stronger spark when used with the Universal
Solid State Electronic Ignition Module. Or the engine can be
converted to battery-powered
ignition. Dimensions: 1.700" O.D. x 1.080" length x 1/2" x 1/2" square
hole. How
magneto coils generate a spark. IMPORTANT: Use a new copper
core/non-resistor AC Delco, Autolite or Champion spark plug of the correct
type gapped at .025" for longer coil life. Use of a
resistor type spark plug
will void warranty. New Old Stock. Discontinued OEM Kohler part # 220435-S.
$144.00 each, plus shipping & handling. |
|
  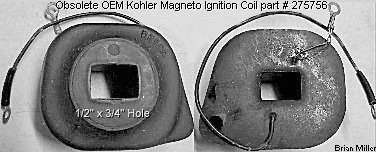 Magneto Armature
Ignition Coils. Fits various Kohler K-series engine models
KV161,
L160/L161, L181,
K181, K241, K301, K321, K330/K331 and K341 with points, condenser/capacitor
and coil under flywheel. Common with Kohler engines mounted to a generator
or welder. Also fits most small- and medium-frame aluminum block Tecumseh
engines with points, condenser and coil under flywheel. NOTES: These coils
should produce a stronger spark when used with the
Universal Solid State Electronic Ignition
Module. Also, each coil listed below can be substituted for the obsolete
OEM Kohler part # 275756 coil by grinding down the laminations on the armature
to .405" x .405" square. Do not grind out inside of coil! To secure coil
on the armature, bend one lamination over end of coil. Or engine could be
converted to the more reliable
battery-powered ignition system. 1.0 ohm internal primary resistor.
Dimensions of each coil: 1.700" O.D. x 1.080" length x .405" square hole.
How
magneto coils generate a spark. IMPORTANT: Use a new copper
core/non-resistor AC Delco, Autolite or Champion spark plug of the correct
type gapped at .025" for longer coil life. Use of a
resistor type spark plug
will void warranty. And being all older magneto coil spark plug wires
have a metal core, save it off your old coil. With a 12 volt battery coil
tower terminal and boot installed, it can be used for battery ignition. Magneto Armature
Ignition Coils. Fits various Kohler K-series engine models
KV161,
L160/L161, L181,
K181, K241, K301, K321, K330/K331 and K341 with points, condenser/capacitor
and coil under flywheel. Common with Kohler engines mounted to a generator
or welder. Also fits most small- and medium-frame aluminum block Tecumseh
engines with points, condenser and coil under flywheel. NOTES: These coils
should produce a stronger spark when used with the
Universal Solid State Electronic Ignition
Module. Also, each coil listed below can be substituted for the obsolete
OEM Kohler part # 275756 coil by grinding down the laminations on the armature
to .405" x .405" square. Do not grind out inside of coil! To secure coil
on the armature, bend one lamination over end of coil. Or engine could be
converted to the more reliable
battery-powered ignition system. 1.0 ohm internal primary resistor.
Dimensions of each coil: 1.700" O.D. x 1.080" length x .405" square hole.
How
magneto coils generate a spark. IMPORTANT: Use a new copper
core/non-resistor AC Delco, Autolite or Champion spark plug of the correct
type gapped at .025" for longer coil life. Use of a
resistor type spark plug
will void warranty. And being all older magneto coil spark plug wires
have a metal core, save it off your old coil. With a 12 volt battery coil
tower terminal and boot installed, it can be used for battery ignition.
|
|
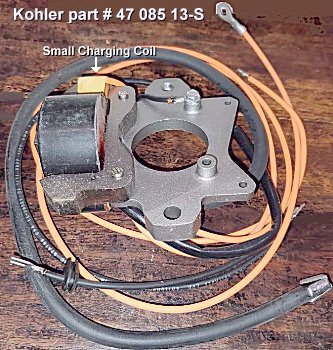 Magneto Armature
Ignition Stator/Coil with Small Charging Coil. Fits various Kohler engines
with stator/coil mounted on bearing plate underneath flywheel with two magnets
inside flywheel. Common with various generator engines. Coil has 1.0 ohm
internal primary resistor. NOTE: This coil should produce a stronger spark
when used with the Universal Solid State Electronic
Ignition Module. Or the engine could be
converted to battery-powered
ignition.
How
magneto coils generate a spark. IMPORTANT: Use a new copper
core/non-resistor AC Delco, Autolite or Champion spark plug of the correct
type gapped at .025" for longer coil life. Use of a
resistor type spark plug
will void warranty. Magneto Armature
Ignition Stator/Coil with Small Charging Coil. Fits various Kohler engines
with stator/coil mounted on bearing plate underneath flywheel with two magnets
inside flywheel. Common with various generator engines. Coil has 1.0 ohm
internal primary resistor. NOTE: This coil should produce a stronger spark
when used with the Universal Solid State Electronic
Ignition Module. Or the engine could be
converted to battery-powered
ignition.
How
magneto coils generate a spark. IMPORTANT: Use a new copper
core/non-resistor AC Delco, Autolite or Champion spark plug of the correct
type gapped at .025" for longer coil life. Use of a
resistor type spark plug
will void warranty.
|
|
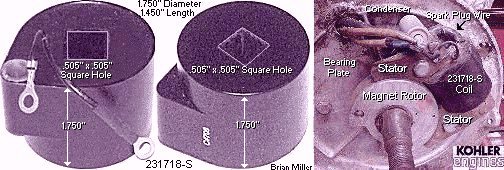 Magneto Armature
Ignition Coil. Fits various Kohler engine models K90, K141, K161,
KV161,
L160/L161, L181
and K181 with coil mounted on U-shaped armature on bearing plate underneath
flywheel with magnet rotor on crankshaft. Also fits various larger cast iron
block Clinton engines with coil/armature mounted on cylinder, above flywheel.
Common with various generator engines. Spark plug wire not included. 1.0
ohm internal primary resistor. NOTE: This coil should produce a stronger
spark when used with the Universal Solid State
Electronic Ignition Module. Or the engine could be
converted to battery-powered
ignition. Dimensions: 1.750" diameter x 1.450" length x .505" square
hole. How
magneto coils generate a spark. IMPORTANT: Use a new copper
core/non-resistor AC Delco, Autolite or Champion spark plug of the correct
type gapped at .025" for longer coil life. Use of a
resistor type spark plug
will void warranty. Magneto Armature
Ignition Coil. Fits various Kohler engine models K90, K141, K161,
KV161,
L160/L161, L181
and K181 with coil mounted on U-shaped armature on bearing plate underneath
flywheel with magnet rotor on crankshaft. Also fits various larger cast iron
block Clinton engines with coil/armature mounted on cylinder, above flywheel.
Common with various generator engines. Spark plug wire not included. 1.0
ohm internal primary resistor. NOTE: This coil should produce a stronger
spark when used with the Universal Solid State
Electronic Ignition Module. Or the engine could be
converted to battery-powered
ignition. Dimensions: 1.750" diameter x 1.450" length x .505" square
hole. How
magneto coils generate a spark. IMPORTANT: Use a new copper
core/non-resistor AC Delco, Autolite or Champion spark plug of the correct
type gapped at .025" for longer coil life. Use of a
resistor type spark plug
will void warranty.
|
|
 Armature Ignition
Coil with Molded-In Solid State Electronic Module. Fits Kohler Magnum
engine model M8. NOTE: Install this coil with spark plug wire facing engine
block as shown in photo to the right ->. Set the air gap/clearance between
the magnet in the flywheel and armature laminations with a business card
or a .010" or .25mm brass
feeler gauge. The .010" or .25mm gap produces a stronger
magnetic field through the coil to generate more electricity for a stronger
spark, and so the engine won't misfire. IMPORTANT: Use a new copper
core/non-resistor AC Delco, Autolite or Champion spark plug of the correct
type gapped at .025" for longer coil life. Use of a
resistor type spark plug
will void warranty. And being all older magneto coil spark plug wires have
a metal core, save it off your old coil. With a 12 volt battery coil tower
terminal and boot installed, it can be used for battery ignition. Armature Ignition
Coil with Molded-In Solid State Electronic Module. Fits Kohler Magnum
engine model M8. NOTE: Install this coil with spark plug wire facing engine
block as shown in photo to the right ->. Set the air gap/clearance between
the magnet in the flywheel and armature laminations with a business card
or a .010" or .25mm brass
feeler gauge. The .010" or .25mm gap produces a stronger
magnetic field through the coil to generate more electricity for a stronger
spark, and so the engine won't misfire. IMPORTANT: Use a new copper
core/non-resistor AC Delco, Autolite or Champion spark plug of the correct
type gapped at .025" for longer coil life. Use of a
resistor type spark plug
will void warranty. And being all older magneto coil spark plug wires have
a metal core, save it off your old coil. With a 12 volt battery coil tower
terminal and boot installed, it can be used for battery ignition.
|
|
| 12 Volt Ignition Coils
- IMPORTANT: Most failures of a
battery-powered ignition coils and/or electronic ignition control modules
are caused by either the use of suppression/carbon-core spark plug wire(s),
resistor-type spark plug(s) [NGK spark plugs], or overcharging of the electrical
system due to a defective voltage rectifier/regulator or defective [automotive]
battery. Therefore, if it's not already equipped, it's best to install an
ammeter/amp gauge to monitor the charging system. Also, any coil will burn
up if the ignition switch is left on with the points closed for more than
a few minutes with the engine not running. To prevent this from possibly
happening and/or for security reasons, use an OFF-ON key switch and/or a
master disconnect switch with a removable key instead of just a toggle switch
to power the ignition system. Also, the coil could burn up if the charging
system continually overcharge due to a defective voltage rectifier/regulator
or a defective [automotive] battery.
|
|
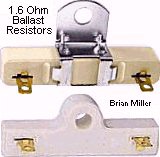 New
1.6 ohm Ballast Resistor for use with a 12 volt ignition coil with
a internal resistor less than 3.0 ohms. Use this to send less current through
points to prevent excessive burning or wearing of contacts, or use with the
Chrysler/Dodge/Plymouth (MOPAR) electronic ignition control module/unit,
or connect with coil having a minimum 1.4 ohm internal primary resistor to
prevent burning up the Dynatek Dyna S
electronic ignition control modules. Install between the wire coming from
the ignition switch to the coil positive [+] terminal. Can be used with general
lawn and garden, snow removal, etc., but not for competitive pulling. NOTE:
Ignition resistors with a higher
ohm value are known
as "Point Savers." The higher the ohm resistance in an ignition coil or a
ballast resistor has, the longer the ignition points will last (as long as
the points are installed clean, and doesn't become contaminated with dust,
oil, water, etc.). Any 12 volt ignition coil with an 3.0 or higher ohm internal
primary resistor connected to a minimum 1.6 ohm ballast resistor when used
in a points and condenser/capacitor ignition system will allow the points
to possibly last the life of the engine. Because the reduced resistance allows
a very low current/voltage to pass through the contacts in the points. The
ignition system will still produce a strong spark because an average small
engine requires only a fraction of voltage from the coil. Also, avoid using
a suppression/carbon-core coil-to-spark plug wire and/or resistor type of
spark plug due to overheating of the ignition coil. Therefore, it's best
to use a metal core coil-to-spark plug wire and copper core/non-resistor
spark plug. Click
here to learn how to check the ohms resistance in a spark plug wire.
$8.00 each, plus shipping & handling. New
1.6 ohm Ballast Resistor for use with a 12 volt ignition coil with
a internal resistor less than 3.0 ohms. Use this to send less current through
points to prevent excessive burning or wearing of contacts, or use with the
Chrysler/Dodge/Plymouth (MOPAR) electronic ignition control module/unit,
or connect with coil having a minimum 1.4 ohm internal primary resistor to
prevent burning up the Dynatek Dyna S
electronic ignition control modules. Install between the wire coming from
the ignition switch to the coil positive [+] terminal. Can be used with general
lawn and garden, snow removal, etc., but not for competitive pulling. NOTE:
Ignition resistors with a higher
ohm value are known
as "Point Savers." The higher the ohm resistance in an ignition coil or a
ballast resistor has, the longer the ignition points will last (as long as
the points are installed clean, and doesn't become contaminated with dust,
oil, water, etc.). Any 12 volt ignition coil with an 3.0 or higher ohm internal
primary resistor connected to a minimum 1.6 ohm ballast resistor when used
in a points and condenser/capacitor ignition system will allow the points
to possibly last the life of the engine. Because the reduced resistance allows
a very low current/voltage to pass through the contacts in the points. The
ignition system will still produce a strong spark because an average small
engine requires only a fraction of voltage from the coil. Also, avoid using
a suppression/carbon-core coil-to-spark plug wire and/or resistor type of
spark plug due to overheating of the ignition coil. Therefore, it's best
to use a metal core coil-to-spark plug wire and copper core/non-resistor
spark plug. Click
here to learn how to check the ohms resistance in a spark plug wire.
$8.00 each, plus shipping & handling. |
|
| IMPORTANT: Most failures of
battery-powered ignition coils and/or electronic ignition control modules
are caused by either the use of suppression/carbon-core spark plug wire(s),
resistor-type spark plug(s), overcharging of the electrical system due to
a defective voltage rectifier/regulator or defective [automotive] battery,
or if the ignition switch is left on with the points closed for more than
a few minutes with the engine not running. Therefore, if it's not already
equipped, it's best to install an ammeter/amp gauge to monitor the charging
system. And use an OFF-ON key switch and/or a master disconnect switch with
a removable key instead of just a toggle switch to power the ignition
system.
|
|
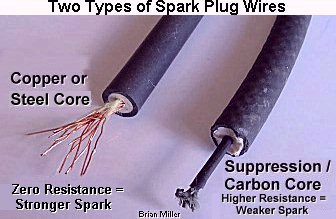   High Quality,
High Performance Copper or Metal Core 7mm Spark Plug Wire Assemblies Listed
Below. Universal design for many applications. Along with a copper core
spark plug, metal core spark wires provide a stronger spark that allow the
ignition coil to operate cooler, last longer and provide the highest possible
energy to ensure maximum ignition potential. Replace defective coil-to-spark
plug wire or use either of the parts listed below when converting from
Breakerless Ignition or magneto ignition to battery-powered points/condenser
ignition. Suitable for general lawn & garden equipment, small motorized
vehicles or competition garden pulling tractor engines. Fits Kohler engine
models K141, K160/K161,
KV161,
L160/L161, L181, K181,
K241, K301, K321, K330/K331, K341, K361, KT17 (first design), KT17 Series
II, KT19 (first design) KT19 Series II, KT21, K482, K532, K582 and K660/K662
(with wires cut to desired length) and other makes and models of small engines
with a battery-powered ignition system. Don't be fooled by the dark color,
these wires have a metal core that provide 100% voltage to the spark plug
for a strong spark to extend the life of the coil. Copper or metal wire delivers
maximum energy with zero ohm resistance to the spark plug. (FYI - Most OEM
automotive or brightly-colored coil-to-spark plug wires have a suppression/carbon
core that deliver about 40%-50% voltage to the spark plug at peak demand,
which is at open RPM, they've been known to burn up a good coil.) Solid metal
terminals for maximum conductivity and corrosion resistance. Snug-fitting
quality rubber boots keep out dirt and moisture for reliable engine start
up. Engineered for reliability and long life. Spring-lock terminals insure
positive and secure connection through the toughest conditions and multiple
spark plug changes. High Quality,
High Performance Copper or Metal Core 7mm Spark Plug Wire Assemblies Listed
Below. Universal design for many applications. Along with a copper core
spark plug, metal core spark wires provide a stronger spark that allow the
ignition coil to operate cooler, last longer and provide the highest possible
energy to ensure maximum ignition potential. Replace defective coil-to-spark
plug wire or use either of the parts listed below when converting from
Breakerless Ignition or magneto ignition to battery-powered points/condenser
ignition. Suitable for general lawn & garden equipment, small motorized
vehicles or competition garden pulling tractor engines. Fits Kohler engine
models K141, K160/K161,
KV161,
L160/L161, L181, K181,
K241, K301, K321, K330/K331, K341, K361, KT17 (first design), KT17 Series
II, KT19 (first design) KT19 Series II, KT21, K482, K532, K582 and K660/K662
(with wires cut to desired length) and other makes and models of small engines
with a battery-powered ignition system. Don't be fooled by the dark color,
these wires have a metal core that provide 100% voltage to the spark plug
for a strong spark to extend the life of the coil. Copper or metal wire delivers
maximum energy with zero ohm resistance to the spark plug. (FYI - Most OEM
automotive or brightly-colored coil-to-spark plug wires have a suppression/carbon
core that deliver about 40%-50% voltage to the spark plug at peak demand,
which is at open RPM, they've been known to burn up a good coil.) Solid metal
terminals for maximum conductivity and corrosion resistance. Snug-fitting
quality rubber boots keep out dirt and moisture for reliable engine start
up. Engineered for reliability and long life. Spring-lock terminals insure
positive and secure connection through the toughest conditions and multiple
spark plug changes.
 Please specify if you need the rubber neoprene
boot for a 3/4" coil tower (fits most standard-output coils), or 5/8" coil
tower (fits most twin cylinder dual-wire coils and high-output/performance
or OEM automotive electronic ignition coils). Please specify if you need the rubber neoprene
boot for a 3/4" coil tower (fits most standard-output coils), or 5/8" coil
tower (fits most twin cylinder dual-wire coils and high-output/performance
or OEM automotive electronic ignition coils).
|
|
Complete
Battery-Powered Ignition Conversion Kits Listed Below - When
Kohler's OEM magneto or Breakerless Ignition fails, the engine can be converted
to a battery-powered ignition system. battery-powered ignition systems last
longer, produce a stronger spark, and when a part goes bad, it doesn't cost
much to replace. It's a reliable, simple design and there's no guesswork
about it. FYI: battery-powered ignition conversion kits are intended mainly
for various older engines when the OEM magneto or Breakerless Ignition no
longer produce a spark, replacement parts are not available, are very expensive
or cost prohibitive. (Sometimes one must improvise when certain parts are
obsolete.) Also, the most hassle when using battery-powered ignition without
an integrated charging system with the engine to recharge the battery is
the use of a  battery charger. For a battery to power the ignition, a
small, lightweight and rechargeable
12 volt sealed lead acid (SLA) battery with a minimum 4Ah
(Amp Hour) rating or a small
motorcycle battery can be used.
battery charger. For a battery to power the ignition, a
small, lightweight and rechargeable
12 volt sealed lead acid (SLA) battery with a minimum 4Ah
(Amp Hour) rating or a small
motorcycle battery can be used.
FYI - Kohler's Breakerless Ignition and Tecumseh's Solid State Ignition (SSI) systems use a key switch that's also made for a self-energizing magneto or magneto-type solid state ignition system. Unlike the OFF-ON-START key switch for a battery-powered ignition system, just like the magneto or solid state ignition systems, with the Breakerless Ignition is self-energizing, and to kill the engine, the key switch grounds out or shorts the [low voltage] circuit between the energizing coil and ignition module. But the battery type OFF-ON-START key switch opens the circuit to kill the engine. So with the battery-powered points and condenser ignition system (along with a 12 volt coil), you will need to use a battery type OFF-ON-START key switch, or an OFF-ON toggle switch or an OFF-ON (security) key switch to power the ignition with a momentary push button starter switch to crank the engine. If swapping out the OEM Breakerless Ignition, magneto or solid state (grounding type) OFF-ON-START ignition key switch for a battery type OFF-ON-START key switch, the wire connectors in the wiring connector will need to be rearranged to match the terminals on the battery type key switch to crank the engine, power the ignition and electrical accessories, and recharge the battery. I've performed this before on some of my customer's ordinary garden tractors and garden pulling tractors, and it works great. Click/tap here for battery-powered ignition wiring diagrams. |
|
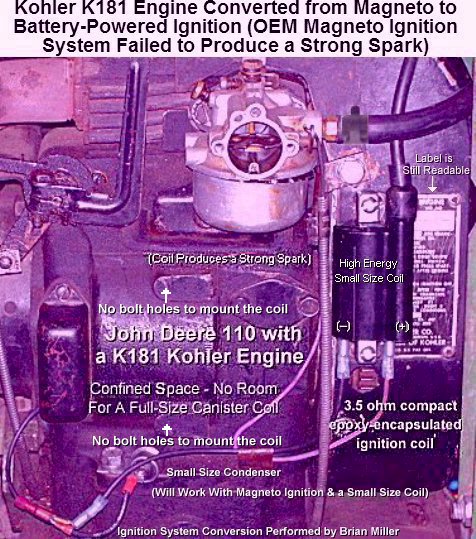 Several years
ago, an out of town customer brought his John Deere model 110 to our shop
for repairs. This tractor has a Kohler engine model K181 with self-energizing
magneto ignition and a 10 amp alternator charging system. (The ignition coil
and charging coils are mounted on the same armature/stator frame under the
flywheel.) My customer told me that he had another reputable small engine
repair shop in his hometown install a new spark plug, points, condenser and
an entirely new armature/stator assembly, but they could not get the engine
to rev up. Several years
ago, an out of town customer brought his John Deere model 110 to our shop
for repairs. This tractor has a Kohler engine model K181 with self-energizing
magneto ignition and a 10 amp alternator charging system. (The ignition coil
and charging coils are mounted on the same armature/stator frame under the
flywheel.) My customer told me that he had another reputable small engine
repair shop in his hometown install a new spark plug, points, condenser and
an entirely new armature/stator assembly, but they could not get the engine
to rev up.
Anyway, I put the tractor on the sturdy
platform table that I
built to make it easier to work on. The engine would start right up and idle
well, but failed to rev up. It would just die out when throttled up. So I
cleaned and inspected the entire carburetor, including clearing out anything
that may have been lodged in the main jet; tried a new Autolite 295 copper
core spark plug gapped at .030"; cleaned and reset the points gap; tried
another new condenser; So after some thoughtful consideration, I came to the conclusion that the OEM Kohler part # 237876 self-energizing magneto ignition/charging system armature/stator assembly is obviously a notorious, bad design. Although this system is still available new from Kohler, Kohler discontinued installing this on certain engines only after a short time. (Apparently, for an obvious reason.)
If you have a similar ignition problem like this and if you're interested, I offer all the parts, including a new compact epoxy-encapsulated 12 volt armature ignition coil kit, that can be used to convert the self-energizing magneto ignition to battery-powered ignition for your tractor. See the complete ignition conversion kit(s) below. I can also convert your tractor from a faulty magneto ignition to the more reliable battery-powered ignition if you don't mind bringing your tractor to my shop. Click here to contact A-1 Miller's for FREE honest and accurate technical support and/or for ordering information and payment options. Please contact A-1 Miller's if you need part(s) and/or service(s) performed that's not listed or mentioned in this website. [Top of Page]
Convert virtually any single cylinder, air-cooled cast iron or various aluminum block small gas engine, such as Kohler, Tecumseh, Briggs & Stratton, Clinton, etc., with a failed self-energizing magneto ignition system to the battery-powered ignition system. NOTE: Must use a universal automotive off/ignition/start key switch, or an OFF-ON ignition toggle switch or a [security] ignition key switch with a push button starter switch. Reuse same type of spark plug and existing ignition points (if in good condition), but set the point gap at .020" or set ignition timing at 20º BTDC. See ignition kits and wiring diagram below Ê.
NOTE: A small, fully charged 12 volt battery is required for this ignition
system. A
High Quality Ignition Kit to Convert from Kohler Magneto Ignition to the More Reliable Battery-Powered Ignition System for an Unconfined Engine Compartment with Unlimited Space to mount a full size canister coil. Designed for Kohler engine models K90/K91, K141, K161/K160, KV161, L160/L161, L181, K181, K241, K301, K321, K330/K331 and K341.
When ordering, please indicate make and model of engine. Ignition parts kit include:
NOTE: A small, fully charged 12 volt battery is required for this ignition
system. A
|
|
| New points, condensers/capacitors, coils and spark plugs for other makes and models of engines are also available. Please call or email A-1 Miller's for your needs. Click here to contact A-1 Miller's for FREE honest and accurate technical support and/or for ordering information and payment options. Please contact A-1 Miller's if you need part(s) and/or service(s) performed that's not listed or mentioned in this website. [Top of Page] | |
 Get that
old, antique small gas engine for general lawn & garden equipment, go-karts,
King Midget micro car, all terrain vehicles, snowmobiles,
industrial/commercial, etc., running again with 21st century technology using
100% reliable digital electronic ignition, even when new replacement parts
are cost-prohibited or obsolete. Electronic ignition can be installed on
virtually any small gas engine, regardless of the make and model. Where there's
a will, there's a way. It's mind over matter.
Click here
to contact A-1 Miller's for FREE honest and accurate technical support and/or
for ordering information and payment options. Please contact A-1
Miller's
if you need part(s) and/or
service(s) performed that's not listed or mentioned in this
website. [Top of Page]
[Return to previous paragraph, section
or website]
Get that
old, antique small gas engine for general lawn & garden equipment, go-karts,
King Midget micro car, all terrain vehicles, snowmobiles,
industrial/commercial, etc., running again with 21st century technology using
100% reliable digital electronic ignition, even when new replacement parts
are cost-prohibited or obsolete. Electronic ignition can be installed on
virtually any small gas engine, regardless of the make and model. Where there's
a will, there's a way. It's mind over matter.
Click here
to contact A-1 Miller's for FREE honest and accurate technical support and/or
for ordering information and payment options. Please contact A-1
Miller's
if you need part(s) and/or
service(s) performed that's not listed or mentioned in this
website. [Top of Page]
[Return to previous paragraph, section
or website]
This is the era of modern wonders, where everything is electronic, transistorized, digitized and miniaturized. Yet even today, many competition garden pulling tractors with an older engine still use the old-fashioned breaker point ignition systems. For other people, the frustration of attempting to keep a breaker point-fired tractor in peak running condition has been enough of a reason to join the electronic/solid state electronic ignition era. Breaker point systems do have some positives, though. ignition points are cheap and somewhat easy to install. And many people are comfortable with installing their own ignition points. The bad side of using ignition points is, besides the ignition points contacts burning, pitting and wearing out, if or when the ignition points lobe on the (Kohler) camshaft and/or the ignition points pushrod become worn, this will narrow the gap on the ignition points, and retard the ignition timing. The ignition points lobe can wear so much that resetting the ignition points at the factory setting of .020" or setting the ignition timing at 20º BTDC becomes impossible. As the point gap gets too narrow, the ignition timing will become retarded (less than the factory setting of 20º BTDC), which will cause the engine to run sluggish and lose power, and when it gets too wide, the timing will become too advanced (more than the factory setting of 20º BTDC), which will cause the engine to run hotter than normal, which could cause premature engine wear and oil burning, eventually resulting in an engine rebuild. There's also less chance of a dangerous fire due to non-existence of ignition points.
 Self-energizing small engine magneto armature
ignition coils and battery-powered coils with either points and condenser
or electronic ignition must be used with a metal core spark plug wire and
a copper core/non-resistor spark plug. Most automobiles with electronic ignition
have
suppression/carbon core spark plug wires only to prevent
interference of sensitive electronic components and [AM/FM] radio static.
However, if a suppression/carbon core spark plug wire and/or a
resistor type spark plug
is used with a magneto or battery-powered ignition coil, the coil may operate
at a much higher than normal temperature (too hot to the touch), and either
the coil will fail or the engine will idle well, but hesitate to rev up at
high RPM due to the high resistance in the suppression/carbon core spark
plug wire and/or a resistor
type spark plug. And avoid using a
suppression/carbon core spark plug wire with an electronic
ignition system on a small engine! The reason being is if the suppression/carbon
core spark plug wire becomes extremely weak and deteriorated with very high
resistance, this can cause the ignition coil and possibly the electronic
ignition control module to burn up.
Self-energizing small engine magneto armature
ignition coils and battery-powered coils with either points and condenser
or electronic ignition must be used with a metal core spark plug wire and
a copper core/non-resistor spark plug. Most automobiles with electronic ignition
have
suppression/carbon core spark plug wires only to prevent
interference of sensitive electronic components and [AM/FM] radio static.
However, if a suppression/carbon core spark plug wire and/or a
resistor type spark plug
is used with a magneto or battery-powered ignition coil, the coil may operate
at a much higher than normal temperature (too hot to the touch), and either
the coil will fail or the engine will idle well, but hesitate to rev up at
high RPM due to the high resistance in the suppression/carbon core spark
plug wire and/or a resistor
type spark plug. And avoid using a
suppression/carbon core spark plug wire with an electronic
ignition system on a small engine! The reason being is if the suppression/carbon
core spark plug wire becomes extremely weak and deteriorated with very high
resistance, this can cause the ignition coil and possibly the electronic
ignition control module to burn up.
NOTE: With my Universal Solid State Electronic Ignition Module and crank-trigger/flywheel-triggered ignition systems (all listed below), when installed accordingly, the ignition timing is ALWAYS advanced. If it's set or installed retarded, it will NOT automatically advance as soon as the engine starts. If the timing is set retarded, the only way to advance it is by rotating an ignition plate or ignition distributor manually by hand, or automatically by a vacuum canister with intake manifold, or by centrifugal force with flyweights.
When the timing is retarded, the engine may start with no problems, but not idle or rev up too well, and it'll lack sufficient horsepower. Also, with retarded timing, all of the fuel in the combustion chamber will not be burned. Part of the raw fuel will exit out of the exhaust, while the rest will remain in the chamber combustion and cling to the cylinder wall, causing the crankcase lubricating oil to become diluted or thin-out. When this happens, "cylinder wash down" will result. Cylinder wash down is when the gas (or diesel fuel) dilutes the light coating of oil on the cylinder wall, and the piston rings will no longer be adequately lubricated, causing direct metal to metal contact, which will cause them to wear excessively, and cause the cylinder wall have a protruding ridge towards the top, resulting in a smoky, oil burning engine overtime. Cylinder wash down can also happen to a diesel engine when the fuel injectors are purposely "turned up" to increase the fuel delivery so the engine will produce more horsepower. This will cause a lot of black smoke be blown out the exhaust all the time (at idle and especially upon acceleration), which will result in shorter engine life, and eventually, gray exhaust smoke (crankcase oil ash) will be mixed with the black exhaust smoke (resembles partially burnt diesel fuel ash exhaust). It'll run good for a while!
But when the ignition timing is too advanced, this will cause the engine to run too hot, which will likely cause the piston(s) to swell larger than normal, allowing it/them to make metal to metal contact against the cylinder wall, resulting in excessive wear. When the piston wears, it will be too loose in the cylinder, causing a rattling sound. Plus, due to the worn piston, the rings will loose their square edge against the cylinder wall, and become rounded, which will allow oil to be moved to the top of the piston instead of being scraped back into the crankcase. (This is the how the 2nd or middle ring works.) Plus, the rings will lose their expansion against the cylinder wall as well. Eventually, the engine will blow blue or gray smoke out the exhaust, and it will ultimately need to be rebuilt.
If electronic ignition is installed correctly, when the ignition is triggered by the flywheel, this stabilizes the timing, so you won't ever have to worry about it changing. The engine will produce more horsepower and you will have more confidence that the engine will last longer. (As long as an air filter is used, the carburetor is adjusted correctly and the crankcase oil is changed regularly.) So for the utmost precision ignition timing and maintenance-free convenience, flywheel-triggered electronic ignition is the way to go! The high performance electronic ignition systems offered in this website produce a stable and a very strong spark with the use of microelectronics. They will help the engine to start quicker, idle smoothly and rev up to full RPM with no hesitation whatsoever. Allows a stock coil to perform like a high performance coil without shortening the life of the coil.
As a matter of fact, electronic ignition works so well, this is why most small engine manufacturers dropped their points and condenser ignition and went to the more dependable and reliable electronic ignition in 1982. And most automotive manufacturers started installing the more dependable and reliable electronic ignition in their vehicles since 1972 (Chrysler products) and 1974 (GM and Ford products).
Tired of cleaning, changing or constantly readjusting the ignition points, and replacing the condenser? Well, upgrade/convert the engine with an A-1 Miller's custom-made, maintenance-free and weather-proof 100% digitized flywheel-triggered electronic ignition system! Shock and moisture resistant, and all it takes is a few simple hand tools to install. In my opinion, getting rid of the points and condenser/capacitor have been the best advance ever in engine technology. FYI - I've designed and sold many various custom-made electronic ignition systems to customers for the past several years and haven't received one complaint about the performance of their engine. Because I use technology that I learned from experiences with my competitive competition pulling tractors (engines) to help factory stock lawn & garden engines perform better. And as a matter of fact, other people have emailed or called me to complain to me about my competitor's replacement electronic ignition systems for Tecumseh engines. They said their technical customer service assistance to resolve the problem was of no help. No joke. Apparently, my competitors haven't quite figured it out yet.
FYI - Kohler's Breakerless Ignition and Tecumseh's (cast iron engine) Solid State Ignition (SSI) systems use a key switch that's also made for a self-energizing magneto or solid state electronic ignition system. Unlike the key switch for a battery-powered ignition system, the Breakerless Ignition is self-energizing, and to kill the engine, the key switch grounds out or shorts the [low voltage] circuit between the energizing coil and ignition module. And the battery-powered key switch opens the circuit to kill the engine. So with the battery-powered points and condenser ignition system (along with a 12 volt coil), you will need to use a battery-powered key switch, or an OFF-ON toggle switch or [security] key switch to power the ignition and a momentary push button starter switch to crank the engine could be used instead. If swapping out the OEM Breakerless Ignition, SSI, magneto or solid state ignition key switch for a battery-powered ignition key switch, the wire connectors in the wiring harness plug will need to be rearranged to match the terminals on the key switch to power the ignition, crank the engine and run other electrical accessories. I've done this before on some of my customer's garden tractors and it works great. Click/tap here for battery-powered ignition wiring diagrams.
Replace Old-Fashioned, Out-Dated and
Troublesome Points and Condenser in Virtually Any Magneto Ignition System
with the State of the Art Universal Solid State Electronic Ignition
Module! [Top of Page]
[Return to previous paragraph, section
or website]
Wiring Diagram and Installation Instructions for Universal Solid State Electronic Magneto Ignition Module are as follows:
|
A-1 Miller's Custom-Made 12 Volt Replacement Electronic Ignition Kit for Tecumseh Cast Iron Block Engines | [Top of Page]
A-1 Miller's Custom-Made, Reliable and Maintenance-Free 12 Volt Replacement Electronic Ignition Kit for Tecumseh engine models VH80, VH100, HH80, HH100, HH120, OH120, OH140, OH150, OH160 and OH180 with a gear starter that have a failed OEM Solid State Ignition Module as shown to the right ->. Fits Tecumseh engine blocks with two bosses with the 2-13/16" bolt hole spacing for the OEM SSI module. This will NOT work on a Tecumseh engine with a starter/generator because there are no protruding pins on the edge of the flywheel to trigger the spark. This replacement ignition system installs in place of the OEM Tecumseh Solid State Ignition (SSI) module unit and is completely hidden under the flywheel shroud, with no external ignition components exposed, with only one wire connection to the ignition switch. Works great for lawn & garden, and generator/welder engines! This ignition system works flawlessly and may outlast the life of the engine. This high performance ignition system have been thoroughly tested under extreme conditions, and produces a stable and a very strong spark with the use of microelectronics, even with the 12 volt 3.5 ohm high energy compact epoxy-encapsulated armature ignition coil as shown in the photos, helping the engine to start quicker, idle smoothly and rev up to full RPM with no hesitation whatsoever. Epoxy molding makes the sensor/module and coil impervious to dirt, oil, grease and moisture. This ignition system may outlast the life of the engine. This revolutionizes the ignition system for older cast iron block Tecumseh engines! All replacement ignition parts are readily available from A-1 Miller's. Now comes with a metal shield to block electromagnetic pulse (EMP) from damaging the ignition module. An EMP can damage or destroy an electronic ignition module by inducing high voltage and current surges within its circuits. These surges can overwhelm the module's components, leading to burnt-out circuits, particularly in semiconductors, and rendering the module non-functional. Metal shielding protects electronic ignition modules from EMP damage by redirecting the electromagnetic pulse around the shielded area. The EMP induces currents in the conductive shielding material, preventing those currents from reaching the sensitive electronic components inside, thus avoiding overvoltage and burnout. Photos of ignition system shown above without EMP metal shield. NOTE - Being this ignition system requires 12 volts DC negative ground of power, the OEM key switch for the Tecumseh Solid State Ignition (SSI) will not work with any battery-powered ignition systems. The OEM switch used with SSI is actually for magneto ignition, which when the engine is shut-down, it grounds the self-energizing wire connected to the SSI ignition. And battery ignition requires a switch that disconnects the electrical source from the ignition. So with this ignition system, you will need either a battery type OFF-ON-START key switch, or an OFF-ON toggle switch or an OFF-ON key switch (for security purposes; to power the ignition) with a momentary push button starter switch. Go here for choice of switches.
IMPORTANT: Most failures of a battery-powered ignition coils and/or electronic ignition control modules are caused by either the use of suppression/carbon-core spark plug wire(s), resistor-type spark plug(s), or overcharging of the electrical system due to a defective voltage rectifier/regulator or defective [automotive] battery. Therefore, if it's not already equipped, it's best to install an ammeter/amp gauge to monitor the charging system. Also, any coil will burn up if the ignition switch is left on with the points closed for more than a few minutes with the engine not running. To prevent this from possibly happening and/or for security reasons, use an OFF-ON key switch and/or a master disconnect switch with a removable key instead of just a toggle switch to power the ignition system. Also, the coil could burn up if the charging system continually overcharge due to a defective voltage rectifier/regulator or a defective [automotive] battery. Replacement Tecumseh Electronic Ignition Kit with Self-Contained Electronic Ignition . This ignition system requires 12 volts DC negative ground. Includes: new electronic ignition sensor/module and new high quality, 12 volt 3.5 ohm high energy compact epoxy-encapsulated armature ignition coil w/molded-in metal spark plug wire, both fastened to an aluminum ignition plate, new Autolite 295 or Champion J8C spark plug, new momentary push button switch (to crank the engine; optional) and new OFF-ON toggle switch/flip switch or [security] key switch (to power the ignition; optional). Installation Instructions and Engine Starting Procedure for A-1 Miller's Replacement Tecumseh Electronic Ignition System listed above - Click/tap here to print out the ignition installation instructions and engine stating procedure for this system.
I offer the below custom-made electronic ignition kit options. Please let me know which kit you'd prefer to use and I'll give you the total amount with shipping and payment options. These kits come with a limited 90 day warranty from date of purchase. Click/tap here to print out the ignition installation instructions and engine stating procedure for this system.
FYI - I've been to many car races, and truck and tractor pulls through the years, and I've noticed that when most drivers start their engine, they would crank it over first with a push button switch, then turn on the ignition switch, and the engine would start every time without hesitation. They start the engine in this order because it has fixed and set in the fully advanced ignition timing position with no retard. Starting the engine this way prevents it from kicking back, which prevent damage to the aluminum starter motor housing. This is how the Tecumseh engines with my custom ignition system listed above should be started without kick back. FYI - I've been receiving several emails and phone calls from people who purchased another type of custom-made electronic ignition system from another source online for their Tecumseh cast iron block engines. If you're experiencing problems with this other type of ignition, you will need to complain to the person you purchased it from. Because being I'm not familiar with the design of another person's custom-made ignition system, the advice I may give you to get your engine running right may not be 100% accurate. It'll be like the mechanic of a reputable Chevrolet car dealer/repair shop trying to tell someone how to fix their poor performing Ford vehicle. By the way - I thoroughly researched and test every custom-made electronic ignition system that I offer in my websites on the test engines in my shop to insure that they work flawlessly, and I have not received any complaints from my customers so far. |
 FYI - I can install
any of my custom-made flywheel- or crank-trigger electronic ignition systems
on your older small gas engine and/or rewire your lawn & garden tractor,
small engine equipment, small motorized vehicle or competition garden pulling
tractor so all the electrical accessories will work and if everything else
is in good condition with the engine (compression, carburetion, etc.), the
engine should start quicker, idle smoothly and rev up to full RPM with no
hesitation whatsoever. I have the knowledge, skills, all the parts and tools
to perform a professional job. I've rewired many customer's lawn & garden
tractors, small engine equipment and competition garden pulling tractors
many times with great results. If you're interested, please
click/tap here for contact information and directions
to A-1 Miller's shop.
FYI - I can install
any of my custom-made flywheel- or crank-trigger electronic ignition systems
on your older small gas engine and/or rewire your lawn & garden tractor,
small engine equipment, small motorized vehicle or competition garden pulling
tractor so all the electrical accessories will work and if everything else
is in good condition with the engine (compression, carburetion, etc.), the
engine should start quicker, idle smoothly and rev up to full RPM with no
hesitation whatsoever. I have the knowledge, skills, all the parts and tools
to perform a professional job. I've rewired many customer's lawn & garden
tractors, small engine equipment and competition garden pulling tractors
many times with great results. If you're interested, please
click/tap here for contact information and directions
to A-1 Miller's shop.
| Flywheel-Triggered
Electronic Ignition Conversion Kits. Convert a Magneto or Battery-Powered
Points/Condenser Ignition System to a Reliable and Maintenance-Free 12 Volt
Flywheel-Triggered Battery-Powered Electronic Ignition System on Kohler engine
models K90/K91, K141, K160/K161, KV160/KV161, L160/L161, L181, K181, K241,
K301 or K321 with the Small Flywheel and Starter/Generator |
[Top of Page]
Designed to convert a 12 volt points and condenser ignition system into the more reliable and dependable 100% digital 12 volt electronic ignition system. Points and condenser cannot be used with this ignition system. Remove the points and condenser and cover the points pushrod hole with the supplied block-off plate with silicone sealant.
IMPORTANT: Most failures of a battery-powered ignition coils and/or electronic ignition control modules are caused by either the use of suppression/carbon-core spark plug wire(s), resistor-type spark plug(s), or overcharging of the electrical system due to a defective voltage rectifier/regulator or defective [automotive] battery. Therefore, if it's not already equipped, it's best to install an ammeter/amp gauge to monitor the charging system. Also, any coil will burn up if the ignition switch is left on with the points closed for more than a few minutes with the engine not running. To prevent this from possibly happening and/or for security reasons, use an OFF-ON key switch and/or a master disconnect switch with a removable key instead of just a toggle switch to power the ignition system. Also, the coil could burn up if the charging system continually overcharge due to a defective voltage rectifier/regulator or a defective [automotive] battery.
Directions to Install This Kit - Click/tap here to print out these installation instructions.
I offer the Option #1 kits below. Please let me know which kit you'd prefer and I'll give you the total amount with shipping and payment options. Click here to contact A-1 Miller's for FREE honest and accurate technical support and/or for ordering information and payment options. Please contact A-1 Miller's if you need part(s) and/or service(s) performed that's not listed or mentioned in this website. [Top of Page]
|
Click here to contact A-1 Miller's for FREE honest and accurate technical support and/or for ordering information and payment options. Please contact A-1 Miller's if you need part(s) and/or service(s) performed that's not listed or mentioned in this website. [Top of Page]
Information About Kohler's Breakerless Ignition - (Scroll down for more information on this.)
If a Kohler flywheel has no projection (slightly angled hump) or large bolt head for Breakerless Ignition, but does have the 3/4" wide area between the fins and ring gear, or a billet steel flywheel, to use a magnetic pickup coil, 3-wire inductive (detects iron/steel) proximity sensor, a small, short steel Phillips or button head socket (Allen) Head screw and a minimum 1/4" length aluminum spacer secured with a split lock washer or high strength liquid threadlocker (Red Loctite, Permatex or equivalent) can be used as the signal detection for the flywheel-triggered electronic ignition. A steel dowel pin or knurled steel pin could be used instead of a screw or spiral pin, but because of exerted centrifugal force, the screw would be more secure due to its thread retention. FYI - Store a container of liquid threadlocker or Super Glue upright and not laying flat. The capped tip will not dry out and clog when stored upright.
The curvature or dome shaped heads of button- and Phillips-head screws makes them ideal for use on a trigger disc or flywheel. Spark occurs at the leading (high side) edge of the hump or screw, and not in the center of the hump or screw. When the cube-shaped proximity sensor is at the leading edge of the hump and when the S mark on the flywheel is aligned with the raised line on the bearing plate, it is at this point the timing is at 20º BTDC. But if the flywheel has the 3/4" wide area, but no projection (hump) or large bolt head, with the magnetic pickup coil or cube-shaped proximity sensor installed on the bearing plate and the 20º BTDC mark on the flywheel aligned with the raised line on the bearing plate.
When using an inductive proximity sensor, being these type of sensors detect a farther distance (up to 3/16") than a magnetic pickup coil, install a 3/4" length steel screw with a 1/4" length aluminum spacer (to retain flywheel balance). This will extend the detectable target 1/4" above the surface of the flywheel to prevent an out of time spark occurrence by part of the flywheel itself. Or if using a non-magnetic pickup coil, 3-wire hall effect proximity sensor or a non-magnetic electronic ignition sensor/module, a small ring magnet fastened by a small screw can be used to create a rotating magnet detection target. The head of the screw will become magnetized.
An 8-32 UNC and 10-32 UNF x 1/2" length screws with a split lock washer (and small magnet) only weighs about 1/10 of an ounce or 2.8 grams, so this will not make the flywheel significantly noticeably or dangerously out of balance. But if you're concerned about the flywheel being out of balance with the trigger screw/bolt, pin or screw w/ring magnet installed, the flywheel can be static balanced by weighing the flywheel and screw/bolt, pin or screw w/ring magnet separately on a precision scale, make a note of the exact weight of each item, and either install a stainless steel screw of the same exact weight as the trigger screw and magnet on the opposite side of the flywheel (180º apart), or drill a couple of shallow holes into the flywheel next to or beside the installed trigger screw/bolt, pin or screw w/ring magnet to put the flywheel back in balance. Make sure the flywheel is perfectly clean of dirt and debris, too. Actually, it's best to have the flywheel with the trigger screw/bolt, pin or screw w/ring magnet installed dynamically precision spin-balanced on a automotive balancing machine. Again, make sure the flywheel is perfectly clean of dirt and debris.
And for the ignition timing to be set at 20º BTDC, with the S mark on the flywheel and raised line on the bearing plate aligned, the screw will need to be located at 2-3/8" when using a magnetic pickup coil or proximity sensor. This setup can be adapted to a Kohler engine with the flywheel that has the starter/generator and gear starter alike. Or it can be applied to an engine with a steel flywheel for competition pulling. And the mounting holes in the angled bracket for the magnetic pickup coil can be elongated for precise adjustment/setting of the timing. If there's already a projection (hump) or large bolt head on the flywheel, then there's no need to modify the flywheel for this conversion or upgrade. If they're not already present, new 10-24 UNC threads will need to be drilled and tapped in the two raised bosses in the bearing plate to mount the bracket for the sensor's bracket.
Information About Converting from a Failed OEM Kohler Breakerless Ignition System to a Custom-Made Battery-Powered Electronic Ignition System or Battery-Powered Points/Condenser Ignition System | [Top of Page]

 The energizer wire that come from the stator under
the flywheel for Kohler Breakerless Ignition or Tecumseh Solid State Electronic
Ignition Module generates about 250 volts (serious) while the engine is running
at full governed speed. Actually, the primary circuit in virtually all magneto
ignition coils generate anywhere from 200 to 400 volts. So do not touch this
wire or terminal with one bare hand and the engine itself with your other
bare hand while the engine is running! Electrocution or death could occur.
It is not needed for any of A-1 Miller's crank-trigger ignition systems.
So snip off this wire or tape up the terminal.
The energizer wire that come from the stator under
the flywheel for Kohler Breakerless Ignition or Tecumseh Solid State Electronic
Ignition Module generates about 250 volts (serious) while the engine is running
at full governed speed. Actually, the primary circuit in virtually all magneto
ignition coils generate anywhere from 200 to 400 volts. So do not touch this
wire or terminal with one bare hand and the engine itself with your other
bare hand while the engine is running! Electrocution or death could occur.
It is not needed for any of A-1 Miller's crank-trigger ignition systems.
So snip off this wire or tape up the terminal.
 NOTE: On all Kohler engines
with Breakerless Ignition, there is a tiny (3/16") brass cup/expansion cup
plug in the points pushrod hole. This is to prevent oil from leaking out
the crankcase with Breakerless Ignition. This plug MUST be removed to use
the points pushrod when converting to points/condenser ignition. To prevent
damage to certain moving parts inside the engine and possible eventual internal
engine failure, do not push this plug into the crankcase! It may NOT drain
out with the oil either. If it is pushed into the crankcase, the oil pan
will need to be removed in order to remove the brass plug. To remove this
plug from outside the engine, carefully and gently drill a 7/64" pilot
hole through the plug, then use a #6
self-tapping drywall screw (a small
ordinary self-tapping screw may not work as well) with
small Vise-Grips or a small
crowbar or
pry bar hooked to the screw to pull the plug out of the
hole. Because without drilling the hole first, the self-tapping drywall screw
by itself may not be able to bore a hole through the plug without pushing
it deeper into the pushrod hole. And do not force the drill bit into the
plug or it could get pushed inside the crankcase! Use a new drill bit if
necessary. When the plug is removed, a 3/16" drill bit or hand reamer may
need to be used to clean out any debris/rust from the pushrod hole. After
the points is properly installed, and with the piston positioned at TDC on
the compression stroke, set the point gap at .020", or better yet,
set the ignition timing at 20º
BTDC, and definitely use a copper core/non-resistor spark plug of the
correct type gapped at .035".
NOTE: On all Kohler engines
with Breakerless Ignition, there is a tiny (3/16") brass cup/expansion cup
plug in the points pushrod hole. This is to prevent oil from leaking out
the crankcase with Breakerless Ignition. This plug MUST be removed to use
the points pushrod when converting to points/condenser ignition. To prevent
damage to certain moving parts inside the engine and possible eventual internal
engine failure, do not push this plug into the crankcase! It may NOT drain
out with the oil either. If it is pushed into the crankcase, the oil pan
will need to be removed in order to remove the brass plug. To remove this
plug from outside the engine, carefully and gently drill a 7/64" pilot
hole through the plug, then use a #6
self-tapping drywall screw (a small
ordinary self-tapping screw may not work as well) with
small Vise-Grips or a small
crowbar or
pry bar hooked to the screw to pull the plug out of the
hole. Because without drilling the hole first, the self-tapping drywall screw
by itself may not be able to bore a hole through the plug without pushing
it deeper into the pushrod hole. And do not force the drill bit into the
plug or it could get pushed inside the crankcase! Use a new drill bit if
necessary. When the plug is removed, a 3/16" drill bit or hand reamer may
need to be used to clean out any debris/rust from the pushrod hole. After
the points is properly installed, and with the piston positioned at TDC on
the compression stroke, set the point gap at .020", or better yet,
set the ignition timing at 20º
BTDC, and definitely use a copper core/non-resistor spark plug of the
correct type gapped at .035".
| Custom-Made Electronic Ignition Kits (below) for Converting
Kohler engine models K241, K301, K321, K341 or K361 to Flywheel-Triggered
Ignition, if the engine originally came with points/condenser ignition or
Breakerless Ignition. Do away with the old fashioned points and condenser
ignition, or defective and cost-prohibitive Breakerless Ignition components,
and convert your engine to the reliability, dependability and durability
of flywheel-triggered ignition!
This ignition system operates with full 12 volts. This is a thoroughly
tested, researched and proven reliable ignition system invented by A-1 Miller's
for ordinary lawn & garden engines and competition pulling engines. With
most tractors, the ignition conversion can be made with the engine in the
tractor. The only modifications that need to be done is the flywheel shroud
needs to be loosened to access and replace the Trigger Module, and two holes
will need to be drilled and tapped with the 2 supplied screws in the kit.
To install this replacement ignition system; the ignition coil mounts in
place of the Breakerless Ignition coil; the proximity cube sensor/bracket
mounts in place of the Breakerless Ignition Trigger Module, which is located
at the 10:30 position on the bearing plate; and two 9/64" holes will need
to be drilled and tapped (with the two self-threading screws are supplied
with the kit) on the backside of the bearing plate, on the left side when
facing the flywheel, to mount the GM HEI ignition control module. Be sure
to install small flat washers between the module and mounting surface to
provide an "air space" so the module will remain cool while in
operation.
IMPORTANT: Most failures of battery-powered ignition coils and/or electronic ignition control modules are caused by either the use of suppression/carbon-core spark plug wire(s), resistor-type spark plug(s), or overcharging of the electrical system due to a defective voltage rectifier/regulator or defective [automotive] battery. Therefore, if it's not already equipped, it's best to install an ammeter/amp gauge to monitor the charging system. Also, the coil and module may burn up if the ignition switch is left on for more than a few minutes with the engine not running. To prevent this from possibly happening and/or for security reasons, use an OFF-ON key switch and/or a master disconnect switch with a removable key instead of just a toggle switch to power the ignition system. Also, the coil could burn up if the charging system continually overcharge due to a defective voltage rectifier/regulator or a defective [automotive] battery. List of Parts in Kit Includes:
Installation Instructions: Click/tap here to print out the wiring diagram and installation/wiring connection instructions.
Wiring Diagram and Wiring Connection Instructions:
I offer the Option #1 kits below. Please let me know which kit you'd prefer and I'll give you the total amount with shipping and payment options. Click here to contact A-1 Miller's for FREE honest and accurate technical support and/or for ordering information and payment options. Please contact A-1 Miller's if you need part(s) and/or service(s) performed that's not listed or mentioned in this website. [Top of Page] To convert from Breakerless Ignition to Points and Condenser Ignition System. NOTE: New 12 volt ignition coil and spark plug wire included with each kit below.
To Convert from Points and Condenser Ignition to my Custom Electronic Ignition System. NOTE: Your 12 volt ignition coil and spark plug wire can be reused with each option below.
To Convert from Breakerless Ignition to my Custom Electronic Ignition System. NOTE: With points and condenser ignition, your 12 volt ignition coil and spark plug wire is to be reused with each kit below.
Option #2 - A-1 Miller's Custom-Made Reliable and Maintenance-Free 12 Volt Electronic Ignition Conversion Kit that is Triggered Off the Ring Gear of a 9-1/2" Flywheel with the Narrow, Tapered Edge. (Most common type of flywheel.) Convert from points and condenser ignition to electronic ignition on Kohler Engine Models K241, K301, K321, K341 and K361. [Top of Page]
Installation Instructions: Click/tap here to print out the wiring diagram and installation/wiring connection instructions.
Option #3 - Complete Battery-Powered Points and Condenser Ignition System Kit to Convert from [a failed] OEM Kohler Breakerless Ignition OR a Cast Iron Block Briggs & Stratton Engine with a Magneto Ignition System. Designed for Kohler engine models K181, K241, K301, K321 (that originally came with Breakerless Ignition).
Ignition Parts Include: (Prices are as of 2/7/25)
NOTE - Being this ignition system requires 12 volts DC negative ground of power, the OEM key switch for Breakerless Ignition will not work with any battery-powered ignition systems. The switch used with Breakerless Ignition is actually a magneto ignition switch, which when the engine is shut-down, it grounds the self-energizing wire connected to the ignition. And battery ignition requires a switch that disconnects the coil from the electrical source (battery). So with this ignition system, you will need either a battery type OFF-ON-START key switch, or an OFF-ON toggle switch or an OFF-ON key switch (for security purposes; to power the ignition) with a momentary push button starter switch. Go here for choice of switches. IMPORTANT: Most failures of a battery-powered ignition coils and/or electronic ignition control modules are caused by either the use of suppression/carbon-core spark plug wire(s), resistor-type spark plug(s), or overcharging of the electrical system due to a defective voltage rectifier/regulator or defective [automotive] battery. Therefore, if it's not already equipped, it's best to install an ammeter/amp gauge to monitor the charging system. Also, any coil will burn up if the ignition switch is left on with the points closed for more than a few minutes with the engine not running. To prevent this from possibly happening and/or for security reasons, use an OFF-ON key switch and/or a master disconnect switch with a removable key instead of just a toggle switch to power the ignition system. And the coil could burn up if the charging system continually overcharge due to a defective voltage rectifier/regulator or a defective [automotive] battery.
|
|||
Click here to contact A-1 Miller's for FREE honest and accurate technical support and/or for ordering information and payment options. Please contact A-1 Miller's if you need part(s) and/or service(s) performed that's not listed or mentioned in this website. [Top of Page]
3/16" Steel Plug for Kohler Ignition Points Pushrod
Hole. Fits Kohler engine models K90/K91, K141, K160/K161,
KV161,
L160/L161, L181,
K181, K241, K301, K321, K341, K361, and K482, K532, K582 (with an unworn
points pushrod hole). Use this part (to prevent eventual oil leakage) when
converting engine to electronic ignition. (Listed in this website.) Remove
points cover, points and OEM pushrod, and install this plug in the pushrod
hole with a medium size hammer. Plug should fit tight in hole, but if it
fits loose, create knurled/raised ridges on the plug with a sharp, flat cold
chisel and hammer, and apply silicone sealant on plug when installing in
the block. No need to reinstall cover and points. NOTE: The alternative
to using this plug is to remove the ignition points and points pushrod, and
place the pushrod on a hard, flat surface, and use a hammer and sharp flat
cold chisel to lightly create knurled raised marks midway on the pushrod.
Then reinstall the knurled pushrod in the engine block with the hammer. Or
a
20 penny common nail cut off to 1/2" length and the end
ground to a bevel will serve the same purpose. The knurled ridges will retain
the pushrod in the hole. Replaces Kohler part # X-702-1 (brass welch
plug). OEM Briggs & Stratton part #'s 231143, 692882. $6.00 each,
plus shipping & handling. [Return
to previous paragraph, section or website]
 Points Pushrod Hole Block-Off
Plate. Fits Kohler engine models K90/K91, K141, K160/K161,
KV161,
L160/L161, L181,
K181, K241, K301, K321, K341, K361, KT17 (first design), KT17 Series II,
KT19 (first design) KT19 Series II, KT21, K482, K532 and K582. Use this part
to cover points pushrod hole when converting engine to electronic ignition.
(Listed in this website.) Apply RTV silicone sealant to prevent oil leak
and use the OEM ignition points mounting screws to secure plate in place.
A-1 Miller's fabricated part. $10.00 each, plus shipping & handling.
Points Pushrod Hole Block-Off
Plate. Fits Kohler engine models K90/K91, K141, K160/K161,
KV161,
L160/L161, L181,
K181, K241, K301, K321, K341, K361, KT17 (first design), KT17 Series II,
KT19 (first design) KT19 Series II, KT21, K482, K532 and K582. Use this part
to cover points pushrod hole when converting engine to electronic ignition.
(Listed in this website.) Apply RTV silicone sealant to prevent oil leak
and use the OEM ignition points mounting screws to secure plate in place.
A-1 Miller's fabricated part. $10.00 each, plus shipping & handling.
A-1 Miller's Custom-Made Flywheel-Triggered Electronic Ignition Conversion Kit for Kohler opposed twin cylinder engine models KT17 (first design), KT17 Series II, KT19 (first design), KT19 Series II, KT21, and perhaps opposed twin cylinder Magnum engines with the KT-series flywheel installed, except generator engines. [Top of Page]
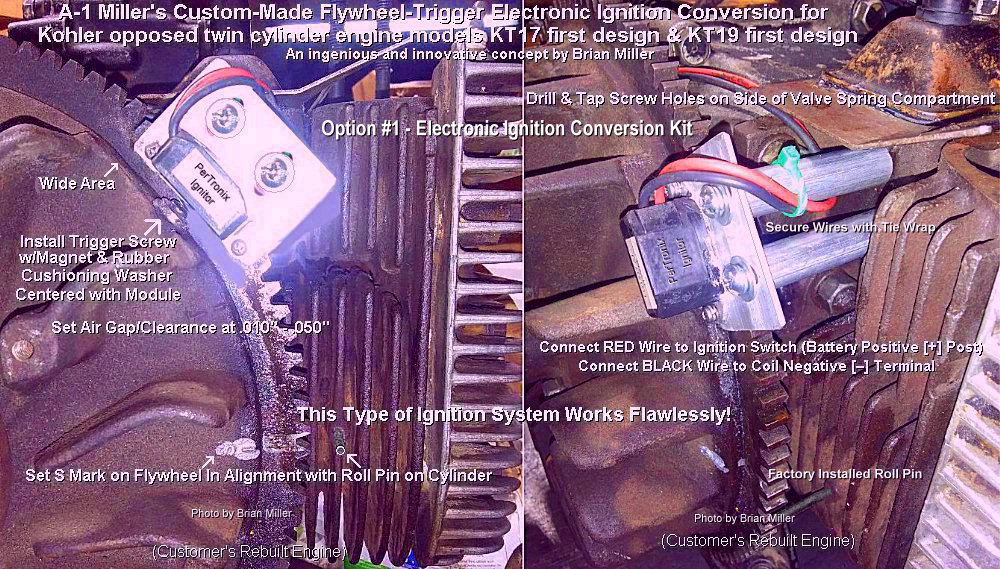
Designed
to convert a 12 volt points and condenser ignition system into the more reliable
and dependable 100% digital 12 volt electronic ignition system.
Points and condenser cannot be used with this ignition system. Remove the
points and condenser and cover the points pushrod hole with the supplied
block-off plate with silicone sealant. With this custom electronic ignition
conversion kit, the edge of the flywheel must be drilled and tapped with
installation for a small screw and magnet. This type of electronic ignition
must be triggered off the flywheel. There is no other way of making it happen.
If you can't find someone local that can do this for you,
A-1 Miller's offer this service if you won't mind bringing
your engine to us.
This ignition system is very reliable, works flawlessly and, may extend and/or outlast the life of the engine. Replaces points and condenser. This high performance ignition system have been thoroughly tested under extreme conditions, and produces a stable and a very strong spark with the use of microelectronics, even with the stock OEM canister ignition coil, helping the engine to start quicker, idle smoothly and rev up rev up to full RPM with no hesitation whatsoever. This revolutionizes the ignition system for the opposed twin cylinder Kohler engines! With points (and condenser) ignition, the factory setting for the timing on these engines is 23º BTDC. Being the points is operated off the camshaft, and being there's slight free-play/clearance between the gear teeth on the camshaft and crankshaft (which is normal), the ignition timing can fluctuate a few degrees, resulting in slight loss of engine power. And sometimes the lobe for the points pushrod on the cam will wear, which will make setting the timing at full 23º BTDC impossible, which will also cause the engine to lose power. (Both of these are confirmed in the official Kohler KT17, KT17 Series II, KT19 and KT19 Series II service manual.) And with a worn points lobe, the entire engine will need to be completely disassembled to replace the camshaft. This custom-made electronic ignition system maintains the timing at 23º BTDC at all times because it operates off the flywheel, which is driven by the crankshaft. With this custom ignition system, the timing will never change. It works the same as crank trigger ignition. The OEM Kohler [4.0 ohm] opposed twin cylinder canister ignition coil works excellent with this ignition sensor/module to produce a very strong spark. Allows a stock coil to perform like a high performance coil without shortening the life of the coil. To prevent burning up the electronic ignition module, it MUST be used with a coil having a minimum of 3.0 ohm resistance.
KT-series Electronic Ignition Option #1 - This electronic ignition conversion kit use two round supports that fastens on the side of the valve spring compartment, to mount the module/sensor onto. (Pictured above.) This kit is designed specifically for the KT17 (first design), KT19 (first design) and KT21 engines. But can also be used on the KT17 Series II and KT19 Series II engines, and Magnum opposed twin cylinder engines with the KT-series flywheel installed. Kit includes: New hall effect electronic ignition sensor/module fastened on adjustable/slotted aluminum mounting plate, two 10-24 UNC screws w/flat washers and lock washers, two aluminum spacers, target screw w/magnet and rubber washer (prevents the delicate magnet from possibly breaking when lightly fastened against the uneven rough casting of the flywheel), two new Autolite 26 or Champion 25 (RV17YC) spark plugs, and points pushrod hole block-off plate (use with silicone sealant). Use this ignition system with the OEM off-ignition-start key switch and dual wire ignition coil. All replacement ignition parts are readily available. And if this custom electronic ignition is used in a garden tractor with a longitudinal engine, such as Cub Cadet, Economy Power King, Ford, hydrostatic-drive John Deere, MTD Farm King Model 960, Pennsylvania Panzer, Meteor, Copar, etc., it'll be easier to install if the engine is removed from the tractor. NOTE: If your engine is hard to start, looses horsepower and dies when hot, and restarts when cooled, and repeats this over and over, then chances are, it needs a professional valve job performed with the valve clearances reset to factory specs. Because just installing electronic ignition will not fix a faulty valve problem. Please contact A-1 Miller's if you're interested in having a professional valve job performed on your Kohler opposed twin cylinder engine.
INSTALLATION INSTRUCTIONS for KT17 (first design), KT19 (first design) and KT21 engines. This option can also be used on the KT17 Series II and KT19 Series II engines, and Magnum opposed twin cylinder engines with the KT-series flywheel installed. Video of this ignition system installed on a running engine coming later. Scroll down to read the wiring connection instructions or click here to view and print out these installation instructions.
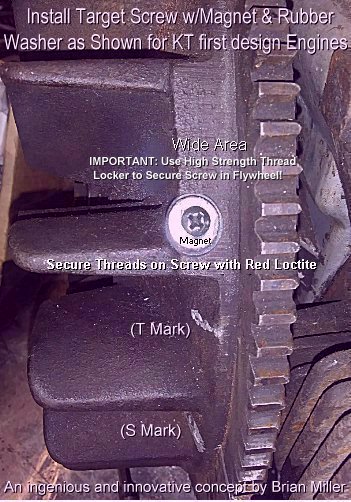
 Use a
Sharpie metallic silver permanent ink marker to locate
and install the
Use a
Sharpie metallic silver permanent ink marker to locate
and install the  trigger screw
w/magnet and rubber washer on the flat area on the flywheel above the
T mark as shown in the photo to the right ->. This will place the
ignition timing in alignment with the center of the electronic ignition
sensor/module when the S mark on the flywheel is in exact alignment
with the roll pin on the cylinder (which is positioned at 23º BTDC).
The screw head in the magnet is magnetized to trigger the spark. There is
no need to remove the flywheel to drill and tap the threads to accept the
supplied 6-32 UNC trigger screw.
Click/tap here to learn
how to professionally cut new threads. To prevent from possibly breaking
off drill bit or tap, secure the flywheel so it does not rotate one way or
the other while drilling hole and/or cutting threads! NOTE: The rubber
washer prevents the delicate magnet from possibly breaking when lightly fastened
against the uneven rough casting of the flywheel. IMPORTANT: To prevent from
possibly loosening, secure screw in flywheel or rotating disc with
high strength liquid threadlocker
(Red Loctite, Permatex or equivalent). Tighten
screw just when the rubber begin to bulge, and allow the Loctite to dry and
harden overnight. The hall effect electronic ignition sensor/module is activated
by the South pole of the magnet, so do not remove the magnet from the screw!
FYI - Store a container of liquid threadlocker or Super Glue upright and
not laying flat. The capped tip will not dry out and clog when stored
upright.
Being there are no two bosses
on the cooling fins of the #1 cylinder (right side of engine when facing
the flywheel) of the KT17 (first design) and KT19 (first design) engines,
use the flat casting on the side of the valve spring compartment on the #1
cylinder facing the flywheel to mount the two supports with the electronic
ignition sensor/module adjustable mounting plate. See the
[mock up] photo in this section.
trigger screw
w/magnet and rubber washer on the flat area on the flywheel above the
T mark as shown in the photo to the right ->. This will place the
ignition timing in alignment with the center of the electronic ignition
sensor/module when the S mark on the flywheel is in exact alignment
with the roll pin on the cylinder (which is positioned at 23º BTDC).
The screw head in the magnet is magnetized to trigger the spark. There is
no need to remove the flywheel to drill and tap the threads to accept the
supplied 6-32 UNC trigger screw.
Click/tap here to learn
how to professionally cut new threads. To prevent from possibly breaking
off drill bit or tap, secure the flywheel so it does not rotate one way or
the other while drilling hole and/or cutting threads! NOTE: The rubber
washer prevents the delicate magnet from possibly breaking when lightly fastened
against the uneven rough casting of the flywheel. IMPORTANT: To prevent from
possibly loosening, secure screw in flywheel or rotating disc with
high strength liquid threadlocker
(Red Loctite, Permatex or equivalent). Tighten
screw just when the rubber begin to bulge, and allow the Loctite to dry and
harden overnight. The hall effect electronic ignition sensor/module is activated
by the South pole of the magnet, so do not remove the magnet from the screw!
FYI - Store a container of liquid threadlocker or Super Glue upright and
not laying flat. The capped tip will not dry out and clog when stored
upright.
Being there are no two bosses
on the cooling fins of the #1 cylinder (right side of engine when facing
the flywheel) of the KT17 (first design) and KT19 (first design) engines,
use the flat casting on the side of the valve spring compartment on the #1
cylinder facing the flywheel to mount the two supports with the electronic
ignition sensor/module adjustable mounting plate. See the
[mock up] photo in this section.
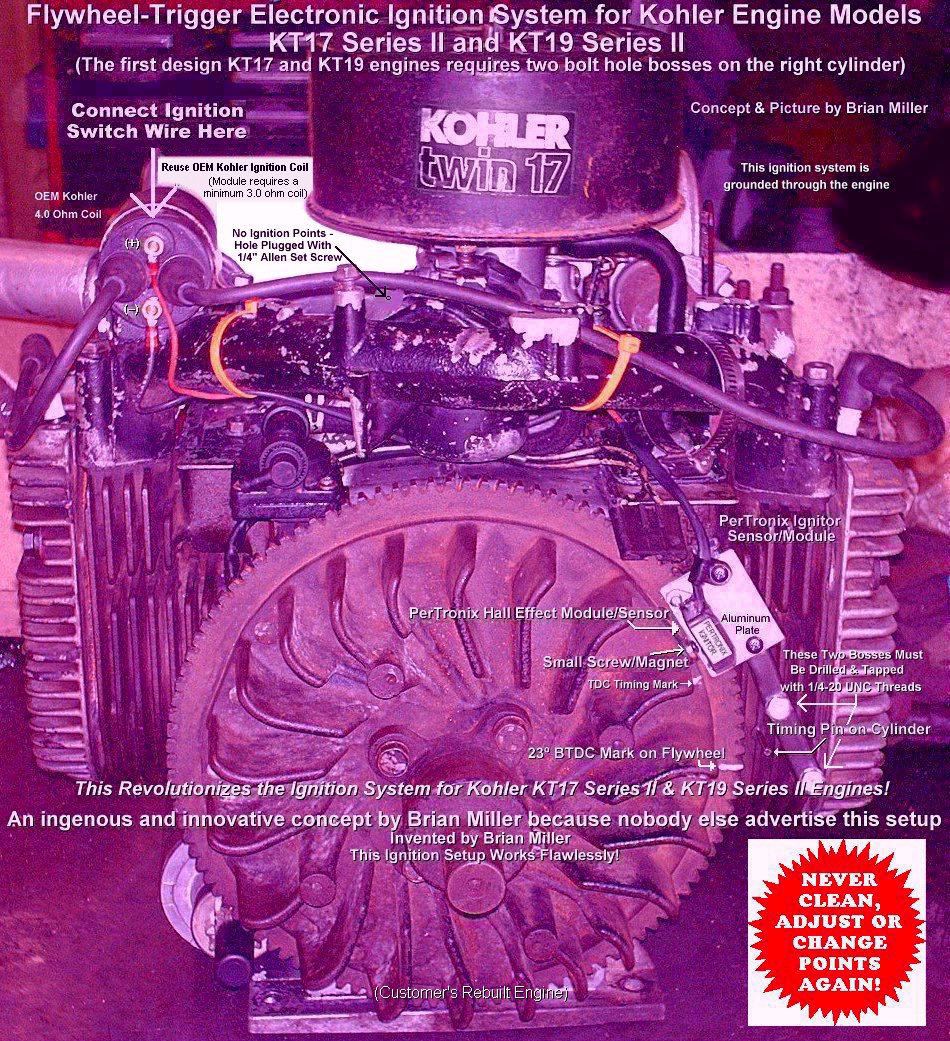
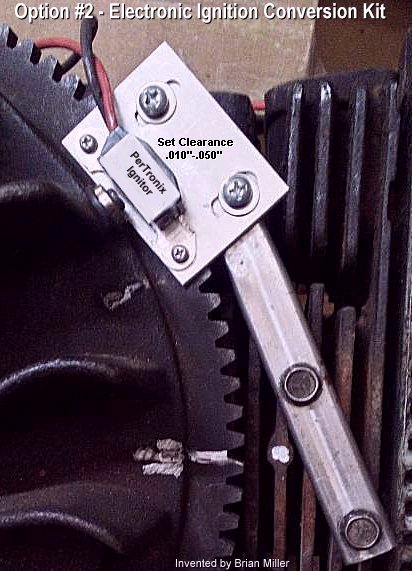 KT-series Electronic Ignition
Option #2 - This electronic ignition conversion kit use a somewhat long square
steel tube support that mounts on the 2 bosses on the #1 cylinder, to mount
the module/sensor onto. (Pictured above.) This kit is specifically designed
ONLY for the KT17 Series II and KT19 Series II engines (and perhaps Magnum
engines with the KT-series flywheel installed). Kit includes: New hall effect
electronic ignition sensor/module fastened on aluminum mounting plate and
square steel tubing, two 1/4" x 1-1/2" length grade 8 bolts w/lock washers,
target screw w/magnet and rubber washer (prevents the delicate magnet
from possibly breaking when lightly fastened against the uneven rough casting
of the flywheel), two Autolite 26 or Champion 25 (RV17YC) spark plugs,
and points pushrod hole block-off plate (use with silicone sealant). Use
this ignition system with the OEM off-ignition-start key switch and dual
wire ignition coil. All replacement ignition parts are readily available.
And if this custom electronic ignition is used in a garden tractor with a
longitudinal engine, such as Cub Cadet, Economy Power King,
Ford, hydrostatic-drive John Deere, MTD Farm King Model 960, Pennsylvania
Panzer, Meteor, Copar, etc., it'll be easier to install if the engine is
removed from the tractor.
KT-series Electronic Ignition
Option #2 - This electronic ignition conversion kit use a somewhat long square
steel tube support that mounts on the 2 bosses on the #1 cylinder, to mount
the module/sensor onto. (Pictured above.) This kit is specifically designed
ONLY for the KT17 Series II and KT19 Series II engines (and perhaps Magnum
engines with the KT-series flywheel installed). Kit includes: New hall effect
electronic ignition sensor/module fastened on aluminum mounting plate and
square steel tubing, two 1/4" x 1-1/2" length grade 8 bolts w/lock washers,
target screw w/magnet and rubber washer (prevents the delicate magnet
from possibly breaking when lightly fastened against the uneven rough casting
of the flywheel), two Autolite 26 or Champion 25 (RV17YC) spark plugs,
and points pushrod hole block-off plate (use with silicone sealant). Use
this ignition system with the OEM off-ignition-start key switch and dual
wire ignition coil. All replacement ignition parts are readily available.
And if this custom electronic ignition is used in a garden tractor with a
longitudinal engine, such as Cub Cadet, Economy Power King,
Ford, hydrostatic-drive John Deere, MTD Farm King Model 960, Pennsylvania
Panzer, Meteor, Copar, etc., it'll be easier to install if the engine is
removed from the tractor.
With this custom electronic ignition conversion kit, the edge of the flywheel must be drilled and tapped with installation for a small screw and magnet. This type of electronic ignition must be triggered off the flywheel. There is no other way of making it happen. If you can't find someone local that can do this for you, A-1 Miller's offer this service if you won't mind bringing your engine to us.
INSTALLATION INSTRUCTIONS of the sensor/module specifically for KT17 Series II and KT19 Series II engines, (and perhaps Magnum engines with the KT-series flywheel installed) - Video of this ignition system installed on a running engine coming later.
trigger screw
w/magnet and rubber washer on the flat area on the flywheel above the
T mark as shown in the photo to the right ->. This will place the
ignition timing in alignment with the center of the self-contained electronic
ignition sensor/module when the S mark on the flywheel is in
exact alignment with the roll pin on the cylinder (which is positioned at
23º BTDC). The screw head is magnetized to trigger the spark. There
is no need to remove the flywheel to drill and tap the threads. The screw
hole must be professionally drilled and tapped to accept the supplied 6-32
UNC trigger screw. Click
here to learn how to professionally cut new threads. To prevent breaking
off drill bit or tap, secure the flywheel so it does not rotate one way or
the other while drilling hole and/or cutting threads! NOTE: The rubber
washer prevents the delicate magnet from possibly breaking when lightly fastened
against the uneven rough casting of the flywheel. IMPORTANT: To prevent from
possibly loosening, secure screw in flywheel or rotating disc with
high strength liquid threadlocker
(Red Loctite, Permatex or equivalent). Tighten
screw just when the rubber begin to bulge, and allow the Loctite to dry and
harden overnight. The hall effect electronic ignition sensor/module is activated
by the South pole of the magnet, so do not remove the magnet from the screw!
FYI - Store a container of liquid threadlocker or Super Glue upright and
not laying flat. The capped tip will not dry out and clog when stored
upright.
 Use the two bosses on the #1 cylinder to mount the bracket
with the ignition sensor/module. Being there are no bolt holes in the bosses,
the center of each boss must be professionally drilled and tapped to accept
the supplied 1/4-20 UNC x 1-1/2" length grade 8 bolts with split lock washers.
Click/tap here to learn
how to professionally cut new threads.
IMPORTANT! Drill only 3/4" deep; do not drill
all the way through the cylinder wall! To guarantee the 3/4" depth, use a
Use the two bosses on the #1 cylinder to mount the bracket
with the ignition sensor/module. Being there are no bolt holes in the bosses,
the center of each boss must be professionally drilled and tapped to accept
the supplied 1/4-20 UNC x 1-1/2" length grade 8 bolts with split lock washers.
Click/tap here to learn
how to professionally cut new threads.
IMPORTANT! Drill only 3/4" deep; do not drill
all the way through the cylinder wall! To guarantee the 3/4" depth, use a
 drill stop (small locking collar) secured at the 3/4"
depth. There is no need to remove the flywheel to do this.
See the
[mock up] animated photo to the right.->
drill stop (small locking collar) secured at the 3/4"
depth. There is no need to remove the flywheel to do this.
See the
[mock up] animated photo to the right.->
Points Pushrod Hole Block-Off
Plate. Fits Kohler engine models K90/K91, K141, K160/K161,
KV161,
L160/L161, L181,
K181, K241, K301, K321, K341, K361, KT17 (first design), KT17 Series II,
KT19 (first design) KT19 Series II, KT21, K482, K532 and K582. Use this part
to cover points pushrod hole when converting engine to electronic ignition.
(Listed in this website.) Apply RTV silicone sealant to prevent oil leak
and use the OEM ignition points mounting screws to secure plate in place.
A-1 Miller's fabricated part. $10.00 each, plus shipping & handling.
Detectable Steel Target Screw
w/Magnet and Protective Rubber Washer for Custom Flywheel-Triggered Electronic
Ignition Systems. Head of screw becomes magnetized. Fasten on rotating disc,
edge of flywheel or backside of flywheel (in the case of an Onan engine)
when using a 3-wire hall effect proximity sensor or hall effect electronic
ignition sensor/module to trigger the spark. 8-32 UNC x 1/2" length hardened
steel Phillips head screw.
Click/tap here to learn
how to professionally cut new threads. Weighs about 1/10 oz. / 2 grams.
NOTE: The rubber washer prevents the high strength but delicate and brittle
magnet from possibly breaking when the screw is tightened to the uneven or
rough casting on the flywheel. IMPORTANT: To prevent from possibly loosening,
secure screw in flywheel or rotating disc with
high strength liquid threadlocker
(Red Loctite, Permatex or equivalent). Tighten
screw just when the rubber begin to bulge, and allow the Loctite to dry and
harden overnight. The hall effect electronic ignition sensor/module is activated
by the South pole of the magnet, so do not remove the magnet from the screw!
$10.00 each, plus shipping & handling. Please
let me know if you're interested in purchasing this
item and I'll give you the total amount with shipping and payment options.
Click here to contact A-1 Miller's Performance Enterprises to place an order, send your parts for repairing, and/or for FREE professional and honest technical customer service assistance and support and payment options. If you need a part or parts that's not listed in this website, please contact A-1 Miller's and we'll see if we can get it at a reasonable price. | [Return to previous paragraph, section or website] [Top of Page]
|
Custom-Made Reliable and Maintenance-Free 12 Volt Crank-Trigger Electronic Ignition Systems That Operate Off the PTO End of Virtually Any Older General-Use Small Engine or Competition Pulling Small Engine - Eliminates Old-Fashioned Points and Condenser or Troublesome OEM Solid State Ignition
Be
ahead of the pulling competition with 21st century technology using 100%
reliable digital electronic ignition!
Click here
to contact A-1 Miller's for FREE honest and accurate technical support and/or
for ordering information and payment options. Please contact A-1
Miller's
if you need part(s) and/or
service(s) performed that's not listed or mentioned in this
website. [Top of Page]
A new way to revolutionize the ignition system on virtually any small gas engine! Virtually trouble- and maintenance-free, and water-proof. These ignition modules/sensors is a small, lightweight, compact and completely self-contained electronic ignition system built with the latest state-of-the-art engineering with the use of microelectronics. Fits entirely on the engine block; no ignition box and additional wiring to clutter the engine compartment because the electronic ignition control module and pickup coil/sensor are contained in the same sealed casing. The self-contained Dynatek Dyna S sensor/module produce a stable and a very strong spark with the use of microelectronics. They will produce a stronger spark to help the engine to start quicker, idle smoothly and rev up to full RPM with no hesitation whatsoever. Allows a stock coil to perform like a high performance coil without shortening the life of the coil.
These maintenance-free crank-trigger electronic ignition setups have been thoroughly tested and proven very reliable for general lawn and work, and all classes of single and opposed twin cylinder competition pulling engines. One sensor/module is needed for an opposed twin cylinder engine, and two modules/sensors spaced precisely at 90º apart are required for V-twin engines. These are the same ignition systems used by professional pullers everywhere. Reliable at high RPM, these electronic ignition modules provide unlimited RPM. They will allow the ignition system to operate at the speed of electricity (which can be anywhere from about 50% to 99% of the speed of light, depending upon the quality of the electronic components and wiring connections).
Spark occurs when the magnet embedded in an aluminum locking set screw collar (magnet ring), which is much like an automotive reluctor ring, that's fastened on the crankshaft's PTO end passes the sensor/module. These sensors/modules packs a lot of punch and allow the ignition system operate at 100% efficiency for a stronger spark. When wired correctly, it's normal for the flywheel- and crank-trigger ignition systems to make a spark when first powered up. And if it makes a spark as the sensor passes the metal target object, then the ignition system is working as it should.
NOTE: With all of my crank-trigger ignition systems (all listed below), when installed accordingly, the ignition timing is ALWAYS advanced. If it's set or installed retarded, it will NOT automatically advance as soon as the engine starts. If the timing is set retarded, the only way to advance it is by rotating an ignition plate or ignition distributor manually by hand, or automatically by a vacuum canister with intake manifold, or by centrifugal force with flyweights.
The Dynatek Dyna S sensor/module operates with 12-1/2 to 15 volts DC negative ground, and requires an ignition coil with a minimum 3.0 ohm resistor. Using a coil with less than 3.0 ohm of primary resistance for a long period of time will cause the module to overheat and the engine may misfire until it cools down, or the sensor/module might fail prematurely. A metal core spark plug wire and copper core/non-resistor spark plug should be used. If the voltage drops below the minimum requirement for either sensor/module, the engine may idle well, but not rev up, or the engine may run erratic. Either sensor/module can be used with a standard-output/stock or (40,000 volt) high-output/performance or OEM automotive electronic ignition coil, as long as it has a 3.0 ohm internal primary resistor, or connected to a ballast resistor, resulting in 3.0 ohm of resistance.
Maintenance-Free 12 Volt Dynatek Dyna S Crank-Trigger Electronic Ignition Installation Instructions -
 A-1 Miller's universal flat
aluminum mounting plate with the self-contained Dynatek Dyna S ignition
sensor/module kits can be adapted for use on various makes and models of
one or two cylinder (twin opposing cylinders) small engines. Being there
are so many different bolt patterns on the PTO end of Kohler and other makes
and models of small engines, these are not a simple "one kit fits all" bolt-on
ignition setup. Therefore, customer will need to locate and drill holes in
the mounting plate in alignment with the bolt holes on the PTO end of the
engine block. If there are no bolt hole(s) on the PTO end of the block, they
will need to be drilled and tapped.
Click/tap here to learn
how to professionally cut new threads. For strength and durability, a
minimum of 1/4" bolts (thread size) should be used to fasten mounting plate
to PTO end of engine block. Locate and drill (machine) slotted adjustment
holes in the mounting plate. And then drill and cut 4-40 NC threads in the
mounting plate to fasten the sensor/module. Air gap/clearance between the
sensor/module and locking set screw collar w/embedded magnet is .010" or
.25mm - .050" or 1mm. sensor/module may not operate or engine may misfire
if gap is wider than .060". NOTE: Do not allow
sensor/module to make contact with locking set screw collar w/embedded magnet
while engine is running!
Click
HERE for custom-made electronic ignition
kits that operate off the flywheel end of the engine. These can be used for
ordinary lawn & garden engines or stock competition pulling
engines.
A-1 Miller's universal flat
aluminum mounting plate with the self-contained Dynatek Dyna S ignition
sensor/module kits can be adapted for use on various makes and models of
one or two cylinder (twin opposing cylinders) small engines. Being there
are so many different bolt patterns on the PTO end of Kohler and other makes
and models of small engines, these are not a simple "one kit fits all" bolt-on
ignition setup. Therefore, customer will need to locate and drill holes in
the mounting plate in alignment with the bolt holes on the PTO end of the
engine block. If there are no bolt hole(s) on the PTO end of the block, they
will need to be drilled and tapped.
Click/tap here to learn
how to professionally cut new threads. For strength and durability, a
minimum of 1/4" bolts (thread size) should be used to fasten mounting plate
to PTO end of engine block. Locate and drill (machine) slotted adjustment
holes in the mounting plate. And then drill and cut 4-40 NC threads in the
mounting plate to fasten the sensor/module. Air gap/clearance between the
sensor/module and locking set screw collar w/embedded magnet is .010" or
.25mm - .050" or 1mm. sensor/module may not operate or engine may misfire
if gap is wider than .060". NOTE: Do not allow
sensor/module to make contact with locking set screw collar w/embedded magnet
while engine is running!
Click
HERE for custom-made electronic ignition
kits that operate off the flywheel end of the engine. These can be used for
ordinary lawn & garden engines or stock competition pulling
engines.
Dynatek Dyna S Crank Trigger Ignition Kit and Systems for a Single Cylinder Engine listed below. These ignition systems works flawlessly and may outlast the life of the engine. These ignition systems operate off the PTO end of the crankshaft and is mainly for competition pulling engines that have nothing on the PTO end of the crankshaft. NOTE: Slotted mounting holes will be machined in the mounting plate. If the bolt holes in the PTO end of the block don't match the ones in the plate or if bolt holes are not present, then new bolt holes will need to be drilled and tapped in the engine block. Click/tap here to learn how to professionally cut new threads. Can be used on Kohler 10-16hp single or opposed twin cylinder horizontal shaft engines. Set the clearance between the module and locking collar at .010" or .25mm - .050" or 1mm. NOTE: For easier setting of the timing with the old style electronic ignition , use a permanent ink marker (Sharpie, Magic Marker, Marks-A-Lot, etc.) on the side of the locking collar in alignment with the magnet to indicate the location of the magnet. IMPORTANT - Gently rotate the flywheel back and forth by hand to check and see that the module does not make contact with the locking collar. Do not allow the module make contact with the locking collar while the engine is running! IMPORTANT - The module will burn up after a few minutes up if the ignition switch is left on with the engine not running. To prevent this from possibly happening and/or for security reasons, use an OFF-ON key switch and/or a master disconnect switch with a removable key instead of just a toggle switch to power the ignition system.
 Designed
to convert a 12 volt points and condenser ignition system into the more reliable
and dependable 100% digital 12 volt electronic ignition system.
Points and condenser cannot be used with this ignition system. Remove the
points and condenser and cover the points pushrod hole with the supplied
block-off plate with silicone sealant.
Designed
to convert a 12 volt points and condenser ignition system into the more reliable
and dependable 100% digital 12 volt electronic ignition system.
Points and condenser cannot be used with this ignition system. Remove the
points and condenser and cover the points pushrod hole with the supplied
block-off plate with silicone sealant.
Crank Trigger Ignition with the Self-Contained Dynatek Dyna S Sensor/Module Fastened on an Aluminum Mounting Plate, Triggered by an Embedded Magnet in a Locking Set Screw Collar. Requires 12 volts DC negative ground of power and an ignition coil with minimum 3.0 ohms resistance. Mounting plate fastens on the PTO end of engine block, and coil mounts remotely on side of flywheel shroud or elsewhere in engine compartment. This high performance ignition system have been thoroughly tested under extreme conditions, and produces a stable and a very strong spark with the use of microelectronics, helping the engine to start quicker, idle smoothly and rev up rev up to full RPM with no hesitation whatsoever. Allows a stock coil to perform like a high performance coil without shortening the life of the coil. Ignition coil not included, purchase separately or customer use their own [minimum 3.0 ohm] ignition coil. Module may burn up if the wrong coil is used. Click here to learn how to test the ohm resistance of a coil. Set the air gap/clearance between sensor and magnet in locking set screw collar at .010" or .25mm - .050" or 1mm, and set spark plug gap at .035". NOTE: For easier setting of the timing with this electronic ignition module, use a permanent ink marker (Sharpie, Magic Marker, Marks-A-Lot, etc.) on the side of the locking collar in alignment with the magnet to indicate the location of the magnet. IMPORTANT - Connect the RED wire to the coil positive [+] terminal (which connects to the ignition switch and battery positive (+) post), and connect the BLACK wire to the coil negative (–) terminal. IMPORTANT: The module will burn up after a few minutes up if the ignition switch is left on with the engine not running. To prevent this from possibly happening and/or for security reasons, use an OFF-ON key switch and/or a master disconnect switch with a removable key instead of just a toggle switch to power the ignition system. When the ignition unit is installed and wire(s) correctly connected, turn the ignition switch on to supply electricity to the coil, and rotate the flywheel back and forth by hand so the magnet passes the module and observe for a strong, "snappy" blue spark at the spark plug's tip. Please specify diameter of crankshaft PTO end for locking set screw collar w/embedded magnet. Most common OEM crankshaft PTO end diameters are 1" and 1-1/8", but 3/4", 1-1/4", 1-3/8", 1-7/16" and 1-1/2" are rare. Most billet steel crankshafts have a 1-1/4" or 1-1/2" diameter raised shoulder. IMPORTANT: Use a new copper core/non-resistor AC Delco, Autolite or Champion spark plug of the correct type gapped at .025" for longer coil life. Use of a resistor type spark plug will void warranty. This ignition setup is shown above. Mounting plate available with 3-1/2" or 4" bolt hole spacing, but customer may have to drill and tap the block to mount the crank-trigger or modify the bracket if necessary. All replacement ignition parts are readily available. Video of this ignition system installed on a running engine coming later. $130.00 per kit, plus shipping & handling. Please let me know if you're interested in purchasing this kit and I'll give you the total amount with shipping and payment options.
Points Pushrod Hole Block-Off
Plate. Fits Kohler engine models K90/K91, K141, K160/K161,
KV161,
L160/L161, L181,
K181, K241, K301, K321, K341, K361, KT17 (first design), KT17 Series II,
KT19 (first design) KT19 Series II, KT21, K482, K532 and K582. Use this part
to cover points pushrod hole when converting engine to electronic ignition.
(Listed in this website.) Apply RTV silicone sealant to prevent oil leak
and use the OEM ignition points mounting screws to secure plate in place.
A-1 Miller's fabricated part. $10.00 each, plus shipping & handling.
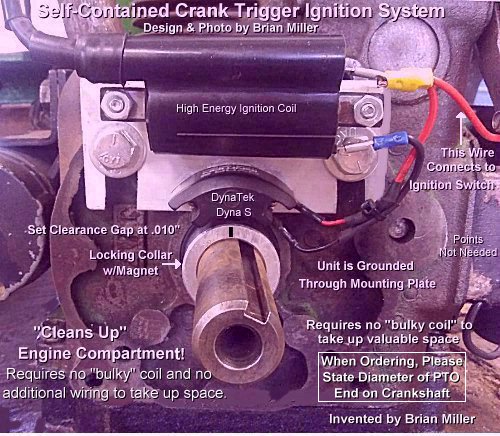
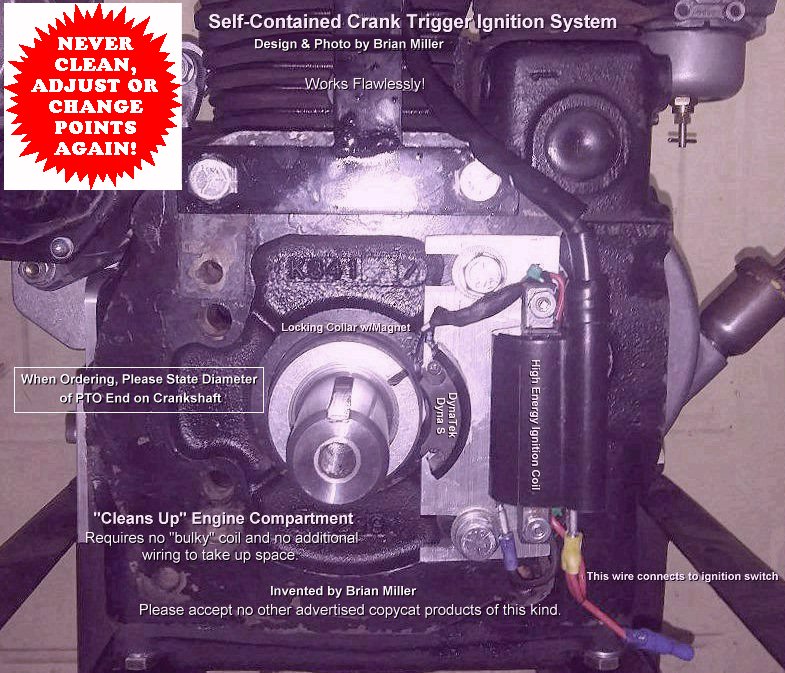 Designed
to convert a 12 volt points and condenser ignition system into the more reliable
and dependable 100% digital 12 volt electronic ignition system.
Points and condenser cannot be used with this ignition system. Remove the
points and condenser and cover the points pushrod hole with the supplied
block-off plate with silicone sealant.
Designed
to convert a 12 volt points and condenser ignition system into the more reliable
and dependable 100% digital 12 volt electronic ignition system.
Points and condenser cannot be used with this ignition system. Remove the
points and condenser and cover the points pushrod hole with the supplied
block-off plate with silicone sealant.
Self-Contained and Compact Crank Trigger Ignition System with the Dynatek Dyna S Sensor/Module Incorporated with a High Energy Ignition Coil, Both Fastened on an Aluminum Mounting Plate, Triggered by an Embedded Magnet in a Locking Set Screw Collar. Requires 12 volts DC negative ground of power. Thoroughly tested and proven to be very reliable. The high energy armature ignition coil is fastened above the Dynatek Dyna S sensor/module on the same aluminum ignition plate. This ignition system operates off the PTO end of the engine and is mainly for competition pulling engines that have nothing on the PTO end of the crankshaft. This ignition system "cleans up" the engine compartment. No remotely-mounted coil or extra wiring needed. Can be mounted above or on right side of crankshaft. This high performance ignition system have been thoroughly tested under extreme conditions, and produces a stable and a very strong spark with the use of microelectronics, even with the compact epoxy-encapsulated armature ignition coil, helping the engine to start quicker, idle smoothly and rev up rev up to full RPM with no hesitation whatsoever. The Dynatek Dyna S sensor/module is triggered by a small magnet embedded in an aluminum locking set screw collar (magnet ring) that's fastened on the crankshaft. All replacement ignition parts are readily available. Mounting plate available with 3-1/2" or 4" bolt hole spacing. But customer may have to drill and tap the block to mount the crank-trigger or modify the bracket if necessary. Click/tap here to learn how to professionally cut new threads. Simple wiring connections: Connect the RED wire to the ignition switch (which connects to the battery positive (+) post), and connect the BLACK wire to the grounding-type kill switch. The ignition system is grounded to the engine through negative (–) battery post. IMPORTANT: The module will burn up after a few minutes up if the ignition switch is left on with the engine not running. To prevent this from possibly happening and/or for security reasons, use an OFF-ON key switch and/or a master disconnect switch with a removable key instead of just a toggle switch to power the ignition system. Set the air gap/clearance between sensor and magnet in locking set screw collar at .010" or .25mm - .050" or 1mm, and set spark plug gap at .035". NOTE: For easier setting of the timing with this electronic ignition module, use a permanent ink marker (Sharpie, Magic Marker, Marks-A-Lot, etc.) on the side of the locking collar in alignment with the magnet to indicate the location of the magnet. When the ignition unit is installed and wire(s) correctly connected, turn the ignition switch on to supply electricity to the coil, and rotate the flywheel back and forth by hand so the magnet passes the module and observe for a strong, "snappy" blue spark at the spark plug's tip. The locking collar w/embedded magnet is available for all diameters of PTO end of the crankshaft. IMPORTANT: Use a new copper core/non-resistor AC Delco, Autolite or Champion spark plug of the correct type gapped at .025" for longer coil life. Use of a resistor type spark plug will void warranty. Please specify diameter of crankshaft PTO end for locking set screw collar w/embedded magnet. Most common OEM crankshaft PTO end diameters are 1" and 1-1/8", but 3/4", 1-1/4", 1-3/8", 1-7/16" and 1-1/2" are rare. Most billet steel crankshafts have a 1-1/4" or 1-1/2" diameter raised shoulder. $250.00 per kit, plus shipping & handling. Please let me know if you're interested in purchasing this kit and I'll give you the total amount with shipping and payment options.
Points Pushrod Hole Block-Off
Plate. Fits Kohler engine models K90/K91, K141, K160/K161,
KV161,
L160/L161, L181,
K181, K241, K301, K321, K341, K361, KT17 (first design), KT17 Series II,
KT19 (first design) KT19 Series II, KT21, K482, K532 and K582. Use this part
to cover points pushrod hole when converting engine to electronic ignition.
(Listed in this website.) Apply RTV silicone sealant to prevent oil leak
and use the OEM ignition points mounting screws to secure plate in place.
A-1 Miller's fabricated part. $10.00 each, plus shipping & handling.
Click here to contact A-1 Miller's for FREE honest and accurate technical support and/or for ordering information and payment options. Please contact A-1 Miller's if you need part(s) and/or service(s) performed that's not listed or mentioned in this website. [Top of Page]
Self-Contained Crank Trigger Electronic Ignition System with the Dynatek Dyna S Sensor/Module Incorporated with a High Energy Ignition Coil Fastened on an Angled Aluminum Mounting Plate, and Locking Set Screw Collar w/Embedded Magnet for Kohler Engine Models KT17 (first design), KT17 Series II, KT19 (first design), KT19 Series II, KT21, M18 and M20 Competition Pulling Engines Only -
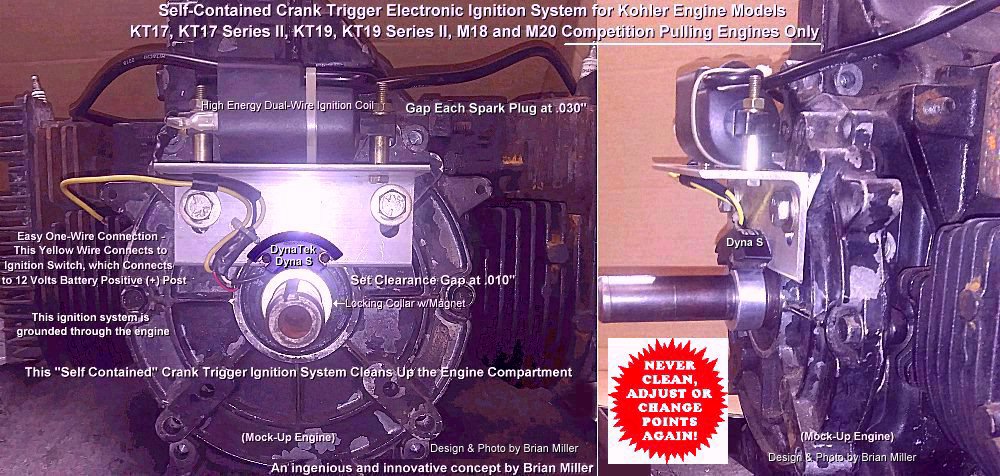
Designed to convert a 12 volt points and condenser ignition system into the more reliable and dependable 100% digital 12 volt electronic ignition system. Points and condenser cannot be used with this ignition system. Remove the points and condenser and cover the points pushrod hole with the supplied block-off plate with silicone sealant.
 Crank Trigger Electronic Ignition
System with the Self-Contained Dynatek Dyna S Sensor/Module and an Incorporated
High Energy Ignition Coil Fastened on an Angled Aluminum Mounting Plate,
and Locking Set Screw Collar w/Embedded Magnet for Kohler Engine Models KT17
(first design), KT17 Series II, KT19 (first design), KT19 Series II, KT21,
M18 and M20 Competition Pulling Engines Only. Requires 12 volts
DC negative ground of power. Being the aftermarket and OEM Magnum M18 and
M20 solid state electronic armature ignition coils will hold up to around
3,600 RPM, when used at higher RPM, the secondary windings within the coil
tend to overheat, causing the coil to eventually fail. But this custom-made
ignition system helps the engine to rev to its maximum without failing. It
works flawlessly and may outlast the life of the engine. It operates off
the PTO end of the engine and is mainly for competition pulling engines that
have nothing on the PTO end of the crankshaft. The high energy dual-spark
plug wire compact armature ignition coil is fastened above the Dynatek Dyna
S module on a sturdy aluminum mounting plate; cleans up the engine compartment.
IMPORTANT: When ordering, please indicate the
bolt hole spacing (measurement) for mounting the angle bracket to the rear
closure plate on the PTO end of the engine. Or customer can machine their
own adjustable slotted mounting holes. This high performance
ignition system have been thoroughly tested under extreme conditions, and
produces a stable and a very strong spark with the use of
microelectronics, even with the compact armature ignition
coil, helping the engine to start quicker, idle smoothly and rev up to full
RPM with no hesitation whatsoever. The Dynatek Dyna S sensor/module is triggered
by a small magnet embedded in an aluminum locking set screw collar (magnet
ring) that's fastened on the crankshaft. Use this setup for durability when
the solid state armature ignition coil keeps failing for no apparent reason.
All replacement ignition parts are readily available. Simple one wire hook-up;
RED wire on sensor/module connects to
12 volt ignition switch (which connects to the positive (+) battery post).
This ignition system is grounded through the engine. NOTE: For easier setting
of the timing with this electronic ignition module, use a permanent ink marker
(Sharpie,
Magic Marker,
Marks-A-Lot, etc.) on the side of the locking collar in
alignment with the magnet to indicate the location of the magnet. Kit includes:
Dynatek Dyna S sensor/module and high energy dual wire epoxy-encapsulated
armature ignition coil with two molded-in metal core coil-to-spark plug wires
and 90º spark plug terminals/boots fastened on aluminum mounting plate,
and small magnet embedded in an aluminum locking set screw collar (magnet
ring), and new battery ignition OFF-IGNITION-START key switch (do not reuse
OEM Magnum solid state ignition key switch with this system) or momentary
push button starter switch (to crank the engine), OFF-ON toggle switch or
an OFF-ON key switch (for security purposes; to power the ignition) and fully
insulated male and female
slip-on spade crimp-type wire connectors (to easily
connect/disconnect the ignition system to/from the electrical source). Remove
the OEM solid state armature ignition coil and aluminum bracket. They will
serve no purpose with this kit. Use with metal core spark plugs gapped at
.030" each. When the ignition unit is installed and wire(s) correctly connected,
turn the ignition switch on to supply power to the coil, and rotate the flywheel
back and forth by hand so the magnet passes the module and observe for a
strong, "snappy" blue spark at the spark
plug's tip(s). Please specify diameter of crankshaft PTO end for locking
set screw collar w/embedded magnet. IMPORTANT: Use a new copper
core/non-resistor AC Delco, Autolite or Champion spark plug of the correct
type gapped at .025" for longer coil life. Use of
resistor type spark plugs
will void warranty. Coil can withstand high engine vibration. Please
specify diameter of crankshaft PTO end for the
locking set screw collar when ordering.
Click here to learn how to set the ignition
timing on a KT17 (first design), KT17 Series II, KT19 (first design) KT19
Series II, KT21, M18 or M20 engine with crank trigger ignition.
Crank Trigger Electronic Ignition
System with the Self-Contained Dynatek Dyna S Sensor/Module and an Incorporated
High Energy Ignition Coil Fastened on an Angled Aluminum Mounting Plate,
and Locking Set Screw Collar w/Embedded Magnet for Kohler Engine Models KT17
(first design), KT17 Series II, KT19 (first design), KT19 Series II, KT21,
M18 and M20 Competition Pulling Engines Only. Requires 12 volts
DC negative ground of power. Being the aftermarket and OEM Magnum M18 and
M20 solid state electronic armature ignition coils will hold up to around
3,600 RPM, when used at higher RPM, the secondary windings within the coil
tend to overheat, causing the coil to eventually fail. But this custom-made
ignition system helps the engine to rev to its maximum without failing. It
works flawlessly and may outlast the life of the engine. It operates off
the PTO end of the engine and is mainly for competition pulling engines that
have nothing on the PTO end of the crankshaft. The high energy dual-spark
plug wire compact armature ignition coil is fastened above the Dynatek Dyna
S module on a sturdy aluminum mounting plate; cleans up the engine compartment.
IMPORTANT: When ordering, please indicate the
bolt hole spacing (measurement) for mounting the angle bracket to the rear
closure plate on the PTO end of the engine. Or customer can machine their
own adjustable slotted mounting holes. This high performance
ignition system have been thoroughly tested under extreme conditions, and
produces a stable and a very strong spark with the use of
microelectronics, even with the compact armature ignition
coil, helping the engine to start quicker, idle smoothly and rev up to full
RPM with no hesitation whatsoever. The Dynatek Dyna S sensor/module is triggered
by a small magnet embedded in an aluminum locking set screw collar (magnet
ring) that's fastened on the crankshaft. Use this setup for durability when
the solid state armature ignition coil keeps failing for no apparent reason.
All replacement ignition parts are readily available. Simple one wire hook-up;
RED wire on sensor/module connects to
12 volt ignition switch (which connects to the positive (+) battery post).
This ignition system is grounded through the engine. NOTE: For easier setting
of the timing with this electronic ignition module, use a permanent ink marker
(Sharpie,
Magic Marker,
Marks-A-Lot, etc.) on the side of the locking collar in
alignment with the magnet to indicate the location of the magnet. Kit includes:
Dynatek Dyna S sensor/module and high energy dual wire epoxy-encapsulated
armature ignition coil with two molded-in metal core coil-to-spark plug wires
and 90º spark plug terminals/boots fastened on aluminum mounting plate,
and small magnet embedded in an aluminum locking set screw collar (magnet
ring), and new battery ignition OFF-IGNITION-START key switch (do not reuse
OEM Magnum solid state ignition key switch with this system) or momentary
push button starter switch (to crank the engine), OFF-ON toggle switch or
an OFF-ON key switch (for security purposes; to power the ignition) and fully
insulated male and female
slip-on spade crimp-type wire connectors (to easily
connect/disconnect the ignition system to/from the electrical source). Remove
the OEM solid state armature ignition coil and aluminum bracket. They will
serve no purpose with this kit. Use with metal core spark plugs gapped at
.030" each. When the ignition unit is installed and wire(s) correctly connected,
turn the ignition switch on to supply power to the coil, and rotate the flywheel
back and forth by hand so the magnet passes the module and observe for a
strong, "snappy" blue spark at the spark
plug's tip(s). Please specify diameter of crankshaft PTO end for locking
set screw collar w/embedded magnet. IMPORTANT: Use a new copper
core/non-resistor AC Delco, Autolite or Champion spark plug of the correct
type gapped at .025" for longer coil life. Use of
resistor type spark plugs
will void warranty. Coil can withstand high engine vibration. Please
specify diameter of crankshaft PTO end for the
locking set screw collar when ordering.
Click here to learn how to set the ignition
timing on a KT17 (first design), KT17 Series II, KT19 (first design) KT19
Series II, KT21, M18 or M20 engine with crank trigger ignition.
Points Pushrod Hole Block-Off
Plate. Fits Kohler engine models K90/K91, K141, K160/K161,
KV161,
L160/L161, L181,
K181, K241, K301, K321, K341, K361, KT17 (first design), KT17 Series II,
KT19 (first design) KT19 Series II, KT21, K482, K532 and K582. Use this part
to cover points pushrod hole when converting engine to electronic ignition.
(Listed in this website.) Apply RTV silicone sealant to prevent oil leak
and use the OEM ignition points mounting screws to secure plate in place.
A-1 Miller's fabricated part. $10.00 each, plus shipping & handling.
Click here to contact A-1 Miller's for FREE honest and accurate technical support and/or for ordering information and payment options. Please contact A-1 Miller's if you need part(s) and/or service(s) performed that's not listed or mentioned in this website. [Top of Page]
 Replacement Dynatek Dyna S
Sensor/Modules. IMPORTANT: Use with minimum 3.0 ohm coil to prevent burning
up module.
Click here to learn how to check the primary ohms resistance
in a coil. Simple wiring instructions: Connect the
RED wire to the coil positive [+] terminal
(which connects to the ignition switch and battery positive (+) post), and
connect the BLACK wire to the coil negative (–) terminal, and
self-grounding kill switch (pulling tractor). There are no other wire(s)
that connects to the negative (–) terminal on the coil. The mounting
base of the sensor/module is grounded to the engine and negative (–)
battery post.
IMPORTANT
- Use dielectric grease between the module/sensor and aluminum mounting plate
to dissipate the normal operating heat with cool circulating air. And the
module will burn up after a few minutes up if the ignition switch is left
on with the engine not running. To prevent this from possibly happening and/or
for security reasons, use an OFF-ON key switch and/or a
master disconnect switch with a removable
key instead of just a toggle switch to power the ignition system.
To test if the module is good or bad, with an analog or digital
multimeter set on the Ohms resistance, connect one lead to the BLACK
wire and the other lead to the mounting base. If the meter shows no resistance,
the module is good. But if it shows resistance, the module is bad (shorted
out internally). Use with aluminum locking set screw collar w/embedded magnet
(magnet ring; listed below) on PTO end of crankshaft to trigger the spark.
Replacement Dynatek Dyna S
Sensor/Modules. IMPORTANT: Use with minimum 3.0 ohm coil to prevent burning
up module.
Click here to learn how to check the primary ohms resistance
in a coil. Simple wiring instructions: Connect the
RED wire to the coil positive [+] terminal
(which connects to the ignition switch and battery positive (+) post), and
connect the BLACK wire to the coil negative (–) terminal, and
self-grounding kill switch (pulling tractor). There are no other wire(s)
that connects to the negative (–) terminal on the coil. The mounting
base of the sensor/module is grounded to the engine and negative (–)
battery post.
IMPORTANT
- Use dielectric grease between the module/sensor and aluminum mounting plate
to dissipate the normal operating heat with cool circulating air. And the
module will burn up after a few minutes up if the ignition switch is left
on with the engine not running. To prevent this from possibly happening and/or
for security reasons, use an OFF-ON key switch and/or a
master disconnect switch with a removable
key instead of just a toggle switch to power the ignition system.
To test if the module is good or bad, with an analog or digital
multimeter set on the Ohms resistance, connect one lead to the BLACK
wire and the other lead to the mounting base. If the meter shows no resistance,
the module is good. But if it shows resistance, the module is bad (shorted
out internally). Use with aluminum locking set screw collar w/embedded magnet
(magnet ring; listed below) on PTO end of crankshaft to trigger the spark.
 Aluminum
Locking Set Screw Collar w/Embedded Trigger Magnet (Magnet Ring). Use with
Dynatek Dyna S, hall effect electronic ignition module or hall effect proximity
sensors. When ordering, please specify diameter of crankshaft PTO end or
shaft it's to be mounted on. Most common Kohler crankshaft PTO end diameters
are 1", 1-1/8", but 3/4", 1-1/4", 1-3/8", 1-7/16" and 1-1/2" are rare. Most
billet steel crankshafts have a 1-1/2" diameter PTO end (raised shoulder).
NOTE: For easier setting of the timing with the electronic ignition module,
use a permanent ink marker
(Sharpie,
Magic Marker,
Marks-A-Lot, etc.) on the side of the locking collar in
alignment with the magnet to indicate the location of the magnet. Other sizes
available. $30.00 each, plus shipping & handling. Please
let me know if you're interested in purchasing this
part and I'll give you the total amount with shipping and payment options.
[Return to previous section]
Aluminum
Locking Set Screw Collar w/Embedded Trigger Magnet (Magnet Ring). Use with
Dynatek Dyna S, hall effect electronic ignition module or hall effect proximity
sensors. When ordering, please specify diameter of crankshaft PTO end or
shaft it's to be mounted on. Most common Kohler crankshaft PTO end diameters
are 1", 1-1/8", but 3/4", 1-1/4", 1-3/8", 1-7/16" and 1-1/2" are rare. Most
billet steel crankshafts have a 1-1/2" diameter PTO end (raised shoulder).
NOTE: For easier setting of the timing with the electronic ignition module,
use a permanent ink marker
(Sharpie,
Magic Marker,
Marks-A-Lot, etc.) on the side of the locking collar in
alignment with the magnet to indicate the location of the magnet. Other sizes
available. $30.00 each, plus shipping & handling. Please
let me know if you're interested in purchasing this
part and I'll give you the total amount with shipping and payment options.
[Return to previous section]
Click here to contact A-1 Miller's for FREE honest and accurate technical support and/or for ordering information and payment options. Please contact A-1 Miller's if you need part(s) and/or service(s) performed that's not listed or mentioned in this website. [Top of Page] [Return to previous paragraph, section or website]
How to Test for Spark and Set the Timing for the electronic ignition
sensor/modules - After either setup is installed on the engine and
electricity is supplied, simply rotate the locking set screw collar w/embedded
magnet (loose) on the crankshaft back and forth by hand. Each time the embedded
detector/trigger magnet passes the sensor/module, spark should occur. NOTE:
Do not use a
battery charger alone for power to perform this test. Battery
chargers constantly switch between high and low voltage at 60 cycles per
second, and the module sees this as the ignition being switched on and off,
resulting in a continuous array of sparks.
A simple and precise way to set the ignition timing STATICALLY (engine not running) for either sensor/module -
How to accurately set the ignition timing STATICALLY for the Electronic Ignition Module or Inductive 3-Wire Proximity sensor/module - (This is also how to test if the sensor/modules or the ignition system is functioning or not.)
How to precisely set the ignition timing DYNAMICALLY (engine running) using an automotive inductive timing light for either sensor/module. (This is the most accurate way to set the timing.) NOTE: Timing can be checked, but not set while the engine is running! Do not allow sensor/module to make contact with the locking set screw collar w/embedded magnet while engine is running! -
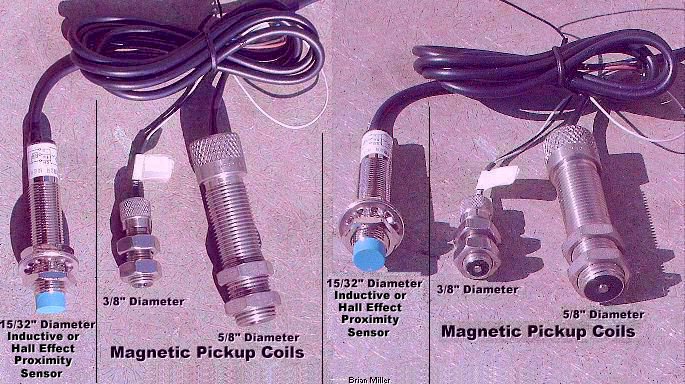 Magnetic pickup coils
and round-shaped proximity sensors are very sensitive to mechanical damage
(and electrical damage if connected wrong). For
magnetic pickup coils, set the air gap/clearance from
the detectable target (screw, pin or small raised area on the rotating disc)
at .010"-.060" with a brass
feeler gauge. And being 3-wire inductive
proximity sensors have a farther detection range, set the air gap/clearance
of .010"-.188". If the gap is wider than .188" (3/16") with either sensor,
the ignition system may not produce a spark or the engine may misfire at
higher RPM. And to prevent the possibility of an out of time spark, the
detectable target needs to be a minimum of 3/16" higher than or above the
circumference surface of the rough casting on a steel disc or cast iron flywheel.
Direct metal contact with either sensor could damage them! When
in doubt if a sensor is mechanically damaged, look at the end of it with
the strong magnifying glass to see any damage. If it is damaged, it needs
to be replaced. A magnetic pickup coil can be tested with a digital
multimeter set on 200m DC, with the negative lead of the meter on the white
wire of the pickup coil and positive lead on the black wire, then pass a
small steel screw or bolt over the end of the magnetic pickup coil. If the
meter shows a reading, the pickup coil is in good condition.
Magnetic pickup coils
and round-shaped proximity sensors are very sensitive to mechanical damage
(and electrical damage if connected wrong). For
magnetic pickup coils, set the air gap/clearance from
the detectable target (screw, pin or small raised area on the rotating disc)
at .010"-.060" with a brass
feeler gauge. And being 3-wire inductive
proximity sensors have a farther detection range, set the air gap/clearance
of .010"-.188". If the gap is wider than .188" (3/16") with either sensor,
the ignition system may not produce a spark or the engine may misfire at
higher RPM. And to prevent the possibility of an out of time spark, the
detectable target needs to be a minimum of 3/16" higher than or above the
circumference surface of the rough casting on a steel disc or cast iron flywheel.
Direct metal contact with either sensor could damage them! When
in doubt if a sensor is mechanically damaged, look at the end of it with
the strong magnifying glass to see any damage. If it is damaged, it needs
to be replaced. A magnetic pickup coil can be tested with a digital
multimeter set on 200m DC, with the negative lead of the meter on the white
wire of the pickup coil and positive lead on the black wire, then pass a
small steel screw or bolt over the end of the magnetic pickup coil. If the
meter shows a reading, the pickup coil is in good condition.
 Magnetic Pickup Coils
for A-1 Miller's custom-made flywheel-
or crank-trigger electronic ignition
systems. All magnetic pickup coils are Normally Open, and isolated from the
mounting bracket, so a steel bracket can be used. Either can be used with
the high-output/performance GM 4-pin HEI module w/1.0 ohm coil, or with the
Chrysler or Ford electronic ignition control module/units. Self-generating
power. Detects head of small ferrous metal (steel) screw or bolt fastened
to rotating disc or flywheel to generate electricity in the magnetic pickup
coil. Install screw head extended minimum 3/16" higher than or above the
surface of the [cast iron or steel] flywheel to prevent an out of time spark
occurrence by the flywheel itself. Wide operating temperature range.
epoxy-encapsulated, mechanically rugged. Impervious to dirt, oil and water.
No maintenance required. Durable metal shielded threads with two
jam nuts.
Please specify size when ordering. Can be used with a steel bracket without
interference of magnetism. By the way - The magnetic pickup coils below work
exactly the same. There is absolutely no difference in performance.
Set the air gap/clearance from the detectable target (screw, pin or small
raised area on the rotating disc) at .010"-.020" with a
brass
feeler gauge.
Click/tap here for wiring diagrams.
Magnetic Pickup Coils
for A-1 Miller's custom-made flywheel-
or crank-trigger electronic ignition
systems. All magnetic pickup coils are Normally Open, and isolated from the
mounting bracket, so a steel bracket can be used. Either can be used with
the high-output/performance GM 4-pin HEI module w/1.0 ohm coil, or with the
Chrysler or Ford electronic ignition control module/units. Self-generating
power. Detects head of small ferrous metal (steel) screw or bolt fastened
to rotating disc or flywheel to generate electricity in the magnetic pickup
coil. Install screw head extended minimum 3/16" higher than or above the
surface of the [cast iron or steel] flywheel to prevent an out of time spark
occurrence by the flywheel itself. Wide operating temperature range.
epoxy-encapsulated, mechanically rugged. Impervious to dirt, oil and water.
No maintenance required. Durable metal shielded threads with two
jam nuts.
Please specify size when ordering. Can be used with a steel bracket without
interference of magnetism. By the way - The magnetic pickup coils below work
exactly the same. There is absolutely no difference in performance.
Set the air gap/clearance from the detectable target (screw, pin or small
raised area on the rotating disc) at .010"-.020" with a
brass
feeler gauge.
Click/tap here for wiring diagrams.
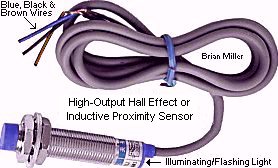 Round 3-Wire Inductive Proximity
Sensors listed below for crank-trigger and flywheel-triggered ignition
systems or other types of electronic systems. Recommended for use with the
GM HEI, Chrysler or Ford electronic ignition control module/units. Wide operating
temperature range. epoxy-encapsulated, mechanically rugged. Impervious to
dirt, oil and water. No maintenance required. Sensors are capable of powering
crank-trigger or flywheel-triggered ignition and digital
tachometer at the same time. Durable metal shielded
threads with two stainless steel thin
jam nuts
and three, 10 foot long wire leads. Dimensions of each item below: 15/32"
(12mm) diameter x 1-3/8" thread length. Some proximity sensors have an LED
(Light Emitting Diode) on the rear of unit. If the proximity sensor is wired
incorrectly, the LED will stay on and go off when activated.
PNP = Positive/Neutral/Positive. NPN = Neutral/Positive/Neutral.
Positive is when connection is made. Neutral is when connection is not made.
NOTE: Set air gap/clearance at .010" - .188". Direct metal contact
with either sensor will damage them. And if the gap is wider than specified,
the engine could misfire at higher RPM. To prevent the possibility of an
out of time spark, the detectable target needs to be a minimum of 3/16" higher
than or above the circumference surface of a steel or cast iron rotating
disc or flywheel.
Click/tap here
for wiring diagrams. [Return to
previous section]
Round 3-Wire Inductive Proximity
Sensors listed below for crank-trigger and flywheel-triggered ignition
systems or other types of electronic systems. Recommended for use with the
GM HEI, Chrysler or Ford electronic ignition control module/units. Wide operating
temperature range. epoxy-encapsulated, mechanically rugged. Impervious to
dirt, oil and water. No maintenance required. Sensors are capable of powering
crank-trigger or flywheel-triggered ignition and digital
tachometer at the same time. Durable metal shielded
threads with two stainless steel thin
jam nuts
and three, 10 foot long wire leads. Dimensions of each item below: 15/32"
(12mm) diameter x 1-3/8" thread length. Some proximity sensors have an LED
(Light Emitting Diode) on the rear of unit. If the proximity sensor is wired
incorrectly, the LED will stay on and go off when activated.
PNP = Positive/Neutral/Positive. NPN = Neutral/Positive/Neutral.
Positive is when connection is made. Neutral is when connection is not made.
NOTE: Set air gap/clearance at .010" - .188". Direct metal contact
with either sensor will damage them. And if the gap is wider than specified,
the engine could misfire at higher RPM. To prevent the possibility of an
out of time spark, the detectable target needs to be a minimum of 3/16" higher
than or above the circumference surface of a steel or cast iron rotating
disc or flywheel.
Click/tap here
for wiring diagrams. [Return to
previous section]
Please let me know if you're interested in purchasing either of the above and I'll give you the total amount with shipping and payment options.
Detectable Steel Target Screw
w/Magnet and Protective Rubber Washer for Small Engines with A-1 Miller's
Custom Flywheel-Triggered Electronic Ignition System with the self-contained
hall effect electronic ignition sensor/module. Head of screw becomes
magnetized. Fasten on rotating disc, edge of flywheel or backside of flywheel
(in the case of an Onan twin cylinder engine) when using a 3-wire hall effect
proximity sensor or hall effect electronic ignition sensor/module to trigger
the spark. 8-32 UNC x 1/2" length hardened steel Phillips head screw.
Click/tap here to learn
how to professionally cut new threads. Weighs about 1/10 oz. / 2 grams.
NOTE: The rubber washer prevents the delicate magnet from possibly breaking
when lightly fastened against the uneven rough casting of the flywheel.
IMPORTANT: To prevent from possibly loosening, secure screw in flywheel or
rotating disc with
high strength liquid threadlocker
(Red Loctite, Permatex or equivalent). Tighten
screw just when the rubber begin to bulge, and allow the Loctite to dry and
harden overnight. The hall effect electronic ignition sensor/module is activated
by the South pole of the magnet, so do not remove the magnet from the
screw!
 Detectable Steel Target Screw
w/Magnet and Protective Rubber Washer for Tecumseh engine models VH80, VH100,
HH80, HH100, HH120, OH120, OH140, OH150, OH160 and OH180 with a gear
starter that have a failed OEM Solid State Ignition Module or Other Make
and Model of Small Engine with A-1 Miller's Custom Flywheel-Triggered Electronic
Ignition System with the Dynatek Dyna S or self-contained hall effect electronic
ignition sensor/module. Head of screw becomes magnetized. To use this
part on a Tecumseh engine, remove both firing pins from the flywheel, and
install this part in place of the short pin (about 17º BTDC
position). Fasten on rotating disc, edge of flywheel or backside of flywheel
(in the case of an Onan twin cylinder engine) when using a 3-wire hall effect
proximity sensor or hall effect electronic ignition sensor/module to trigger
the spark. 12-24 UNC x 3/4" length hardened steel Phillips head screw.
Click/tap here to learn
how to professionally cut new threads. Weighs about 1/10 oz. / 2 grams.
NOTE: The rubber washer prevents the delicate magnet from possibly breaking
when lightly fastened against the uneven rough casting of the flywheel.
IMPORTANT: To prevent from possibly loosening, secure screw in flywheel or
rotating disc with
high strength liquid threadlocker
(Red Loctite, Permatex or equivalent). Tighten
screw just when the rubber begin to bulge, and allow the Loctite to dry and
harden overnight. The hall effect electronic ignition sensor/module is activated
by the South pole of the magnet, so do not remove the magnet from the
screw!
Detectable Steel Target Screw
w/Magnet and Protective Rubber Washer for Tecumseh engine models VH80, VH100,
HH80, HH100, HH120, OH120, OH140, OH150, OH160 and OH180 with a gear
starter that have a failed OEM Solid State Ignition Module or Other Make
and Model of Small Engine with A-1 Miller's Custom Flywheel-Triggered Electronic
Ignition System with the Dynatek Dyna S or self-contained hall effect electronic
ignition sensor/module. Head of screw becomes magnetized. To use this
part on a Tecumseh engine, remove both firing pins from the flywheel, and
install this part in place of the short pin (about 17º BTDC
position). Fasten on rotating disc, edge of flywheel or backside of flywheel
(in the case of an Onan twin cylinder engine) when using a 3-wire hall effect
proximity sensor or hall effect electronic ignition sensor/module to trigger
the spark. 12-24 UNC x 3/4" length hardened steel Phillips head screw.
Click/tap here to learn
how to professionally cut new threads. Weighs about 1/10 oz. / 2 grams.
NOTE: The rubber washer prevents the delicate magnet from possibly breaking
when lightly fastened against the uneven rough casting of the flywheel.
IMPORTANT: To prevent from possibly loosening, secure screw in flywheel or
rotating disc with
high strength liquid threadlocker
(Red Loctite, Permatex or equivalent). Tighten
screw just when the rubber begin to bulge, and allow the Loctite to dry and
harden overnight. The hall effect electronic ignition sensor/module is activated
by the South pole of the magnet, so do not remove the magnet from the
screw!
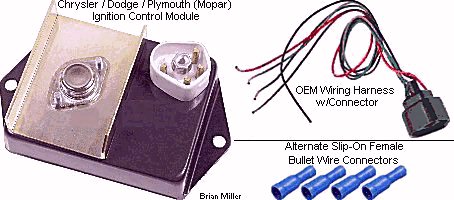 New High Quality Chrysler/Dodge/Plymouth (MOPAR) Electronic
Ignition Control Module/Unit for a custom crank- or flywheel-triggered electronic
ignition to use with virtually any small gas engine, automotive, and virtually
any gas engine. Requires 12 volts DC negative ground of power and a minimum
1.2 ohm ballast resistor to prevent burning up this module.
Click/tap here to learn how to check the ohm
resistance in a ballast resistor. This module can be used with the magnetic
pickup coil or proximity sensor and virtually any ignition coil, regardless
of the ohm resistance or voltage output, for a very strong spark (even with
a stock coil), which will produce a stronger spark to help the engine to
start quicker, idle smoothly and rev up to full RPM with no hesitation
whatsoever. Allows a stock coil to perform like a high performance coil without
shortening the life of the coil. A metal core spark plug wire and copper
core/non-resistor spark plug should be used with virtually any ignition system
to guarantee a strong spark and from burning up the coil.
Click/tap here to learn how to check the ohm
resistance in a spark plug wire. Actual weight of module: 14 oz.
Click/tap here for wiring diagrams.
$20.00 each, plus shipping & handling.
New High Quality Chrysler/Dodge/Plymouth (MOPAR) Electronic
Ignition Control Module/Unit for a custom crank- or flywheel-triggered electronic
ignition to use with virtually any small gas engine, automotive, and virtually
any gas engine. Requires 12 volts DC negative ground of power and a minimum
1.2 ohm ballast resistor to prevent burning up this module.
Click/tap here to learn how to check the ohm
resistance in a ballast resistor. This module can be used with the magnetic
pickup coil or proximity sensor and virtually any ignition coil, regardless
of the ohm resistance or voltage output, for a very strong spark (even with
a stock coil), which will produce a stronger spark to help the engine to
start quicker, idle smoothly and rev up to full RPM with no hesitation
whatsoever. Allows a stock coil to perform like a high performance coil without
shortening the life of the coil. A metal core spark plug wire and copper
core/non-resistor spark plug should be used with virtually any ignition system
to guarantee a strong spark and from burning up the coil.
Click/tap here to learn how to check the ohm
resistance in a spark plug wire. Actual weight of module: 14 oz.
Click/tap here for wiring diagrams.
$20.00 each, plus shipping & handling.
New 1.6 ohm Ballast Resistor for use with Chrysler module (listed above) to prevent burning up unit. $8.00 each, plus shipping & handling.
 New High Quality
Ford/Mercury/Lincoln Electronic Ignition Control Module/Unit for a custom
crank- or flywheel-triggered electronic ignition to use with virtually any
small engine or automotive engine. Requires 12 volts DC negative ground of
power and no ballast resistor. This module can be used with the magnetic
pickup coil or proximity sensor and virtually any ignition coil, regardless
of the ohm resistance or voltage output for a very strong spark, and will
produce a stronger spark to help the engine to start quicker, idle smoothly
and rev up to full RPM with no hesitation whatsoever. Allows a stock coil
to perform like a high performance coil without shortening the life of the
coil. A metal core spark plug wire and copper core/non-resistor spark plug
should be used with virtually any ignition system to guarantee a strong spark
and from burning up the coil. Click/tap here
to learn how to check the ohm resistance in a spark plug wire. Actual
weight of module: 1 lb. 7 oz. Click/tap here
for wiring diagrams. Please let me know if you're
interested in purchasing this part and I'll give you the total amount with
shipping and payment options.
New High Quality
Ford/Mercury/Lincoln Electronic Ignition Control Module/Unit for a custom
crank- or flywheel-triggered electronic ignition to use with virtually any
small engine or automotive engine. Requires 12 volts DC negative ground of
power and no ballast resistor. This module can be used with the magnetic
pickup coil or proximity sensor and virtually any ignition coil, regardless
of the ohm resistance or voltage output for a very strong spark, and will
produce a stronger spark to help the engine to start quicker, idle smoothly
and rev up to full RPM with no hesitation whatsoever. Allows a stock coil
to perform like a high performance coil without shortening the life of the
coil. A metal core spark plug wire and copper core/non-resistor spark plug
should be used with virtually any ignition system to guarantee a strong spark
and from burning up the coil. Click/tap here
to learn how to check the ohm resistance in a spark plug wire. Actual
weight of module: 1 lb. 7 oz. Click/tap here
for wiring diagrams. Please let me know if you're
interested in purchasing this part and I'll give you the total amount with
shipping and payment options.
Reliable and Durable Tachometers and Hour Meter [Return to Previous Section, Paragraph or Website]
 High Quality, Reliable and
Durable Inductive Small Engine Tachometer and Hour Meter with Replaceable
Battery. A tachometer is required for monitoring and/or setting the maximum
speed of a small engine, which is normally 3,200 or 3,600 RPM (depending
on type of carburetor), to prevent from over-revving and possible damage
to the engine or dangerous flywheel explosion. Very accurate, vibration-proof
and weatherproof construction. Can be surface-mounted and secured with two
screws to monitor engine RPM, or hand-held to set engine RPM. Large 3/8 inch
LCD display. Works with magneto or battery-powered ignition systems by selecting
engine type by programming S1 and S2 buttons. If tachometer does not turn
on automatically as soon as engine starts, press and hold the two buttons
at the same time. Instructions included. Reads up to 99,999 RPM. Hour
meter reads up to 9999:59 hours/minutes. Programmable maintenance hour setting
with service icon, a service reminder when to change oil or other maintenance.
Can be manually reset to Zero hours. Easy installation: Single wire wraps
around spark plug wire and secured with two supplied nylon zip-ties. No wire
terminal connections required. Includes replaceable CR2450 battery. Dimensions:
2" wide x 1-3/4" depth x 3/4" height. $25.00 each, plus shipping &
handling. Please let me know if you're interested
in purchasing this item and I'll give you the total amount with shipping
and payment options.
High Quality, Reliable and
Durable Inductive Small Engine Tachometer and Hour Meter with Replaceable
Battery. A tachometer is required for monitoring and/or setting the maximum
speed of a small engine, which is normally 3,200 or 3,600 RPM (depending
on type of carburetor), to prevent from over-revving and possible damage
to the engine or dangerous flywheel explosion. Very accurate, vibration-proof
and weatherproof construction. Can be surface-mounted and secured with two
screws to monitor engine RPM, or hand-held to set engine RPM. Large 3/8 inch
LCD display. Works with magneto or battery-powered ignition systems by selecting
engine type by programming S1 and S2 buttons. If tachometer does not turn
on automatically as soon as engine starts, press and hold the two buttons
at the same time. Instructions included. Reads up to 99,999 RPM. Hour
meter reads up to 9999:59 hours/minutes. Programmable maintenance hour setting
with service icon, a service reminder when to change oil or other maintenance.
Can be manually reset to Zero hours. Easy installation: Single wire wraps
around spark plug wire and secured with two supplied nylon zip-ties. No wire
terminal connections required. Includes replaceable CR2450 battery. Dimensions:
2" wide x 1-3/4" depth x 3/4" height. $25.00 each, plus shipping &
handling. Please let me know if you're interested
in purchasing this item and I'll give you the total amount with shipping
and payment options.
 High Quality, Reliable and
Durable Digital Tachometer/Proximity Sensor Kits. A tachometer is required
in setting the correct engine RPM, which is normally 3,200 or 3,600 RPM
(depending on type of carburetor), to prevent from over-revving and possible
damage to the engine or dangerous flywheel explosion. Choice of a
RED or
BLUE numeric display. Will work with
most small engines or multi-cylinder automotive engines, gas or diesel. Very
accurate, vibration-proof and weatherproof construction. The great thing
about this type of tachometer is that it needs no setup or programming. Displays
accurate RPM as soon as the engine cranks over to start. Displays up to 9,999
RPM. Tachometer returns to zero [0000] when engine is shut down. Can be used
for lawn & garden equipment or competition pulling engines. Designed
to be permanently mounted to monitor engine RPM at all times. Tachometer
can be in-dash or panel-mounted. This precision digital tachometer operates
with external power and on the same principle as my
flywheel- or
crank-trigger ignition systems with a proximity sensor to detect the
target, which can be a small ferrous steel screw or pin, or magnet in a rotating
disc on the crankshaft or on/in flywheel. Operates totally independent of
the ignition system, or can be used with crank trigger ignition with the
same proximity sensor. Sensor is capable of powering this digital tachometer
and crank-trigger ignition module at the same time, with the exception of
using the electronic ignition modules. This tachometer must be wired separately
or wiring can be incorporated with my crank-trigger ignition system that
use a proximity sensor. A sturdy metal bracket will need to be fabricated
by customer to mount the sensor in close proximity of the detector/trigger
target. Set air gap/clearance at .010"-.188". Tachometer works with 8-24
volts DC, proximity sensor works with 6-36 volts DC. Dimensions for mounting
hole for tachometer: 3" wide x 1-17/32" wide. Tachometer measures 1" in depth.
Dimensions of proximity sensor: 15/32" diameter threads x 1-3/8" thread length.
Wiring Instructions: #1 wire on tachometer connects to
BROWN wire on proximity sensor and ignition
switch (12 volt power), #2 wire on tachometer connects to
BLUE wire on proximity sensor and
engine/chassis ground (which connects to the negative (–) battery post),
and #5 wire on tachometer connects to BLACK wire on either proximity
sensor listed below. Wires #3 and #4 connects to nothing. Wiring is the same
for the hall effect and inductive proximity sensors. Certain proximity sensors
have an LED (Light Emitting Diode), which flashes when in close proximity
of target. If the proximity sensor is wired incorrectly, the LED will illuminate
at all times.
Click or tap here for YouTube videos to see how well this
tachometer works.
High Quality, Reliable and
Durable Digital Tachometer/Proximity Sensor Kits. A tachometer is required
in setting the correct engine RPM, which is normally 3,200 or 3,600 RPM
(depending on type of carburetor), to prevent from over-revving and possible
damage to the engine or dangerous flywheel explosion. Choice of a
RED or
BLUE numeric display. Will work with
most small engines or multi-cylinder automotive engines, gas or diesel. Very
accurate, vibration-proof and weatherproof construction. The great thing
about this type of tachometer is that it needs no setup or programming. Displays
accurate RPM as soon as the engine cranks over to start. Displays up to 9,999
RPM. Tachometer returns to zero [0000] when engine is shut down. Can be used
for lawn & garden equipment or competition pulling engines. Designed
to be permanently mounted to monitor engine RPM at all times. Tachometer
can be in-dash or panel-mounted. This precision digital tachometer operates
with external power and on the same principle as my
flywheel- or
crank-trigger ignition systems with a proximity sensor to detect the
target, which can be a small ferrous steel screw or pin, or magnet in a rotating
disc on the crankshaft or on/in flywheel. Operates totally independent of
the ignition system, or can be used with crank trigger ignition with the
same proximity sensor. Sensor is capable of powering this digital tachometer
and crank-trigger ignition module at the same time, with the exception of
using the electronic ignition modules. This tachometer must be wired separately
or wiring can be incorporated with my crank-trigger ignition system that
use a proximity sensor. A sturdy metal bracket will need to be fabricated
by customer to mount the sensor in close proximity of the detector/trigger
target. Set air gap/clearance at .010"-.188". Tachometer works with 8-24
volts DC, proximity sensor works with 6-36 volts DC. Dimensions for mounting
hole for tachometer: 3" wide x 1-17/32" wide. Tachometer measures 1" in depth.
Dimensions of proximity sensor: 15/32" diameter threads x 1-3/8" thread length.
Wiring Instructions: #1 wire on tachometer connects to
BROWN wire on proximity sensor and ignition
switch (12 volt power), #2 wire on tachometer connects to
BLUE wire on proximity sensor and
engine/chassis ground (which connects to the negative (–) battery post),
and #5 wire on tachometer connects to BLACK wire on either proximity
sensor listed below. Wires #3 and #4 connects to nothing. Wiring is the same
for the hall effect and inductive proximity sensors. Certain proximity sensors
have an LED (Light Emitting Diode), which flashes when in close proximity
of target. If the proximity sensor is wired incorrectly, the LED will illuminate
at all times.
Click or tap here for YouTube videos to see how well this
tachometer works.
Aluminum Locking Set Screw Collar
w/Embedded Trigger Magnet. Use with hall effect proximity sensors only.
$15.00 each, plus shipping & handling.

Available Soon - Detailed Illustrated Plans on How to Construct a Professional Pull-Back and Self-Propelled Garden Tractor/Small Wheel Mini Rod Pulling Sleds (Weight Transfer Machines) - [Top of Page]
 FYI - I'm getting closer to
completing my sled plans. But being I have lots of work to do in my shop,
I work on designing my sled plans in my spare time. As soon as my plans with
an inventory list of parts to use and with illustrations are perfected, I'll
post the announcement in my websites. And as for prices of the pull-back
sled and self-propelled sled plans, I'm not sure yet. Make me an offer and
I'll consider it. And remember - Perfection takes time. If it's worth having,
it's worth waiting for. It'll be money well spent. Contact
information below.
FYI - I'm getting closer to
completing my sled plans. But being I have lots of work to do in my shop,
I work on designing my sled plans in my spare time. As soon as my plans with
an inventory list of parts to use and with illustrations are perfected, I'll
post the announcement in my websites. And as for prices of the pull-back
sled and self-propelled sled plans, I'm not sure yet. Make me an offer and
I'll consider it. And remember - Perfection takes time. If it's worth having,
it's worth waiting for. It'll be money well spent. Contact
information below.
Complete Narrowed Automotive Rear End/Differential for Use in Garden Tractor Pulling Sled - [Top of Page]
Details Include -
 When connected to an automotive
3- or 4-speed manual transmission, this narrowed rear end controls the movement
of the weight box in a garden tractor pulling sled (weight transfer machine).
When connected to an automotive
3- or 4-speed manual transmission, this narrowed rear end controls the movement
of the weight box in a garden tractor pulling sled (weight transfer machine).
 To place an order, send your item(s) for repairing, and/or
for customer service assistance, and FREE honest and accurate technical support,
please contact: A-1 Miller's Performance Enterprises, 12091 N Route B,
Hallsville, MO (Missouri) 65255-9604 USA. Please call in your order or send
an email with a list parts you need and your contact information.
To place an order, send your item(s) for repairing, and/or
for customer service assistance, and FREE honest and accurate technical support,
please contact: A-1 Miller's Performance Enterprises, 12091 N Route B,
Hallsville, MO (Missouri) 65255-9604 USA. Please call in your order or send
an email with a list parts you need and your contact information.
 Phone: 1-573-881-7229 (cell;
call, text or leave voicemail). Please call Monday-Friday, 9am to 5pm, Central
time zone, except holidays. If no answer, please try again later.
Phone: 1-573-881-7229 (cell;
call, text or leave voicemail). Please call Monday-Friday, 9am to 5pm, Central
time zone, except holidays. If no answer, please try again later.
 E-mail:
pullingtractor@aol.com. A-1 Miller's
shop is open to the public Monday-Friday, 9am to 5pm, Central time zone,
with an appointment on weekends, except holidays. If you're the kind of person
who don't trust delivery/shipping companies (mis)handling your high-dollar
and fragile merchandise, you can make the long drive to A-1 Miller's new
shop (click image to the right) to personally purchase parts, or drop off
and/or pick up your carburetor, clutch assembly, and/or other parts for repairing
and/or rebuilding. Or visit our new shop to drop off your parts. Please contact
us before coming so we'll be at our shop waiting for your arrival. When you
visit our shop, you will be dealing directly with the owner for the best
customer service. "The road to a [trusted] friend's house (or shop) is
never long." Don't sacrifice quality workmanship for distance.
Payment Options below.
Photos
of our new building/shop are posted here!
12091 N Route B, Hallsville, MO - Google Maps.
[Return To Previous Paragraph, Section
or Website]
E-mail:
pullingtractor@aol.com. A-1 Miller's
shop is open to the public Monday-Friday, 9am to 5pm, Central time zone,
with an appointment on weekends, except holidays. If you're the kind of person
who don't trust delivery/shipping companies (mis)handling your high-dollar
and fragile merchandise, you can make the long drive to A-1 Miller's new
shop (click image to the right) to personally purchase parts, or drop off
and/or pick up your carburetor, clutch assembly, and/or other parts for repairing
and/or rebuilding. Or visit our new shop to drop off your parts. Please contact
us before coming so we'll be at our shop waiting for your arrival. When you
visit our shop, you will be dealing directly with the owner for the best
customer service. "The road to a [trusted] friend's house (or shop) is
never long." Don't sacrifice quality workmanship for distance.
Payment Options below.
Photos
of our new building/shop are posted here!
12091 N Route B, Hallsville, MO - Google Maps.
[Return To Previous Paragraph, Section
or Website]
Payment Options, and We Ship to Canada and
Worldwide 
Item(s) in a package or cushioned envelope weighing less than 1 lb. is sent
by US Postal Service Airmail Letter Post for a 4-7 days delivery. Packaged
item(s) weighing over 1 lb. and up to 66 lb. is sent by US Postal Service
Airmail Parcel Post for a 4-10 days delivery. I cannot use the US Postal
Services' Flat Rate Priority Mail envelopes and boxes to ship outside U.S.
territories. Item(s) weighing over 67 lbs. or more is sent by FedEx Ground
or equivalent services. We try to keep our shipping cost to customers within
reason. Therefore, we don't ship our products in a fancy-looking package
with our company name and/or logo on it because most customers will just
toss it in the trash after they remove the contents. And being there is no
USPS tracking number outside the US, all I can do is make sure I write your
address correctly on the customs form and on your package.
My websites are not set up to process orders and accept payments. Therefore, to place an order with me, please call either number above or send an email with a list of parts you need, with your name, complete and correct postal mailing address and phone number. For payment options, I accept cash (in person), USPS Postal Money Orders, cashier's checks, business checks, MasterCard, VISA, Discover, American Express (please add 2.5% to the total amount for the credit/debit card processor's surcharge). If paying with a credit/debit card, please call me at either number above. Or to make a payment to me through PayPal, please click this link: https://www.paypal.com. Or use Cash App (username: pullingtractor) or Venmo (username: Pullingtractor) to make a payment to me. And be sure to mention a description of what the payment is for with your full name, postal address, phone number and email address. If sending a money order or cashier's check, please include a note in the envelope with your name, complete mailing address, phone number, email address and a description of what the payment is for. I'll make a note of your order when I have all your information, and I may have to order some of the parts on your list, which should take a few days to come in, but I will send everything to you as soon as I have the parts in stock after I receive your payment.


Return To Previous Website | Top of Page | Copyright © 1996-Present. This website created, designed and maintained by A-1 Miller's Performance Enterprises

 Stainless Steel Points Pushrod.
Fits Kohler K141, K160/K161,
Stainless Steel Points Pushrod.
Fits Kohler K141, K160/K161,
 Flared-End Stainless Steel Points Pushrod. Fits Kohler K141,
K160/K161,
Flared-End Stainless Steel Points Pushrod. Fits Kohler K141,
K160/K161,  Stainless Steel Points Pushrod.
Fits K90/K91, K241, K301, K321, K341, K361, K482, K532 and K582 engines.
OEM Kohler part # 47 411 04-S (was 46 411 01-S). $22.10 each, plus
shipping & handling.
Stainless Steel Points Pushrod.
Fits K90/K91, K241, K301, K321, K341, K361, K482, K532 and K582 engines.
OEM Kohler part # 47 411 04-S (was 46 411 01-S). $22.10 each, plus
shipping & handling.
 Flared-End Stainless Steel Points Pushrod. Fits K90/K91, K241,
K301, K321, K341, K361, K482, K532 and K582 engines. Use for a worn groove
in points lobe on camshaft or governor shaft. Makes contact with unworn sides
or areas of points lobe so ignition timing can be fully advanced to 20º
BTDC. NOTE: Entire engine must be completely disassembled, and install
this part from inside crankcase or governor assembly. A-1 Miller's high
quality aftermarket part. $20.00 each, plus shipping & handling.
Flared-End Stainless Steel Points Pushrod. Fits K90/K91, K241,
K301, K321, K341, K361, K482, K532 and K582 engines. Use for a worn groove
in points lobe on camshaft or governor shaft. Makes contact with unworn sides
or areas of points lobe so ignition timing can be fully advanced to 20º
BTDC. NOTE: Entire engine must be completely disassembled, and install
this part from inside crankcase or governor assembly. A-1 Miller's high
quality aftermarket part. $20.00 each, plus shipping & handling.
 Thin-Wall Brass Sleeve Bushing
for Points Pushrod. Use this to repair worn 3/16" points pushrod hole in
governor assembly for Kohler engine models K482, K532 and K582. To install,
the points pushrod hole will need to be precision-aligned bored (enlarged)
exactly to .218" with a chucking reamer for a press-fit installation. Dimensions:
3/16" I.D. x 7/32" O.D. x 5/8" length. $4.00 each, plus shipping &
handling.
Thin-Wall Brass Sleeve Bushing
for Points Pushrod. Use this to repair worn 3/16" points pushrod hole in
governor assembly for Kohler engine models K482, K532 and K582. To install,
the points pushrod hole will need to be precision-aligned bored (enlarged)
exactly to .218" with a chucking reamer for a press-fit installation. Dimensions:
3/16" I.D. x 7/32" O.D. x 5/8" length. $4.00 each, plus shipping &
handling.
 "Ready to Install"
Points-to-Ignition Coil Wire Kits. Replace OEM wire with frayed/cracked
insulation and/or broken connector(s) to prevent a short circuit and/or engine
misfire. Or use this when converting from Breakerless Ignition to points
and condenser ignition. Fits Kohler engines with battery-powered ignition,
models K90/K91, K141, K160/K161,
"Ready to Install"
Points-to-Ignition Coil Wire Kits. Replace OEM wire with frayed/cracked
insulation and/or broken connector(s) to prevent a short circuit and/or engine
misfire. Or use this when converting from Breakerless Ignition to points
and condenser ignition. Fits Kohler engines with battery-powered ignition,
models K90/K91, K141, K160/K161,
 Low Capacity Ignition
Condenser/
Low Capacity Ignition
Condenser/
 Medium Capacity Ignition
Condensers/
Medium Capacity Ignition
Condensers/ Medium Capacity Ignition
Condensers/
Medium Capacity Ignition
Condensers/ High Capacity/Performance
Ignition
Condenser/
High Capacity/Performance
Ignition
Condenser/ OEM Kohler condenser clamp w/9/32"
mounting hole. Allows high-output/performance condenser (listed above) be
mounted next to coil with one of coil's mounting bracket bolts. Or could
be used as a wire clamp for bundle of wires. Used and in excellent condition.
Irrelevant Kohler part number. $2.00 each, plus shipping & handling.
OEM Kohler condenser clamp w/9/32"
mounting hole. Allows high-output/performance condenser (listed above) be
mounted next to coil with one of coil's mounting bracket bolts. Or could
be used as a wire clamp for bundle of wires. Used and in excellent condition.
Irrelevant Kohler part number. $2.00 each, plus shipping & handling.
 High Quality Copper Core/Non-Resistor
Spark Plugs. Designed for most larger cast iron block Briggs & Stratton
engines, Kohler engine models K141, K160/K161,
High Quality Copper Core/Non-Resistor
Spark Plugs. Designed for most larger cast iron block Briggs & Stratton
engines, Kohler engine models K141, K160/K161,
 High Quality Copper Core/Non-Resistor
Spark Plugs. Designed for Kohler engine models K241, M10, K301, M12,
K330/K331, K321, M14, K341, M16, K361, K482, K532 and K582. Also designed
for 1952-1970 Chevrolet and GMC L4, L6, V6 and V8 engines. Copper core spark
plugs provide a stronger spark that allow the ignition coil to operate cooler
and last longer. For best small engine performance and longevity of the coil,
set gap at .025" with a self-energizing magneto or solid state electronic
ignition system, .035" with a full size battery-powered ignition coil, and
.060" with a high-output/performance battery-powered coil. 14mm threads x
7/16" thread reach for stock OEM cylinder heads, flat washer seat.
High Quality Copper Core/Non-Resistor
Spark Plugs. Designed for Kohler engine models K241, M10, K301, M12,
K330/K331, K321, M14, K341, M16, K361, K482, K532 and K582. Also designed
for 1952-1970 Chevrolet and GMC L4, L6, V6 and V8 engines. Copper core spark
plugs provide a stronger spark that allow the ignition coil to operate cooler
and last longer. For best small engine performance and longevity of the coil,
set gap at .025" with a self-energizing magneto or solid state electronic
ignition system, .035" with a full size battery-powered ignition coil, and
.060" with a high-output/performance battery-powered coil. 14mm threads x
7/16" thread reach for stock OEM cylinder heads, flat washer seat.
 High Quality Copper
Core/Non-Resistor Spark Plugs for use in machined billet cylinder heads
for competition pulling only. Designed for Kohler engine models K241,
M10, K301, M12, K330/K331, K321, M14 , K341 and M16. Copper core spark plugs
provide a stronger spark that allow the ignition coil to operate cooler and
last longer. For best engine performance and longevity of the coil, set gap
at .025" with a self-energizing magneto or solid state electronic ignition
system, .035" with a full size battery-powered ignition coil, and .060" with
a high-output/performance battery-powered coil. 14mm threads x 3/4" thread
reach, flat washer seat. Irrelevant Kohler part number.
High Quality Copper
Core/Non-Resistor Spark Plugs for use in machined billet cylinder heads
for competition pulling only. Designed for Kohler engine models K241,
M10, K301, M12, K330/K331, K321, M14 , K341 and M16. Copper core spark plugs
provide a stronger spark that allow the ignition coil to operate cooler and
last longer. For best engine performance and longevity of the coil, set gap
at .025" with a self-energizing magneto or solid state electronic ignition
system, .035" with a full size battery-powered ignition coil, and .060" with
a high-output/performance battery-powered coil. 14mm threads x 3/4" thread
reach, flat washer seat. Irrelevant Kohler part number.
 High Quality Copper
Core/Non-Resistor Spark Plugs. Designed for most models of Onan opposed
twin-cylinder air-cooled small engines. Copper core spark plugs provide a
stronger spark that allow the ignition coil to operate cooler and last longer.
For best engine performance and longevity of the coil, set gap at .025" with
a self-energizing magneto or solid state electronic ignition system, .035"
with a full size battery-powered ignition coil, and .060" with a
high-output/performance battery-powered coil. 14mm threads x 11/16" thread
reach, flat washer seat.
High Quality Copper
Core/Non-Resistor Spark Plugs. Designed for most models of Onan opposed
twin-cylinder air-cooled small engines. Copper core spark plugs provide a
stronger spark that allow the ignition coil to operate cooler and last longer.
For best engine performance and longevity of the coil, set gap at .025" with
a self-energizing magneto or solid state electronic ignition system, .035"
with a full size battery-powered ignition coil, and .060" with a
high-output/performance battery-powered coil. 14mm threads x 11/16" thread
reach, flat washer seat.
 Indexing Washers for Tapered
Seat Spark Plugs with 14mm Threads. Positions spark plug in combustion
chamber of OHV engines with open/exposed gap facing the piston for up to
10% more horsepower and torque when using tractor under extreme conditions,
such as heavy mowing, garden plowing, pushing/blowing snow or competition
pulling. Made of copper. Available in the following thicknesses: .010", .021"
and .032". $1.50 each, plus shipping & handling.
Indexing Washers for Tapered
Seat Spark Plugs with 14mm Threads. Positions spark plug in combustion
chamber of OHV engines with open/exposed gap facing the piston for up to
10% more horsepower and torque when using tractor under extreme conditions,
such as heavy mowing, garden plowing, pushing/blowing snow or competition
pulling. Made of copper. Available in the following thicknesses: .010", .021"
and .032". $1.50 each, plus shipping & handling.
 1/4" Width Slide-On Brass
Spade Crimp Wire Connector with Locking Tab/Tang. Replace damaged brass
connector(s) to insure 100% electrical connections for reliability. Fits
plastic housing electrical connectors used on most OFF-ON-START key switches,
voltage rectifier/regulators, head lights, etc. FYI - Solder or use
1/4" Width Slide-On Brass
Spade Crimp Wire Connector with Locking Tab/Tang. Replace damaged brass
connector(s) to insure 100% electrical connections for reliability. Fits
plastic housing electrical connectors used on most OFF-ON-START key switches,
voltage rectifier/regulators, head lights, etc. FYI - Solder or use
 Armature Ignition Coil with
Molded-In Solid State Electronic Module. Fits Kohler Magnum engine models
M10, M12, M14 and M16. NOTE: Install this coil with spark plug wire facing
engine block as shown in photo to the right ->. Set the air gap/clearance
between the magnet in the flywheel and armature laminations with a business
card or a .010" or .25mm brass
Armature Ignition Coil with
Molded-In Solid State Electronic Module. Fits Kohler Magnum engine models
M10, M12, M14 and M16. NOTE: Install this coil with spark plug wire facing
engine block as shown in photo to the right ->. Set the air gap/clearance
between the magnet in the flywheel and armature laminations with a business
card or a .010" or .25mm brass
 Armature Ignition Coil with
Molded-In Solid State Electronic Module. Fits Kohler Magnum opposed twin
cylinder engine models MV16, M18, MV18, M20 and MV20. NOTE: Install this
coil with spark plug wires facing engine block as shown in photo to the right
->. Set the air gap/clearance between the magnet in the flywheel and armature
laminations with a business card or a .010" or .25mm brass
Armature Ignition Coil with
Molded-In Solid State Electronic Module. Fits Kohler Magnum opposed twin
cylinder engine models MV16, M18, MV18, M20 and MV20. NOTE: Install this
coil with spark plug wires facing engine block as shown in photo to the right
->. Set the air gap/clearance between the magnet in the flywheel and armature
laminations with a business card or a .010" or .25mm brass
 Full Size 20,000 Volt Oil-Filled
12 Volt Canister Ignition Coils. Each coil listed below have a 3.0 ohm
internal primary resistor. Includes mounting bracket. Draws 3-4 amps with
points or electronic ignition. Use with medium capacity condenser. Replace
defective OEM coil or use either of these coils when converting from Breakerless
Ignition to battery-powered points/condenser ignition. Each have a 3/4" diameter
center tower. IMPORTANT: For longer coil life, use a new copper
core/non-resistor AC Delco, Autolite or Champion spark plug of the correct
type gapped at .035". Use of a
Full Size 20,000 Volt Oil-Filled
12 Volt Canister Ignition Coils. Each coil listed below have a 3.0 ohm
internal primary resistor. Includes mounting bracket. Draws 3-4 amps with
points or electronic ignition. Use with medium capacity condenser. Replace
defective OEM coil or use either of these coils when converting from Breakerless
Ignition to battery-powered points/condenser ignition. Each have a 3/4" diameter
center tower. IMPORTANT: For longer coil life, use a new copper
core/non-resistor AC Delco, Autolite or Champion spark plug of the correct
type gapped at .035". Use of a
 High Quality Epoxy-Encapsulated
4.0 ohm 12 Volt Armature Universal Ignition Coil with Molded-In Dual Metal
Core Spark Plug Wires for Opposed Twin Cylinder Engines. Can be used
on Kohler engine models KT17, KT17 Series II, KT19, KT19 Series II, KT21,
K482, K532, K582, K660/K662, Onan opposed twin cylinder engines, or virtually
any opposed twin cylinder small engine with a fabricated bracket. Mounting
hardware included for custom applications. Two 90º spark plug boots
and terminals included. Can be used with A-1 Miller's custom-made
High Quality Epoxy-Encapsulated
4.0 ohm 12 Volt Armature Universal Ignition Coil with Molded-In Dual Metal
Core Spark Plug Wires for Opposed Twin Cylinder Engines. Can be used
on Kohler engine models KT17, KT17 Series II, KT19, KT19 Series II, KT21,
K482, K532, K582, K660/K662, Onan opposed twin cylinder engines, or virtually
any opposed twin cylinder small engine with a fabricated bracket. Mounting
hardware included for custom applications. Two 90º spark plug boots
and terminals included. Can be used with A-1 Miller's custom-made
 Epoxy-Encapsulated 4.0 ohm
12 Volt Canister Ignition Coils for Opposed Twin Cylinder Engine. Each
coil below fits Kohler engine models KT17, KT17 Series II, KT19 and KT19
Series II. Can be used with A-1 Miller's custom-made
Epoxy-Encapsulated 4.0 ohm
12 Volt Canister Ignition Coils for Opposed Twin Cylinder Engine. Each
coil below fits Kohler engine models KT17, KT17 Series II, KT19 and KT19
Series II. Can be used with A-1 Miller's custom-made
 Epoxy-Encapsulated 12 Volt
Ignition Coils for Opposed Twin Cylinder Engine. Each listed below fits
Kohler engine models K482, K532, K582, or virtually any opposed twin cylinder
small engine with a fabricated bracket. Can be used with A-1 Miller's custom-made
Epoxy-Encapsulated 12 Volt
Ignition Coils for Opposed Twin Cylinder Engine. Each listed below fits
Kohler engine models K482, K532, K582, or virtually any opposed twin cylinder
small engine with a fabricated bracket. Can be used with A-1 Miller's custom-made
 removed
the new armature/stator assembly and reinstalled the original armature/stator
assembly; installed a new OEM Kohler magneto armature ignition coil on the
armature; and even tried a different flywheel, but with all of these things,
one after the other, the engine would still die out above idle, no matter
what. Then I connected a temporary battery-powered ignition system with jumper
wires with alligator clips just to find if the engine would rev up at open
throttle, and it did, with no problems! Then after all of this, I found that
the charging system would not generate the full 10 amps to recharge the battery.
It would only generate about 3 amps. (The tractor had a factory-installed
amp gauge.) The voltage rectifier/regulator was in good condition too, but
there was nothing I could do to fix this.
removed
the new armature/stator assembly and reinstalled the original armature/stator
assembly; installed a new OEM Kohler magneto armature ignition coil on the
armature; and even tried a different flywheel, but with all of these things,
one after the other, the engine would still die out above idle, no matter
what. Then I connected a temporary battery-powered ignition system with jumper
wires with alligator clips just to find if the engine would rev up at open
throttle, and it did, with no problems! Then after all of this, I found that
the charging system would not generate the full 10 amps to recharge the battery.
It would only generate about 3 amps. (The tractor had a factory-installed
amp gauge.) The voltage rectifier/regulator was in good condition too, but
there was nothing I could do to fix this.
 tack-weld the two supplied nuts
(in alignment with drilled holes) or tack-weld head of screws (to serve as
studs) to inside of shroud, and securely fasten coil with the two supplied
spacers, lock washers to nuts or screws. (When fastened to flywheel shroud,
coil will have a nice, distinctive appearance, and like it's factory-installed.)
Use #250 (1/4")
tack-weld the two supplied nuts
(in alignment with drilled holes) or tack-weld head of screws (to serve as
studs) to inside of shroud, and securely fasten coil with the two supplied
spacers, lock washers to nuts or screws. (When fastened to flywheel shroud,
coil will have a nice, distinctive appearance, and like it's factory-installed.)
Use #250 (1/4")


 Fasten the module to the engine
sheet metal that has plenty of cool, circulating air with the supplied mounting
screw.
Fasten the module to the engine
sheet metal that has plenty of cool, circulating air with the supplied mounting
screw.
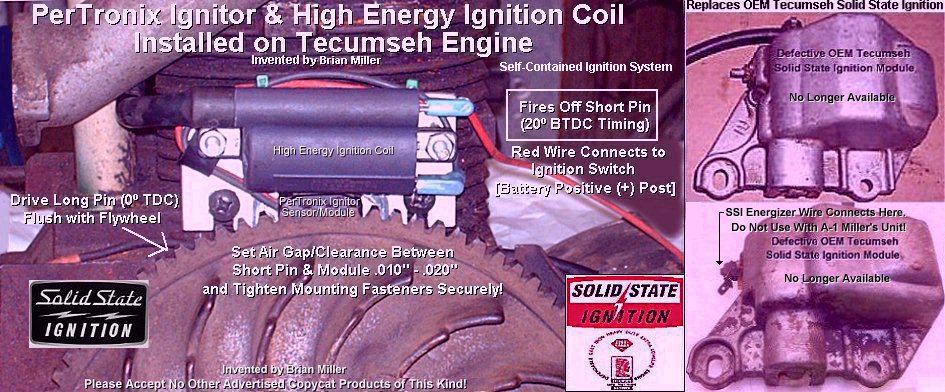


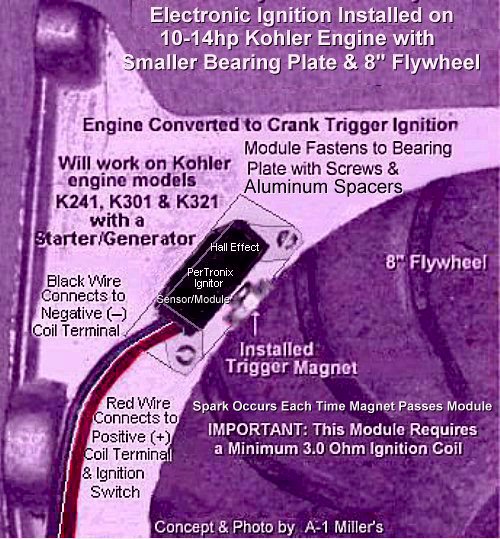
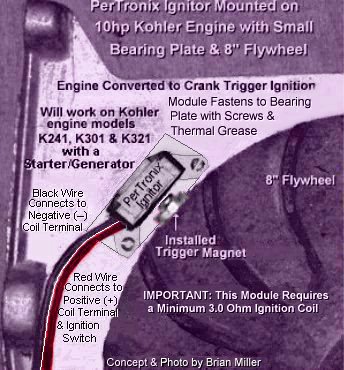 This ignition system utilizes the
self-contained electronic ignition sensor/module, which works flawlessly,
is very reliable and may outlast the life of the engine. This high performance
ignition system have been thoroughly tested under extreme conditions, and
produces a stable and a very strong spark with the use of
This ignition system utilizes the
self-contained electronic ignition sensor/module, which works flawlessly,
is very reliable and may outlast the life of the engine. This high performance
ignition system have been thoroughly tested under extreme conditions, and
produces a stable and a very strong spark with the use of

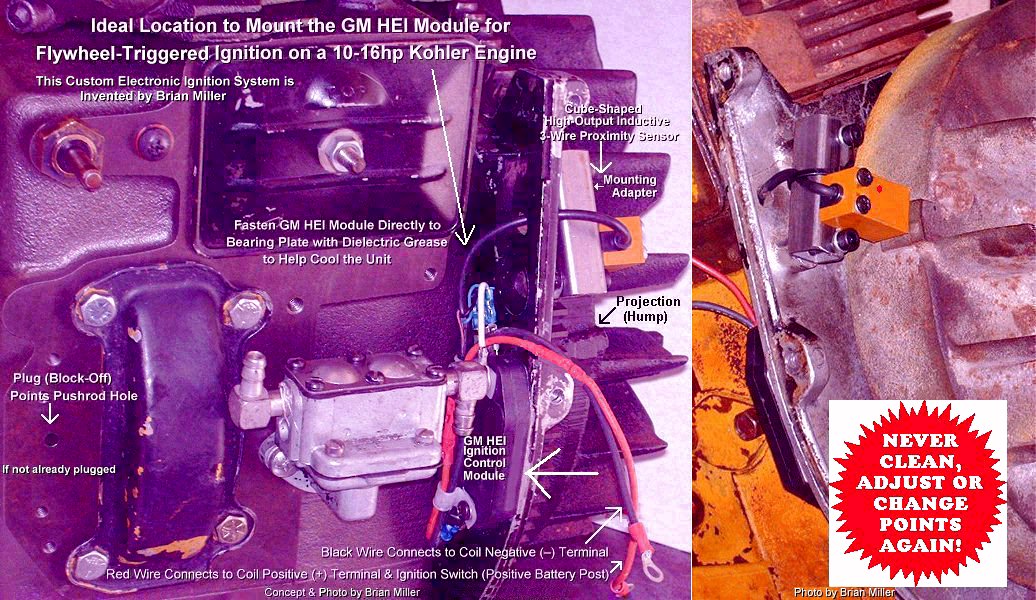
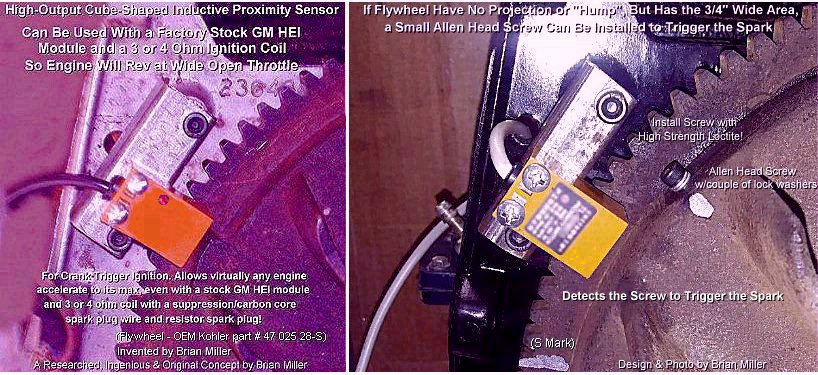

 two 8-32 UNC x 1" hex head
self-threading screws (not self-tapping) and two flat washers (to create
an air space for cooling of module).
two 8-32 UNC x 1" hex head
self-threading screws (not self-tapping) and two flat washers (to create
an air space for cooling of module).
 Mounting of module requires
two 9/64" drilled holes. Module can be remotely mounted on a flat surface
with cool, circulating air, or to install module behind bearing plate, use
a
Mounting of module requires
two 9/64" drilled holes. Module can be remotely mounted on a flat surface
with cool, circulating air, or to install module behind bearing plate, use
a
 Connect the BLACK
wire on the sensor to the [G] terminal on the module.
Connect the BLACK
wire on the sensor to the [G] terminal on the module.
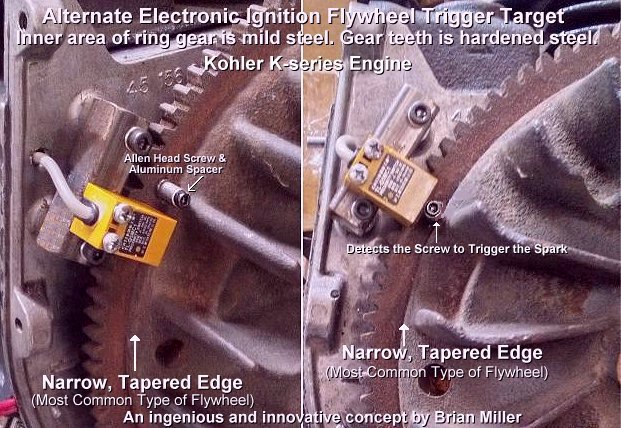 List of Parts in Kit
Includes:
List of Parts in Kit
Includes:
 6-32 UNC x 3/4" length Allen
head screw with aluminum spacer and split lock washer.
6-32 UNC x 3/4" length Allen
head screw with aluminum spacer and split lock washer.

 High Output Cube-Shaped 3-Wire
Inductive Proximity Sensor. Sensor is capable of powering the GM 4-pin HEI
crank-trigger ignition control module and a digital
High Output Cube-Shaped 3-Wire
Inductive Proximity Sensor. Sensor is capable of powering the GM 4-pin HEI
crank-trigger ignition control module and a digital