
 Information
About Carter, Kohler and Walbro Carburetors used on Kohler K-series and Magnum
Engines, and Various Fuel Systems
Information
About Carter, Kohler and Walbro Carburetors used on Kohler K-series and Magnum
Engines, and Various Fuel Systems
Information
About Carter, Kohler and Walbro Carburetors used on Kohler K-series and Magnum
Engines, and Various Fuel Systems
Information
About Carter, Kohler and Walbro Carburetors used on Kohler K-series and Magnum
Engines, and Various Fuel Systems
Educating and Inspiring Small Engine, Lawn & Garden, and Garden
Pulling Tractor Enthusiasts Since 1996. Where Science and Common Sense Come
Together for Safety and Improved Engine/Tractor Performance |
A-1
Miller's Performance Enterprises - Parts & Services
Webstore |  Available Soon - Detailed Illustrated Plans
on How to Construct Professional Pulling Sleds and Tractor Pulling Sleds
For Sale
Available Soon - Detailed Illustrated Plans
on How to Construct Professional Pulling Sleds and Tractor Pulling Sleds
For Sale
Nowadays, prices are subject to change without notice. Click
Refresh to see any
changes or updates. Optimized for 1152 x 864 computer screen resolution.
To search for a word or phrase in any of my websites, press the CTRL
 and F
and F  keys on
your keyboard simultaneously to open the Find or Search dialog box in your
web browser. And being I have no
apprentice to update and pay for my websites so they'll
continue to be on the Internet, they will be removed forever when I'm no
longer around. Scroll down this website or click/tap the links below to
jump down to...
keys on
your keyboard simultaneously to open the Find or Search dialog box in your
web browser. And being I have no
apprentice to update and pay for my websites so they'll
continue to be on the Internet, they will be removed forever when I'm no
longer around. Scroll down this website or click/tap the links below to
jump down to...

 There's a cheater in every sport, and competition garden
tractor pulling is no different. Honest pullers who ignore the cheater(s)
are fools. And when there's prize money involved, a fool and their money
are soon parted. Anyway, to make competition pulling a fun, fair and enjoyable
sport and experience for the entire family, be protective of your equipment!
While at the pulls, keep an eye on your carburetor and
fuel shut-off valve! When a competitive or winning
pulling tractor is left alone, it's been known that certain disgruntled pullers
(sore losers
There's a cheater in every sport, and competition garden
tractor pulling is no different. Honest pullers who ignore the cheater(s)
are fools. And when there's prize money involved, a fool and their money
are soon parted. Anyway, to make competition pulling a fun, fair and enjoyable
sport and experience for the entire family, be protective of your equipment!
While at the pulls, keep an eye on your carburetor and
fuel shut-off valve! When a competitive or winning
pulling tractor is left alone, it's been known that certain disgruntled pullers
(sore losers  ) belonging
to various associations/clubs, virtually anywhere and everywhere, will turn
the high speed air/fuel adjuster one way or the other, or close the
fuel shut-off valve to keep the engine from
running at it's full potential, or from running at all. This is one of the
easiest, dishonest and sneaky ways to retard or disable and sabotage a
competitor's tractor. All a cheater needs is an opportunity in an attempt
to gain an advantage on the track. This is also the fastest way for a pulling
association or club to gain a bad reputation and lose honest pullers. (Bad
news travels fast.) This type of dishonest behavior doesn't happen often,
but you need to be prepared if or when it does happen. To be prepared for
this unforeseeable event, it'll be a good idea to cover the entire carburetor
with a
drawstring bag, or better yet, cover the entire tractor
with a canvas or heavy blanket and keep an eye on it.
Keep an eye on your
kill switch plug, too! Always try to stay one step ahead of a cheater.
Go here for more information:
Do some garden tractor pullers act like spoiled brats?
) belonging
to various associations/clubs, virtually anywhere and everywhere, will turn
the high speed air/fuel adjuster one way or the other, or close the
fuel shut-off valve to keep the engine from
running at it's full potential, or from running at all. This is one of the
easiest, dishonest and sneaky ways to retard or disable and sabotage a
competitor's tractor. All a cheater needs is an opportunity in an attempt
to gain an advantage on the track. This is also the fastest way for a pulling
association or club to gain a bad reputation and lose honest pullers. (Bad
news travels fast.) This type of dishonest behavior doesn't happen often,
but you need to be prepared if or when it does happen. To be prepared for
this unforeseeable event, it'll be a good idea to cover the entire carburetor
with a
drawstring bag, or better yet, cover the entire tractor
with a canvas or heavy blanket and keep an eye on it.
Keep an eye on your
kill switch plug, too! Always try to stay one step ahead of a cheater.
Go here for more information:
Do some garden tractor pullers act like spoiled brats?
YouTube video: Pulling Sled Exposed For Cheating? You Decide.. https://www.youtube.com/watch?v=7Jd5rEuaZZA
Advertisement: (Prices are subject to change without notice.)
| Click here to contact A-1 Miller's Performance
Enterprises to place an order, send your parts for repairing, and/or for
FREE professional and honest technical customer service assistance and support
and payment options. Please contact A-1 Miller's if you need a part or
parts, or service(s) performed that's not listed or mentioned in this
website.
How the Remote Fuel Primer System Works: The fuel primer bulb on a snowblower engine connects directly to the float bowl and takes place of the atmospheric vent hole in the float bowl. The bulb itself has a small atmospheric vent hole. When the bulb is compressed (small atmospheric vent hole sealed), this creates air pressure within the bulb, tubing and float bowl, which force fuel up through the main jet/nozzle (emulsion tube), creating a slight flooding condition in the throttle bore. Thus, helping a cold engine without a choke plate start much easier. With this system, the engine cannot be "over-choked," which could foul the spark plug. The fuel primer system can also be used as a manual accelerator pump when an engine hesitates to rev up on its own. With the original atmospheric vent opening (air passageway from inside the float bowl area to outside of carburetor) in the carburetor plugged, a short brass tube is inserted into a drilled hole in the float bowl area on the side of the carburetor body, and with a small fuel hose connecting the carburetor to the primer bulb assembly, which is mounted on the steering column support pedestal. How to Install and Use My Remote Fuel Primer System:
FYI - Most [cold] engines will not start when fuel is introduced directly into the combustion chamber through the spark plug hole. Doing this only results in a flooding condition and the engine may not start. Gas (or starting fluid) needs to be mixed with incoming air through the carburetor intake so the air can atomize the fuel (break down into a fine mist) to burn more thoroughly so the engine will be able to start quicker.
|
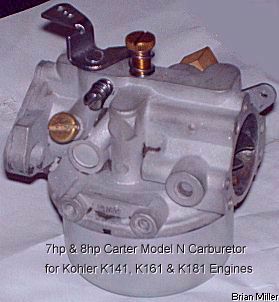
Identification of Carter and Kohler Carburetors -
(Corrected and updated 3/11/21) The types of carburetors that's used on Kohler engine models K90/K91, K141, K160/K161, KV161, L160/L161, L181, K181 and M8 are as follows:
 The Carter
Model N #13 and #16 carburetors are designed specifically for Kohler
engine model K90 and K91 (which are the same engine), and certain low RPM
K141 engines. The throttle bore measures .810" diameter and the
venturi is .542" diameter. When used on a Kohler engine
model K141, K160/K161, certain KV161,
L160/L161, L181, K181 or M8, due to the smaller throttle
bore and restrictive venturi, and velocity or volume of air that's required,
the bigger engine may not produce full power at 3,600 RPM. (It'll be the
same as using a
restrictor plate, or a small 2-barrel carburetor versus
a big 4-barrel carburetor on an automotive engine.) This carburetor came
on various other makes and models of engines, too. It was a popular carburetor
for its time. Measure the throttle bore with a
dial or digital caliper, and measure the venturi with a
plug gauge, such as a deep-well socket or round tubing of the right outside
diameter. The original Kohler (originally Carter) part numbers for this
carburetor are: A-220100, A-220574, A-220745, A-220777, C-220777, E-220517,
F-220762, F-230501, D-220451, G-220517, 46 053 03-S. Being this carburetor
is no longer made in the USA; Kohler part # 46 853 01-S), its replacement
is the Walbro WHL #36 or the aftermarket Carter-replicated carburetor.
The Carter
Model N #13 and #16 carburetors are designed specifically for Kohler
engine model K90 and K91 (which are the same engine), and certain low RPM
K141 engines. The throttle bore measures .810" diameter and the
venturi is .542" diameter. When used on a Kohler engine
model K141, K160/K161, certain KV161,
L160/L161, L181, K181 or M8, due to the smaller throttle
bore and restrictive venturi, and velocity or volume of air that's required,
the bigger engine may not produce full power at 3,600 RPM. (It'll be the
same as using a
restrictor plate, or a small 2-barrel carburetor versus
a big 4-barrel carburetor on an automotive engine.) This carburetor came
on various other makes and models of engines, too. It was a popular carburetor
for its time. Measure the throttle bore with a
dial or digital caliper, and measure the venturi with a
plug gauge, such as a deep-well socket or round tubing of the right outside
diameter. The original Kohler (originally Carter) part numbers for this
carburetor are: A-220100, A-220574, A-220745, A-220777, C-220777, E-220517,
F-220762, F-230501, D-220451, G-220517, 46 053 03-S. Being this carburetor
is no longer made in the USA; Kohler part # 46 853 01-S), its replacement
is the Walbro WHL #36 or the aftermarket Carter-replicated carburetor.
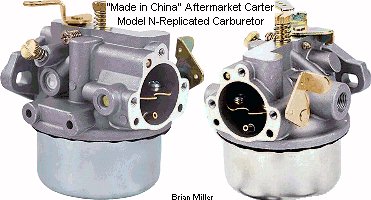 High Quality Aftermarket
Carter Model N-Replicated Carburetor. The throttle bore in this particular
carburetor measures .811" diameter and the
venturi is .588" diameter. This is an alternative universal
low cost carburetor that can be used on Kohler engine models
K181,
L181 or M8. Due
to the larger size of the venturi, this carburetor may not work correctly
on the Kohler models K90/K91, K141 or K160/K161 engines. Irrelevant Carter
or Kohler part number(s).
High Quality Aftermarket
Carter Model N-Replicated Carburetor. The throttle bore in this particular
carburetor measures .811" diameter and the
venturi is .588" diameter. This is an alternative universal
low cost carburetor that can be used on Kohler engine models
K181,
L181 or M8. Due
to the larger size of the venturi, this carburetor may not work correctly
on the Kohler models K90/K91, K141 or K160/K161 engines. Irrelevant Carter
or Kohler part number(s).
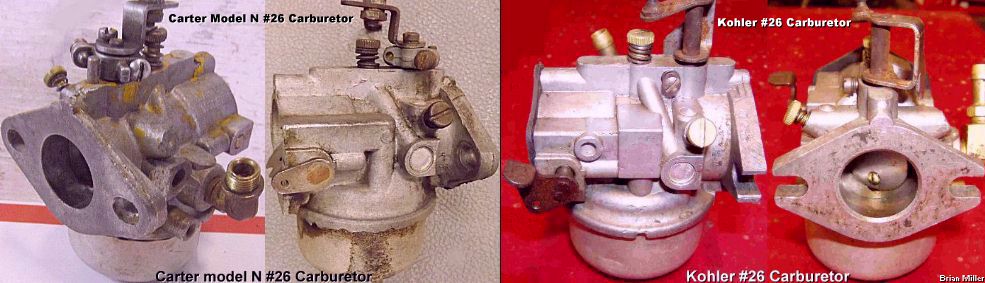
FYI - When Edelbrock bought out the automotive division of Carter Carburetor Corporation sometime before 1984, Carter sold their line of small engine carburetors to Kohler Engines in 1985. And for some reason, Kohler retained the Carter Model N wording on the #13, #16, #18, #20 and #22 carburetors. But on the bigger Carter #26 and #30 single cylinder engine carburetors, Kohler redesigned (and actually improved) the throttle shaft with an integrated lever; incorporated the idle speed adjustment screw w/spring in the carburetor body; redesigned the size of holes in the choke plates according to engine size; and made slots in the carburetor body for easier installation and removal on and off the engine. And Kohler included two additional air cleaner mounting screw holes for the Kohler AQS "Quiet Line" engine models K241-K361. Everything else remained the same on the Carter and Kohler carburetors, with the exception of various redesigned choke levers. Kohler didn't retain the Carter #28 carburetor because it's too similar to the #30 carburetor. But the #28 carburetor is available only in aftermarket. Although the #26 and #28 carburetors are available in aftermarket, for some reason, the #30 carburetor is not available in aftermarket. Six different variations of the Carter or Kohler carburetors was made for the Kohler K-series K241 through K361 engines, KT-series, and the K482, K532 and K582 engines. (NOTE: If it's rebuildable or repairable, please do not discard your Carter or Kohler carburetor or other OEM Kohler parts. Most discontinued Kohler parts are hard to find nowadays, and nothing works better than the original part(s) that came on the engine.)
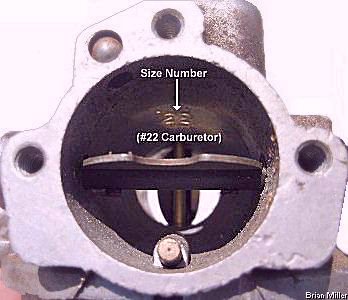
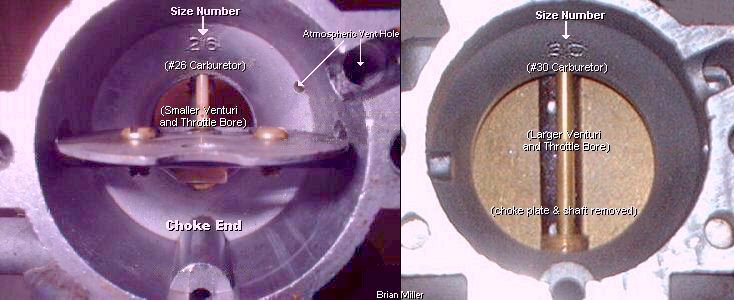 The size number (diameter of
throttle bore) for the Carter or Kohler carburetors is embossed inside the
upper part of the choke end, just above the
venturi. But not all Kohler carburetors have a number embossed.
In this case, the throttle bore (throttle plate area) will need to be measured
to determine the exact size of the carburetor. The size number refers to
the amount of air that can flow through the carburetor.
The size number (diameter of
throttle bore) for the Carter or Kohler carburetors is embossed inside the
upper part of the choke end, just above the
venturi. But not all Kohler carburetors have a number embossed.
In this case, the throttle bore (throttle plate area) will need to be measured
to determine the exact size of the carburetor. The size number refers to
the amount of air that can flow through the carburetor.
The carburetor with 26 embossed in the choke end has a 26mm or 1.07" diameter throttle bore. (26mm converts close to 1.070"). The carburetor with 28 embossed in the choke end has a 28mm diameter or 1.17" throttle bore. (28mm converts close to 1.170".) And the carburetor with 30 embossed in the choke end has a 30mm or 1.200" diameter throttle bore (30mm converts close to 1.200".) For precision, when measuring the throttle bore to determine the size, it's best to use a dial or digital caliper.
FYI: Some people advertise online that the carburetor for Kohler engine models K241, M10, K301 or M12 can also be used on Kohler engine models K321, M14, K341, M16 and K361. But I know for a fact that if the K241, M10, K301 or M12 carburetor is used on a K321, M14, K341, M16 or K361, which produces 14hp, 16hp and 18hp, respectively, with the correct carburetors, would produce about 12hp, 14hp and 15hp, and make less torque, because the engine would be drawing less air through the smaller carburetor to produce not as much compression. I guess the seller don't know the difference between these carburetors, because they look virtually identical on the outside. Or maybe the seller figures what most people don't know, makes them more money.
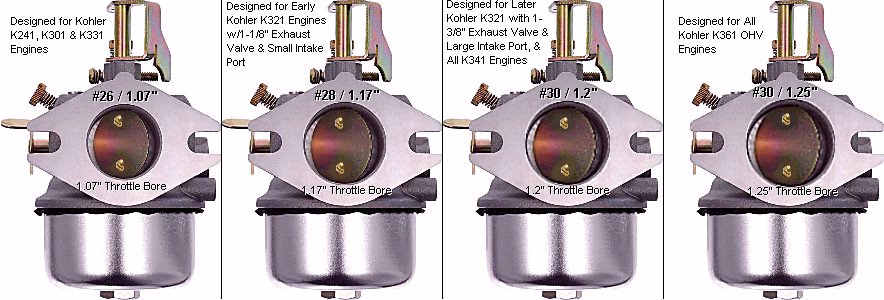 The carburetors used on Kohler
engine models K241, M10, K301, M12, K321, M14, K341, M16 and K361 are different.
They may appear the same on the outside, but be very different on the inside.
The K241, M10, K301 and M12 engines require a carburetor with a 1.07" throttle
bore and
venturi that measures .812" diameter. The K321, M14 engines
requires a carburetor with a 1.2" throttle bore and venturi that measures
.937" diameter. The K341, M16 engines requires a carburetor with a 1.2" throttle
bore and venturi that measures 1.000" diameter. And the K361 engine requires
a carburetor with a 1.250" throttle bore and venturi that measures 1.062"
diameter. If the wrong carburetor is used on any particular engine, the engine
may not run right and not produce full power. The carburetors that's used
on various models of Kohler engines are as follows:
The carburetors used on Kohler
engine models K241, M10, K301, M12, K321, M14, K341, M16 and K361 are different.
They may appear the same on the outside, but be very different on the inside.
The K241, M10, K301 and M12 engines require a carburetor with a 1.07" throttle
bore and
venturi that measures .812" diameter. The K321, M14 engines
requires a carburetor with a 1.2" throttle bore and venturi that measures
.937" diameter. The K341, M16 engines requires a carburetor with a 1.2" throttle
bore and venturi that measures 1.000" diameter. And the K361 engine requires
a carburetor with a 1.250" throttle bore and venturi that measures 1.062"
diameter. If the wrong carburetor is used on any particular engine, the engine
may not run right and not produce full power. The carburetors that's used
on various models of Kohler engines are as follows:
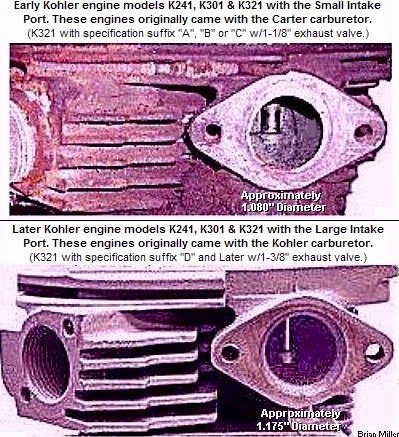 Also, after 1985, Kohler gave
the K321 engine a larger 1-3/8" exhaust valve and made the intake port larger
in diameter. These are engines with specification suffix "D" and later. The
larger exhaust valve , bigger intake port and bigger #30 carburetor allows
for more air to enter and exit out of the combustion chamber so the engine
will produce full 14hp at 3,600 RPM. By the way - The early K321 engine with
the small intake port and small exhaust valve make a good stock 4,000 RPM
stock competition pulling engine, but the later K321 engine with the big
intake port and big exhaust valve make an excellent open RPM competition
pulling engine.
Also, after 1985, Kohler gave
the K321 engine a larger 1-3/8" exhaust valve and made the intake port larger
in diameter. These are engines with specification suffix "D" and later. The
larger exhaust valve , bigger intake port and bigger #30 carburetor allows
for more air to enter and exit out of the combustion chamber so the engine
will produce full 14hp at 3,600 RPM. By the way - The early K321 engine with
the small intake port and small exhaust valve make a good stock 4,000 RPM
stock competition pulling engine, but the later K321 engine with the big
intake port and big exhaust valve make an excellent open RPM competition
pulling engine.
 There's another #30 carburetor
designed specifically for the Kohler engine model K582. The throttle shaft
is positioned horizontally and the idle fuel mixture screw is directly on
top of the carburetor body instead of at an angle on the side. This OEM Kohler
carburetor is discontinued from Kohler L, but
is available in aftermarket as the Kohler-replicated fully adjustable #28
carburetor with a 1.17" throttle bore J. FYI:
Lots of people advertise online that the carburetor for the K482 and K532
can also be used on the K582. But I know for a fact that if the K482 and
K532 carburetor is used on the K582, which produces 24hp with the correct
carburetor, would produce about 21hp and make less torque, because the engine
would be drawing less air through the smaller carburetor to produce not as
much compression. I guess the seller don't know the difference between these
carburetors, because they look virtually identical on the outside. Or maybe
the seller figures what most people don't know, makes them more money.
There's another #30 carburetor
designed specifically for the Kohler engine model K582. The throttle shaft
is positioned horizontally and the idle fuel mixture screw is directly on
top of the carburetor body instead of at an angle on the side. This OEM Kohler
carburetor is discontinued from Kohler L, but
is available in aftermarket as the Kohler-replicated fully adjustable #28
carburetor with a 1.17" throttle bore J. FYI:
Lots of people advertise online that the carburetor for the K482 and K532
can also be used on the K582. But I know for a fact that if the K482 and
K532 carburetor is used on the K582, which produces 24hp with the correct
carburetor, would produce about 21hp and make less torque, because the engine
would be drawing less air through the smaller carburetor to produce not as
much compression. I guess the seller don't know the difference between these
carburetors, because they look virtually identical on the outside. Or maybe
the seller figures what most people don't know, makes them more money.
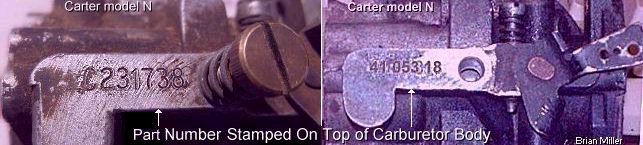
By the way - the part number of all Kohler-made and Walbro carburetors are stamped on the right side of the mounting flange. Don't refer to the numbers just below the fuel inlet port. They represent nothing that I know of. Click here to identify a Kohler or Walbro carburetor and matching parts: Kohler Carburetor Reference Manual TP-2377-E.pdf. If there's no numbers anywhere on the carburetor body, then it's definitely an aftermarket carburetor. Because Carter, Kohler and Walbro ALWAYS stamp a part number on the flange of all their carburetors.


Airflow / CFM (Cubic Feet per Minute) | NOTE: A bored-out venturi (machined larger for more airflow to increase compression) and reworked carburetor is when it's modified for maximum performance for competition pulling only.
FYI - The throttle bore itself in a Carter or Kohler #26/1.07" carburetor can be bored to 1.17" (#28 size) or 1.2" (#30 size), and the main jet/nozzle (emulsion tube) will still bottom out against the throttle bore, and of course, a 1.17" or 1.2" throttle shaft and plate would need to be used. But the boring process will break through the idle fuel mixing well (the idle progression holes and the welch plug hole) that's next to the throttle plate. Modifications to this area would need to be made by threading in an 1/8" Allen pipe plug where the welch plug is (or was), and drilling and installing a small brass or copper tube from the idle fuel mixture adjuster screw down into the float bowl, next to the float, with enough clearance so it won't interfere with the movement of the float. A 1/4-28 UNF x 3/4" thread length bolt will also need to be installed where the high speed air/fuel needle adjuster is (was) to block off a vacuum leak to will occur with the modifications of the idle air/fuel mixing well. Actually, it would be MUCH easier and less cost effective to just convert either a Carter or Kohler #28 or #30 carburetor for high-performance use and not having to do anything to modify the idle fuel passageway.
Boring-out of the venturi (machined larger for more airflow to increase compression) in the carburetor alone will not help to increase engine performance. To increase the overall airflow in and out of the combustion chamber for improved engine performance, and if sanctioning club's rules allow this, the intake (and exhaust) port runners must be enlarged, too. This is called "porting an engine." The [stock size] valves will also need to be reworked and undercut to increase airflow. Or larger reworked and undercut valves and a cam with more lift and duration will need to be used.
For competition pulling, carburetor design and size depends on port sizes, valve sizes, if the intake valve and seat have 30º/31º angles and undercut heads, and the cam profile (lift and duration) is important. If an engine has stock ports, valves and cam, a plain stock carburetor can be used. But if the ports and valves have been reworked for more airflow, and a bigger cam is going to be used, then a bored-out carburetor with a .995" or 1" venturi can be used for best performance. A bored-out venturi and reworked carburetor is when the carburetor is modified for maximum performance for general yard and garden use, and/or for competition pulling.
The 26mm carburetor obviously has a smaller throttle bore. Therefore, is restricted as to how much air can flow through it, even with the venturi removed. It'll work excellent on a hot K241 or mild K301 engine, but the larger 28mm and 30mm carburetors flows more air, 7.7% more for the 28mm, and 15.5% more for the 30mm. Which are ideal for a hot K301 and larger engines with porting, polishing, bigger valves and a big cam. If you feel that a single 30mm carburetor won't flow enough air for your particular engine, then either a "Super Carb," Dellorto, Mikuni, S&S Super D or twin Kohler carburetor setup (on a "Y" intake) should be used. If you have a K321 Kohler engine, and you can't find a #28 or #30 carburetor, then a Carter or Kohler #26 carburetor will work just fine for general lawn and garden use. Personally, I ran a stock Kohler #26 on the K321 Kohler engine that's on my 6,000 lb. self-propelled pulling sled for 10 years and the engine didn't lack any power whatsoever.
Using a carburetor with a small
venturi and/or small throttle bore versus one with a bigger venturi and/or
bigger throttle bore on a Kohler engine is similar to using an
automotive 2 barrel carburetor versus
a 4 barrel carburetor. The one with bigger venturis and/or bigger throttle
bores will allow the engine to draw more air at higher RPM so it can develop
more compression, which will allow it to produce more power. The exception
to this rule is the Carter/Kohler #26 or Walbro #52 carburetor that's designed
for the Kohler K241, K301, M10 and M12 engines, versus the Carter/Kohler
#28 and #30 or Walbro #60 or #64 carburetors that's designed for the K321,
K341, K361, M14 and M16 engines. In stock condition and due to its small
displacement, the K241 and M10 engines isn't capable of drawing enough air
or creating enough velocity through the #30, #60 or #64 carburetor, and possibly
the #28 carburetor, to suck the fuel from the nozzle so the engine can rev
up on its own.
Identification and Information About Walbro WHG #52, #60 and #64 Carburetors -
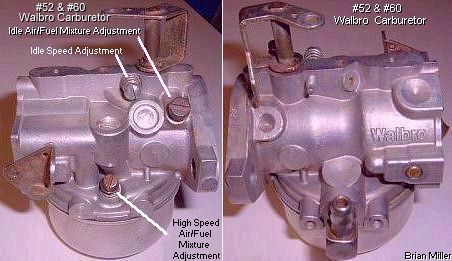 The Walbro WHG #52, #60 and #64
carburetors originally come on all Magnum engines. These carburetors are
direct replacements for the Kohler carburetors. The Walbro #52 carburetor
has a throttle bore diameter of 1.07" and is designed for use on models K241,
M10, K301, M12, KT17 (first design), KT17 Series II, KT19 (first design),
KT19 Series II, KT21, MV16, M18, MV18, M20 and MV20 engines. And the Walbro
#60 or #64 carburetor have a throttle bore diameter of 1.2" and is designed
for the K321, M14, K341, M16 engines, and being the 1.25" Kohler carburetor
that was originally designed for the K361 engine is longer available, the
only option is to use the Walbro #60 or #64 carburetor.
The Walbro WHG #52, #60 and #64
carburetors originally come on all Magnum engines. These carburetors are
direct replacements for the Kohler carburetors. The Walbro #52 carburetor
has a throttle bore diameter of 1.07" and is designed for use on models K241,
M10, K301, M12, KT17 (first design), KT17 Series II, KT19 (first design),
KT19 Series II, KT21, MV16, M18, MV18, M20 and MV20 engines. And the Walbro
#60 or #64 carburetor have a throttle bore diameter of 1.2" and is designed
for the K321, M14, K341, M16 engines, and being the 1.25" Kohler carburetor
that was originally designed for the K361 engine is longer available, the
only option is to use the Walbro #60 or #64 carburetor.
The older Walbro WHG #52, #60 and #64 carburetors are reliable and they seem to last a long time before requiring service. Most older Walbros are worth rebuilding, because the float valve seats are made of hardened solid bronze, which is actually harder than cast iron. They were manufactured back in the day when most business owners took pride in their products and offered their customers a quality product.
But the newer Walbro carburetors, especially the ones that come on recently-built aluminum block small air-cooled engines, are notorious for leaking gas after several years of use. Although overhaul/rebuild carburetor kits are available, it really does no good to rebuild them and install a new fuel inlet valve because the float valve seat is made of soft brass, which erodes with use due to microscopic particles of dirt/debris that pass through the filtering material in the fuel filter, and in most Walbro carburetors, the seat is not replaceable. The fuel inlet seat in older Walbro carburetors are made of hardened compressed bronze, which is actually harder than cast iron. There is no indication or records of when Walbro made the change from the hard seat to the soft seat.
 The fine mesh filter screen
and filtering material in fuel filters can only block certain size of dirt
and debris from entering the carburetor. Any extremely tiny particles that
can pass through the fuel filter will build up in the bottom of the float
bowl and can eventually clog the main fuel jet. Lightweight and suspended
particles in the fuel of the float bowl gets sucked up through the main jet
and is burned in the combustion chamber. The best way to remove built-up
stuck and stubborn debris from inside the float bowl is to use a 2" brass
wire cup brush (shown to the right ->) with a hand-held power drill, and
then use 150± P.S.I. compressed air with an
air blow gun nozzle to clear out the debris from the main
jet hole and clear out the entire float bowl area of the carburetor. On very
rare occasions, a hair can pass through a fine mesh fuel filter screen and
become lodged (trapped) between the float valve and inlet seat, causing the
carburetor to slightly flood with gas. When this happens, the hair can be
successfully removed with 150± P.S.I. compressed air and an air blow
gun nozzle and the same float valve and seat can be reused because chances
are, they will not be damaged.
The fine mesh filter screen
and filtering material in fuel filters can only block certain size of dirt
and debris from entering the carburetor. Any extremely tiny particles that
can pass through the fuel filter will build up in the bottom of the float
bowl and can eventually clog the main fuel jet. Lightweight and suspended
particles in the fuel of the float bowl gets sucked up through the main jet
and is burned in the combustion chamber. The best way to remove built-up
stuck and stubborn debris from inside the float bowl is to use a 2" brass
wire cup brush (shown to the right ->) with a hand-held power drill, and
then use 150± P.S.I. compressed air with an
air blow gun nozzle to clear out the debris from the main
jet hole and clear out the entire float bowl area of the carburetor. On very
rare occasions, a hair can pass through a fine mesh fuel filter screen and
become lodged (trapped) between the float valve and inlet seat, causing the
carburetor to slightly flood with gas. When this happens, the hair can be
successfully removed with 150± P.S.I. compressed air and an air blow
gun nozzle and the same float valve and seat can be reused because chances
are, they will not be damaged.
To put it in plain English: If your Walbro carburetor doesn't leak gas out the choke end, but need an overhaul/rebuild, then it may be worthwhile to install a new kit. But if it does leak gas, then I doubt that a new float valve will fix the problem. Your only options are: install a fuel shut-off valve and turn off the fuel every time the engine is not in use, or install a rebuilt Carter or Kohler K-series carburetor.
About 90% of small engine carburetors are manufactured by Walbro nowadays, and I don't think that one is better than the other. The trick to getting the soft brass seat (and needle/float valve) to last longer is to use a fuel filter with a very fine mesh or pleated paper element. The finer, the better. Because it's the microscopic dirt/debris/grit that passes through the filter that causes the seat (and needle/float valve) to erode and wear. And every pressed-in brass seat that I've replaced ALWAYS leaked gas. There's just no way to get them to seal with the carburetor body, not even with high strength liquid thread locker.
The only problem using a Walbro on a pulling tractor or for high-performance application is they can't be bored-out or modified in any way because the throttle bore wall (where the venturi is located) is too thin. Therefore, they're limited to how much air can flow through them. The US government EPA laws required that Kohler and all other small engine manufacturers redesign their carburetors so the engine will produce less air pollution. So they started using a redesigned emissions-controlled, EPA-approved Walbro carburetor with a fixed/non-adjustable main jet. This is to prevent people from setting the air/fuel ratio too rich and create more air pollution. The older-designed Walbros that have an adjustable main jet, which is located on the lower right side of the carburetor, are still available new. main jets of various sizes are available for most carburetors with a fixed/non-adjustable main jet so the engine will run correctly depending on the altitude level, atmospheric/barometric pressure and air temperature where the engine will be used.
A small engine with a fixed, non-adjustable high speed main jet carburetor is supposed to run at a maximum of 3,200 RPM. If the RPM is set higher, the air/fuel mixture will lean out (too much air and not enough fuel), resulting in the engine overheating, which will eventually cause the cylinder head to burn-out, or premature wear to the piston and rings, resulting in the engine burning crankcase oil. The way around this is to drill out the high speed main jet a few thousandths of an inch to give the engine more fuel. But only do this if it's absolutely necessary! If an engine lacks sufficient power at 3,200 RPM, then it obviously needs a professional valve job performed and/or major tune-up.
(Added 7/18/20) If a small engine cylinder head is burned out (usually close to the exhaust valve), if it's burned out where the gasket seals, as long as there's no cracks in the head, it can be successfully welded up, machined flat, the bolt hole redrilled and be put back into service. The following items are what causes cylinder head burn-out...
Walbro WHG #52, #60 and #64 carburetors work great for ordinary lawn and garden equipment, general lawn work and they're perfect for basic stock low RPM/low performance pulling tractors with an engine that's governed to a maximum of 3,200 RPM with a fixed/non-adjustable main jet, or 3,600 RPM with a fully adjustable main jet. A carburetor with a fixed/non-adjustable main jet is limited to just 3,200 RPM and should never be operated faster for an extended length of time. Although the venturi cannot be bored-out on a Walbro, they work equally as well as the older Carter or Kohler carburetors when used on a stock engine. The main jet in the newer Walbro WHG #52, #60 and #64 carburetors are calibrated at the factory to provide the engine with just the right amount of fuel at 3,200 RPM. Therefore, the fixed/non-adjustable main jet inside the carburetor cannot be replaced with an adjustable one.
Advertisement: (Prices are subject to change without notice.)
| Click here to contact A-1 Miller's Performance Enterprises to place an order, send your parts for repairing, and/or for FREE professional and honest technical customer service assistance and support and payment options. Please contact A-1 Miller's if you need a part or parts, or service(s) performed that's not listed or mentioned in this website. | |
If a small engine cylinder head is burned out (usually close to the exhaust valve), as long as there's no cracks in the head, it can be successfully welded up, machined flat, the bolt hole redrilled and be put back into service.
NOTE - If it's repairable, please do not discard your cylinder head or other OEM Kohler parts. Most discontinued Kohler parts in good, usable/rebuildable condition are hard to find nowadays, and nothing works better than the original part(s) the engine was designed for. |
Carter or Kohler or Walbro Fully Adjustable main jet Carburetors VS. Walbro Fixed/Non-Adjustable Main Jet Carburetor RPM to Horsepower specifications - By the way - running a small engine at 3,600 RPM will NOT shorten the life of the engine.
Walbro WHG #52, #60 and #64 carburetors with a fixed/non-adjustable main
jet are designed with emission controls in mind to run leaner to create less
air pollution. However, the main problem with most Walbros having a
fixed/non-adjustable main jet is during cooler weather operation. During
cool weather, and running at 3,200 RPM, the engine will sometimes run too
lean on fuel and operate erratically. To fix this, first of all, make sure
the hole (orifice) in the main jet is not partially clogged. If it is, use
a
 carburetor jet cleaner wire set or an
oxy-acetylene welding torch tip cleaner to clear any debris
that may be lodged in the hole. IMPORTANT:
When cleaning the hole (orifice) in the main jet, use a wire cleaner of the
correct size, and be careful not to enlarge the hole, or the engine may run
too rich on fuel! This cannot be undone! Then use 150±
P.S.I. compressed air with an
air blow gun nozzle to clear out any dirt/debris. If the
engine still runs too lean on fuel, simply enlarge the hole (orifice) in
the main jet a few thousandths of an inch. Then use 150± P.S.I. compressed
air with an air blow gun nozzle to clear out any metal particles. Be careful
not to enlarge the hole (orifice) in the main jet too much, or the engine
will run rich on fuel! The hole (orifice) diameter in the OEM factory
main jet for 100% gasoline is 3/64" (.047"). If necessary, enlarge the main
jet and fuel inlet holes with a #55 (.052") drill bit. That's a .0052"
difference. After doing this, for cool weather, the engine should run better,
last longer and produce more power. But don't enlarge the hole (orifice)
in the main jet too much! A too big of a hole (orifice) will cause an engine
to run too rich on fuel, making it blow black smoke out the exhaust and possibly
fouling the spark plug. If the hole (orifice) is made too large, the carburetor
will be useless for gasoline, and E85 fuel must be used.
But if an engine is going to be used only during warm weather and if it runs
okay [during warm weather], don't enlarge the hole (orifice) in the main
jet.
carburetor jet cleaner wire set or an
oxy-acetylene welding torch tip cleaner to clear any debris
that may be lodged in the hole. IMPORTANT:
When cleaning the hole (orifice) in the main jet, use a wire cleaner of the
correct size, and be careful not to enlarge the hole, or the engine may run
too rich on fuel! This cannot be undone! Then use 150±
P.S.I. compressed air with an
air blow gun nozzle to clear out any dirt/debris. If the
engine still runs too lean on fuel, simply enlarge the hole (orifice) in
the main jet a few thousandths of an inch. Then use 150± P.S.I. compressed
air with an air blow gun nozzle to clear out any metal particles. Be careful
not to enlarge the hole (orifice) in the main jet too much, or the engine
will run rich on fuel! The hole (orifice) diameter in the OEM factory
main jet for 100% gasoline is 3/64" (.047"). If necessary, enlarge the main
jet and fuel inlet holes with a #55 (.052") drill bit. That's a .0052"
difference. After doing this, for cool weather, the engine should run better,
last longer and produce more power. But don't enlarge the hole (orifice)
in the main jet too much! A too big of a hole (orifice) will cause an engine
to run too rich on fuel, making it blow black smoke out the exhaust and possibly
fouling the spark plug. If the hole (orifice) is made too large, the carburetor
will be useless for gasoline, and E85 fuel must be used.
But if an engine is going to be used only during warm weather and if it runs
okay [during warm weather], don't enlarge the hole (orifice) in the main
jet.
On the newer carburetors with a fixed/non-adjustable main jet, the hole (orifice) in the main jet may need to be enlarged .002"-.003" to give the engine a little more fuel so it'll run better at higher RPM. Otherwise, the engine could "burn up" or wear out prematurely due to the lean air/fuel mixture. I have an assortment of tiny drill bits that I use on our customer's lawn & garden equipment carburetors.
 A new
style Walbro carburetor with a fixed/non-adjustable main jet should never
be used on a non-governed (wide-open throttle) engine or on an engine that's
going to turn at 3,200 RPM! The reason for this is because if an engine operates
faster with a carburetor having a fixed/non-adjustable main jet, it'll run
too lean on fuel at high RPM (it'll draw much more air than fuel), which
will cause the combustion chamber to overheat and the excessive heat will
likely damage the piston and rings and possibly warp the cylinder head and/or
exhaust valve or even crack the cast iron engine block.
A lean fuel mixture can also melt away part of the
aluminum in the combustion chamber of an aluminum block engine.
A new
style Walbro carburetor with a fixed/non-adjustable main jet should never
be used on a non-governed (wide-open throttle) engine or on an engine that's
going to turn at 3,200 RPM! The reason for this is because if an engine operates
faster with a carburetor having a fixed/non-adjustable main jet, it'll run
too lean on fuel at high RPM (it'll draw much more air than fuel), which
will cause the combustion chamber to overheat and the excessive heat will
likely damage the piston and rings and possibly warp the cylinder head and/or
exhaust valve or even crack the cast iron engine block.
A lean fuel mixture can also melt away part of the
aluminum in the combustion chamber of an aluminum block engine.
The size number on the Walbro WHG #52, #60 and #64 carburetors is embossed inside the carburetor and can be seen by looking inside the upper part of the choke end, just above the venturi. A "52" carburetor has a 26mm diameter throttle bore, which converts closely to 1.024 inches (26 ÷ 25.4 = 1.024"), but actually measures 1.07".
 And being the venturi in the
old-style Carter Model N #13, #16, #18, #20, #22 carburetors used on Kohler
engine models K90/K91, K141, K160/K161, KV161,
L160/L161,
L181, K181 can't be bored-out either, the only option for pulling
competitively with these is to fabricate an adapter to fasten to the intake
port on the engine block and use a #52 Walbro or #26 Carter or Kohler carburetor.
And being the venturi in the
old-style Carter Model N #13, #16, #18, #20, #22 carburetors used on Kohler
engine models K90/K91, K141, K160/K161, KV161,
L160/L161,
L181, K181 can't be bored-out either, the only option for pulling
competitively with these is to fabricate an adapter to fasten to the intake
port on the engine block and use a #52 Walbro or #26 Carter or Kohler carburetor.
The best way to determine which engine any particular carburetor is made for is to measure the diameter of the throttle bore. Because a set of numbers that's stamped on the carburetor body mean nothing, not even to Kohler Engine dealers. If a carburetor measures .822" (13/16"), then it's designed for the K141, K160/K161, L160/L161, L181, K181 engines. If it measures 1.07", then it's for the 10hp or 12hp engines. And if it measures 1.17" or 1.2", it's for a K321, K341 or K361 engine.
The Wrong Type of Choke Lever!
Whenever I get a carburetor with the choke lever in the wrong position, if
it has a steel choke shaft, I just grind the lever off at the flare and weld
it back on the shaft in the right position. But if it has a brass shaft,
I use a steel choke shaft out of a junk carburetor. Or if I don't have a
used one in stock, I machine a steel choke shaft from a 1/4" mild steel rod.
Like the old saying goes: "There's more than one way to skin a cat."

The Unknown and Tricky Choke Shaft Detent Ball and Spring -

 The choke shaft detent ball is a tiny 1/8" (Carter or Kohler
carburetors) or 5/32" (Walbro carburetors) steel ball, and the detent spring
is a small, stout 1/8" or 5/32" diameter compression spring located inside
the air cleaner mounting hole at the 9:00 position when facing the choke
end with the float area down. Certain Walbro carburetors have the ball and
spring located at the 3:00 position. The detent ball and spring is under
pressure by the choke shaft, and is held in the open position by an indention
(small shallow hole) in the shaft. The detent ball and spring are required
only for hand-operation of the choke plate to keep it in the open position
on stand-alone engines without a remote control cable, such as a competition
garden pulling tractor, garden tiller, generator/welder, air compressor,
water pump, etc. If the choke is operated by a cable, such as on a lawn &
garden tractor, then these parts aren't needed and will serve no purpose
whatsoever. Before removing the choke shaft from the carburetor body, and
to prevent the detent ball (and possibly spring) from popping out and getting
lost, using your left hand, hold your thumb over the screw hole and index
or middle finger over the end of the choke shaft hole, then slowly and gently
pull the choke shaft out of the hole, watching that the ball don't pop out
and get lost. Replace these if lost so the choke will stay open while the
engine is running.
The choke shaft detent ball is a tiny 1/8" (Carter or Kohler
carburetors) or 5/32" (Walbro carburetors) steel ball, and the detent spring
is a small, stout 1/8" or 5/32" diameter compression spring located inside
the air cleaner mounting hole at the 9:00 position when facing the choke
end with the float area down. Certain Walbro carburetors have the ball and
spring located at the 3:00 position. The detent ball and spring is under
pressure by the choke shaft, and is held in the open position by an indention
(small shallow hole) in the shaft. The detent ball and spring are required
only for hand-operation of the choke plate to keep it in the open position
on stand-alone engines without a remote control cable, such as a competition
garden pulling tractor, garden tiller, generator/welder, air compressor,
water pump, etc. If the choke is operated by a cable, such as on a lawn &
garden tractor, then these parts aren't needed and will serve no purpose
whatsoever. Before removing the choke shaft from the carburetor body, and
to prevent the detent ball (and possibly spring) from popping out and getting
lost, using your left hand, hold your thumb over the screw hole and index
or middle finger over the end of the choke shaft hole, then slowly and gently
pull the choke shaft out of the hole, watching that the ball don't pop out
and get lost. Replace these if lost so the choke will stay open while the
engine is running.
Installing the choke shaft over the friction (detent) ball and spring can be tricky. This is how it's performed -
 Place the carburetor on a sturdy work bench or table, or gently
clamped level it in a bench vise with the choke end facing upward and the
float bowl facing toward you.
Place the carburetor on a sturdy work bench or table, or gently
clamped level it in a bench vise with the choke end facing upward and the
float bowl facing toward you.
How to Adjust the Air/Fuel Mixture Screws on a Kohler (or virtually any small engine) Fully Adjustable Carburetor - [Return To Previous Paragraph, Section or Website][Top of Page]
Operation of the Slow- and Mid-Range Carburetor Functions -
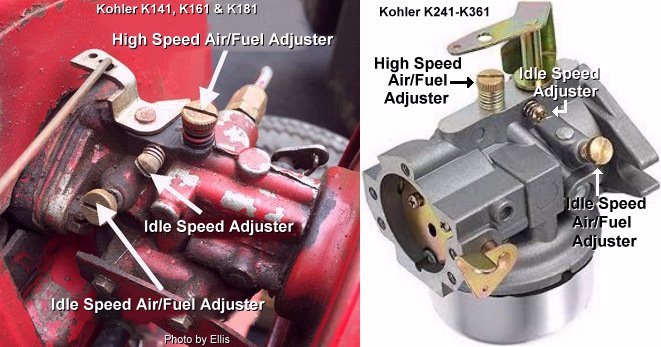 At idle speed, the engine operates
only through the idle fuel passageway. As a metered amount of air is drawn
through slow air bleed jets, fuel is drawn through main jet and further metered
through slow jet. Air and fuel are mixed in body of slow jet and exit to
idle progression (transfer port) chamber. From idle progression chamber,
air fuel mixture is metered through idle port passage. At low idle air/fuel
mixture is controlled by setting of idle fuel adjusting screws. This mixture
is then mixed with main body of air and delivered to engine. As throttle
plate opening increases, greater amounts of air/fuel mixture are drawn in
through fixed and metered idle progression holes. As throttle plate opens
further, vacuum signal become great enough at
venturi so main circuit begins to work.
At idle speed, the engine operates
only through the idle fuel passageway. As a metered amount of air is drawn
through slow air bleed jets, fuel is drawn through main jet and further metered
through slow jet. Air and fuel are mixed in body of slow jet and exit to
idle progression (transfer port) chamber. From idle progression chamber,
air fuel mixture is metered through idle port passage. At low idle air/fuel
mixture is controlled by setting of idle fuel adjusting screws. This mixture
is then mixed with main body of air and delivered to engine. As throttle
plate opening increases, greater amounts of air/fuel mixture are drawn in
through fixed and metered idle progression holes. As throttle plate opens
further, vacuum signal become great enough at
venturi so main circuit begins to work.
Operation of the High Speed Main Jet -
At high speeds/loads engine operates on main circuit. As a metered amount of air is drawn through air jet, fuel is drawn through main jet. Air and fuel are mixed in main nozzles then enters main body of air flow where further mixing of fuel and air occurs. This mixture is then delivered to combustion chamber. Carburetor has a fixed main circuit; no adjustment is possible.
If the engine runs well at idle and at higher RPM, don't worry about how the idle and high speed air/fuel mixture adjustment screws are set. Carburetor adjustments depend on the altitude level, atmospheric/barometric pressure and air temperature where the engine will be operated. In higher elevations, air is thin or less dense. Therefore, the engine requires more air than fuel to run well. But in lower elevations, air is heavy or dense, and because of this, the engine requires less air than fuel. So there is obviously no "one set adjustment" for all carburetors in all areas. And no new or rebuilt carburetor with adjustable jet(s) for small engines, automotive or whatever, come from the manufacturer or rebuilder with the idle speed, idle air/fuel mixture or the high speed air/fuel mixture adjustments set correctly. This is true for ordinary lawn and garden, and all small engines, and competition pulling engines alike, with the exception of [Walbro] carburetors with the fixed/non-adjustable high speed jet.
How the Idle Fuel Passageway Works in the Carter and Kohler Carburetors -
On the Carter or Kohler (and Walbro) carburetors, the hole towards the bottom of the long main needle adjuster is supposed to be open and not clogged, so the engine can draw fuel through it for idling from the float bowl. The idle fuel passageway for a Carter or Kohler carburetors goes as follows: Fuel is first drawn through the lower end via the tiny hole(s) (orifice) on the high speed needle adjuster, then through engine vacuum, fuel is drawn up through the tube, and over and down toward the idle air/fuel mixture screw (which sets at an angle), and then fuel is drawn into the throttle bore, next to the throttle plate. The information mentioned below Ê is mainly for Carter or Kohler carburetors. The fuel mixture screws are used as follows:
 Use a
1/32" high speed steel spiral drill bit or
1/32" end mill to enlarge the [single] lower hole (orifice)
in high speed needle air/fuel adjuster screw in Carter Model N #13, #16,
#18, #20, #22 carburetors, and Carter or Kohler #26, #28 and #30 carburetors
to create more suction for fuel through the tube to help the engine start
quicker (with throttle in idle position), idle smoothly, and idle down upon
deceleration without stalling. No need to use this on adjuster with two lower
holes. NOTE: Carefully enlarge the hole by hand with drill bit
clamped in a
mini micro pin vise hand drill chuck. And be careful when
using any tiny drill bit because they can break easily. After enlarging hole,
clear out any metal cuttings from inside the adjuster tube with 150±
P.S.I. compressed air and an air blow gun nozzle.
Use a
1/32" high speed steel spiral drill bit or
1/32" end mill to enlarge the [single] lower hole (orifice)
in high speed needle air/fuel adjuster screw in Carter Model N #13, #16,
#18, #20, #22 carburetors, and Carter or Kohler #26, #28 and #30 carburetors
to create more suction for fuel through the tube to help the engine start
quicker (with throttle in idle position), idle smoothly, and idle down upon
deceleration without stalling. No need to use this on adjuster with two lower
holes. NOTE: Carefully enlarge the hole by hand with drill bit
clamped in a
mini micro pin vise hand drill chuck. And be careful when
using any tiny drill bit because they can break easily. After enlarging hole,
clear out any metal cuttings from inside the adjuster tube with 150±
P.S.I. compressed air and an air blow gun nozzle.
 Many times when cleaning a Carter or Kohler carburetor, the
welch plug that's on the side of the carburetor doesn't need to be removed.
The only time it needs to be removed is when the tiny fuel feed hole that's
next to the throttle plate become clogged with dried gas or debris. To clear
this hole, with the idle air/fuel mixture screw and the high speed needle
adjuster removed, thread a 1/4-28 UNF screw/bolt in place of the high speed
needle adjuster (this will place more air pressure against the idle fuel
feed hole), apply 150± P.S.I. compressed air with an
air blow gun nozzle in the idle mixture screw hole, and
place your finger inside the throttle bore over the fuel feed hole, and if
you feel air come out of the hole, the hole is cleared out. If air does come
out of the idle fuel feed hole, then the welch plug will need to be removed
and manually cleared out with a
carburetor jet cleaner wire set or an
oxy-acetylene welding torch tip cleaner. A new welch plug
will need to be installed.
Many times when cleaning a Carter or Kohler carburetor, the
welch plug that's on the side of the carburetor doesn't need to be removed.
The only time it needs to be removed is when the tiny fuel feed hole that's
next to the throttle plate become clogged with dried gas or debris. To clear
this hole, with the idle air/fuel mixture screw and the high speed needle
adjuster removed, thread a 1/4-28 UNF screw/bolt in place of the high speed
needle adjuster (this will place more air pressure against the idle fuel
feed hole), apply 150± P.S.I. compressed air with an
air blow gun nozzle in the idle mixture screw hole, and
place your finger inside the throttle bore over the fuel feed hole, and if
you feel air come out of the hole, the hole is cleared out. If air does come
out of the idle fuel feed hole, then the welch plug will need to be removed
and manually cleared out with a
carburetor jet cleaner wire set or an
oxy-acetylene welding torch tip cleaner. A new welch plug
will need to be installed.
If an engine blows black smoke out the exhaust while running, then here are the main causes:
Black exhaust smoke is when an engine is getting too much gas and/or not enough air in the combustion chamber. The causes for this are either... (listed from most common to rare causes)
Also, sometimes flooding of the carburetor will deposit gas in the crankcase oil, but only in a vertical shaft engine. Because gas can't seep into the crankcase on horizontal shaft engines. The cause of the problem is the carburetor is flooding. The gas seeps past the piston ring gaps and into the crankcase. To fix this, clean the float valve (needle and seat) in the carburetor, or install a new carburetor overhaul/rebuild kit with a new float valve needle and seat. Also, clean out the fuel hoses with 150± P.S.I. compressed air and an air blow gun nozzle and install a new fuel filter. And then the crankcase oil will need to be drained and clean/uncontaminated motor oil installed.
The OEM Kohler Carburetor Intake Air/Fuel Mixture Baffle Plate -
 The purpose of the OEM Kohler
carburetor/intake air/fuel mixture baffle plate is to atomize (reduced into
smaller particles) or "swirl" the incoming air/fuel mixture more efficiently
at higher RPM so the engine will produce more horsepower and torque. This
part was made by Kohler of stamped .018" thickness aluminum with inside
45º/angled tabs/baffles, and installed on certain opposed (flathead)
twin cylinder engines carburetor and intake manifold sandwiched between two
(ordinary/.030" thickness) mounting gaskets. The discontinued OEM Kohler
part number for this is 52 063 40-S. And according to the official Kohler
engine parts list, this particular part originally came on Kohler Magnum
model M18 engines with specification numbers: 24620, 24644, 24665, 24666
(all AYP); 24646 (Cub Cadet); model MV18 engines with specification numbers:
58553, 58556, 58560, 58561 (all AYP); M20 engines with specification numbers:
49603, 49634 (both AYP); and model MV20 engines with specification numbers:
57525 (Exmark); 57526 (Yardman); 57527, 57528, 57529 (all AYP). If you're
lucky enough to find one of these, it can be used on the Kohler single cylinder
engine models K241, M10, K301, M12, K321, K330/K331, M14, K341, M16 and K361
to improve the performance at higher RPM. This part is guaranteed to work!
It showed a slight increase in horsepower and torque when tested on my personal
engine dyno. It's the next best thing to having a
fuel injected engine.
[Return
To Previous Paragraph or Section]
The purpose of the OEM Kohler
carburetor/intake air/fuel mixture baffle plate is to atomize (reduced into
smaller particles) or "swirl" the incoming air/fuel mixture more efficiently
at higher RPM so the engine will produce more horsepower and torque. This
part was made by Kohler of stamped .018" thickness aluminum with inside
45º/angled tabs/baffles, and installed on certain opposed (flathead)
twin cylinder engines carburetor and intake manifold sandwiched between two
(ordinary/.030" thickness) mounting gaskets. The discontinued OEM Kohler
part number for this is 52 063 40-S. And according to the official Kohler
engine parts list, this particular part originally came on Kohler Magnum
model M18 engines with specification numbers: 24620, 24644, 24665, 24666
(all AYP); 24646 (Cub Cadet); model MV18 engines with specification numbers:
58553, 58556, 58560, 58561 (all AYP); M20 engines with specification numbers:
49603, 49634 (both AYP); and model MV20 engines with specification numbers:
57525 (Exmark); 57526 (Yardman); 57527, 57528, 57529 (all AYP). If you're
lucky enough to find one of these, it can be used on the Kohler single cylinder
engine models K241, M10, K301, M12, K321, K330/K331, M14, K341, M16 and K361
to improve the performance at higher RPM. This part is guaranteed to work!
It showed a slight increase in horsepower and torque when tested on my personal
engine dyno. It's the next best thing to having a
fuel injected engine.
[Return
To Previous Paragraph or Section]
Information About Using a Carburetor Intake Tube/Spacer (Fuel Atomization Chamber) -


![]() Using
a fuel atomization chamber intake tube or spacer to distance the carburetor
away from the engine block allows the fuel to atomize better (break down
into smaller particles or a fine mist) so the engine will produce more power
and torque at higher RPM. The further the carburetor is spaced from the engine
block (flathead engines) or cylinder head(s) on OHV engines, the better the
fuel will atomize and the more power the engine will produce at higher RPMs.
It works, and it works great. This is why most makes and models of carbureted
small engines [other than the cast iron block single cylinder Kohler] have
a long intake tube, and why most naturally-aspirated carbureted high-performance
automotive V6 and V8 engines use a high-rise intake manifold. Again, it's
the next best thing to having a
fuel injected engine.
Using
a fuel atomization chamber intake tube or spacer to distance the carburetor
away from the engine block allows the fuel to atomize better (break down
into smaller particles or a fine mist) so the engine will produce more power
and torque at higher RPM. The further the carburetor is spaced from the engine
block (flathead engines) or cylinder head(s) on OHV engines, the better the
fuel will atomize and the more power the engine will produce at higher RPMs.
It works, and it works great. This is why most makes and models of carbureted
small engines [other than the cast iron block single cylinder Kohler] have
a long intake tube, and why most naturally-aspirated carbureted high-performance
automotive V6 and V8 engines use a high-rise intake manifold. Again, it's
the next best thing to having a
fuel injected engine.
A 1" carburetor spacer will definitely help atomize the fuel into smaller particles so the engine will produce more noticeable power, and it'll help the engine last longer and burn less fuel. On average, dyno tests had proven that engines with a 1" spacer produced about 12% more horsepower and torque. This is why virtually all [aluminum block] Briggs & Stratton, Tecumseh, and other makes and models of small engines use a factory-installed intake tube. But for some reason, cast iron block single cylinder Kohler engines are the only ones that didn't come with an intake tube.
When choosing the length of the intake tube, it seems that a 3" length works best for gas, and 5" length works best for E85 or methanol fuels. Because gas runs more lean than E85 or methanol, it requires less space or distance to fully atomize (be reduced into smaller particles), and being E85 and methanol fuels run richer, they need more space or distance to fully atomize before these enter the combustion chamber.
For competition pulling, if an association's/club's rules state that no intake tube can be used with the carburetor, the OEM Kohler carburetor intake air/fuel mixture baffle plate (as described above) and/or a heat isolator gasket will work great instead. The heat isolator gasket isolates the carburetor body from the engine heat so when the cool fuel from the carburetor makes contact with the warm/hot engine (intake runner), it will instantly atomize better (be reduced into smaller particles) before it enters the combustion chamber, which will help the engine produce more horsepower and torque. Yet again, it's the next best thing to having a fuel injected engine.
 FYI - The automotive V8 high rise intake manifold and Chrysler's
Slant Six engine (with the longer intake manifold runners) were designed
to atomize the fuel better so the engine will produce more power at higher
RPM and get better fuel mileage at any RPM. If anyone tells you differently
about the Chrysler slant six engine, then they are wrong! These are the ONLY
reasons Chrysler made the slant six engine, designed it the way they did
and it works!
FYI - The automotive V8 high rise intake manifold and Chrysler's
Slant Six engine (with the longer intake manifold runners) were designed
to atomize the fuel better so the engine will produce more power at higher
RPM and get better fuel mileage at any RPM. If anyone tells you differently
about the Chrysler slant six engine, then they are wrong! These are the ONLY
reasons Chrysler made the slant six engine, designed it the way they did
and it works!
In addition, "roughing up" the inside of the intake tube will help create turbulence to "break up" and atomize the fuel better and should help a Kohler engine produce a few more ponies. This works for automotive engines, and it should work for Kohler engines as well.
 On
single cylinder Kohler competition pulling engines that run at open RPM,
when using a mounting gasket between the intake tube and intake port, due
to normal high RPM engine vibration, the [somewhat soft] gasket will allow
the tube (and carburetor) to vibrate and possibly cause one half of the intake
port (with a huge enlarged port opening, which weakens the port) to break
off. This is based on fact and has been known to happen. So to prevent this
from happening, instead of using a gasket, a shallow, narrow groove can be
machined in one end of the flange of the tube for a reusable small
cross-sectional diameter neoprene rubber O-ring. The O-ring will take place
of the gasket to prevent a vacuum leak. The O-ring will compress, guaranteeing
metal to metal contact to secure the tube directly to the engine block. The
same can be done to a carburetor mounting flange.
On
single cylinder Kohler competition pulling engines that run at open RPM,
when using a mounting gasket between the intake tube and intake port, due
to normal high RPM engine vibration, the [somewhat soft] gasket will allow
the tube (and carburetor) to vibrate and possibly cause one half of the intake
port (with a huge enlarged port opening, which weakens the port) to break
off. This is based on fact and has been known to happen. So to prevent this
from happening, instead of using a gasket, a shallow, narrow groove can be
machined in one end of the flange of the tube for a reusable small
cross-sectional diameter neoprene rubber O-ring. The O-ring will take place
of the gasket to prevent a vacuum leak. The O-ring will compress, guaranteeing
metal to metal contact to secure the tube directly to the engine block. The
same can be done to a carburetor mounting flange.
Another way to gain more horsepower and torque at virtually any RPM besides roughing up the inside of the intake tube is to fabricate a spiral fuel atomizer from ordinary sheet metal steel. This particular part is made the same length but a few thousandths bigger in width than the intake tube, twisted one time (180º), and is fitted snugly inside the intake tube. This is a dyno-proven add-on and performance modification that increases engine horsepower and torque by about 5-10%.
Also for competition pulling, with an intake tube in use, mounting gaskets are not necessary. Just resurface the carburetor mounting flange and ends of the intake tube (if needed) on a wide, flat belt sander, large flat sanding disc or on the side of an abrasive metal cutting wheel on a electric chop saw (the kind that automotive muffler shops use) (use eye protection!), and then apply a thin bead of clear RTV silicone adhesive sealant with no gasket. When a gasket is used, the bolts or nuts (with studs) are tightened, the softness of the gasket could cause the carburetor flange to warp and possibly break. With no gasket involved, there will be metal to metal contact with the silicone filling in the open gaps between the two metals, and there is NO WAY the flange can warp or possibly break! By the way - I've always preferred to use clear RTV silicone adhesive sealant for three reasons: Gaskets don't always seal the irregularities between mating metals, especially thin metal covers; being it's an adhesive, it bonds parts together, forming a leak-proof seal; and being it's clear, it makes for a clean and professional-looking repair job. When applied sparingly, it can't be easily seen or noticed between the parts.
The Cause of Slight Carburetor Flooding or "Loading Up on Fuel" at Slow Idle with a High-Performance/Long Duration Camshaft -
Sometimes when using a high-performance/long duration camshaft, regardless if the engine has a stock or modified carburetor, if the engine idles for a long period of time, it may run rich on fuel at a slow idle speed. What causes this is with a long duration cam, intake vacuum is low and with a single cylinder engine, being the valves stay open longer, excess fuel builds up in the carburetor and/or intake tube. All engines with a long duration camshaft have lower than normal vacuum at slow idle. The longer the duration a cam has, the lower the vacuum. What causes excess fuel to build up in the intake is the long duration of the cam lobes holds the [intake] valve open longer, and at slow idle, pressure of the piston moving upward in the cylinder blows some of the air/fuel back into the carburetor and/or intake tube. And as the engine is revved up, raw unburned fuel black smoke (gas) will blow out the exhaust pipe until the fuel is cleared out of the carburetor and/or intake tube. With the engine running well above idle, air become trapped within the combustion chamber and the piston don't have time to push any air/fuel back into the carburetor and/or intake tube. This happens with all types of fuels and there's nothing that can be done about it. It's the nature of the long duration camshaft. Some might think when this happens that there's something wrong with the carburetor, and nothing can be done to the idle fuel passageway to prevent this. Just make a simple adjustment with the idle air/fuel mixture screw, set the engine at a fast idle and don't allow the engine to idle for a long period of time. [Return To Previous Paragraph or Section]
The Major Causes of Carburetor Flooding -
FYI - I don't put any additives in my gas. I think it's a waste of money and effort, and gives false hope. I filter out the dirt and remove any water from the [somewhat fresh] left-over gas that's in my customer's small engine equipment, and dump it in my personal car or truck so it will mix with the fresh gas that's already in the tank. Then I always use fresh/purchased gas with no additives in my customer's small engine equipment.
What prevents most carburetor and fuel system from having problems when using gasoline is to run the engine out of fuel or draining the entire fuel system if it's not going to be used for more than 30 days at a time. If there's no fuel left in the system, then there should be no problems. The following causes are listed from most common to rare.
If fuel drips out of or from the carburetor...
 Fuel leak at the carburetor float
bowl rubber O-ring seal. Only happens when engine is in operation. Circumference
of float bowl not sealing tight against the
neoprene
rubber O-ring seal and fuel baffle/splash shield in carburetor body.
Fuel leak at the carburetor float
bowl rubber O-ring seal. Only happens when engine is in operation. Circumference
of float bowl not sealing tight against the
neoprene
rubber O-ring seal and fuel baffle/splash shield in carburetor body.
If gas constantly pours out of the carburetor...
The best way to remove built-up
stuck and stubborn debris from inside the float bowl is to use a 2" brass
wire cup brush (shown to the right ->) with a hand-held power drill, and
then use 150± P.S.I. compressed air with an
air blow gun nozzle to clear out the debris from the main
jet hole and clear out the entire float bowl area of the carburetor.
 If the carburetor on an engine
has been setting for some time without an air cleaner/filter assembly, and
if gas pours out of the carburetor only when cranking the engine, especially
with a mechanical fuel pump, then the gas stops pouring out when the engine
isn't cranked, check for a clogged atmospheric vent opening (air passageway
from inside the float bowl area to outside of carburetor) in the carburetor.
Sometimes a
mud dauber (wasp-like insect) will build their nest in
a place like this. (I've seen this happen a few times with my customer
carburetor rebuilds.)
If the carburetor on an engine
has been setting for some time without an air cleaner/filter assembly, and
if gas pours out of the carburetor only when cranking the engine, especially
with a mechanical fuel pump, then the gas stops pouring out when the engine
isn't cranked, check for a clogged atmospheric vent opening (air passageway
from inside the float bowl area to outside of carburetor) in the carburetor.
Sometimes a
mud dauber (wasp-like insect) will build their nest in
a place like this. (I've seen this happen a few times with my customer
carburetor rebuilds.)
What makes crankcase oil black is blow-by due to either worn piston rings, carburetor flooding or the engine running rich on fuel (gas). And if there's gas in the oil (you can smell the presence of gas), this means there's a hole in the diaphragm in the mechanical fuel pump. Being there are no fuel pump repair kits available nowadays, an either good used or new replacement fuel pump is required.
How to Separate Gasoline from Water -
No need to dispose of fresh gas just because it's contaminated with water (and/or dirt and debris). And with the price of gas nowadays, this would be a wise thing to do.
 Gasoline and alcohol fuels
are both extremely flammable! Use caution and don't smoke, avoid making sparks
or don't have an open flame exposed when working near or with either of them.
Work in a well-ventilated area, too.
Gasoline and alcohol fuels
are both extremely flammable! Use caution and don't smoke, avoid making sparks
or don't have an open flame exposed when working near or with either of them.
Work in a well-ventilated area, too.
By the way - As business is booming, we've been to many competition garden tractor pulls through the years and noticed that some pulling tractors leak fuel in places where a fuel leak shouldn't be. Therefore, I think the safety inspections should include checking the fuel hoses for dry-rotting, cracks, fuel leaks, loose fittings, etc. (The tractors should have sturdy wheelie bars, too.) The inspectors should grab hold of the fuel hose(s) with their hand, bend it and slightly jerk on it to check for durability. This is very important. Especially in a kid's class. Don't wait until a small issue become a major problem, then turn in to a catastrophe. If a pulling club's sanctioning safety rules are enforced, and pullers would build their tractors right and maintain them regularly, there wouldn't be any injuries, fires, or fear of a fire. Click or tap here to read more about a competition garden pulling tractor catching on fire.
 If an engine won't idle or idles poorly, if it's a Carter or
Kohler carburetor, chances are, there's old, dried gas debris inside the
high speed air/fuel needle adjuster tube. To fix this, first, on an adjuster
with only one lower hole, carefully enlarge the hole with a
1/32" high speed steel spiral drill bit or
1/32" end mill. Then use a small, bendable mild steel wire,
such as a
bread wrapper wire twist tie with the coating stripped
off, to clean out inside the tube. And use the 150± P.S.I. compressed
air with an
air blow gun nozzle to thoroughly clear out the tube. Suck
through the tube with your mouth to make sure it's clear and unclogged. (Proven
method that works.) If performing this won't clear out the tube, then a new
or used unclogged high speed air/fuel needle adjuster screw will need to
be acquired. But make sure it's the correct adjuster for your particular
carburetor!
If an engine won't idle or idles poorly, if it's a Carter or
Kohler carburetor, chances are, there's old, dried gas debris inside the
high speed air/fuel needle adjuster tube. To fix this, first, on an adjuster
with only one lower hole, carefully enlarge the hole with a
1/32" high speed steel spiral drill bit or
1/32" end mill. Then use a small, bendable mild steel wire,
such as a
bread wrapper wire twist tie with the coating stripped
off, to clean out inside the tube. And use the 150± P.S.I. compressed
air with an
air blow gun nozzle to thoroughly clear out the tube. Suck
through the tube with your mouth to make sure it's clear and unclogged. (Proven
method that works.) If performing this won't clear out the tube, then a new
or used unclogged high speed air/fuel needle adjuster screw will need to
be acquired. But make sure it's the correct adjuster for your particular
carburetor!
If an engine idles slow when the throttle lever is held to the slowest position by hand, but refuses to idle down on its own, the following may be the causes:
If an engine idles well, but runs only at top governed speed (up to 3,200 RPM with a fixed/non-adjustable main jet; or 3,600 RPM with a fully adjustable main jet) with the choke partially closed, or if it surges or hesitates to rev up, this means the engine is running too lean on fuel, and following are the most likely causes: (Listed from most common to rare.)
Solution: Remove carburetor,
remove float bowl and float, and use a
carburetor jet cleaner wire set or an
oxy-acetylene welding torch tip cleaner to clear out the
dried gas and/or dirt/debris from the main jet.
IMPORTANT: When cleaning the hole (orifice) in
the main jet, use a wire cleaner of the correct size, and be careful not
to enlarge the hole, or the engine may run too rich on fuel! This cannot
be undone! But if the engine still runs the same after cleaning
the main jet, then the hole (orifice) in the main jet will need to be slightly
if enlarged a few thousandths of an inch to give the engine a little more
fuel. After cleaning or enlarging the hole (orifice) in the main jet, always
use 150± P.S.I. compressed air with an
air blow gun nozzle to clear the debris and/or metal fragments
from the carburetor.
 FYI - If a gas cap is missing the sealing gasket/splash
shield, this part can be made from durable
paper-like gasket material by cutting out a piece so the
outside diameter fits snug inside the cap. Be sure to make a small hole (1/32")
off-center in the gasket for the atmospheric vent to draw air in the tank
as fuel is depleted. And if fuel spews out of the vent hole in the cap (with
the gasket/splash shield installed) with a full tank of gas due to normal
engine vibration, to prevent a possible fire, place a small piece of porous
foam rubber
(reticulated polyurethane foam) between the gasket/splash
shield and vent hole in the cap. The foam will absorb the fuel and block
it from being forced out the vent hole, and it'll allow incoming outside
air to pass through as fuel is depleted in the tank.
FYI - If a gas cap is missing the sealing gasket/splash
shield, this part can be made from durable
paper-like gasket material by cutting out a piece so the
outside diameter fits snug inside the cap. Be sure to make a small hole (1/32")
off-center in the gasket for the atmospheric vent to draw air in the tank
as fuel is depleted. And if fuel spews out of the vent hole in the cap (with
the gasket/splash shield installed) with a full tank of gas due to normal
engine vibration, to prevent a possible fire, place a small piece of porous
foam rubber
(reticulated polyurethane foam) between the gasket/splash
shield and vent hole in the cap. The foam will absorb the fuel and block
it from being forced out the vent hole, and it'll allow incoming outside
air to pass through as fuel is depleted in the tank.
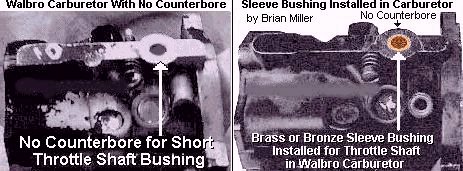
 Solution: If throttle shaft hole in the carburetor body
has a counterbore, install new flat bronze bushing and/or new throttle shaft,
or if no counterbore is present, have throttle shaft hole precision align-bored
for installation of a new bronze sleeve bushing with an [oiled] foam rubber
seal. Click or tap here for more
information.
Solution: If throttle shaft hole in the carburetor body
has a counterbore, install new flat bronze bushing and/or new throttle shaft,
or if no counterbore is present, have throttle shaft hole precision align-bored
for installation of a new bronze sleeve bushing with an [oiled] foam rubber
seal. Click or tap here for more
information.
FYI - If the spark plug's tip is black and/or has wet gas on it, and if the carburetor has been thoroughly cleaned (multiple times), but you think the problem is still in the carburetor, well, the carburetor is probably working fine because the engine is obviously getting plenty of fuel. As an older, experienced mechanic once said: "Most carburetor problems are electrical." Meaning faulty/weak ignition system. This have been proven true more times than I can remember.
Backfiring out the exhaust upon deceleration is normal for virtually all engines since gas is still going through the combustion chamber, compressing in the exhaust and exploding from the exhaust heat. But if an engine constantly backfires out the exhaust at any speeds after running for several minutes, the problem may be...
 The fuel solenoid used on newer
Briggs & Stratton, Kohler, etc., engines is located on the bottom of
the float bowl. The spring-loaded plunger in it stops the fuel supply to
the combustion chamber by blocking off the main jet as soon as the ignition
is turned off. With this type of fuel solenoid, the engine will die immediately
when the ignition is turned off. This solenoid also prevents a loud BANG
out the muffler when the ignition is turned off while the engine is hot.
Without it, when the [hot] engine is turned off while throttled up, unburned
gas will continue to pass through the combustion chamber, build up in the
still red-hot muffler where the gas is compressed with hot air, and then
produce a loud BANG out the muffler.
The fuel solenoid used on newer
Briggs & Stratton, Kohler, etc., engines is located on the bottom of
the float bowl. The spring-loaded plunger in it stops the fuel supply to
the combustion chamber by blocking off the main jet as soon as the ignition
is turned off. With this type of fuel solenoid, the engine will die immediately
when the ignition is turned off. This solenoid also prevents a loud BANG
out the muffler when the ignition is turned off while the engine is hot.
Without it, when the [hot] engine is turned off while throttled up, unburned
gas will continue to pass through the combustion chamber, build up in the
still red-hot muffler where the gas is compressed with hot air, and then
produce a loud BANG out the muffler.
The solenoid is supposed to make a "click" sound when the ignition is turned on. When in doubt rather it's the solenoid that's defective or bad wiring on the tractor, the solenoid can be tested with a 12 volt battery. With the solenoid removed from the carburetor, connect the battery positive (+) post to the solenoid wire, and connect the battery negative (–) post to the body of the solenoid. If the plunger quickly withdraws in the solenoid body, it's in good condition. If it doesn't withdraw, then the wire connecting to the solenoid has an open in it.
If the solenoid fails to function, it can be replaced with a new one, or remove it and simply snip off the protruding pin (plunger rod), and reinstall it. Doing this will allow the engine to draw fuel and run. But remember to idle the engine down for a few minutes each time before shutting it off, or like I said, it may produce a loud BANG out the muffler.
Advertisement: (Prices are subject to change without notice.)
| Click here to contact A-1 Miller's Performance
Enterprises to place an order, send your parts for repairing, and/or for
FREE professional and honest technical customer service assistance and support
and payment options. Please contact A-1 Miller's if you need a part or
parts, or service(s) performed that's not listed or mentioned in this
website.
NOTE: Being the solenoid (OEM Kohler part # 25 755 06-S) for Kohler engine models M18 with specification numbers: 24563, 24568, 24574, 24577, 24592, 24594, 24599, 24619, 24630, 24631, 24636, 24646, 24655, 24656, 24659, 24664, 24674, 24696, 49514, 49544, 49545, 49565, 49569, 49570, 49572; M20 with specification numbers: 49584, 49595, 49599, 49608, 49623, 49624, 49629; MV20 with specification numbers: 57501-57514, 57527, 57528 is no longer available, to convert these engines without use of the solenoid, remove the failed solenoid and valve, cut short 3/8" threads in the hole (remove the float bowl first and use compressed air with an air blow gun nozzle to clear out the metal cuttings afterwards), and install a short 3/8" Allen set screw in the hole. Don't thread the set screw deep into the hole, or it will block off outside atmospheric air from entering the float bowl. Without a solenoid and with the conversion, the engine will require a different ignition switch to shut off the spark. And the engine should be idled down before shutting it off to lessen the chance of a backfire out the muffler. |
How To Loosen a Gummed-Up, Stuck, Corroded or Rusted-In-Place Throttle or Choke Shaft, or Adjusting Screw -
 EVAPO-RUST® and
 Metal Rescue are very safe products to use and
works wonders to remove rust and loosen virtually any rusted or corroded
metal part! Just soak the carburetor body for 1 hour for light rust and up
to 12 hours for extremely heavy rust. Then use small locking pliers
(Vise Grip) to GENTLY rotate the shaft back and forth
Metal Rescue are very safe products to use and
works wonders to remove rust and loosen virtually any rusted or corroded
metal part! Just soak the carburetor body for 1 hour for light rust and up
to 12 hours for extremely heavy rust. Then use small locking pliers
(Vise Grip) to GENTLY rotate the shaft back and forth
 . Don't force it because it could become twisted
and/or break off at the closest plate retaining screw hole! It may rotate
(loosen) just a few thousandths of an inch. After it rotates slightly, spray
it again and gently rotate it again. Eventually, it should rotate more and
swivel 100% free. These products are very safe to use and they work wonders
on virtually anything that's rusted!
. Don't force it because it could become twisted
and/or break off at the closest plate retaining screw hole! It may rotate
(loosen) just a few thousandths of an inch. After it rotates slightly, spray
it again and gently rotate it again. Eventually, it should rotate more and
swivel 100% free. These products are very safe to use and they work wonders
on virtually anything that's rusted!
Or use a heavy duty bathroom toilet bowl cleaner. Most of them will remove rust and scale. If it reads on the label that it will remove rust, then that's the one to use. Pour the cleaner in a container that's large enough for the carburetor body, and allow it to soak for about 30 minutes and then rinse it off with water. The throttle or choke shaft should swivel with no problems.
Or use distilled white vinegar to remove rust from the outside of gas tanks, tools, bolts/nuts, clutch pressure plates or virtually any exterior steel or cast iron object. Check it out here: vinegar rust removal - YouTube. Distilled white vinegar will not remove rust from inside a gas tank because it cannot be "rubbed loose" by hand from inside the tank.
GUNK Liquid Wrench® also works wonders to loosen virtually
any rusted or corroded metal part! Just spray the ends of the throttle or
choke shaft, let soak for about 30 minutes or perhaps overnight, then use
small locking pliers
(Vise Grip) to GENTLY rotate the shaft back and forth
. Don't force it because it could become twisted
and/or break off at the closest plate retaining screw hole! It may rotate
(loosen) just a few thousandths of an inch. After it rotates slightly, spray
it again and gently rotate it again. Eventually, it should rotate more and
swivel 100% free.
If the shaft(s) refuse to loosen with either Evapo-Rust, Liquid Wrench or
heavy duty bathroom toilet bowl cleaner, remove the float bowl, float, fuel
baffle/splash shield and O-ring seal. Clamp the carburetor in a bench vice,
then use a
propane torch or an
oxy-acetylene torch to LIGHTLY heat the carburetor
body next to the shaft (don't get the carburetor body too hot!), and use
the locking pliers
(Vise Grip) to GENTLY rotate the shaft back and forth
. The shaft should swivel 100% free within a
few seconds of heating. Heating might also work to remove a stuck-in-place
idle speed adjuster screw, idle fuel mixture screw or the main adjuster screw.
Be very gentle rotating a brass screw to loosen it because being brass is
a soft metal, it could snap off! And be careful not to get cast aluminum
too hot, it may crumble or split into pieces! Don't use a torch in an attempt
to remove a stuck main jet/nozzle (emulsion tube)
from a carburetor that's in good condition. Being the aluminum surrounding
the main jet/nozzle (emulsion tube) is thin, it will
most likely crumble or split into pieces under the severe heat, rendering
the carburetor useless.
Click here to
learn how to remove the main jet/nozzle.
How to Clean the Inside of a Heavily Rusted or Dirty Metal gas tank -
Fill the gas tank with
EVAPO-RUST®,
Metal Rescue�, or a
heavy duty bathroom toilet bowl cleaner. Most of these
will remove rust and scale. If it reads on the label that it will remove
rust, then that's the one to use. Leave it for 1 hour for light rust and
up to 12 hours for extremely heavy rust, drain and flush with clean water,
allow to thoroughly dry. These products are very safe to use and they work
wonders on virtually anything that's rusted! Or use
distilled white
vinegar to remove rust from inside gas tanks, tools, bolts/nuts, clutch
pressure plates or virtually any steel or cast iron part:
vinegar rust removal - YouTube.
Another method to clean an internally rusted or especially dirty gas tank, put some small driveway gravel in the tank with water, seal the fuel outlet fitting and gas cap vent holes (make sure the gas cap has a good seal), then literally and vigorously shake the heck out of it! Or for less tiresome labor, put the gravel and water in the tank, seal it up, securely tie a blanket around it and then put it in a clothes dryer or fasten it in an electric paint shaker. Set the dryer on the cold or "No Heat" setting, and let the dryer tumble or paint shaker shake for a couple of hours. When the water is drained and majority of the gravel removed, use a garden water hose to thoroughly clean out inside the tank. It should look new inside. If there's still some rust or dirt/debris in it, repeat the process until all the rust or dirt/debris is broken loose. And regardless of what you may have heard, putting sugar in a gas tank will NOT ruin the engine! Don't believe in everything you hear. Read about it here: snopes.com: Sugar in the gas tank. YouTube link: Sugar in Your Gas Engine gas tank.
How to Repair a Hole in a Metal Fuel or Oil Storage Tank -
 If virtually any kind of
ferrous metal
(steel) tank have a rusted or dented hole in it and leaks fuel or liquid,
it can be successfully repaired by using a quality-made
gas tank sealant. But if the hole is too large for the
sealant, and if the tank is made of steel, a reputable
automotive radiator repair shop can solder a [tin] patch
over the hole. Then ask them to pressure test the tank filled with air submerged
in water to see if the patched hole leaks (bubbles). They usually have
rubber expansion plugs of various sizes to block-off the
inlet and outlet openings or ports.
If virtually any kind of
ferrous metal
(steel) tank have a rusted or dented hole in it and leaks fuel or liquid,
it can be successfully repaired by using a quality-made
gas tank sealant. But if the hole is too large for the
sealant, and if the tank is made of steel, a reputable
automotive radiator repair shop can solder a [tin] patch
over the hole. Then ask them to pressure test the tank filled with air submerged
in water to see if the patched hole leaks (bubbles). They usually have
rubber expansion plugs of various sizes to block-off the
inlet and outlet openings or ports.
How to Remove the OEM Carter or Kohler Soft Brass Throttle or Choke Shaft Retaining Screws Without Breaking Them Off - [Return To Previous Paragraph or Section]
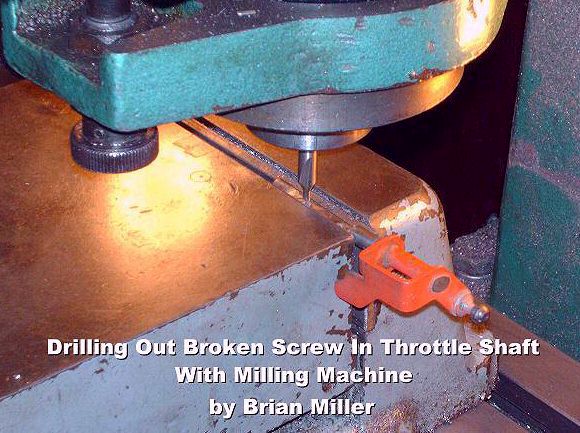
 First of all, I hate when people throw away a reusable throttle
or choke shaft just because it has a broken off throttle or choke plate retaining
screw in it. The only reason most carburetor manufacturers install soft brass
screws in the throttle and choke shafts is because the protruding threaded
ends can be easily flared to prevent the screws from loosening and becoming
dislodged. This saves the factory money from not having to use lock washers
or liquid threadlocker. A dislodged throttle plate screw could be sucked
into the combustion chamber and become lodged between the intake valve and
seat, bend the exhaust valve, or damage the cylinder head and top of the
piston. But f the OEM soft brass throttle or choke shaft screws do come out
without breaking off, they should never be reused because the area in the
threads can be distorted or over-stretched from being overtightened, which
could cause the screw to eventually break off.
First of all, I hate when people throw away a reusable throttle
or choke shaft just because it has a broken off throttle or choke plate retaining
screw in it. The only reason most carburetor manufacturers install soft brass
screws in the throttle and choke shafts is because the protruding threaded
ends can be easily flared to prevent the screws from loosening and becoming
dislodged. This saves the factory money from not having to use lock washers
or liquid threadlocker. A dislodged throttle plate screw could be sucked
into the combustion chamber and become lodged between the intake valve and
seat, bend the exhaust valve, or damage the cylinder head and top of the
piston. But f the OEM soft brass throttle or choke shaft screws do come out
without breaking off, they should never be reused because the area in the
threads can be distorted or over-stretched from being overtightened, which
could cause the screw to eventually break off.
Anyway, when removing these screws and to prevent them from breaking off, first, grind down the protruding/flared ends with a Dremel or equivalent small rotary grinder chucked with either a very small grinding stone (chainsaw sharpening stone) or an 1/8" high speed steel end mill until the threads are flush with the shaft. Then the screws can be easily removed from the shaft without breaking them off. Be sure to use a quality-made screwdriver with a flat blade and square edge that fits the slot of the screw head perfectly to prevent from distorting or "stripping out" the slot. (This is why A-1 Miller's use and offer for sale hardened 18-8 stainless steel screws [with split lock washers]. Unlike [OEM] soft brass screws, 18-8 stainless steel will not strip out or break off under normal installation.)
But should a brass screw break off in the throttle or choke shaft without first grinding down the protruding/flared end, sometimes the shaft can be difficult to remove from the carburetor body due to the protruding flared end. Or if the slot in the screw head gets "stripped-out." In this case, use the Dremel to grind the flared end of the [broken] screw and/or grind off the head of the screw until it's flush with the shaft. Then the shaft can be removed. Afterwards, the broken screw can be drilled out using a milling machine clamped in a vise with a 1/16" center bit drill to make a small depression in the exact center of the broken screw to prevent "drill bit skating" so either a 5/64", #46 or 2mm drill bit can be used to drill out the rest of the broken screw, and then the threads may need to be straightened/cleaned with a 3-48 UNC taper hand tap. Don't use a center punch on the broken screw. This could bend the shaft, create a crack when straightened, possibly cause it to break later when in use. The throttle and choke shafts in Carter and Kohler carburetors originally come with 3-48 UNC screws. A #3 split lock washer should be used with a 3-48 UNC screw. Should the threaded hole become enlarged from drilling out the broken screw, the hole(s) can be made bigger with a 4-40 UNC tap, and a 4-40 UNC screw with a #4 split lock washer will need to be installed. By the way - liquid threadlocker is not required with a lock washer. [Return To Previous Paragraph or Section]
Correct Orientation and Installation of the Throttle Plate and Choke Plate for Carter, Kohler and Walbro Carburetors - [Return To Previous Website, Paragraph or Section]
Operation of the throttle plate and it works: All genuine OEM factory-made throttle plates, rather if it's for a small engine, automotive, farm tractor, industrial engine, etc., are made 3% oblong or "egg-shaped", and have a slight angle on the edges that seal against the sides of the throttle bore when the throttle plate is fully closed. The oblong shape and angles prevent the majority of incoming air from entering the combustion chamber when the throttle is in the idle position so the engine can draw air and 100% fuel through the idle fuel passageway in the carburetor so the engine can run at a low speed. With the throttle plate closed, low air vacuum occurs through the throttle bore and no fuel is drawn out of or through the [high speed] main jet/nozzle (emulsion tube). When the throttle is opened and the engine is revved up, high velocity or volume of air is drawn through the throttle bore and then fuel is drawn out of or through the main jet/nozzle. And when the engine is running approximately above 2,000 RPM, no fuel is drawn through the idle fuel passageway.
 If the throttle shaft is removed
to install a new bushing and/or a new throttle shaft, or if the
venturi is to be bored-out (and the main jet/nozzle removed
for a reworked carburetor on a competition
pulling engine), the throttle plate must be removed first.
Read the article above or click here to
learn how to properly remove the throttle (and choke) plate.
If the throttle shaft is removed
to install a new bushing and/or a new throttle shaft, or if the
venturi is to be bored-out (and the main jet/nozzle removed
for a reworked carburetor on a competition
pulling engine), the throttle plate must be removed first.
Read the article above or click here to
learn how to properly remove the throttle (and choke) plate.
To reinstall the throttle plate correctly, on the Carter, Kohler and Walbro carburetors, the C (Carter), K (Kohler) or W (Walbro) stamped on the throttle plate faces outward and toward your right when facing the throttle bore with the carburetor positioned right side up and float bowl down or toward you, as shown in the photo to the right ->. Back off the idle speed adjustment screw so it doesn't make contact with the throttle lever to allow the throttle plate be in the fully closed position. This will allow for the throttle plate to rest 100% in the throttle bore and against the throttle shaft. Make sure the throttle plate is centered with the throttle bore in the fully closed position and against the throttle shaft. Use the tips of a small [pointy] needle-nose pliers to align the holes in the throttle plate with the screw holes in the throttle shaft. Install and tighten the retaining screws with lock washers. If the throttle plate is installed in reverse or not 100% centered with the throttle bore, too much air will by-pass the throttle plate and the engine will not be able to idle down at a slow speed. Most aftermarket/ oblong throttle plates are not stamped with a letter and don't have the angle on the sides, so they can be installed in either direction, and they should seal 100% to allow the engine idle down just as well.
And when reinstalling a choke plate, make sure it's correctly aligned and centered with the intake end of the carburetor on the choke shaft when in the fully closed position. If the choke plate is not installed correctly, it will not close fully, and the engine will be hard to start or may not start at all (without the assistance of a remote fuel primer system installed).
ALWAYS install the lock washers
(or apply
medium strength liquid threadlocker) on the threads of
the throttle (and choke) plate screws, and tighten them securely to prevent
them from possibly loosening and being sucked into the combustion chamber,
and getting lodged between the intake or exhaust valve and seat, which can
possibly cause the valve to bend, or lodge on top of the piston, which can
cause damage to the piston and cylinder head, and possibly the cylinder wall.
Do the job right the first time and it won't have to be done again later,
possibly with devastating results.
[Return
To Previous Paragraph or Section]
How to Remove the Main Jet/Nozzle (Emulsion Tube) from a Carter or Kohler #26, #28 or #30 Carburetor - [Return To Previous Paragraph or Section]

 When rebuilding an OEM Carter or Kohler
#26, #28 or #30 carburetor, there is really no need to remove the
main jet/nozzle (emulsion tube). If the main jet/nozzle
will not come out, don't worry about it. All that has to be done is make
sure that the bottom hole and side holes in the main jet/nozzle are open.
To check if the side holes are open, simply spray WD-40 or aerosol carburetor
cleaner through the small hole just beneath the choke plate and observe if
it comes out the main jet/nozzle inside the throttle bore and float bowl
area.
When rebuilding an OEM Carter or Kohler
#26, #28 or #30 carburetor, there is really no need to remove the
main jet/nozzle (emulsion tube). If the main jet/nozzle
will not come out, don't worry about it. All that has to be done is make
sure that the bottom hole and side holes in the main jet/nozzle are open.
To check if the side holes are open, simply spray WD-40 or aerosol carburetor
cleaner through the small hole just beneath the choke plate and observe if
it comes out the main jet/nozzle inside the throttle bore and float bowl
area.
But if the main jet/nozzle is clogged, or if you're boring the venturi to modify/rework the carburetor for high-performance use, then the main jet/nozzle must be removed. Before attempting to remove the main jet/nozzle, and if the screwdriver slot is in good condition, then I found the best, easiest and proven way to remove it is by the following process. This method works great most of the time and the main jet/nozzle should loosen with no problems.
 (left-hand or reverse rotation
of an analog clock) by hand and with a firm grip on the screwdriver to loosen
it. Do not use a wooden handle screwdriver because the handle could break
from the impact of the hammer.
(left-hand or reverse rotation
of an analog clock) by hand and with a firm grip on the screwdriver to loosen
it. Do not use a wooden handle screwdriver because the handle could break
from the impact of the hammer.
If the above È method still didn't work, then unfortunately, sometimes the main jet/nozzle (emulsion tube) will get stuck in place and the screwdriver slot will strip out. (I hate when this happens.) Do not use an Easy Out [Broken] Screw Extractor! With this tool, the tapered shape will force the main jet/nozzle to swell or spread outward (cause it to increase in diameter), and the deeper it goes, it could possibly crack the aluminum tube, rendering the carburetor body useless. The alternative method to remove the main jet/nozzle is to drill it out. This process is performed as follows:
 If the main jet/nozzle in a
junk/useless Carter or Kohler carburetor is stuck and cannot be removed
with a screwdriver, the threaded tube can be split with either a
nut splitter,
flat cold chisel and hammer (with the tube placed on a
hard, flat surface), or heat the tube with a
propane torch or an
oxy-acetylene torch until it splits apart. If attempting
to use the
nut splitter, be careful not to damage the main jet/nozzle
itself! After the main jet/nozzle is removed, use a hacksaw to cut the
screwdriver slot slightly deeper in the main jet/nozzle so it can be reused
in another carburetor.
If the main jet/nozzle in a
junk/useless Carter or Kohler carburetor is stuck and cannot be removed
with a screwdriver, the threaded tube can be split with either a
nut splitter,
flat cold chisel and hammer (with the tube placed on a
hard, flat surface), or heat the tube with a
propane torch or an
oxy-acetylene torch until it splits apart. If attempting
to use the
nut splitter, be careful not to damage the main jet/nozzle
itself! After the main jet/nozzle is removed, use a hacksaw to cut the
screwdriver slot slightly deeper in the main jet/nozzle so it can be reused
in another carburetor.
How to Remove the Main Jet/Nozzle (Emulsion Tube) from a Carter Model N #13, #16, #18, #20 or #22 Carburetor for Cleaning -
 If the main jet/nozzle in a Carter Model N #13, #16, #18, #20
or #22 carburetor that's used on Kohler engine models K90/K91, K141, K160/K161,
KV161,
L160/L161,
L181, K181 needs to be removed for cleaning, being this type
of nozzle is pressed in the carburetor body. It removes and reinstalls a
lot easier than the above È main jet/nozzle.
The removal and installation process is as follows:
If the main jet/nozzle in a Carter Model N #13, #16, #18, #20
or #22 carburetor that's used on Kohler engine models K90/K91, K141, K160/K161,
KV161,
L160/L161,
L181, K181 needs to be removed for cleaning, being this type
of nozzle is pressed in the carburetor body. It removes and reinstalls a
lot easier than the above È main jet/nozzle.
The removal and installation process is as follows:
By the way - as far as I know, new main jet/nozzles for the Carter Model N #13, #16, #18, #20 or #22 carburetor is not available from any source.
How to Remove a Broken-Off High Speed Air/Fuel Mixture Adjustment Needle Screw from a Carter or Kohler Carburetor -
Sometimes when an engine sits with gas in the fuel system, the old, dried gas residue will cause the high speed air/fuel adjuster to become seized in the carburetor body. And when attempting to remove it, the hollow tube could will break off flush with the carburetor body. (Anything is possible with soft brass and old, dried gas.) Anyway, The removal process of a broken-off main adjuster is as follows:
If you don't feel comfortable removing the broken adjuster yourself, I charge $30.00 labor each, plus return shipping & handling, to remove a broken adjuster.
Using Pump Gas with 10% Ethanol Versus 100% Race Gas in a Pulling Tractor -
First of all, in an daily-driven vehicle, gasoline with no lead is hard on soft cast iron exhaust valve seats. A soft cast iron valve seat is one that's been machined directly into an engine block or cylinder head, and it have not been heated-treated or no hardened insert is installed. In a daily-driven automobile, the seat(s) will eventually deteriorate or the metal will literally "wear away" because the absence of lead in gas to provide a protective coating to prevent wear. And being most exhaust valves are made of extremely hardened steel, they're not likely to wear at all. The intake valve and the cast iron seat is not likely to wear as much, if any. And an engine block or cylinder head with heat-treated seats or have hardened steel exhaust valve seat insert(s) installed, they should not wear whatsoever.
Anyway, the 10% ethanol in pump gas (common everyday automotive fuel) lessens exhaust emissions. Plus, the alcohol content boosts the octane, making it somewhat of a high-performance fuel. The lead content in race gas (VP Racing Fuel, Turbo Blue, Sunoco, Torco, etc.) boosts the octane also, except it's alcohol-free to pass the tech fuel test for tractor pulling. And the valve seat(s) that's ground in a cast iron block in a competition pulling engine burning 87 octane unleaded regular gas should last a long time, no longer than the tractor runs down the track (2-3 minutes per pull). They're not being driven a long distance, like in a car or truck. How to test for alcohol content in gasoline.
Older-formula mothballs have also been used by drag racers to enhance the octane rating of fuel, by dissolving the mothballs in some of the fuel and filtering out the remains with a filter paper.
Adding 2 cycle engine oil to gasoline will also boost the octane rating of the gas because the oil slows down the combustion process. The length of the combustion burning process depends on the amount of oil added to the gas. The oil content will help lubricate the cylinder wall and valves.
Average Octane Rating of Various Fuels | Remember - Only high compression engines benefit from the use of high octane fuel to increase the power output. High octane fuels have no effect whatsoever and will not increase the power output when used in a low compression engine.
|
|
By the way - I've never had problems with gas having 10% ethanol in any of my small engines or automotive engines. I don't know why anyone else would. Maybe that's because when one is having problems with a small engine not running right, it's much easier to just blame it on "bad gas" than to look for the real problem elsewhere with the engine. Remember - it takes three things to make an internal combustion engine run: carburetion, compression and ignition. A professional, thorough and energetic mechanic don't blame the problem on one thing and overlook the other two. Unless of course, he's lazy and looking to make some quick money by doing an easy fix.
NOTE: The main jet (and fuel inlet hole) should not be enlarged for alcohol-free, high octane racing gas, such as VP Racing fuel, Turbo Blue, Sunoco, Premium gas, or gas with 10% ethanol, because these fuels require the same air/fuel mixture ratio as for ordinary, low octane automotive gas. If the main jet hole (orifice) is intentionally enlarged for gasoline-based fuels, the engine will run too rich on fuel, and there'll be no way to lean it out. How to test for alcohol content in gasoline.
 Can Using Gas with
15 Percent Ethanol Damage an Engine?
Can Using Gas with
15 Percent Ethanol Damage an Engine?
Using gasoline with more than 10 percent ethanol may cost less at the pump, but it can permanently damage small engine components. E15 (gasoline with 15% ethanol) can damage engines not specifically designed for it, particularly motorcycles, boats, and small engines, like lawnmowers, riding mowers and garden tractors. While safe for 2001+ passenger vehicles, it can cause corrosion, degrade rubber/plastic parts, and clog fuel systems in incompatible engines due to higher ethanol content.
Key Considerations for E15 Usage:
![]() How to Use
E85 Fuel in
a Garden Tractor or Lawn & Garden Equipment - [Top
of Page]
How to Use
E85 Fuel in
a Garden Tractor or Lawn & Garden Equipment - [Top
of Page]
What is E85? E85 is the term for motor fuel blends (special blend of automotive fuel) of 85% ethanol (corn alcohol AKA "moonshine") and 15% gasoline. E85 is an alternative fuel as defined by the U.S. Department of Energy. Besides its superior performance characteristics, ethanol burns cleaner than pure gasoline; it is a completely renewable, domestic, environmentally friendly fuel that enhances the nation's economy and energy independence. The addition of ethanol boosts octane and, because it is an oxygenate, ethanol contributes to a more complete fuel combustion resulting in reduced emissions of carbon monoxide and other ozone-forming emissions. Ethanol also degrades quickly in water and, therefore, poses much less risk to the environment than an oil or gasoline spill. To learn more about E85, visit this website: National Ethanol Vehicle Coalition (http://www.e85fuel.com). Click or tap here to learn how to test for alcohol content in gasoline.
Fueling with E85 is not only beneficial to the environment, you'll most likely see a small increase in performance, which will be accompanied by a small decrease in fuel economy. On average, when an engine is powered by E85, the engine will have about 5% more horsepower and a 10% drop in fuel-efficiency. The added power comes from ethanol's higher (105) octane rating. The fuel economy decrease comes from the fact that ethanol has a lower energy content than gasoline, which means the engine will have to use more of it. Only high compression engines benefit from the use of high octane fuel to increase the power output. High octane fuels have no effect whatsoever when used in low compression engines.
E85 is available from most gas pumps at about 15% less than 91 octane. It can be used in virtually any gas engine fuel system, new or old. The only problem is, the rubber-like fuel hose, seals and gaskets in the fuel system might deteriorate due to the alcohol content in E85. Click or tap here to learn how to test for alcohol content in gasoline. But if the fuel system has neoprene rubber or synthetic rubber parts, there should be no problems. E85 works great for competition pulling, general lawn use or for any small engine equipment. It'll create less carbon build up in the combustion chamber, too. I've reworked lots of carburetors for people who use their garden tractor just to mow grass with and they love how the E85 produces more power. Their only complaint is the engine burns more fuel. But that's the sacrifice for more power. If an engine is converted correctly, E85 should cause no problems with engine wear or fuel system deterioration. Basically, all that needs to be done to the engine is the main jet and fuel inlet (float valve) hole in the carburetor will need to be made about 80% bigger and the ignition timing will need to be advanced about 150% more than stock. If the main jet isn't enlarged, the engine probably won't run on E85, or if it does, it will run too lean on fuel, overheat the engine, possibly damage the valves, piston and piston rings because of the excessive operating temperature. And if the timing isn't advanced enough to thoroughly burn the [slower burning] E85 fuel, some of it will exit out the exhaust unburned, with no increase in power.
No special motor oil is required with E85. But with prolonged idling, the oil may need to be changed more often. The 20% increase in the main jet and fuel inlet holes, and ignition timing applies to virtually all small engine carburetors and engines, despite the make or manufacturer.
E85 can be purchased at select gas stations in the U.S. It cost less per gallon than regular unleaded gasoline. And an engine will burn about 20% more fuel than gas with E85, but it'll also produce about 10% more power, operate cooler, have a cleaner combustion chamber and the engine will last longer.
On the K161 and K181 Kohler K-series and Magnum engines, with the Carter Model N #13, #16, #18, #20, #22 carburetor, the hole (orifice) in the main jet for 100% gasoline measures exactly 3/64" (.046") in diameter. To convert these carburetors for use with E85, enlarge the main jet and fuel inlet (float valve) holes with a 5/64" or #47 (.078") drill bit. NOTE: Drill the fuel inlet from the inside out (opposite flow of fuel) to prevent a burr that may cause the carburetor to leak fuel or flood out. For accuracy, use a small metal lathe to drill the hole bigger. IMPORTANT: If you don't feel comfortable using a metal lathe, please consult a professional and experienced machinist with a lathe. The ignition timing will also need to be advanced to 24º BTDC so the engine will take full advantage and make maximum power of the slower burning, higher octane fuel. Then with the engine running at 3,600 RPM, adjust the high-speed fuel mixture needle valve so the engine runs smooth.
On the K241-K341 single- and twin-cylinder Kohler K-series and Magnum engines with the older Carter or Kohler carburetors, the factory hole (orifice) in the main jet size for 100% gasoline measures exactly 1/16" (.0625") in diameter. To convert these carburetors for use with E85, enlarge the main jet and fuel inlet (float valve) holes with a 3/32" or #42 (.094") drill bit. NOTE: Drill the fuel inlet from the inside out (opposite flow of fuel) to prevent a burr that may cause the carburetor to leak fuel or flood out. For accuracy, use a small metal lathe to drill the hole bigger. IMPORTANT: If you don't feel comfortable using a metal lathe, please consult a professional and experienced machinist with a lathe. The ignition timing will also need to be advanced to 24º BTDC so the engine will make full advantage and make maximum power of the slower burning, higher octane fuel. Then with the engine running at 3,600 RPM, adjust the high-speed air/fuel mixture needle valve until the engine runs smoothly.
To convert virtually any 4-cycle engine to run well and produce full power on E85 fuel...
By the way, an engine can be converted back for use with 100% gas by removing the main jet/nozzle and installing a main jet/nozzle with a stock .0625" hole, and the ignition timing would need to be set at 20º BTDC. This is all that needs to be done to the engine. But if you have trouble removing the main jet/nozzle, I can do this for you and install a stock main jet/nozzle, if you won't mind sending me your carburetor.
 The Advantages
of Using Methanol Fuel in a Pulling Tractor - [Top
of Page]
The Advantages
of Using Methanol Fuel in a Pulling Tractor - [Top
of Page]
 If the carburetor have been
reworked and the ignition timing are adjusted and set correctly, methanol
can produce up to 13% increase in horsepower. If the fuel is set slightly
rich (which it should be), there's no need to constantly adjust the carburetor
settings and/or ignition timing to compensate for changes in hot or cold
weather conditions. Because of its low volatile octane rating (ability to
burn quick), methanol shouldn't be used for general lawn use. It's primarily
a high-performance fuel only, and should be used only in a high-performance
engine. Starting fluid (ether) or gasoline may need to be sprayed or squirted
into the carburetor to get the engine started in cooler weather, though.
And, faster gearing may be needed because of the
increase in horsepower and torque.
If the carburetor have been
reworked and the ignition timing are adjusted and set correctly, methanol
can produce up to 13% increase in horsepower. If the fuel is set slightly
rich (which it should be), there's no need to constantly adjust the carburetor
settings and/or ignition timing to compensate for changes in hot or cold
weather conditions. Because of its low volatile octane rating (ability to
burn quick), methanol shouldn't be used for general lawn use. It's primarily
a high-performance fuel only, and should be used only in a high-performance
engine. Starting fluid (ether) or gasoline may need to be sprayed or squirted
into the carburetor to get the engine started in cooler weather, though.
And, faster gearing may be needed because of the
increase in horsepower and torque.
It may take some experimentation to get a particular tractor to perform on methanol. Just because most experienced pullers get their tractors hooked-up good on it is no reason anyone else can't. Once one do get their tractor to perform well on methanol, they'll be reluctant to go back to gas. By the way - methanol can be purchased at most places that sell racing fuels. And it cost less than 1/3 of racing gas fuels (per gallon).
METHANOL vs GAS
-
Most garden tractor carburetors can be easily converted for methanol use. The main thing to keep in mind is that methanol require about twice the volume of fuel than gas. (Approximately a 5-6:1 ratio for methanol versus 10-12:1 ratio for gas). To run methanol, the main jet and fuel inlet (float valve) holes will need to be enlarged to about 95% of their original size.
High compression engines naturally operate at a higher operating temperature. When using low octane gasoline (Regular Unleaded or 87 octane rating) in a high compression engine, the octane of the gas is reduced by 1 point for every 10º above the normal operating combustion chamber temperature that it is formulated for. This will cause the gas to burn faster. When trying to restart a high compression overheated engine on low octane gas, what is happening is the gas is burning quickly and entirely in the combustion chamber, and producing expanding heat before the piston reaches TDC, driving the piston back down in the cylinder before it reaches TDC. This is the cause of detonation (pounding of the piston) and it'll cause the engine to "grunt" or momentarily make the crankshaft rotate in the opposite direction (but the weight of the flywheel prevents this from happening). Overheating could also crack the [cast iron] cylinder, shrink the piston, burn a hole in the piston (detonation) and weaken the expansion of the piston rings. Methanol fuel has an octane rating of 135. This is why methanol works best in a high-performance, high compression engine.
White deposits on the exhaust valve and in the combustion chamber is normal with gas fuels. Due to the lesser amount of gas in E85, it leaves behind very little deposits, and methanol doesn't leave any deposits because there's no carbon in the fuel. Only fossil fuels have carbon in them and that's what's left behind in the combustion chamber and on the exhaust valve.
Did you know that high octane gas or "race car gas" (approximately 109-110 octane) is much better than any filling station pump gas when used in a high-performance engine? Higher octane gas burns slow, producing more heat, thus allowing an engine to develop more power. Because heat is how an engine produces power. Methanol fuel produces even more heat than gas does.
Methanol never gets stale while setting around. It's burning factors (the qualities that produce power) remain intact until all of the fuel evaporates. Gasoline on the other hand, as it gets aged and stale, it's burning factors is the first thing to go. Unlike methanol, eventually all that is left of the old gas is some "foul smelling residue." Methanol never smells "old" or "stale."
If the air/fuel ratio isn't properly adjusted with both methanol or gasoline, possible engine damage may result. If either fuel is leaned-out too much, possible piston to cylinder wall scuffing, scoring or even seizure may result. If methanol is ran too rich, the oil on the cylinder wall may be diluted, causing excessive wear to the piston, rings and sometimes the cylinder wall. And if gas is ran too rich, loss in power may result with possible spark plug fouling. (Methanol is more forgiving to an engine than gas.)
A high-performance cam, larger piston, big valves and a bigger carburetor will undoubtedly help gas-burning engines develop more power. But only from the use of the parts themselves. Methanol on the other hand, will help give an engine a little more boost. Simply from the fuel itself.
Engines will consume about 50% more fuel burning methanol than gas. This is why methanol is not used on the open market in daily driven automobiles.
Some racing gasolines could eventually cause an engine to wear prematurely when used under high-performance conditions (and if the ignition timing is over-advanced). Piston wear, piston ring expansion failure, valve warping, even motor oil breakdown could result over time due to the high operating temperatures of gas in a high compression engine. (Especially on air cooled engines with no cooling system.)
An engine runs cooler burning methanol than gas. The reason why? Approximately twice the amount of methanol fuel enters an engine. There's more fuel per parts of air. As a result, this allows an engine to operate at a much cooler temperature. Gasoline on the other hand, runs less fuel per parts of air. Therefore, it's a "lean" burning fuel. Gas allows a high-compression engine to operate at a higher temperature. Which in turn could cause premature engine wear. Simply because too much heat itself will cause a good engine to wear out faster than anything else.
For more information on methanol, click here: Erowid Alcohol Vault : Methanol Material Safety Data Sheet and Race fuel - Alcohol fuels.
100% ethanol (AKA moonshine) and denatured alcohol burns pretty much the same as 100% methanol. There's very little difference between these alcohol fuels. If an engine is converted correctly for use with these fuels, it will produce the same amount of power, run cooler and last longer.
By the way - If you've ever wondered if moonshine runners burned moonshine in their cars, well, they probably didn't. Because first of all, they needed to make money off the moonshine that they made. And second, the engine would need to be converted and car modified for use with 100% pure alcohol so it would burn thoroughly and it wouldn't cause harm to the engine at higher RPM. This means the hole in the fuel inlet seat and main jet hole (orifice) in the carburetor would need to be drilled twice their original size, a bigger fuel line would need to be installed for more fuel flow, a 12 volt low pressure electric fuel pump would also need to be installed to pump twice the volume of fuel from the tank to the carburetor, a high-secondary voltage ignition system would need to be installed with wider spark plug gaps, and the ignition timing would need to be advanced to 38º BTDC to thoroughly burn the alcohol. And after all this, the car would burn TWICE as much fuel resulting in VERY poor mileage. And they couldn't stop and fill up along the way with more moonshine while the cops were on their tail! (Gasoline would be a lot more economical!)
On the K90, K141, K160, K161, K181/M8 Kohler K-series and Magnum engines, with the Carter Model N #13, #16, #18, #20, #22 carburetor, the hole (orifice) in the main jet size for 100% gasoline measures exactly 3/64" (.046") in diameter. To convert these carburetors for use with methanol, enlarge the main jet and fuel inlet (float valve) holes with a 3/32" (.094") diameter drill bit. NOTE: Drill through the fuel inlet hole from inside out (opposite flow of fuel) to prevent a burr that may prevent the float valve from sealing, which could cause the carburetor to leak fuel or flood. The ignition timing will also need to be advanced to 30º BTDC so the engine will take full advantage and make maximum power of the slower burning, higher octane fuel. Then with the engine running at 3,600± RPM, adjust the high-speed fuel mixture needle valve so the engine runs smooth.
On the K241-K341 single- and twin-cylinder Kohler K-series and Magnum engines Carter or Kohler carburetors with the fully adjustable high speed main jet, the factory hole (orifice) in the main jet size for 100% gasoline measures exactly 1/16" (.0625") in diameter. To convert these carburetors for use with methanol, enlarge the hole in the fuel inlet (float valve) with a 7/64" (.109") drill bit, and then enlarge the hole (orifice) in the main jet/nozzle (emulsion tube) with a #32 or 3mm drill bit. NOTE: Drill through the fuel inlet hole from inside out (opposite flow of fuel) to prevent a burr that may prevent the float valve from sealing, which could cause the carburetor to leak fuel or flood. The ignition timing will also need to be advanced to 30º BTDC so the engine will take full advantage and make maximum power of the slower burning, higher octane fuel. Then if it's a stock engine, with the engine running at 3,600± RPM, adjust the high-speed air/fuel mixture needle valve until the engine runs smoothly.
A Kohler, Kawasaki, etc., V-twin engine with a 2-barrel carburetor with separate/individual intake runners, one barrel can lean out due to a partially clogged main jet, while the other barrel will provide plenty of fuel to the cylinder. The cylinder with the partially clogged jet will run hotter than normal, which can cause the piston rings to lose their expansion against the cylinder wall. The cylinder head can also warp and valve seats can loosen and fall out of their counterbore. This is why most pullers prefer to use a single barrel carburetor.
By the way, an engine can be converted back for use with 100% gas by removing the main jet/nozzle and installing a main jet/nozzle with a stock .0625" hole, and the ignition timing would need to be set at 20º BTDC. This is all that needs to be done to the engine. But if you have trouble removing the main jet/nozzle, I can do this for you and install a stock main jet/nozzle, if you won't mind sending me your carburetor.
How to Use Methanol Fuel
in a Competition Garden Pulling Tractor - (Added 5/22/25)
[Top of Page]
Methanol (CH3OH), also known as wood alcohol, is a toxic alcohol that's used industrially as a solvent, denaturant, and in the production of various chemicals and fuels. Besides its superior performance characteristics, methanol burns cleaner than pure gasoline and methanol; it is a completely renewable, domestic, environmentally friendly fuel that enhances the nation's economy and energy independence. When an engine is set up correctly, methanol contributes to a more complete fuel combustion resulting in reduced emissions of carbon monoxide and other ozone-forming emissions. Methanol also degrades quickly in water and, therefore, poses much less risk to the environment than an oil or gasoline spill. Go here to learn more about methanol.
Fueling with methanol is not only beneficial to the environment, you'll most likely see an increase in engine performance, which will be accompanied by a 50%± increase in fuel usage. On average, when an engine is powered by methanol, it will have about 13% more horsepower and a 50% drop in fuel-efficiency. The added power comes from methanol's higher (110) octane rating. The fuel economy decrease comes from the fact that ethanol has a lower energy content than gasoline, which means the engine will have to use more of it. Only high compression engines benefit from the use of high octane fuel to increase the power output. High octane fuels have no effect whatsoever when used in low compression engines.
No special motor oil is required with methanol. But with prolonged idling, the oil may need to be changed more often. The 20% increase in the main jet and fuel inlet holes, and ignition timing applies to virtually all small engine carburetors and engines, despite the make or manufacturer.
When running a pulling engine at open RPM, sometimes the engine will starve for fuel with gravity feed fuel system. Therefore, Kohler's camshaft-driven mechanical fuel pump or a 12 volt low pressure electric fuel pump should be used to guarantee that the carburetor will receive plenty of fuel at all times. The mechanical pump should be used on a pulling tractor when burning gas only. They're not capable of delivering sufficient amount of fuel with E85 or methanol at high RPM like an electric pump will.
For a pulling tractor, if methanol fuel is subject to a water test, don't add WD-40 or oil in the pump. Just drain and clear out all fuel, use compressed air to remove any remaining fuel from the pump, and store the tractor in a cool, dry environment.
Testing Methanol Fuel for Contaminants -
 It's a good idea to use a small amount of special upper cylinder lubricant (such as Lucas Oil Upper Cylinder Lubrication, M2 Upper Lube & Lead Additive, Marvel Mystery Oil, etc.) mixed with methanol to prevent possible piston to cylinder scoring and to help lubricate the valve stems and guides. If a lubricant isn't used and if methanol is ran too lean (especially in cool weather), this could ruin a good high-dollar piston and possibly score the cylinder wall. Methanol must be ran rich if no lubricant is mixed with it. But some sanctioning pulling rules don't allow lubricant to be mixed with methanol because it boosts the octane and will likely fail in a fuel test, which means the tractor will be disqualified after competing. The more oil that is added, the higher the octane will be. When pulling under rules that require 100% methanol fuel, and if a tractor have been using methanol with a lubricant, be sure to completely drain and flush the entire fuel system. Use 150± PSI compressed air to clear out the fuel tank, fuel hose, fuel pump, carburetor, etc. Because any trace amount of lubricant remaining will mix with the methanol and be cause for failure in a fuel test. Some new neoprene rubber fuel hoses contains oil. This means if 100% methanol is supposed to be used, the fuel hose must be flushed with electrical contact cleaner, brake parts cleaner, cleaning solvent or paint thinner (these leave no oily residue), then use 150± PSI compressed air to clear it out, and then allow it to thoroughly air-dry. |
More Information on How to
Use Methanol in a Competition Garden Pulling Tractor -
Methanol, also known as wood alcohol, is made primary from natural gas. And is the best high-performance fuel available. Far better than any expensive "racing" petroleum fuel. It'll help any 4-stroke high-performance engine produce more power and run much cooler. Methanol is a safe fuel to use, too. But if anyone feels uncomfortable using or converting an engine for use of methanol, please consult with a professional engine builder.
Methanol will mix equally with water and it evaporates quickly. The important thing to remember when storing methanol is the keep it in an air tight container in a dry place. Because it can easily draw moisture when stored for a long period, especially in a metal container. (Unlike plastic, steel gets cold, which draws condensation.) If one suspects that water had gotten into the methanol, it can be separated easily by using chamois leather. The chamois will absorb the water and allow the methanol to pass through. If gas has 10% alcohol, then the alcohol will mix the water with the gas and it will appear to have no water at all. The only way to separate the water from the gas and alcohol is through a chamois. Again, the chamois will absorb the water and allow the fuels to drain through.
If your club's sanctioning rules say that the methanol fuel must be able to pass a water test, then just use 100% pure methanol with no oil. (To some clubs, oil is also known as a "contaminant.") Pure methanol will remain clear in water, but turn cloudy in water when mixed with oil. And it's important that the high speed air/fuel mixture screw on the carburetor be richened slightly, to keep from burning the piston (because of the lack of oil in the fuel). Click or tap here to learn how to test for alcohol content in gasoline.
Methanol has absolutely no effect on rubber, neoprene rubber or OEM carburetor or fuel system parts nor does it get stale like gas does. (Don't just theorize about such things, believe in myths, rumors or what some [delusional] people/mechanics/technicians with an active imagination tell you. Perform a scientific test to prove to yourself and debunk the myths. I always do.) But methanol will corrode aluminum as plain water does if it is not drained and allowed to evaporate from the fuel system over an extended length of time. After the methanol is drained and flushed out of the fuel system, motor oil should be applied to the metal parts to protect the surfaces from oxidation.
Because methanol will ignite only in a narrow range of high temperatures, it is less likely to catch on fire should an accident occur. If methanol does catch on fire, unlike gasoline, water can extinguish the flames.
Methanol burns much slower than the highest octane gasoline and E85. (It has about 135 octane rating.) Therefore, the ignition timing must be advanced more than for gas when burning methanol. If the timing isn't advanced enough, some of the methanol will go unburned and little will be gained. Modifications to the point lobe on the camshaft may need to be made in order to achieve the full ignition timing setting. Methanol also require a hotter spark. Therefore, a high-output/performance ignition coil is needed, along with a wide spark plug gap (.060"). NOTE - Never run over-advanced ignition timing with any petroleum-based fuel (gas) just to try to get "more power." All that does is seriously overheat the engine and could weaken (collapse) the piston rings, shrink the piston, warp the cylinder head and exhaust valve and it could even cause the engine block to crack.
 As methanol burns, it produces tremendous combustion chamber pressures under
wide-open throttle conditions, especially in engines that's been ported,
with oversized valves and a big cam, and even more so during cooler weather.
To prevent possible cylinder/crankcase separation or an "engine explosion,"
the cylinder must be securely "strapped" or fastened to the crankcase. Especially
on K301 engines and up. So strap it now, or scrap it later! Methanol
works best in a high compression engine, too.
As methanol burns, it produces tremendous combustion chamber pressures under
wide-open throttle conditions, especially in engines that's been ported,
with oversized valves and a big cam, and even more so during cooler weather.
To prevent possible cylinder/crankcase separation or an "engine explosion,"
the cylinder must be securely "strapped" or fastened to the crankcase. Especially
on K301 engines and up. So strap it now, or scrap it later! Methanol
works best in a high compression engine, too.
"Strapping" the cylinder to the crankcase is when a flat piece of heavy steel or aluminum is across the cylinder head and fastened by means of two minimum 1/2" diameter threaded rods, one located just behind the flywheel and the other on the PTO end of the block. It keeps the cylinder from literately breaking loose from the crankcase because of a thin cylinder wall and/or due to extremely high compression.
Moreover, if you had a K241 block bored for a K301 piston, or a K301 block bored for a K321 piston, and if the tractor is used to push snow, definitely strap the cylinder to the crankcase! Because it now has a much thinner cylinder wall, and the cold winter air is more dense (like the air is thicker or there's more of it). Dense air will build up the compression pressure within the combustion chamber, causing the engine to produce more power. But what also happens is at full throttle, this high compression is pushing upward on the cylinder head, and pulling upward on the cylinder wall. And sometimes the cylinder wall will break, ruining the whole engine. I know, I've seen this happen to a good engine. No joke.
Advertisement:
 To place an order, send your item(s) for repairing, and/or
for customer service assistance, and FREE honest and accurate technical
support, please contact: A-1 Miller's Performance Enterprises, 12091
N Route B, Hallsville, MO (Missouri) 65255-9604 USA. Please call in your
order or send an email with a list parts you need and your contact information. To place an order, send your item(s) for repairing, and/or
for customer service assistance, and FREE honest and accurate technical
support, please contact: A-1 Miller's Performance Enterprises, 12091
N Route B, Hallsville, MO (Missouri) 65255-9604 USA. Please call in your
order or send an email with a list parts you need and your contact information.
 Phone: 1-573-881-7229 (cell;
call, text or leave voicemail) or use
Whatsapp. Please call
Monday-Friday, 9am to 5pm, Central time zone, except holidays. If no answer,
please try again later. Phone: 1-573-881-7229 (cell;
call, text or leave voicemail) or use
Whatsapp. Please call
Monday-Friday, 9am to 5pm, Central time zone, except holidays. If no answer,
please try again later.  E-mail:
pullingtractor@aol.com.
Payment Options. A-1 Miller's shop is open
to the public Monday-Friday, 9am to 5pm, Central time zone, with an appointment
on weekends, except holidays. If you're the kind of person who don't trust
delivery/shipping companies (mis)handling your high-dollar and fragile
merchandise, you can make the long drive to A-1 Miller's new shop (click
image to the right) to personally purchase parts, or drop off and/or pick
up your carburetor, clutch assembly, engine and/or parts, etc., for repairing
and/or rebuilding. Or visit the address of our (old) shop mentioned above
to drop off your engine, transmission, transaxle, garden tractor, small motorized
vehicle, etc. We also custom build pulling tractors and other small vehicles.
Please contact me before coming so I'll be at my shop waiting for your arrival.
When you visit our shop, you will be dealing directly with the owner for
the best customer service. "The road to a [trusted] friend's house (or
shop) is never long." Don't sacrifice quality workmanship for distance.
Photos
of our new building/shop are posted here!
12091 N Route B, Hallsville, MO - Google Maps.
[Return To Previous Paragraph, Section
or Website] E-mail:
pullingtractor@aol.com.
Payment Options. A-1 Miller's shop is open
to the public Monday-Friday, 9am to 5pm, Central time zone, with an appointment
on weekends, except holidays. If you're the kind of person who don't trust
delivery/shipping companies (mis)handling your high-dollar and fragile
merchandise, you can make the long drive to A-1 Miller's new shop (click
image to the right) to personally purchase parts, or drop off and/or pick
up your carburetor, clutch assembly, engine and/or parts, etc., for repairing
and/or rebuilding. Or visit the address of our (old) shop mentioned above
to drop off your engine, transmission, transaxle, garden tractor, small motorized
vehicle, etc. We also custom build pulling tractors and other small vehicles.
Please contact me before coming so I'll be at my shop waiting for your arrival.
When you visit our shop, you will be dealing directly with the owner for
the best customer service. "The road to a [trusted] friend's house (or
shop) is never long." Don't sacrifice quality workmanship for distance.
Photos
of our new building/shop are posted here!
12091 N Route B, Hallsville, MO - Google Maps.
[Return To Previous Paragraph, Section
or Website] |
Cylinder Restraint Strap Kit for Kohler K241-K341/M10-M16 K-series and Magnum Engines. Professionally made. This setup is easy to remove and reinstall when it comes time to freshen the engine. It looks nice and very strong. Prevents cylinder/crankcase separation (engine explosion) during cool weather when cylinder is bored thin for an excessively oversize piston. A must for methanol burning engines. NOTE: An additional 3/8" threaded hole may need to be made for mounting of brace on PTO end of block.
|
Methanol fuel produces a "cooling effect" as it enters an engine at high velocity when the engine is running at open RPM. And, it's a clean burning fuel, it won't carbon up the combustion chamber, foul-out the spark plug or even harm the ozone layer. The crankcase motor oil may need to be changed periodically though.
Here's another thing concerning methanol fuel - when methanol evaporates, it leaves behind very small particles of white, flaky residue deposits in the entire fuel system, which is completely normal and unavoidable. These deposits can clog and ruin a good fuel filter, but will not harm any other parts of the fuel system or the engine. So to keep from having any [future] fuel flow problems and help prevent from losing a good pull, don't install a fuel filter in the system to trap any dirt/debris, because it will also trap the white, flaky residue deposits! Instead, strain the fuel through a filtering material, such as a coffee filter, paint filter, fine mesh screen wire, clean cloth shop towel or a fine woven fabric window curtain, while it's poured into the fuel tank. Place the filtering material in a large funnel, and pour the fuel through it into the tank. The filtering material should be thoroughly cleaned for use next time. But first, make sure the fuel tank and the rest of the fuel system is perfectly clean, and kept clean! And if there are any very small particles of dirt/debris present in the fuel, they should pass through the carburetor, being the fuel passages have been enlarged for the methanol.
Fuel filters can only filter so much of a grain of dirt/debris/grit. Anything smaller will pass through, most of time causing no harm. Sometimes a hair will pass through a wire mesh fuel filter, lodging in the float valve, keeping it from fully closing because the hair can't get past the bend. It'll cause the carburetor to over-flow and flood in a short time if the fuel tank is higher than the carburetor (gravity feed system). On certain small engines, the flooding gas will seep down into the motor oil, ruining it. Briggs & Stratton riding mower engines are notorious for this. All that can be done to fix this is clean out the carburetor and hope it doesn't happen again, or take the time to filter the gas before it's poured in the tank. And if there's enough fresh gas in the crankcase, sometimes the crankcase will explode if the engine backfires through the carburetor. If the crankcase breather is connected to the carburetor or air cleaner/filter assembly, the flame from the backfire will travel through the breather cover and into the crankcase. (I've also seen this happen a few times.)
When burning E85 or methanol fuels, more fuel volume (increase in flow) is required and a 12 volt low pressure electric fuel pump should be used. The carburetor on most garden tractor engines don't require a lot of fuel pressure. One nice thing about 12 volt low pressure electric fuel pumps, besides being very reliable, is that they're self-priming. Meaning when an engine runs out of fuel, there's less risk of burning up the starter motor from excessive cranking for a vacuum or mechanical pump to deliver gas to the carburetor. With an electric fuel pump, as soon as the ignition is turned on (if the pump is wired in with the ignition circuit) or when power is supplied to it, the electric fuel pump instantly delivers gas to the carburetor.
How to convert the Carter and Kohler #26, #28 or #30 carburetors for the engine to run well and produce full power on methanol fuel...
By the way, an engine can be converted back for use with 100% gas by removing the main jet/nozzle and installing a main jet/nozzle with a stock .0625" hole, and the ignition timing would need to be set at 20º BTDC. This is all that needs to be done to the engine. But if you have trouble removing the main jet/nozzle, I can do this for you and install a stock main jet/nozzle, if you won't mind sending me your carburetor.
How to Convert a Briggs & Stratton
16hp, 18hp or 20hp Opposed Twin Cylinder Engine for Use with Methanol Fuel
- NOTE: This is easy to do and have been proven to work flawlessly!
Don't let anyone else tell you differently. Also, this is recommended for
competition pulling only and NOT for general lawn and garden use. And a fuel
pump is required ONLY when the lowest part of the gas tank is positioned
lower than the carburetor. It pumps fuel up to the carburetor. Otherwise,
if the lowest part of the tank is positioned higher than the carburetor,
the engine can run on a gravity feed fuel system.
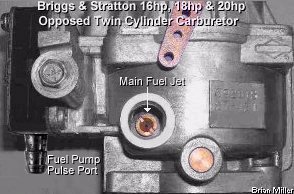
 For
competition pulling only, the Briggs & Stratton 16hp, 18hp or 20hp opposed
twin cylinder engines can be converted for use with methanol fuel. As for
the carburetor, there is two ways to make this happen. The hole in the main
jet for gasoline is .063" in diameter. There is no need to drill out or enlarge
this hole. Just leave it alone. If it is enlarged, the engine will run too
rich on fuel and another main jet with a .063" hole will need to be installed.
Also, the fuel inlet hole (float needle valve hole) will need to be increased
to about twice its size. The OEM B&S float valve can be (re)used. And
being methanol requires more fuel delivery than gas, the diaphragms and springs
in the integrated fuel pump will need to be removed, reinstall the cover
gasket, the OEM fuel pump pulse-type port on both the fuel pump part of the
carburetor and engine block will need to be blocked off with 1/4"
vinyl vacuum caps with a small clamp, and a
12 volt low pressure electric
fuel pump will need to be connected to the fuel inlet port on the
OEM fuel pump. The methanol will flow directly through the OEM fuel pump
internals and to the carburetor.
For
competition pulling only, the Briggs & Stratton 16hp, 18hp or 20hp opposed
twin cylinder engines can be converted for use with methanol fuel. As for
the carburetor, there is two ways to make this happen. The hole in the main
jet for gasoline is .063" in diameter. There is no need to drill out or enlarge
this hole. Just leave it alone. If it is enlarged, the engine will run too
rich on fuel and another main jet with a .063" hole will need to be installed.
Also, the fuel inlet hole (float needle valve hole) will need to be increased
to about twice its size. The OEM B&S float valve can be (re)used. And
being methanol requires more fuel delivery than gas, the diaphragms and springs
in the integrated fuel pump will need to be removed, reinstall the cover
gasket, the OEM fuel pump pulse-type port on both the fuel pump part of the
carburetor and engine block will need to be blocked off with 1/4"
vinyl vacuum caps with a small clamp, and a
12 volt low pressure electric
fuel pump will need to be connected to the fuel inlet port on the
OEM fuel pump. The methanol will flow directly through the OEM fuel pump
internals and to the carburetor.

 And for the engine to make full power from the
slower-burning methanol fuel, the ignition timing will need to be advanced
more than the OEM setting. The OEM timing for B&S engines is fixed at
11º BTDC. For methanol, the timing will need to be advanced to 17º
BTDC. To advance the timing for methanol fuel, a special-made 3/16" square
offset flywheel key must be used. Offset flywheel keys
are originally made for racing go-karts and Junior Dragsters with the 5hp
Briggs & Stratton engine. They come in 2º, 4º, 6º and
8º increments (to advance the timing 2º, 4º, 6º and 8º
more than the OEM setting). Use the 6º offset key for a setting of 17º
BTDC (11º + 6º = 17º). Make sure the offset flywheel key is
installed correctly so the timing will be advanced (BTDC) and not retarded
(ATDC)! Do a
Google search for offset flywheel keys. Also, for an older
B&S engine with points and condenser, it's highly recommended to install
a new Magnetron� electronic ignition module or a
universal electronic transistorized
ignition module for stable timing and a stronger spark. And as usual,
the crankcase oil will need to be changed more often when burning methanol
fuel.
And for the engine to make full power from the
slower-burning methanol fuel, the ignition timing will need to be advanced
more than the OEM setting. The OEM timing for B&S engines is fixed at
11º BTDC. For methanol, the timing will need to be advanced to 17º
BTDC. To advance the timing for methanol fuel, a special-made 3/16" square
offset flywheel key must be used. Offset flywheel keys
are originally made for racing go-karts and Junior Dragsters with the 5hp
Briggs & Stratton engine. They come in 2º, 4º, 6º and
8º increments (to advance the timing 2º, 4º, 6º and 8º
more than the OEM setting). Use the 6º offset key for a setting of 17º
BTDC (11º + 6º = 17º). Make sure the offset flywheel key is
installed correctly so the timing will be advanced (BTDC) and not retarded
(ATDC)! Do a
Google search for offset flywheel keys. Also, for an older
B&S engine with points and condenser, it's highly recommended to install
a new Magnetron� electronic ignition module or a
universal electronic transistorized
ignition module for stable timing and a stronger spark. And as usual,
the crankcase oil will need to be changed more often when burning methanol
fuel.
By the way, an engine can be converted back for use with 100% gas by removing the main jet/nozzle and installing a main jet/nozzle with a stock .0625" hole, and the ignition timing would need to be set at 20º BTDC. This is all that needs to be done to the engine. But if you have trouble removing the main jet/nozzle, I can do this for you and install a stock main jet/nozzle, if you won't mind sending me your carburetor.
Information About the Fuel Atomization Chamber Intake Tube / Carburetor Extension - (Updated 5/30/18)
![]() Using
a fuel atomization chamber intake tube to space the carburetor away from
the engine block allows the fuel to atomize better (break down into smaller
particles or a fine mist) so the engine will produce more power and torque
at higher RPM. The further the carburetor is spaced from the engine block
(flathead engines) or cylinder head(s) on OHV engines, the better the fuel
will atomize and the more power the engine will produce. This is why most
naturally-aspirated high-performance automotive V8 engines use a high-rise
intake manifold.
Using
a fuel atomization chamber intake tube to space the carburetor away from
the engine block allows the fuel to atomize better (break down into smaller
particles or a fine mist) so the engine will produce more power and torque
at higher RPM. The further the carburetor is spaced from the engine block
(flathead engines) or cylinder head(s) on OHV engines, the better the fuel
will atomize and the more power the engine will produce. This is why most
naturally-aspirated high-performance automotive V8 engines use a high-rise
intake manifold.
A 1" carburetor spacer will definitely help atomize the fuel into smaller particles so the engine will produce more noticeable power, and it'll help the engine last longer and burn less fuel. On average, dyno tests had proven that engines with a 1" spacer produced about 12% more horsepower and torque. This is why virtually all [aluminum block] Briggs & Stratton, Tecumseh, and other makes and models of small engines use a factory-installed intake tube. But for some reason, cast iron block single cylinder Kohler engines are the only ones that didn't come with an intake tube.
When choosing the length of the intake tube, it seems that a 3" length works best for gas, and 5" length works best for E85 or methanol. Because gas runs more lean than E85 or methanol, it requires less space or distance to fully atomize, and being E85 and methanol fuels run richer, they need more space or distance to fully atomize before they enter the combustion chamber.
For competition pulling, if club's rules state that no intake tube can be used with the carburetor, a heat isolator gasket will work great instead. (Manufactured of heat-resistant phenolic resin.) The heat isolator gasket isolates the carburetor body from engine heat so when the cool fuel from the carburetor makes contact with the warm engine, the fuel will instantly atomize better before it enters the combustion chamber, which will help the engine produce more power and torque.
In addition, "roughing up" the inside of the intake tube will help create turbulence to "break up" and atomize the fuel better and should help a Kohler engine produce a few more ponies. This works for automotive engines, and it should work for Kohler engines as well.
On
single cylinder Kohler competition pulling engines that run at open RPM,
when using a mounting gasket between the intake tube and intake port, due
to normal high RPM engine vibrations, the [somewhat soft] gasket will allow
the tube (and carburetor) to vibrate and possibly cause one half of the intake
port (with a huge enlarged port opening, which weakens the port) to break
off. This is based on fact and has been known to happen. So to prevent this
from happening, instead of using a gasket, a shallow, narrow groove can be
machined in one end of the flange of the tube for a reusable small
cross-sectional diameter neoprene rubber O-ring. The O-ring will take place
of the gasket to prevent a vacuum leak. The O-ring will compress, guaranteeing
metal to metal contact to secure the tube directly to the engine block. The
same can be done to a carburetor mounting flange.
Another way to gain more horsepower and torque at virtually any RPM besides roughing up the inside of the intake tube is to fabricate a spiral fuel atomizer from ordinary sheet metal steel. This particular part is made the same length but a few thousandths bigger in width than the intake tube, twisted one time (180º), and is fitted snugly inside the intake tube. This is a dyno-proven add-on and performance modification that increases engine horsepower and torque by about 5-10%.
Also for competition pulling, with an intake tube in use, mounting gaskets are not necessary. Just resurface the carburetor mounting flange and ends of the intake tube (if needed) on a wide, flat belt sander, large flat sanding disc or on the side of an abrasive metal cutting wheel on a electric chop saw (the kind that automotive muffler shops use) (use eye protection!) to remove any warpage and restore flatness, and then apply a thin bead of clear RTV silicone adhesive sealant with no gasket. When a gasket is used, the bolts or nuts (with studs) are tightened, the softness of the gasket could cause the carburetor flange to warp and possibly break. With no gasket involved, there will be metal to metal contact with the silicone filling in the open gaps between the two metals, and there is NO WAY the flange can warp or possibly break! By the way - I've always preferred to use clear RTV silicone adhesive sealant for three reasons: Gaskets don't always seal the irregularities between mating metals, especially thin metal covers; being it's an adhesive, it bonds parts together, forming a leak-proof seal; and being it's clear, it makes for a clean and professional-looking repair job. When applied sparingly, it can't be easily seen or noticed between the parts.
 Use a Bigger Air Filter
on a Pulling Engine -
Use a Bigger Air Filter
on a Pulling Engine -
If an engine has a carburetor with a bored-out venturi, bigger ports, bigger valves, a big cam and it runs at open RPM, then it will definitely benefit from use of a bigger air filter. All of these things will undoubtedly allow an engine to draw in a lot more air at high RPM. If rules require that the engine must have an air filter, stack two air filters on top of each other (install a longer mounting stud, too), or use an OEM K341 or opposed (flathead) twin cylinder air cleaner/filter assembly (they're twice as tall than the K241, K301 and K321 air filter) or install a velocity stack and use an aftermarket K&N air filter, or use no air filter at all. IMPORTANT! - Make sure the pulling track is "watered down" or moist when not using an air filter to avoid the engine sucking in harmful dust and dirt. Anyway, the bigger K&N or OEM K341 or opposed (flathead) twin cylinder air filter is so free-flowing and less restrictive, using an air filter this size would the same as not using an air filter all. The shorter K241, K301 and K321 air cleaner/filter assembly is too restrictive for open RPM operation. But if it's a basically stock engine with a stock carburetor, stock size ports and valves, and a stock cam, there'll be very little gained with a bigger air filter. If you pull on a lot of dusty tracks, then it would be worth investing in an air filter to save wear on the engine.
How To Convert a Carter or Kohler Carburetor For High-performance Use
At Any Engine RPM
NOTE: This is relatively easy to do and have been proven to work flawlessly!
Don't let anyone else tell you differently.
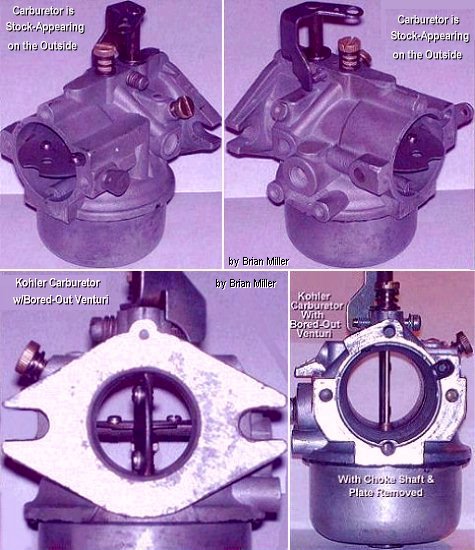
By boring out the venturi (the smallest part of a throttle bore) and reworking the Carter or Kohler carburetor, this will "open up the carburetor" and allow the engine to draw more air into the combustion chamber so it can build up more compression, which will allow it to produce more power. (It'll be like going from a small 2-barrel carburetor to a large 4-barrel carburetor on a V8 automotive engine.) Although the below Ê method is considered "Old School" by today's standards, it has been proven to help the engine produce more horsepower and torque on the dynamometer (dyno), and allow the tractor to pull much stronger on the track, and it equals the performance of the popular and high dollar recast (Kohler) carburetors. A bored-out venturi and reworked carburetor is when the carburetor is modified for maximum performance to increase the power of the engine.
NOTE: The venturi in a Chinese-made Kohler-replicated #26 carburetor can be bored out to is 1.09" or 1-7/64", the same diameter as the throttle bore. But the maximum the venturi in a Chinese-made Kohler-replicated #30 carburetor (which actually has a throttle bore diameter of 29.76mm / 1.17") can be bored-out to is 1". If it's bored-out any bigger centered of the throttle bore, being the #26 and #30 are cast in the same mold and machined the same externally, the boring process will likely break through where the fuel inlet port is, rendering carburetor body useless. But the OEM Kohler #30 carburetor can be bored out to 1.2", the same as the throttle bore, with no risk of breaking into the fuel inlet port. A bored-out venturi and reworked carburetor is when the carburetor is modified for maximum performance for general yard and garden use, and/or for competition pulling.
 Use a reamer or large drill
bit of a specific diameter to bore the venturi. Enlarge the venturi to either
a limit of .995" or 1", make it a straight-through design (to match the diameter
of the throttle bore) or enlarge it to whatever your club's sanctioning rules
allow. Turn the cutting tool at a slow speed, and apply a
continuous spray of WD-40 while boring the venturi to create a smooth,
slick surface in the throttle bore.
Use a reamer or large drill
bit of a specific diameter to bore the venturi. Enlarge the venturi to either
a limit of .995" or 1", make it a straight-through design (to match the diameter
of the throttle bore) or enlarge it to whatever your club's sanctioning rules
allow. Turn the cutting tool at a slow speed, and apply a
continuous spray of WD-40 while boring the venturi to create a smooth,
slick surface in the throttle bore.
 Due to normal engine vibration
at high RPM, plug the original atmospheric vent opening (air passageway from
inside the float bowl area to outside of carburetor) and then drill a 3/32"
hole on the side of the carburetor body in alignment with the atmospheric
vent opening (air passageway from inside the float bowl area to outside of
carburetor) in case of gas overflow and/or so the engine won't possibly run
erratically rich on fuel. Or for safety and convenience, leave out the choke
shaft and plate, plug the choke shaft holes, and install my
remote fuel primer system kit as described elsewhere
in this website.
Due to normal engine vibration
at high RPM, plug the original atmospheric vent opening (air passageway from
inside the float bowl area to outside of carburetor) and then drill a 3/32"
hole on the side of the carburetor body in alignment with the atmospheric
vent opening (air passageway from inside the float bowl area to outside of
carburetor) in case of gas overflow and/or so the engine won't possibly run
erratically rich on fuel. Or for safety and convenience, leave out the choke
shaft and plate, plug the choke shaft holes, and install my
remote fuel primer system kit as described elsewhere
in this website.
 Do not drill out or enlarge
this hole! If it's enlarged, the engine will definitely run too rich
on fuel and another main jet with a .0625" hole will need to be installed.
Use a
1/32" high speed steel spiral drill bit to enlarge
the lower hole (orifice) on high speed needle air/fuel adjuster screws in
Carter or Kohler #26, #28 and #30 carburetors to create more suction through
the tube for the fuel so engine will start quicker (when throttle is in idle
position), idle better, and idle down upon deceleration without stalling.
No need to use this on adjusters with two lower holes. NOTE:
Carefully enlarge the hole by hand with drill bit clamped in a
mini micro pin vise hand drill chuck. Be careful when handling
any tiny drill bit because they can break easily. After enlarging hole, use
150± PSI compressed air to clear out any metal cuttings from inside
the adjuster tube. Make sure the entire idle fuel passageway is clear
of debris, too. Leave the welch plug intact, or if necessary, remove it only
to clear out any debris from the factory-drilled idle holes next to the throttle
plate. If performed correctly, the carburetor should idle just fine and rev
up with no hesitation whatsoever as described in this section. If the engine
is going to run at open RPM, it is recommended that the carburetor be converted
for use with the bottom high speed fuel
adjuster as described in this website.
Do not drill out or enlarge
this hole! If it's enlarged, the engine will definitely run too rich
on fuel and another main jet with a .0625" hole will need to be installed.
Use a
1/32" high speed steel spiral drill bit to enlarge
the lower hole (orifice) on high speed needle air/fuel adjuster screws in
Carter or Kohler #26, #28 and #30 carburetors to create more suction through
the tube for the fuel so engine will start quicker (when throttle is in idle
position), idle better, and idle down upon deceleration without stalling.
No need to use this on adjusters with two lower holes. NOTE:
Carefully enlarge the hole by hand with drill bit clamped in a
mini micro pin vise hand drill chuck. Be careful when handling
any tiny drill bit because they can break easily. After enlarging hole, use
150± PSI compressed air to clear out any metal cuttings from inside
the adjuster tube. Make sure the entire idle fuel passageway is clear
of debris, too. Leave the welch plug intact, or if necessary, remove it only
to clear out any debris from the factory-drilled idle holes next to the throttle
plate. If performed correctly, the carburetor should idle just fine and rev
up with no hesitation whatsoever as described in this section. If the engine
is going to run at open RPM, it is recommended that the carburetor be converted
for use with the bottom high speed fuel
adjuster as described in this website.
 On the throttle shaft, grind
the area opposite the throttle plate until the shaft is about 1/16" thickness
so more air can pass around the shaft at high RPM, but leave the screw holes
"lumped up" to prevent stripping the threads and to maintain strength in
the shaft. See photo to the right. à
On the throttle shaft, grind
the area opposite the throttle plate until the shaft is about 1/16" thickness
so more air can pass around the shaft at high RPM, but leave the screw holes
"lumped up" to prevent stripping the threads and to maintain strength in
the shaft. See photo to the right. à
Nostalgic Memorabilia -
Back in the day (early 1980s and earlier), gasoline at most
filling service gas stations for various [automotive and
other types of] engines were for the following compression ratios: For an
engine with a compression ratio up to 9.25:1, it was safe to use
Regular gasoline (low octane); if the compression ratio
is between 9.25:1-10.50:1, the engine required
Premium gasoline (mid octane), which was also known as
High Test in various locations; and for compression ratios above 10.50:1,
the engine required
Ethyl gasoline (high octane). Nowadays, due to the lead
content in Ethyl, it's been replaced with Premium Unleaded, which was also
known as Super Unleaded in various locations. Actually, ALL gasoline in the
early days contained lead
(Tetraethyllead)
to boost octane and protect soft cast iron valve seats from wearing.
I'd also like to share this old gas station joke: Car owner that
just pulled up to the pump at a
full service gas station says to the
gas station attendant: "Fill 'er up... Ethyl!" Gas station
attendant: "I'll fill up your car, but don't call me Ethel."
Muscle cars, raised white lettering on 70s, 60s or 50s rear tires, air shocks, glasspack mufflers, Cragar SS's or SST's, 4 barrel carburetors and low-priced gas. Cruising and racing the main drag in town with friends and associates on the weekends. Dang, the good ole days! These were the best of times, and we didn't even know it. Nowadays, it's only car show events. |
When to Use a Gravity Feed Fuel Flow System -
 Gravity feed is defined as when the fuel is drawn or pulled
downward by gravity; the lowest part of the gas tank is positioned higher
than the carburetor, and there's no fuel pump involved. Anyway, when burning
gas only (not E85 or methanol fuels)
and if an engine is going to run no faster than 4,000± RPM (governed
RPM limit; the factory setting of maximum RPM for virtually all small gas
engines, including all of Kohler engines is 3,600), then a
gravity
feed fuel system with the lowest part of the gas tank positioned higher
than the carburetor (especially on a hillside), stock fuel fittings and neoprene
rubber fuel hose should work fine.
Gravity feed is defined as when the fuel is drawn or pulled
downward by gravity; the lowest part of the gas tank is positioned higher
than the carburetor, and there's no fuel pump involved. Anyway, when burning
gas only (not E85 or methanol fuels)
and if an engine is going to run no faster than 4,000± RPM (governed
RPM limit; the factory setting of maximum RPM for virtually all small gas
engines, including all of Kohler engines is 3,600), then a
gravity
feed fuel system with the lowest part of the gas tank positioned higher
than the carburetor (especially on a hillside), stock fuel fittings and neoprene
rubber fuel hose should work fine.
A fuel pump is required ONLY when the lowest part of the gas tank or when the entire tank is positioned lower than the carburetor, and when used especially on a hillside. The fuel pump supplies fuel up to the carburetor. Otherwise, if the lowest part of the gas tank is positioned higher than the carburetor at all times, then the engine can run on a gravity feed fuel system with no problems.
Information About the Crankcase Vacuum-Operated/Pulse-Type Fuel Pump - [Return To Previous Paragraph, Section or Website]
 All crankcase
vacuum-operated/pulse-type fuel pumps operate off of the air pressure/vacuum
inside an engine's crankcase. The moving piston(s) inside the crankcase create
a pulsating effect of air ç back and forth
All crankcase
vacuum-operated/pulse-type fuel pumps operate off of the air pressure/vacuum
inside an engine's crankcase. The moving piston(s) inside the crankcase create
a pulsating effect of air ç back and forth
 to activate the pump's diaphragm, which
pumps the fuel to the carburetor. And all crankcase vacuum-operated/pulse-type
fuel pumps come with three barbed hose fittings - one that connects to the
engine crankcase (PULSE), one that connects from the gas tank (IN) and another
that connects to the carburetor (OUT). These should be embossed on the pump
body. But if it doesn't, then the fitting coming from the center of the pump
connects to the crankcase port. And as for the other two fittings, one connects
to the gas tank outlet and the other fitting connects to the carburetor inlet.
to activate the pump's diaphragm, which
pumps the fuel to the carburetor. And all crankcase vacuum-operated/pulse-type
fuel pumps come with three barbed hose fittings - one that connects to the
engine crankcase (PULSE), one that connects from the gas tank (IN) and another
that connects to the carburetor (OUT). These should be embossed on the pump
body. But if it doesn't, then the fitting coming from the center of the pump
connects to the crankcase port. And as for the other two fittings, one connects
to the gas tank outlet and the other fitting connects to the carburetor inlet.
If the engine in a lawn and garden tractor, small motorized vehicle or ATV/UTV sputters and/or dies after going over rough terrain, this could be caused by a defective crankcase vacuum-operated/pulse-type fuel pump. Overtime, the fuel pump bodies become warped and oil in the crankcase is preventing air from pulsating the diaphragm the way it should. If the engine has a 12 volt electrical system with a charging system, it'll be better to install a low pressure 12 volt electric fuel pump. These rarely give trouble.
To test a plastic body crankcase vacuum-operated/pulse-type fuel pump, first check that the fuel hose between the gas tank and fuel pump is open and unobstructed, or if it has dry-rot cracks, which can cause a vacuum leak. To test it, disconnect the fuel hose from the fuel pump and wrap a shop/business towel or clean rag around an air blower nozzle and then insert the nozzle with the rag or towel in the gas tank filler neck. Apply light air pressure in the tank. If fuel comes out of the fuel hose, then it's open. After that, reconnect the fuel hose to the fuel pump. To test the fuel pump itself, first check the hose that connects the fuel pump to the engine crankcase to see if it has a kink in it or if it has dry-rot cracks, which can also cause a vacuum leak. If it's in good condition, then the final step is to disconnect the fuel hose from the carburetor and with adequate amount of fuel in the gas tank, crank the engine and at the same time observe how much fuel is being pumped out of the pump. If there seems to be adequate amount of fuel coming from it, hold your finger over the end of the line and while still cranking the engine, it should build up a small amount of pressure. If none or very little fuel comes out of the pump, then it's bad and needs replacing.
When a crankcase vacuum-operated/pulse-type fuel pump fails to pump fuel, in most cases, the body of the fuel pump will become warped, causing a vacuum leak either from within or from the outside, preventing the diaphragm from pulsating. If the diaphragm is still flexible, chances are, the pump can be repaired by resurfacing the body halves on a wide, flat belt sander, large flat sanding disc or on the side of an abrasive metal cutting wheel on an electric chop saw (the kind that automotive muffler shops use) (use eye protection!) to remove warpage and restore flatness. (Be sure to use eye protection!) If the body halves is warped, the sander/grinder will make contact where the screw holes are, but not the area between the screw holes.
If the bottom of the gas tank is lower than the carburetor, then the engine definitely needs a fuel pump. If the engine didn't originally come with a fuel pump, and has no provision for a mechanical fuel pump and/or no 12 volt power output/supply to use a low pressure 12 volt electric fuel pump, here's how to install a universal crankcase vacuum-operated/pulse-type fuel pump on virtually any small gas engine:
 A vacuum hose fitting can be installed in the valve (rocker
arm) cover of an OHV engine, or for a flathead engine, use a
block-off plate to cover the existing
mechanical fuel pump opening. On an OHV engine, remove the rocker cover,
and drill a 21/32" hole in the desired location, and cut 1/8" NPT threads
in the drilled hole, and then install an 1/8-NPT x 1/4" barbed end [fuel]
hose fitting to serve as the vacuum-pulse port. On a flathead engine,
don't install the fitting in the outer crankcase breather cover. It doesn't
hold crankcase vacuum. The plate behind it with the reed valve does.
A vacuum hose fitting can be installed in the valve (rocker
arm) cover of an OHV engine, or for a flathead engine, use a
block-off plate to cover the existing
mechanical fuel pump opening. On an OHV engine, remove the rocker cover,
and drill a 21/32" hole in the desired location, and cut 1/8" NPT threads
in the drilled hole, and then install an 1/8-NPT x 1/4" barbed end [fuel]
hose fitting to serve as the vacuum-pulse port. On a flathead engine,
don't install the fitting in the outer crankcase breather cover. It doesn't
hold crankcase vacuum. The plate behind it with the reed valve does.

 A crankcase
vacuum-operated/pulse-type fuel pump will work well with the OEM Kohler oval
shape fuel pump block-off cover plate (part # 240282-S) used on certain Kohler
K-series engines with a 21/32" port hole drilled and threads cut with an
1/8" NPT hand tap, and an 1/8" NPT x 1/4" hose fitting installed.
A crankcase
vacuum-operated/pulse-type fuel pump will work well with the OEM Kohler oval
shape fuel pump block-off cover plate (part # 240282-S) used on certain Kohler
K-series engines with a 21/32" port hole drilled and threads cut with an
1/8" NPT hand tap, and an 1/8" NPT x 1/4" hose fitting installed.
NOTE: It doesn't matter if a small amount of crankcase oil gets in the
vacuum-pulse hose. This is normal and the fuel pump will still work just
fine being air, along with the oil, will be pulsating back and forth
, which activates the diaphragm in the pump
that is created by the movement of the engine piston(s).
[Return To Previous Paragraph or
Section]
Troubleshooting a Faulty Pulse-Type/Vacuum-Operated and Mechanical Fuel Pump -
If an engine sits for about one week or longer, if the fuel in the carburetor evaporates and it's hard to start, or fuel must be squirted into the carburetor to get the engine started, then this means that the crankcase vacuum-operated/pulse-type fuel pump mechanical fuel pump may be bad. The inlet valve in the pump is leaking, which is allowing the fuel to drain back into the gas tank with the engine off. As the pump tries to syphon fuel from the tank to refill the carburetor, it's unable because the inlet valve is bad. Solution: a new fuel pump will need to be installed. By the way - the halves of the plastic and metal body fuel pumps cannot be interchanged. When a vacuum or mechanical fuel pump quits working, the causes are listed below:
|
|
What Exactly Is Fuel "Vapor Lock"?
Vapor lock only happens with certain older carbureted cars and trucks with a mechanical fuel pump that's fastened to the engine block. Vapor lock occurs when the [metal] gas line is too close to the hot exhaust, and when the vehicle is in slow traffic, the fuel is moving very slow in the line. Due to extreme heat from the exhaust and on a hot day, and the fan blade not blowing that much air past the exhaust, sometimes the heat will cause the gas to boil, forming air bubbles or air pockets, and the fuel vaporizes, and then the fuel pump can't pump vaporized fuel (air). So as soon as the carburetor runs out of fuel, the engine stalls. The fuel pump will "lock" with vapors trapped inside it. When the vehicle cools, incoming gas will force the air out of the fuel pump and through the carburetor, allowing the fuel to return to the pump, and then the engine will start and run again. This don't happen nowadays with automobiles having fuel injection because the entire fuel hose is pressurized.
But on lawn- or garden-tractors, the fuel hose is located nowhere near the hot exhaust. What is really happening when the engine stalls, is either the fuel system is dirty, the ignition coil is bad, or there's insufficient valve to lifter clearance.
Using a Mechanical Fuel Pump -
 First of all, a fuel pump is
required ONLY when the lowest part of the gas tank is positioned lower than
the carburetor, or when burning E85 or
methanol fuels. It pumps fuel up to the carburetor
when gravity will not allow sufficient fuel flow to the carburetor. Otherwise,
if the lowest part of the gas tank is positioned higher than the carburetor,
the engine can successfully run solely on a gravity feed fuel system.
First of all, a fuel pump is
required ONLY when the lowest part of the gas tank is positioned lower than
the carburetor, or when burning E85 or
methanol fuels. It pumps fuel up to the carburetor
when gravity will not allow sufficient fuel flow to the carburetor. Otherwise,
if the lowest part of the gas tank is positioned higher than the carburetor,
the engine can successfully run solely on a gravity feed fuel system.
 Mechanical plastic and metal
body fuel pumps are very durable and they work pretty well, for both lawn
and garden tractors, small motorized vehicle and stock competition garden
pulling tractors burning gas only. They will not pump enough fuel with
E85 or methanol fuels. Anyway,
the OEM neoprene rubber diaphragm or gaskets rarely go bad in the mechanical
fuel pump. When they fail to pump any fuel, it's usually due to the fuel
pump cover and body become warped due to pressure from the retaining screws,
or one of the poppet valves get damaged. They can become dislodged from their
counterbore, or rusted or corroded from long term water contamination. If
the poppet valves are in good condition and snug in their counterbores, but
if the pump doesn't pump fuel, then in most cases, the cover and body have
become warped, creating a vacuum leak at the diaphragm/gasket between the
cover and body. To fix this, separate the fuel pump cover from the body,
and resurface each on a wide, flat
belt sander, large flat
sanding disc or on the side of an abrasive metal cutting
wheel on an
electric chop saw (the kind that automotive muffler shops
use) (use eye protection!) to remove warpage and restore flatness.
(Be sure to use eye protection!) After resurfacing, remove any rough edges
with a
deburring tool, and thoroughly clean all the parts with
150± P.S.I. compressed air and an
air blow gun nozzle before reassembly. After reassembly
of the pump, it should work good as new. But if this doesn't fix the problem,
or if one of the poppet valves is damaged, then perhaps a new or used
reconditioned pump will need to be acquired.
Mechanical plastic and metal
body fuel pumps are very durable and they work pretty well, for both lawn
and garden tractors, small motorized vehicle and stock competition garden
pulling tractors burning gas only. They will not pump enough fuel with
E85 or methanol fuels. Anyway,
the OEM neoprene rubber diaphragm or gaskets rarely go bad in the mechanical
fuel pump. When they fail to pump any fuel, it's usually due to the fuel
pump cover and body become warped due to pressure from the retaining screws,
or one of the poppet valves get damaged. They can become dislodged from their
counterbore, or rusted or corroded from long term water contamination. If
the poppet valves are in good condition and snug in their counterbores, but
if the pump doesn't pump fuel, then in most cases, the cover and body have
become warped, creating a vacuum leak at the diaphragm/gasket between the
cover and body. To fix this, separate the fuel pump cover from the body,
and resurface each on a wide, flat
belt sander, large flat
sanding disc or on the side of an abrasive metal cutting
wheel on an
electric chop saw (the kind that automotive muffler shops
use) (use eye protection!) to remove warpage and restore flatness.
(Be sure to use eye protection!) After resurfacing, remove any rough edges
with a
deburring tool, and thoroughly clean all the parts with
150± P.S.I. compressed air and an
air blow gun nozzle before reassembly. After reassembly
of the pump, it should work good as new. But if this doesn't fix the problem,
or if one of the poppet valves is damaged, then perhaps a new or used
reconditioned pump will need to be acquired.
 By the way - most [new design]
aftermarket small engine plastic-body mechanical fuel pumps rarely warp between
the screws that fasten the cover and body together because the material is
much thicker in this area. Only the older OEM Kohler plastic- and metal-body
mechanical fuel pumps warp between the screws because the material is the
same thickness where the screws are.
By the way - most [new design]
aftermarket small engine plastic-body mechanical fuel pumps rarely warp between
the screws that fasten the cover and body together because the material is
much thicker in this area. Only the older OEM Kohler plastic- and metal-body
mechanical fuel pumps warp between the screws because the material is the
same thickness where the screws are.
The only problem when using a gasket to fasten the mechanical fuel pump to
the block is, being the mounting flange is so thin, it will warp over time,
causing an oil leak. (This happens with every pump I've seen.) To fix this,
and to [possibly] prevent an oil leak in the future, completely disassemble
the pump, remove the lever and arm (be careful not to lose the spring) and
use a wide, flat
belt sander, large flat
sanding disc or on the side of an abrasive metal cutting
wheel on an
electric chop saw (the kind that automotive muffler shops
use) (use eye protection!) to remove warpage and restore flatness.
(Be sure to use eye protection!) The trick to reinstalling the spring is,
reinstall the arm, lever and support pin in the pump body first, then install
the spring with a small, flat screwdriver. (The pumps with the manual fuel
primer lever is harder to reassemble.) To keep the flange from warping again,
fasten it directly to the block using only
 clear RTV silicone adhesive sealant and use no gasket,
or use a very thin gasket. Finally, install a flat washer (and of course,
a split lock washer) under each mounting screw head to distribute even pressure
on the flange and to prevent the screws from loosening. By the way - I've
always preferred to use
clear RTV silicone adhesive sealant for three reasons:
Gaskets don't always seal the irregularities or imperfections between mating
metals, especially thin metal covers; being it's an adhesive, it bonds parts
together, forming a leak-proof seal; and being it's clear, it makes for a
clean and professional-looking repair job. When applied sparingly, it can't
be easily seen or noticed between the parts.
clear RTV silicone adhesive sealant and use no gasket,
or use a very thin gasket. Finally, install a flat washer (and of course,
a split lock washer) under each mounting screw head to distribute even pressure
on the flange and to prevent the screws from loosening. By the way - I've
always preferred to use
clear RTV silicone adhesive sealant for three reasons:
Gaskets don't always seal the irregularities or imperfections between mating
metals, especially thin metal covers; being it's an adhesive, it bonds parts
together, forming a leak-proof seal; and being it's clear, it makes for a
clean and professional-looking repair job. When applied sparingly, it can't
be easily seen or noticed between the parts.
 The purpose of the older and
now obsolete OEM Kohler mechanical fuel pump with the manual hand lever
(thin metal piece that hangs down under the pump body) is for when the engine
runs out of fuel, after refilling the gas tank, it takes less time to manually
prime the pump and refill the carburetor with gas by working the lever by
hand than it would to crank the engine for a long time so the fuel pump can
draw fuel from the tank and deliver it to the carburetor. This was a nice
feature, especially on engines with a rope or recoil starter! It also saves
wear and tear on the electric starter motor from cranking the engine for
a long time, which could eventually burn up the starter or drain the battery.
The purpose of the older and
now obsolete OEM Kohler mechanical fuel pump with the manual hand lever
(thin metal piece that hangs down under the pump body) is for when the engine
runs out of fuel, after refilling the gas tank, it takes less time to manually
prime the pump and refill the carburetor with gas by working the lever by
hand than it would to crank the engine for a long time so the fuel pump can
draw fuel from the tank and deliver it to the carburetor. This was a nice
feature, especially on engines with a rope or recoil starter! It also saves
wear and tear on the electric starter motor from cranking the engine for
a long time, which could eventually burn up the starter or drain the battery.
 FYI - Virtually of all of Kohler's
single cylinder cast iron block and opposed twin cylinder engines come with
a lobe on the camshaft to activate the mechanical fuel pump. The fuel pump
installs with the lever positioned upwards. And if there's no provision on
the side of a [single cylinder] block to mount a mechanical fuel pump, a
3/4" center hole and two 1/4" bolt holes can be drilled, and the 1/4" holes
tapped for 1/4-20 UNC threads to mount a mechanical fuel pump. Use a fuel
pump mounting gasket as a templet to drill the holes.
FYI - Virtually of all of Kohler's
single cylinder cast iron block and opposed twin cylinder engines come with
a lobe on the camshaft to activate the mechanical fuel pump. The fuel pump
installs with the lever positioned upwards. And if there's no provision on
the side of a [single cylinder] block to mount a mechanical fuel pump, a
3/4" center hole and two 1/4" bolt holes can be drilled, and the 1/4" holes
tapped for 1/4-20 UNC threads to mount a mechanical fuel pump. Use a fuel
pump mounting gasket as a templet to drill the holes.
When to Use a Low Pressure 12 Volt Electric Fuel Pump -
 Most low pressure
12 volt electric fuel pumps are compact,
vibration-proof (has solid state dependability), self-priming, easy to install
and connect the wiring. They work with gasoline-based fuels, won't flood
the carburetor, draw very little amperage from the battery, and they cost
less than most OEM low pressure 12 volt electric
fuel pumps. These works great for garden tractors and small motorized
vehicles with a single- or two-cylinder engine.
Most low pressure
12 volt electric fuel pumps are compact,
vibration-proof (has solid state dependability), self-priming, easy to install
and connect the wiring. They work with gasoline-based fuels, won't flood
the carburetor, draw very little amperage from the battery, and they cost
less than most OEM low pressure 12 volt electric
fuel pumps. These works great for garden tractors and small motorized
vehicles with a single- or two-cylinder engine.
Another good thing about a low pressure 12 volt electric fuel pump verses a mechanical pump (if the mechanical pump doesn't have a primer lever, which must be primed manually) is if an engine runs out of fuel, the engine will not have to be cranked for a long time to get the fuel pumped up to the carburetor, which can be hard on an electric starter motor.
A new electric fuel pump should come with detailed and illustrated installation instructions. If there's no instructions, on a tractor or small engine equipment with battery-powered ignition, connect the RED wire from the pump to the wire that connects to the ignition coil positive (+) terminal (which is connected to the battery positive (+) post through the ignition key switch), and connect the BLACK wire from the pump to the engine sheet metal or chassis ground (which is connected directly to the battery negative (–) post). On a tractor or small engine equipment with magneto or solid state ignition, but with electric start, use an OFF/ON toggle switch connected to the battery positive (+) post to power the fuel pump. In most cases, do not use the [self-grounding magneto] ignition key switch.
Advertisement: (Prices are subject to change without notice.)
| Click here to contact A-1 Miller's Performance Enterprises to place an order, send your parts for repairing, and/or for FREE professional and honest technical customer service assistance and support and payment options. Please contact A-1 Miller's if you need a part or parts, or service(s) performed that's not listed or mentioned in this website. | |
Mechanical Fuel Pump Opening
Adaptor Plates with 1/8" NPT Threaded Port Hole. Use as a crankcase vacuum
port with a vacuum-operated/pulse-type fuel pump (listed further below) to
replace faulty mechanical fuel pump (listed further below). Each plate fits
virtually all models of Kohler engines and certain older Tecumseh engines.
Can be installed with
clear RTV silicone adhesive sealant instead of a gasket
to prevent oil leak. Use
plumber's thread sealing tape on threads of fitting to
guarantee a leak-proof seal. Each plate listed below
 replaces discontinued Kohler part
# 277646 and Tecumseh part # 32955. [Top of Page] replaces discontinued Kohler part
# 277646 and Tecumseh part # 32955. [Top of Page]
Straight Fuel/Pulse Hose Fittings
with 1/8" NPT threads and 1/4" Barb. Use with 1/4" I.D. fuel hose and/or
as a crankcase vacuum port with a vacuum-operated/pulse-type fuel pump (listed
further below). Use
plumber's thread sealing tape on threads of fitting to
guarantee a leak-proof seal.
45º Fuel/Pulse Hose Fitting
with 1/8" NPT threads and 1/4" Barb. Use with 1/4" I.D. fuel hose and/or
as a crankcase vacuum port with a vacuum-operated/pulse-type fuel pump (listed
further below). Use in close quarters to clear obstacles. Use
plumber's thread sealing tape on threads of fitting to
guarantee a leak-proof seal.
90º Fuel/Pulse Hose Fittings
with 1/8" NPT threads and 1/4" Barb. Use with 1/4" I.D. fuel hose and/or
as a crankcase vacuum port with a vacuum-operated/pulse-type fuel pump (listed
further below). Use in close quarters to clear obstacles. Use
plumber's thread sealing tape on threads of fitting to
guarantee a leak-proof seal.
|
|
Pulse-Type/Vacuum-Operated Fuel Pumps. Operates off internal
engine crankcase pulsating air pressure from movement of piston(s). Very
durable, long lasting and universal usage. Designed for many makes and models
of various small gas engines for general lawn and garden usage or for a
4,000± RPM stock competition pulling engine. Can be used as a replacement
for a faulty high-dollar mechanical OEM low pressure fuel pump. NOTE:
Remove rubber caps from fittings before installing fuel and vacuum hoses.
IMPORTANT: Install inline fuel filter between gas tank and pump to lessen
wear and damage to flapper/reed valves in pump.
Click here to learn how
to convert a small engine for use with this type of fuel pump.
|
|
 Mechanical Fuel
Pump Opening Block-Off/Cover Plates. Use with a gravity feed fuel system
or replace faulty mechanical fuel pump (listed further below) with a 12 volt
electric fuel
pump (listed further below). Each plate fits virtually all
models of Kohler engines and certain older Tecumseh engines. Can be installed
with
clear RTV silicone adhesive sealant instead of a gasket
to prevent oil leakage. Mechanical Fuel
Pump Opening Block-Off/Cover Plates. Use with a gravity feed fuel system
or replace faulty mechanical fuel pump (listed further below) with a 12 volt
electric fuel
pump (listed further below). Each plate fits virtually all
models of Kohler engines and certain older Tecumseh engines. Can be installed
with
clear RTV silicone adhesive sealant instead of a gasket
to prevent oil leakage.
|
|
Mechanical
Fuel Pump Mounting Gaskets and Neoprene Seal. Use either gasket with
mechanical fuel pumps and if the rubber seal is missing for a new style pump.
Fits all models of Kohler and older Tecumseh engines with a camshaft-operated
mechanical fuel pump. Gaskets approximately 1/32" thick.
[Return
to Top of Page, Previous Paragraph or Section]
|
|
  Mechanical Fuel Pumps. Fits Kohler engine models K90/K91, K141,
K160/K161,
L160/L161,
L181, K181 and M8. The new style and durable [hard] plastic body
fuel pumps resist warpage and corrosion from water contamination. NOTE:
Use supplied snap ring to compress tabs on pump to install and rotate hose
fittings. IMPORTANT: Install inline fuel filter between gas
tank and pump to lessen wear and damage to poppet valves in pump. Mechanical Fuel Pumps. Fits Kohler engine models K90/K91, K141,
K160/K161,
L160/L161,
L181, K181 and M8. The new style and durable [hard] plastic body
fuel pumps resist warpage and corrosion from water contamination. NOTE:
Use supplied snap ring to compress tabs on pump to install and rotate hose
fittings. IMPORTANT: Install inline fuel filter between gas
tank and pump to lessen wear and damage to poppet valves in pump.
|
|
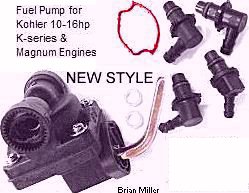 Mechanical Fuel Pumps. Fits Kohler
engine models K241, M10, K301, M12, K330/K331, K321, M14, K341, M16, K361
and K660/K662. The new style and durable [hard] plastic body fuel pumps resist
warpage and corrosion from water contamination. NOTE: Use supplied snap
ring to compress tabs on pump to install and rotate hose fittings. IMPORTANT:
Install inline fuel filter between gas tank and pump
to lessen wear and damage to poppet valves in pump. Mechanical Fuel Pumps. Fits Kohler
engine models K241, M10, K301, M12, K330/K331, K321, M14, K341, M16, K361
and K660/K662. The new style and durable [hard] plastic body fuel pumps resist
warpage and corrosion from water contamination. NOTE: Use supplied snap
ring to compress tabs on pump to install and rotate hose fittings. IMPORTANT:
Install inline fuel filter between gas tank and pump
to lessen wear and damage to poppet valves in pump.
|
|
 Mechanical Fuel Pumps. Fits Kohler
engine models KT17 (first design), KT17 Series II, KT19 (first design), KT19
Series II, KT21, MV16, M18, MV18, M20 and MV20. The new style and durable
[hard] plastic body fuel pumps resist warpage and corrosion from water
contamination. NOTE: Use supplied snap ring to compress tabs on pump to
install and rotate hose fittings. IMPORTANT: Install inline fuel filter between
gas tank and pump to lessen wear and damage to poppet
valves in pump. Mechanical Fuel Pumps. Fits Kohler
engine models KT17 (first design), KT17 Series II, KT19 (first design), KT19
Series II, KT21, MV16, M18, MV18, M20 and MV20. The new style and durable
[hard] plastic body fuel pumps resist warpage and corrosion from water
contamination. NOTE: Use supplied snap ring to compress tabs on pump to
install and rotate hose fittings. IMPORTANT: Install inline fuel filter between
gas tank and pump to lessen wear and damage to poppet
valves in pump.
|
|
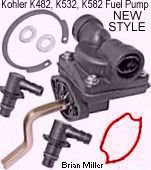 Mechanical Fuel Pumps. Fits Kohler
engine models K482, K532 and K582 opposed twin cylinder engines. The new
style and durable [hard] plastic body fuel pumps resist warpage and corrosion
from water contamination. NOTE: Use supplied snap ring to compress tabs
on pump to install and rotate hose fittings. IMPORTANT: Install inline fuel
filter between gas tank and pump to lessen wear and
damage to poppet valves in pump. Mechanical Fuel Pumps. Fits Kohler
engine models K482, K532 and K582 opposed twin cylinder engines. The new
style and durable [hard] plastic body fuel pumps resist warpage and corrosion
from water contamination. NOTE: Use supplied snap ring to compress tabs
on pump to install and rotate hose fittings. IMPORTANT: Install inline fuel
filter between gas tank and pump to lessen wear and
damage to poppet valves in pump.
|
|
12 Volt Electric Fuel Pump
Installation Kits. Compact and small. Use an electric fuel pump when
the gas tank is lower than the carburetor or when
a mechanical fuel is insufficient. Alcohol-resistant and very durable. Upgrade
to one of these electric pumps for more reliable fuel delivery. Instantly
fills the carburetor with fuel as soon as pump is powered up. Ideal when
equipment runs out of gas and no need to crank the engine for a long time
with a crankcase vacuum-operated/pulse-type or a mechanical fuel pump to
refill the carburetor to restart the engine. Saves wear and tear of the
starter motor and
reserves battery power. Convert from gravity feed, or replace a faulty or
inefficient crankcase vacuum-operated/pulse-type fuel pump or malfunctioning
or inefficient mechanical fuel pump. For most small engines, a fuel regulator
is not required with the low pressure pumps. Each is suitable for small gas
engines up to 4 cylinder carbureted engines. Use on general lawn and garden
equipment, go-karts, ATV's, UTV's, small motorized vehicles or competition
garden pulling tractors with a stock engine or open RPM competition pulling
engine. Will work with most small gas engines such as Kohler, Briggs &
Stratton, Tecumseh, Wisconsin, etc., and on virtually all models of Cub Cadet,
John Deere, Wheel Horse, Sears Suburban, Massey Ferguson, and just about
any lawn & garden equipment with a 12 volt electrical system. If it's
a Kohler AQS "Quiet Line" engine, the [larger] fuel hose fitting in the
carburetor will need to be changed to a 1/4" fitting. IMPORTANT: Use
plumber's thread sealing tape to guarantee a leak-proof
seal. If the engine has magneto or solid state electronic ignition, and no
charging system, a small 12 volt battery will need to be used to power the
fuel pump. The battery would need to be recharged with a 120 volt portable
battery charger from time to time so the fuel pump will work at peak efficiency.
Each fuel pump draws less than 2 amps. Wire Connections: The
RED wire connects to the IGNITION terminal
on the ignition/starter key switch or to an OFF-ON toggle switch, and the
BLACK wire connects to negative (–) ground (chassis or frame).
NOTE: Electric fuel pumps listed here come with a one year warranty from
date of purchase. IMPORTANT: Install the inline fuel filter between gas tank
and pump inlet port to prevent any dirt/debris from wearing the pumping
mechanism. If dirt/debris become lodged in pump, it can be cleared-out with
150± P.S.I. compressed air and an
air blow gun nozzle when applied in the reverse direction
of fuel flow. And for long
term storage of equipment, drain and flush out all fuel, leave fuel hoses
disconnected and apply light oil in the pump to prevent oxidation or "sticking"
of the pumping mechanism.
[Return
To Previous Paragraph or Section]
|
|
Go Here for High Quality Aluminum Gas Tanks and
Brackets: |
How to Prepare an Electric Fuel Pump for Wintertime or Long Term Storage -
If small engine equipment is equipped with an electric fuel pump, for winter-time or long term storage, drain out all fuel, and use 150± P.S.I. compressed air with an air blow gun nozzle to clear out any remaining fuel in the fuel pump and fuel system. Leave the fuel hoses disconnected so the entire fuel system can "air dry". Then apply WD-40 or light weight oil, such as 3-IN-ONE, power steering fluid or equivalent, in the fuel pump to prevent oxidation of any aluminum parts and possible rusting of any steel parts, which could cause the pump to malfunction. Then store the small engine equipment in a cool, dry environment. Avoid storing the equipment in a damp and high humility environment. Click or tap here for more information of long term storage of an engine.
Advertisement: (Prices are subject to change without notice.)
| Click here to contact A-1 Miller's Performance Enterprises to place an order, send your parts for repairing, and/or for FREE professional and honest technical customer service assistance and support and payment options. Please contact A-1 Miller's if you need a part or parts, or service(s) performed that's not listed or mentioned in this website. | |||||||
| Professional Carburetor Rebuilding -
IMPORTANT: When sending your carburetor to A-1 Miller's, use the USPS, FedEx or UPS with a tracking number. Package it securely so it won't get damaged and address it correctly so it won't get lost in shipping and place it in a sealed zip-lock sandwich bag to prevent the odor of gas from escaping the package and prevent the loss of any loose parts in shipping. To prevent the odor of gas from outside the package, apply air freshener on the carburetor to disguise the smell of gas. Because the USPS, FedEx or UPS will not deliver any packages that smell like gas. Also, include a note in the package with your name, complete and correct postal address, phone number (in case I have any questions), a description of what you want done, how the engine will be used and any other parts you may need. FYI - Many of our customers send me their carburetor for rebuilding, but sometimes I can't find anything wrong it. So I'd call our customer and ask how their engine acted or ran. After hearing their story, I tell them it sounds like their engine either needs a professional valve job performed or it needs a professional tune-up. And lo and behold! Many of them either adjusted the valve clearances or had a professional valve job performed, or performed a professional tune-up, and said that their engine ran like new again. So remember, sometimes a carburetor problem may be the valves or the ignition system instead. Please contact A-1 Miller's for FREE professional and honest technical support if you have any concerns with how poorly your engine runs. |
|||||||
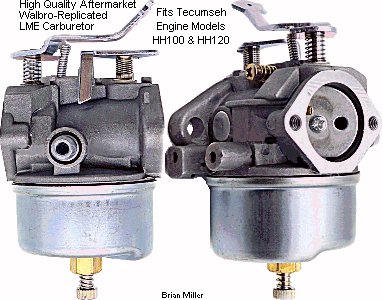 High Quality
Aftermarket Walbro-Replicated LME Carburetor. Brand new. Fits Tecumseh
engine models HH100 and HH120. The OEM Walbro LME carburetor is no longer
available from Tecumseh. Replaces discontinued Tecumseh part #'s 631304A,
631304B and 632424. High Quality
Aftermarket Walbro-Replicated LME Carburetor. Brand new. Fits Tecumseh
engine models HH100 and HH120. The OEM Walbro LME carburetor is no longer
available from Tecumseh. Replaces discontinued Tecumseh part #'s 631304A,
631304B and 632424.
If you're not sure what model Tecumseh engine you have, go here: Craftsman to Tecumseh Model Cross Reference. NOTE: Before considering replacing the carburetor, the engine may have insufficient valve-to-lifter clearances or it may need a professional valve job performed instead. So check and (re)set the valve clearances to factory specifications. If there's black sooty (carbon) residue inside the carburetor throttle bore, this means the intake valve definitely has insufficient clearance. Because sometimes misdiagnosed carburetor problems can be faulty valves. |
|||||||
| Carburetor for Kohler engine model K90/K91 | Carburetors for Kohler engine models K141, K161, K181 and M8 | Carburetor for Kohler engine models K241, M10, K231 and M12 | Carburetor for Kohler engine models K321 and M14 | Carburetor for Kohler engine models K341 and M16 | Carburetor for Kohler engine model K361 | Carburetor for Kohler engine models KT17, KT Series II, KT19, KT Series II, M18 and M20 | Carburetor for Kohler engine models K482, K532 and K582 |
 Professionally
Rebuilt Genuine OEM Carter Model N #13 or #16 Carburetor. Very rare
nowadays. These particular carburetors are designed specifically for Kohler
engine model K90 and K91 (which are the same engine), and certain low RPM
K141 engines. It has a tapered/inverted cone-shaped float bowl and float,
and the throttle bore measures .810" diameter and the
venturi is .542" diameter. When used on a Kohler engine
model K141, K160/K161, L160/L161,
L181, K181 or M8, due to the smaller throttle bore and restrictive venturi,
and velocity or volume of air that's required, the bigger engine may not
produce full power at 3,600 RPM. (It'll be the same as using a small 2-barrel
carburetor versus a big 4-barrel carburetor on an automotive engine.) This
is a plain, stock carburetor that's been completely disassembled, thoroughly
cleaned and professionally rebuilt with a new overhaul kit, new throttle
shaft (if needed) and other new parts if required. No performance modifications
are made to this carburetor whatsoever. The idle speed and air/fuel mixture
adjustments will be initially set on the carburetor just to get the engine
running, but due to the altitude level, atmospheric/barometric pressure and
air temperature where the engine will be used, final idle and high speed
air/fuel mixture adjustments will need to be made by the customer so the
engine will run smooth. Use
plumber's thread sealing tape on threads of fuel hose fitting
to guarantee a leak-proof seal. OEM Carter part #'s A-220100, A-230246, A-230444,
E-220517, F-220762, G-220517, 220451, 220574, 220745, 220777, 230501. OEM
Kohler part # 46 053 03. One of these numbers should be stamped on your OEM
Carter carburetor, but not all numbers stamped on Carter carburetors are
listed with Kohler. This carburetor is discontinued from Kohler.
L All carburetors that A-1 Miller's repair,
rebuild, modify or sell are guaranteed to be free of defects and come with
a limited lifetime workmanship warranty from date of purchase. Warranty includes
FREE professional and honest technical support. NOTE: Before considering
replacing the carburetor, the engine may have insufficient valve-to-lifter
clearances or it may need a professional valve job performed instead. So
check and (re)set the valve clearances to factory specifications. If there's
black sooty (carbon) residue inside the carburetor throttle bore, this means
the intake valve definitely has insufficient clearance. Because sometimes
misdiagnosed carburetor problems can be faulty valves.
[Return To Previous Paragraph or
Section] Professionally
Rebuilt Genuine OEM Carter Model N #13 or #16 Carburetor. Very rare
nowadays. These particular carburetors are designed specifically for Kohler
engine model K90 and K91 (which are the same engine), and certain low RPM
K141 engines. It has a tapered/inverted cone-shaped float bowl and float,
and the throttle bore measures .810" diameter and the
venturi is .542" diameter. When used on a Kohler engine
model K141, K160/K161, L160/L161,
L181, K181 or M8, due to the smaller throttle bore and restrictive venturi,
and velocity or volume of air that's required, the bigger engine may not
produce full power at 3,600 RPM. (It'll be the same as using a small 2-barrel
carburetor versus a big 4-barrel carburetor on an automotive engine.) This
is a plain, stock carburetor that's been completely disassembled, thoroughly
cleaned and professionally rebuilt with a new overhaul kit, new throttle
shaft (if needed) and other new parts if required. No performance modifications
are made to this carburetor whatsoever. The idle speed and air/fuel mixture
adjustments will be initially set on the carburetor just to get the engine
running, but due to the altitude level, atmospheric/barometric pressure and
air temperature where the engine will be used, final idle and high speed
air/fuel mixture adjustments will need to be made by the customer so the
engine will run smooth. Use
plumber's thread sealing tape on threads of fuel hose fitting
to guarantee a leak-proof seal. OEM Carter part #'s A-220100, A-230246, A-230444,
E-220517, F-220762, G-220517, 220451, 220574, 220745, 220777, 230501. OEM
Kohler part # 46 053 03. One of these numbers should be stamped on your OEM
Carter carburetor, but not all numbers stamped on Carter carburetors are
listed with Kohler. This carburetor is discontinued from Kohler.
L All carburetors that A-1 Miller's repair,
rebuild, modify or sell are guaranteed to be free of defects and come with
a limited lifetime workmanship warranty from date of purchase. Warranty includes
FREE professional and honest technical support. NOTE: Before considering
replacing the carburetor, the engine may have insufficient valve-to-lifter
clearances or it may need a professional valve job performed instead. So
check and (re)set the valve clearances to factory specifications. If there's
black sooty (carbon) residue inside the carburetor throttle bore, this means
the intake valve definitely has insufficient clearance. Because sometimes
misdiagnosed carburetor problems can be faulty valves.
[Return To Previous Paragraph or
Section]
NOTE: Before considering replacing the carburetor, the engine may have insufficient valve-to-lifter clearances or it may need a professional valve job performed instead. So check and (re)set the valve clearances to factory specifications. If there's black sooty (carbon) residue inside the carburetor throttle bore, this means the intake valve definitely has insufficient clearance. Because sometimes misdiagnosed carburetor problems can be faulty valves. [Return To Previous Paragraph or Section] |
|||||||
| FYI
- Many online retailers advertise the Chinese-made #26 1.07" carburetor with
the vertical throttle shaft for the Kohler K241, M10, K301, M12, K321, M14,
K341 and M16 engines. This is misleading information and perhaps unintentional
false advertising. Maybe they are just passing this information along from
their supplier. As a matter of fact, the Kohler K241 and K301 engines require
and originally come with a #26 carburetor that have a 1.07" throttle bore.
This particular carburetor is also ideal for use on the M10 and M12 engines
as well. And the [later model] K321 and all K341 engines require and originally
come with a #30 carburetor that have a 1.2" throttle bore. The Chinese only
make a carburetor with the (#26) 1.07" throttle bore that's sized for the
K241 and K301 engines. This particular carburetor is too small for the K321
and K341 engines, and when used on these bigger engines, they will not produce
maximum power at full governed speed.
(Updated 11/8/25)
FYI - Many online retailers advertise the Chinese-made #26 1.07" carburetor with the horizontal throttle shaft for Kohler K482, K532 and K582 engines, and this is misleading information and perhaps unintentional false advertising. Maybe they are just passing this information along from their supplier. As a matter of fact, all Kohler K482 and K532 engines require and originally come with a #26 carburetor that have a 1.07" throttle bore with the choke lever located on the fuel inlet side with the choke lever located on the fuel inlet side in the upright position. The K582 engine require and originally come with a #30 carburetor that have a 1.2" throttle bore with the choke lever located opposite of the fuel inlet side. The Chinese only make a carburetor with the (#26) 1.07" throttle bore that's sized for the K482 and K532 engines. This particular carburetor is too small for the K582 engine, and when used on this bigger engine, it will not produce maximum power at full governed speed. New and Rebuilt Carburetors for Kohler engine models K482, K532 and K582. OEM Kohler carburetors are cleaned and professionally rebuilt with a new overhaul kit, new [snug] throttle shaft (if needed) and other new parts if required. Discontinued Kohler part #'s A-277373, A-277910, C-277061, C-277329, 48 053 01, 48 053 03, 48 053 05, 48 053 07, 48 053 08, 48 053 09, 48 053 10, 48 053 12, 48 053 13, 48 053 14, 48 053 29. One of these numbers should be stamped on mounting flange of your OEM carburetor. NOTE: Please mail us photo(s) of your OEM Kohler carburetor so we can match it to one that we may have in stock. We may have to install the correct throttle and choke levers in ours to match yours. Because nothing works better than the original type of carburetor. [Return To Previous Paragraph or Section]
Professionally Rebuilt OEM Kohler #30 (1.2" throttle bore) carburetor designed specifically for Kohler engine model K582. Cleaned and professionally rebuilt with a new overhaul kit, new [snug] throttle shaft (if needed) and other new parts if required. Discontinued Kohler part #'s 48 053 06, 48 053 11, 48 053 13, 48 053 16, 48 053 18, 48 053 24, 48 053 25, 48 053 27. One of these numbers should be stamped on mounting flange of your OEM carburetor. NOTE: Please mail us photo(s) of your OEM Kohler carburetor so we can match it to one that we may have in stock. We may have to install the correct throttle and choke levers in ours to match yours. Because nothing works better than the original type of carburetor.
|
|||||||
| A-1 Miller's
Professional Repair Service - Professional Stock-Appearing, "Old School"
Technology, High-Performance Carburetor Modifications - Modify OEM Carter
or Kohler #26, #28 or #30 carburetor for enhanced performance on a competition
garden tractor pulling engine. [Top of Page]
Can be used on Stock, Hot Stock, Missouri Super Stock, or any class where the rules state that a stock-appearing carburetor must be used. With these carburetors, your pulling engine will rev higher and produce more power to maintain maximum horsepower and spin the tires. My customers like how their engine preforms when running one of these carburetors. Will pass tech as a stock-appearing carburetor. Solely for competition pulling. Not recommended for general yard and garden use. Stock-appearing means Carter or Kohler #26, #28 or #30 carburetor (except Walbro) is modified internally to improve engine performance. The venturi is bored-out (machined larger for more airflow to increase compression) to .995", 1" or straight-through design (to match the diameter of throttle bore) or whatever your club's sanctioning rules allow for use with pump gas, E-85 or methanol fuels. Please specify if your engine has stock size valves or an oversize intake valve. The idle speed, idle air/fuel mixture and high speed air/fuel mixture adjusters/screws will be initially preset on the carburetor just to get the engine running, but due to the altitude level, atmospheric/barometric pressure and air temperature where the engine will be used, final adjustments will need to be made by the customer so the engine will run smooth. A-1 Miller's may need a copy of your association's/club's sanctioning rules regarding the legality of the carburetor so when we rework/modify it, it'll be legal for the class you plan to pull in. All carburetors that A-1 Miller's repair, rebuild, modify or sell are guaranteed to be free of defects and come with a limited lifetime workmanship warranty from date of purchase. Warranty includes FREE professional and honest technical support. FYI - After your Carter or Kohler carburetor is modified or reworked for high-performance use, as long as everything else are all in good condition with the engine, including the ignition timing, valve train, etc., the carburetor should, without a doubt, perform flawlessly.
Click here to contact A-1 Miller's Performance Enterprises to place an order, send your parts for repairing, and/or for FREE professional and honest technical customer service assistance and support and payment options. Please contact A-1 Miller's if you need a part or parts, or service(s) performed that's not listed or mentioned in this website. |
|||||||
Advertisement: (Prices are subject to change without notice.)
| Click here to contact A-1 Miller's Performance Enterprises to place an order, send your parts for repairing, and/or for FREE professional and honest technical customer service assistance and support and payment options. Please contact A-1 Miller's if you need a part or parts, or service(s) performed that's not listed or mentioned in this website. | |||||||
| NOTE - We have the capability to fabricate and duplicate obsolete and hard to find throttle linkages and levers. If interested, please email me a photo of the part(s) that's needed (if possible) with the exact dimensions. | |||||||
 Carburetor-to-Block
Mounting Gaskets. Fits Kohler engine models K90/K91, K141, K160/K161,
KV161,
L160/L161,
L181, K181, M8, and various other makes and models of small engines
with Carter Model N #13, #16, #18, #20, #22 and Walbro WHL #36, #44 carburetor.
Approximately 1/64" compressed thickness. NOTE: Thoroughly clean off old
gasket material to prevent a vacuum leak. Carburetor-to-Block
Mounting Gaskets. Fits Kohler engine models K90/K91, K141, K160/K161,
KV161,
L160/L161,
L181, K181, M8, and various other makes and models of small engines
with Carter Model N #13, #16, #18, #20, #22 and Walbro WHL #36, #44 carburetor.
Approximately 1/64" compressed thickness. NOTE: Thoroughly clean off old
gasket material to prevent a vacuum leak.
|
 Air Cleaner Base
or Intake Elbow Adapter-to-Carburetor Mounting Gasket. Fits most older Tecumseh
carburetors and Kohler engine models K90/K91, K141, K160/K161,
KV161,
L160/L161,
L181, K181, M8, and various other makes and models of small engines
with Carter Model N #13, #16, #18, #20, #22 or Walbro WHL #36, #44 and LME
carburetor. Approximately 1/32" compressed thickness. Use with two mounting
screws. Air Cleaner Base
or Intake Elbow Adapter-to-Carburetor Mounting Gasket. Fits most older Tecumseh
carburetors and Kohler engine models K90/K91, K141, K160/K161,
KV161,
L160/L161,
L181, K181, M8, and various other makes and models of small engines
with Carter Model N #13, #16, #18, #20, #22 or Walbro WHL #36, #44 and LME
carburetor. Approximately 1/32" compressed thickness. Use with two mounting
screws.
|
||||||
 Air
Cleaner Base-to-Carburetor Mounting Gasket. Fits various Kohler engine models
K181 and M8, and various other makes and models of small engines with Walbro
WHL #36, #44 carburetor. Not available in aftermarket. Air
Cleaner Base-to-Carburetor Mounting Gasket. Fits various Kohler engine models
K181 and M8, and various other makes and models of small engines with Walbro
WHL #36, #44 carburetor. Not available in aftermarket.
|
 Air Cleaner
Base or Intake Elbow Adapter-to-Carburetor Mounting Gaskets. Fits Kohler
engine models K90/K91, K141, K160/K161, K181, M8, and various other makes
and models of small engines with Carter Model N #13, #16, #18, #20, #22 and
Walbro WHL 36, #44 carburetor. Can be used with two or three mounting screws,
depending on type of air cleaner. Approximately 1/32" compressed thickness.
Alternative gasket to the left. Air Cleaner
Base or Intake Elbow Adapter-to-Carburetor Mounting Gaskets. Fits Kohler
engine models K90/K91, K141, K160/K161, K181, M8, and various other makes
and models of small engines with Carter Model N #13, #16, #18, #20, #22 and
Walbro WHL 36, #44 carburetor. Can be used with two or three mounting screws,
depending on type of air cleaner. Approximately 1/32" compressed thickness.
Alternative gasket to the left.
|
||||||
 Carburetor-to-Block
(Thin) Mounting Gaskets. Fits Kohler engine models K241, M10, K301, M12,
K330/K331, K321, M14, K341, M16, K361, KT17 (first design), KT17 Series II,
KT19 (first design), KT19 Series II, KT21, MV16, M18, MV18, M20, MV20 K482,
K532 and K582 with Carter or Kohler #26, #28, #30 or Walbro WHG #52, #60,
#64 carburetor. For general lawn and garden use. Approximately 1/32" compressed
thickness. NOTE: Thoroughly clean off old gasket material to prevent a
vacuum leak. Carburetor-to-Block
(Thin) Mounting Gaskets. Fits Kohler engine models K241, M10, K301, M12,
K330/K331, K321, M14, K341, M16, K361, KT17 (first design), KT17 Series II,
KT19 (first design), KT19 Series II, KT21, MV16, M18, MV18, M20, MV20 K482,
K532 and K582 with Carter or Kohler #26, #28, #30 or Walbro WHG #52, #60,
#64 carburetor. For general lawn and garden use. Approximately 1/32" compressed
thickness. NOTE: Thoroughly clean off old gasket material to prevent a
vacuum leak.
|
 Carburetor-to-Block
(Thick) Heat Isolator Mounting Gasket. Fits Kohler engine models K241,
M10, K301, M12, K330/K331, K321, M14, K341 and M16 with Carter or Kohler
#26, #28, #30 or Walbro WHG #52, #60, #64 carburetor. Use for heavy yard
and/or garden work, or for competition pulling engines. Has one gasket adhered
to each side of heat resistant
phenolic
resin center. Approximately .230" compressed total thickness. NOTE:
Thoroughly clean off old gasket material to prevent a vacuum leak. FYI:
This particular gasket prevents engine heat from being transferred to the
carburetor, resulting in cooling and better
atomization
of the fuel before entering the combustion chamber, improving engine
performance. Carburetor-to-Block
(Thick) Heat Isolator Mounting Gasket. Fits Kohler engine models K241,
M10, K301, M12, K330/K331, K321, M14, K341 and M16 with Carter or Kohler
#26, #28, #30 or Walbro WHG #52, #60, #64 carburetor. Use for heavy yard
and/or garden work, or for competition pulling engines. Has one gasket adhered
to each side of heat resistant
phenolic
resin center. Approximately .230" compressed total thickness. NOTE:
Thoroughly clean off old gasket material to prevent a vacuum leak. FYI:
This particular gasket prevents engine heat from being transferred to the
carburetor, resulting in cooling and better
atomization
of the fuel before entering the combustion chamber, improving engine
performance.
|
||||||
 Air Cleaner
Base-to-Carburetor Mounting Gaskets. Fits Kohler engine models K241, K301,
K321, K330/K331, K341, and various Magnum engine models M10, M12, M14 and
M16 with Carter or Kohler #26, #28, #30 or Walbro WHG #52, #60, #64 carburetor
with the round air cleaner/filter
assembly. NOTE: This gasket can be used on the KT-series and Magnum
opposed twin cylinder engine carburetors by making a hole at 2:00 position
with a [paper]
hole punch to resemble the gasket below. Air Cleaner
Base-to-Carburetor Mounting Gaskets. Fits Kohler engine models K241, K301,
K321, K330/K331, K341, and various Magnum engine models M10, M12, M14 and
M16 with Carter or Kohler #26, #28, #30 or Walbro WHG #52, #60, #64 carburetor
with the round air cleaner/filter
assembly. NOTE: This gasket can be used on the KT-series and Magnum
opposed twin cylinder engine carburetors by making a hole at 2:00 position
with a [paper]
hole punch to resemble the gasket below.
|
 Air Cleaner
Base-to-Carburetor Mounting Gasket. Fits Kohler AQS "Quiet Line" engine models
K241, K301, K321, K341 and K361, and various Magnum engine models M10, M12,
M14 and M16 with Kohler #26, #30 or Walbro WHG #52, #60, #64 carburetor with
the round or oblong/egg-shaped
air cleaner/filter assembly. Air Cleaner
Base-to-Carburetor Mounting Gasket. Fits Kohler AQS "Quiet Line" engine models
K241, K301, K321, K341 and K361, and various Magnum engine models M10, M12,
M14 and M16 with Kohler #26, #30 or Walbro WHG #52, #60, #64 carburetor with
the round or oblong/egg-shaped
air cleaner/filter assembly.
|
||||||
 Air Intake Elbow
Adapter-to-Carburetor Mounting Gasket. Fits Kohler engine models K321, K341,
KT17 (first design), KT17 Series II, KT19 (first design), KT19 Series II,
KT21, MV16, M18, MV18, M20, MV20, K482, K532 and K582. Air Intake Elbow
Adapter-to-Carburetor Mounting Gasket. Fits Kohler engine models K321, K341,
KT17 (first design), KT17 Series II, KT19 (first design), KT19 Series II,
KT21, MV16, M18, MV18, M20, MV20, K482, K532 and K582.
|
 Square-shaped
Air Cleaner Base-to-Elbow Adapter Mounting Gasket. Fits Kohler engine models
CH25, CH730-740, KT17 (first design), KT17 Series II, KT19 (first design),
KT19 Series II, KT21, MV16, M18, MV18, M20, MV20, K482, K532 and K582.
Approximately 1/32" compressed thickness. Not available in aftermarket. Square-shaped
Air Cleaner Base-to-Elbow Adapter Mounting Gasket. Fits Kohler engine models
CH25, CH730-740, KT17 (first design), KT17 Series II, KT19 (first design),
KT19 Series II, KT21, MV16, M18, MV18, M20, MV20, K482, K532 and K582.
Approximately 1/32" compressed thickness. Not available in aftermarket.
|
||||||
 Intake
Manifold-to-Cylinder Mounting Gasket. Fits Kohler opposed twin cylinder engine
models KT17 (first design), KT17 Series II, KT19 (first design), KT19 Series
II, KT21, MV16, M18, MV18, M20 and MV20. Approximately 1/32" compressed
thickness. NOTE: Thoroughly clean off all old gasket material to prevent
a vacuum leak. Intake
Manifold-to-Cylinder Mounting Gasket. Fits Kohler opposed twin cylinder engine
models KT17 (first design), KT17 Series II, KT19 (first design), KT19 Series
II, KT21, MV16, M18, MV18, M20 and MV20. Approximately 1/32" compressed
thickness. NOTE: Thoroughly clean off all old gasket material to prevent
a vacuum leak.
|
 Intake
Manifold-to-Block Mounting Gasket. Fits Kohler opposed twin cylinder engine
models K482, K532 and K582. Not available in aftermarket. NOTE:
Thoroughly clean off all old gasket material to prevent a vacuum leak. Intake
Manifold-to-Block Mounting Gasket. Fits Kohler opposed twin cylinder engine
models K482, K532 and K582. Not available in aftermarket. NOTE:
Thoroughly clean off all old gasket material to prevent a vacuum leak.
|
||||||
  Carburetor Overhaul Kits. Fits Carter and Kohler carburetors
used on Kohler K-series and early Magnum single and opposed twin cylinder
engines, and various other makes and models of small engines. Includes: 3/8"
or 10mm brass fuel inlet seat w/gasket,
Viton-tip
fuel inlet float valve, alcohol-resistant
neoprene
rubber float bowl O-ring seal, alcohol-resistant
neoprene
rubber fuel baffle/splash shield, fiber bottom float bowl gasket and float
hinge pin. NOTE: High quality aftermarket kits are equal to or surpasses
the quality of the OEM Kohler overhaul kit. IMPORTANT: Before reinstalling
a used float bowl on the carburetor, place it on a hard, flat surface, and
flatten the bottom of the bowl from the inside with a small hammer. When
the bowl is installed on the carburetor body with the retaining bolt tightened,
this will "clamp" or squeeze the fuel baffle/splash shield against the O-ring
to prevent splashing fuel from seeping out around the top of the float bowl
when the engine is in operation. Carburetor Overhaul Kits. Fits Carter and Kohler carburetors
used on Kohler K-series and early Magnum single and opposed twin cylinder
engines, and various other makes and models of small engines. Includes: 3/8"
or 10mm brass fuel inlet seat w/gasket,
Viton-tip
fuel inlet float valve, alcohol-resistant
neoprene
rubber float bowl O-ring seal, alcohol-resistant
neoprene
rubber fuel baffle/splash shield, fiber bottom float bowl gasket and float
hinge pin. NOTE: High quality aftermarket kits are equal to or surpasses
the quality of the OEM Kohler overhaul kit. IMPORTANT: Before reinstalling
a used float bowl on the carburetor, place it on a hard, flat surface, and
flatten the bottom of the bowl from the inside with a small hammer. When
the bowl is installed on the carburetor body with the retaining bolt tightened,
this will "clamp" or squeeze the fuel baffle/splash shield against the O-ring
to prevent splashing fuel from seeping out around the top of the float bowl
when the engine is in operation.
 High Quality 1/4" Drive 10mm
6 Point Thin-Wall Deep Well Socket for removing and installing brass
fuel inlet seat in certain aftermarket (Chinese-made) carburetor overhaul
kits for Carter Model N #13, #16, #18, #20, #22, or Carter or Kohler #26,
#28, #30, and aftermarket Kohler-replicated carburetors. Can also be used
for 3/8" brass fuel inlet seats. Machined thin in metal lathe by A-1 Miller's
to fit into the confined space of the fuel inlet seat cavity in carburetor
body. $15.00 each, plus shipping & handling. High Quality 1/4" Drive 10mm
6 Point Thin-Wall Deep Well Socket for removing and installing brass
fuel inlet seat in certain aftermarket (Chinese-made) carburetor overhaul
kits for Carter Model N #13, #16, #18, #20, #22, or Carter or Kohler #26,
#28, #30, and aftermarket Kohler-replicated carburetors. Can also be used
for 3/8" brass fuel inlet seats. Machined thin in metal lathe by A-1 Miller's
to fit into the confined space of the fuel inlet seat cavity in carburetor
body. $15.00 each, plus shipping & handling. |
|||||||
 E85/Methanol
Carburetor Conversion Kit. Fits Carter and Kohler carburetors used on
Kohler K-series and early Magnum single and opposed twin cylinder engines,
and various other makes and models of small engines. Includes: all-metal
float valve, 3/8" brass fuel inlet seat drilled to .090" w/gasket,
alcohol-resistant
neoprene
rubber float bowl O-ring seal, alcohol-resistant
neoprene
rubber fuel baffle/splash shield and fiber float bowl retaining bolt gasket. E85/Methanol
Carburetor Conversion Kit. Fits Carter and Kohler carburetors used on
Kohler K-series and early Magnum single and opposed twin cylinder engines,
and various other makes and models of small engines. Includes: all-metal
float valve, 3/8" brass fuel inlet seat drilled to .090" w/gasket,
alcohol-resistant
neoprene
rubber float bowl O-ring seal, alcohol-resistant
neoprene
rubber fuel baffle/splash shield and fiber float bowl retaining bolt gasket.
How to use E85 Fuel in a Garden Tractor or Lawn & Garden Equipment | The Advantages of using Methanol Fuel in a Competition Garden Pulling Tractor and How to Use Methanol Fuel in a Competition Garden Pulling Tractor |
|||||||
 Float Bowl-to-Carburetor Body O-Ring Seals. This particular
part prevents splashing fuel inside the float bowl from leaking out caused
by normal or high RPM engine vibration. Required in all carburetors. Each
fits Carter Model N #13, #16, #18, #20, #22, and Carter or Kohler #26, #28,
#30 carburetors used on the Kohler K-series and early Magnum single cylinder
4hp-16hp, 18hp OHV single- and opposed twin-cylinder flathead cast iron block
engines. Also fits Tecumseh engines with the Carter or Walbro carburetors
with the large bowl, and Briggs and Stratton 7hp-12hp vertical shaft flathead
engine carburetors. (FYI - The early Briggs & Stratton float carburetors
was designed and made by the
Carter Carburetor Corporation.) Dimensions (±):
2-3/16" I.D. x 2-7/16" O.D. x .040" thickness. Alcohol-resistant neoprene
rubber O-ring included in overhaul/rebuild kits listed above
È. IMPORTANT: Before reinstalling
a used float bowl on the carburetor, place it on a hard, flat surface, and
flatten the bottom of the bowl from the inside with a small hammer. When
the bowl is installed on the carburetor body with the retaining bolt tightened,
this will "clamp" or squeeze the fuel baffle/splash shield against the O-ring
to prevent splashing fuel from seeping out around the top of the float bowl
when the engine is in operation. Float Bowl-to-Carburetor Body O-Ring Seals. This particular
part prevents splashing fuel inside the float bowl from leaking out caused
by normal or high RPM engine vibration. Required in all carburetors. Each
fits Carter Model N #13, #16, #18, #20, #22, and Carter or Kohler #26, #28,
#30 carburetors used on the Kohler K-series and early Magnum single cylinder
4hp-16hp, 18hp OHV single- and opposed twin-cylinder flathead cast iron block
engines. Also fits Tecumseh engines with the Carter or Walbro carburetors
with the large bowl, and Briggs and Stratton 7hp-12hp vertical shaft flathead
engine carburetors. (FYI - The early Briggs & Stratton float carburetors
was designed and made by the
Carter Carburetor Corporation.) Dimensions (±):
2-3/16" I.D. x 2-7/16" O.D. x .040" thickness. Alcohol-resistant neoprene
rubber O-ring included in overhaul/rebuild kits listed above
È. IMPORTANT: Before reinstalling
a used float bowl on the carburetor, place it on a hard, flat surface, and
flatten the bottom of the bowl from the inside with a small hammer. When
the bowl is installed on the carburetor body with the retaining bolt tightened,
this will "clamp" or squeeze the fuel baffle/splash shield against the O-ring
to prevent splashing fuel from seeping out around the top of the float bowl
when the engine is in operation.
|
|||||||
 Alcohol-Resistant
Neoprene
Rubber Fuel Baffle/Splash Shields. This particular part prevents splashing
fuel inside the float bowl from traveling up through the atmospheric vent
passageway and possibly being sucked into the throttle bore, which can
momentarily cause engine misfire due to normal or high RPM engine vibration.
Fastens between bowl O-ring seal and float bowl. Required in all carburetors.
Fits all Carter Model N #13, #16, #18, #20, #22 and Carter or Kohler #26,
#28, #30 carburetors used on the Kohler K-series and early Magnum single
cylinder 4hp-16hp, 18hp OHV single- and opposed twin-cylinder flathead cast
iron block engines. Included in overhaul/rebuild kit listed above
È. IMPORTANT: Before reinstalling
a used float bowl on the carburetor, place it on a hard, flat surface, and
flatten the bottom of the bowl from the inside with a small hammer. When
the bowl is installed on the carburetor body with the retaining bolt tightened,
this will "clamp" or squeeze the fuel baffle/splash shield against the O-ring
to prevent splashing fuel from seeping out around the top of the float bowl
when the engine is in operation. Alcohol-Resistant
Neoprene
Rubber Fuel Baffle/Splash Shields. This particular part prevents splashing
fuel inside the float bowl from traveling up through the atmospheric vent
passageway and possibly being sucked into the throttle bore, which can
momentarily cause engine misfire due to normal or high RPM engine vibration.
Fastens between bowl O-ring seal and float bowl. Required in all carburetors.
Fits all Carter Model N #13, #16, #18, #20, #22 and Carter or Kohler #26,
#28, #30 carburetors used on the Kohler K-series and early Magnum single
cylinder 4hp-16hp, 18hp OHV single- and opposed twin-cylinder flathead cast
iron block engines. Included in overhaul/rebuild kit listed above
È. IMPORTANT: Before reinstalling
a used float bowl on the carburetor, place it on a hard, flat surface, and
flatten the bottom of the bowl from the inside with a small hammer. When
the bowl is installed on the carburetor body with the retaining bolt tightened,
this will "clamp" or squeeze the fuel baffle/splash shield against the O-ring
to prevent splashing fuel from seeping out around the top of the float bowl
when the engine is in operation.
|
|||||||
  Carburetor Floats. Each fits all Carter Model N #13, #16, #18,
#20, #22, and Carter or Kohler #26, #28, #30 carburetors used on the Kohler
K-series, early Magnum single cylinder K90-K361 single- and twin-cylinder
flathead cast iron block engines and various other makes and models of small
engines. May also fit certain carburetors used on Onan engines. Dimensions
(±): 15/16" I.D. x 1-15/16" O.D. x 5/8" tall. NOTE: The float
level/height must be set correctly on ALL brass floats when installed. They
do not come preset. The correct way to set the float level is remove the
carburetor from the engine, remove the float bowl, and with the carburetor
upside-down, use a small flat blade screwdriver to bend the tab on the float
slightly one way or the other to set the float parallel with the carburetor
body. Make sure the float moves up and down freely, too. If it binds or sticks,
carefully use a flat file to narrow the sides of the hinge for clearance.
Be careful not to file into the float itself! Carburetor Floats. Each fits all Carter Model N #13, #16, #18,
#20, #22, and Carter or Kohler #26, #28, #30 carburetors used on the Kohler
K-series, early Magnum single cylinder K90-K361 single- and twin-cylinder
flathead cast iron block engines and various other makes and models of small
engines. May also fit certain carburetors used on Onan engines. Dimensions
(±): 15/16" I.D. x 1-15/16" O.D. x 5/8" tall. NOTE: The float
level/height must be set correctly on ALL brass floats when installed. They
do not come preset. The correct way to set the float level is remove the
carburetor from the engine, remove the float bowl, and with the carburetor
upside-down, use a small flat blade screwdriver to bend the tab on the float
slightly one way or the other to set the float parallel with the carburetor
body. Make sure the float moves up and down freely, too. If it binds or sticks,
carefully use a flat file to narrow the sides of the hinge for clearance.
Be careful not to file into the float itself!
|
|||||||
 Float
Damper/Stabilizer Spring. Fits Carter Model N #13, #16, #18, #20, #22, and
Carter or Kohler #26, #28, #30 carburetors. Minimizes float bounce due to
normal competition pulling engine vibration at open RPM, or excessive small
all-terrain vehicle "bouncing around" over rough and uneven terrain, which
could cause engine misfire due to momentary fuel starvation and/or fuel spillage
out of the atmospheric vent opening (air passageway from inside the float
bowl area to outside of carburetor). Not necessary for ordinary general lawn
and garden equipment or 4,000± RPM competition pulling engines. Float
Damper/Stabilizer Spring. Fits Carter Model N #13, #16, #18, #20, #22, and
Carter or Kohler #26, #28, #30 carburetors. Minimizes float bounce due to
normal competition pulling engine vibration at open RPM, or excessive small
all-terrain vehicle "bouncing around" over rough and uneven terrain, which
could cause engine misfire due to momentary fuel starvation and/or fuel spillage
out of the atmospheric vent opening (air passageway from inside the float
bowl area to outside of carburetor). Not necessary for ordinary general lawn
and garden equipment or 4,000± RPM competition pulling engines.
|
|||||||
 Cylindrical Float
Bowl with 5/16" Hole. Designed for all Carter Model N #13, #16, #18, #20,
#22 carburetors used on Kohler engine models K90/K91, K141, K160/K161,
KV161,
L160/L161, L181, K181, including
various other makes and models of small engines. Replaces very early obsolete
tapered/inverted cone-shaped float bowl on the Carter Model N #13 carburetor
used on the Kohler K90 and various other makes and models of small engines.
Available in aluminum only. Dimensions: 2-3/8" O.D.
x 1-1/4" height x 5/16" bottom hole. NOTE: The float bowls listed below
can be used in place of this one. The 5/16" bottom bolt/washer will seal
the 3/8" hole. Cylindrical Float
Bowl with 5/16" Hole. Designed for all Carter Model N #13, #16, #18, #20,
#22 carburetors used on Kohler engine models K90/K91, K141, K160/K161,
KV161,
L160/L161, L181, K181, including
various other makes and models of small engines. Replaces very early obsolete
tapered/inverted cone-shaped float bowl on the Carter Model N #13 carburetor
used on the Kohler K90 and various other makes and models of small engines.
Available in aluminum only. Dimensions: 2-3/8" O.D.
x 1-1/4" height x 5/16" bottom hole. NOTE: The float bowls listed below
can be used in place of this one. The 5/16" bottom bolt/washer will seal
the 3/8" hole.
|
|||||||
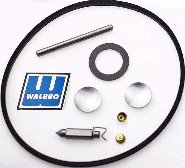 Carburetor Overhaul
Kits with
Viton-tip
fuel inlet float valve. Fits Walbro WHL #36, #44 and WHG #52, #60, #64
carburetors that's used on Kohler Magnum engine models M8, M10, M12, M14,
M16, MV16, M18, MV18, M20 and MV20. Also fits Walbro WHG-16-1, WHG-17-1,
WHG-18-1, WHG-25-1, WHG-26-1, WHG-27-1, WHG-28-1, WHG-31-1, WHG-35-1, WHG-44-1,
WHG-53-1 and WHG-96-1 carburetors used on larger cast iron block Tecumseh
engines. May also fit Walbro carburetors used on certain Onan engines. All
rubber-like parts made of alcohol-resistant
neoprene.
Includes carburetor mounting gasket. NOTE: On all Walbro WHL and WHG
carburetors, the fuel inlet seat is pressed-in at the factory. If it's replaced
with a new seat, fuel will likely leak around the edge of the seat and overflow
the float bowl, rendering the carburetor body useless. So it'll be best to
just install a new fuel inlet valve and leave the OEM seat intact. Remember
- In the laws of physics, the moving part will likely to wear more than the
stationary part. Carburetor Overhaul
Kits with
Viton-tip
fuel inlet float valve. Fits Walbro WHL #36, #44 and WHG #52, #60, #64
carburetors that's used on Kohler Magnum engine models M8, M10, M12, M14,
M16, MV16, M18, MV18, M20 and MV20. Also fits Walbro WHG-16-1, WHG-17-1,
WHG-18-1, WHG-25-1, WHG-26-1, WHG-27-1, WHG-28-1, WHG-31-1, WHG-35-1, WHG-44-1,
WHG-53-1 and WHG-96-1 carburetors used on larger cast iron block Tecumseh
engines. May also fit Walbro carburetors used on certain Onan engines. All
rubber-like parts made of alcohol-resistant
neoprene.
Includes carburetor mounting gasket. NOTE: On all Walbro WHL and WHG
carburetors, the fuel inlet seat is pressed-in at the factory. If it's replaced
with a new seat, fuel will likely leak around the edge of the seat and overflow
the float bowl, rendering the carburetor body useless. So it'll be best to
just install a new fuel inlet valve and leave the OEM seat intact. Remember
- In the laws of physics, the moving part will likely to wear more than the
stationary part.
 Alcohol-Resistant
Viton-tip
fuel inlet float valve. Fits Walbro WHL #36, #44 and WHG #52, #60, #64
carburetors that's used on Kohler Magnum engine models M8, M10, M12, M14,
M16, MV16, M18, MV18, M20 and MV20. Also fits Walbro WHG-16-1, WHG-17-1,
WHG-18-1, WHG-25-1, WHG-26-1, WHG-27-1, WHG-28-1, WHG-31-1, WHG-35-1, WHG-44-1,
WHG-53-1 and WHG-96-1 carburetors used on larger cast iron block Tecumseh
engines. May also fit Walbro carburetors used on certain Onan engines. NOTE:
On all Walbro WHL #36, #44 and WHG #52, #60, #64 carburetors, the fuel inlet
seat is pressed-in at the factory. If it's removed and replaced with a new
one, the carburetor body may be rendered useless, because it will mostly
likely leak fuel. So it'll be best to just install a new fuel inlet valve
and leave the seat alone. Remember - in the laws of physics, the moving part
will wear more than the stationary part. Not available separately from
Kohler. OEM Walbro part # 82-529-7. $7.50 each, plus shipping &
handling. Alcohol-Resistant
Viton-tip
fuel inlet float valve. Fits Walbro WHL #36, #44 and WHG #52, #60, #64
carburetors that's used on Kohler Magnum engine models M8, M10, M12, M14,
M16, MV16, M18, MV18, M20 and MV20. Also fits Walbro WHG-16-1, WHG-17-1,
WHG-18-1, WHG-25-1, WHG-26-1, WHG-27-1, WHG-28-1, WHG-31-1, WHG-35-1, WHG-44-1,
WHG-53-1 and WHG-96-1 carburetors used on larger cast iron block Tecumseh
engines. May also fit Walbro carburetors used on certain Onan engines. NOTE:
On all Walbro WHL #36, #44 and WHG #52, #60, #64 carburetors, the fuel inlet
seat is pressed-in at the factory. If it's removed and replaced with a new
one, the carburetor body may be rendered useless, because it will mostly
likely leak fuel. So it'll be best to just install a new fuel inlet valve
and leave the seat alone. Remember - in the laws of physics, the moving part
will wear more than the stationary part. Not available separately from
Kohler. OEM Walbro part # 82-529-7. $7.50 each, plus shipping &
handling.
Float Bowl Rubber O-Ring Seal.
Fits Walbro WHL #36, #44 and WHG #52, #60, #64 carburetors that's used on
Kohler Magnum engine models M8, M10, M12, M14, M16, MV16, M18, MV18, M20
and MV20. Also fits Walbro WHG-16-1, WHG-17-1, WHG-18-1, WHG-25-1, WHG-26-1,
WHG-27-1, WHG-28-1, WHG-31-1, WHG-35-1, WHG-44-1, WHG-53-1 and WHG-96-1
carburetors used on larger cast iron block Tecumseh engines. May also fit
Walbro carburetors used on certain Onan engines. Made of alcohol-resistant
neoprene
rubber. Dimensions (±): 2-3/8" I.D. x 2-1/2" O.D. x .065" thickness.
Square cross-section.
 Plastic Float. Fits Walbro WHL
#36, #44 and WHG #52, #60, #64 carburetors used on Kohler Magnum engine models
M8, M10, M12, M14, M16, MV16, M18, MV18, M20 and MV20. Also fits Walbro WHG-16-1,
WHG-17-1, WHG-18-1, WHG-25-1, WHG-26-1, WHG-27-1, WHG-28-1, WHG-31-1, WHG-35-1,
WHG-44-1, WHG-53-1 and WHG-96-1 carburetors used on larger cast iron block
Tecumseh engines. May also fit Walbro carburetors used on certain Onan engines. Plastic Float. Fits Walbro WHL
#36, #44 and WHG #52, #60, #64 carburetors used on Kohler Magnum engine models
M8, M10, M12, M14, M16, MV16, M18, MV18, M20 and MV20. Also fits Walbro WHG-16-1,
WHG-17-1, WHG-18-1, WHG-25-1, WHG-26-1, WHG-27-1, WHG-28-1, WHG-31-1, WHG-35-1,
WHG-44-1, WHG-53-1 and WHG-96-1 carburetors used on larger cast iron block
Tecumseh engines. May also fit Walbro carburetors used on certain Onan engines.
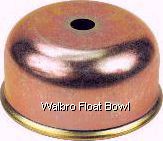 Float bowl. Fits Walbro WHL
#36, #44 and WHG #52, #60, #64 carburetors used on Kohler Magnum engine models
K141, K160/K161, K181, M8, K241, M10, K301, M12, K321, M14, K341, M16, MV16,
M18, MV18, M20 and MV20. Also fits Walbro WHG-16-1, WHG-17-1, WHG-18-1, WHG-25-1,
WHG-26-1, WHG-27-1, WHG-28-1, WHG-31-1, WHG-35-1, WHG-44-1, WHG-53-1 and
WHG-96-1 carburetors used on larger cast iron block Tecumseh engines. May
also fit Walbro carburetors used on certain Onan engines. 2-1/2" outside
diameter. Each made of dent-proof, anodized, corrosion-resistant steel. Float bowl. Fits Walbro WHL
#36, #44 and WHG #52, #60, #64 carburetors used on Kohler Magnum engine models
K141, K160/K161, K181, M8, K241, M10, K301, M12, K321, M14, K341, M16, MV16,
M18, MV18, M20 and MV20. Also fits Walbro WHG-16-1, WHG-17-1, WHG-18-1, WHG-25-1,
WHG-26-1, WHG-27-1, WHG-28-1, WHG-31-1, WHG-35-1, WHG-44-1, WHG-53-1 and
WHG-96-1 carburetors used on larger cast iron block Tecumseh engines. May
also fit Walbro carburetors used on certain Onan engines. 2-1/2" outside
diameter. Each made of dent-proof, anodized, corrosion-resistant steel.
|
|||||||
 5/16" I.D. Float
Bowl Retaining Bolt Sealing Gaskets. Each listed below fits Carter Model
N #13, #16, #18, #20, #22 carburetors, smaller Briggs & Stratton, Mikuni,
Tecumseh and various other makes and models of small engine carburetors.
Fits Kohler engine models K90/K91, K141, K160/K161 and K181. Not included
with the OEM Carter or Kohler carburetor overhaul/rebuild kit. 5/16" I.D. Float
Bowl Retaining Bolt Sealing Gaskets. Each listed below fits Carter Model
N #13, #16, #18, #20, #22 carburetors, smaller Briggs & Stratton, Mikuni,
Tecumseh and various other makes and models of small engine carburetors.
Fits Kohler engine models K90/K91, K141, K160/K161 and K181. Not included
with the OEM Carter or Kohler carburetor overhaul/rebuild kit.
|
|||||||
| Convert the OEM Carter,
Kohler or Kohler-Replicated Aftermarket #26, #28 or #30 Carburetor to a Bottom
High Speed Fuel Adjuster - [Top of Page]
How to Convert a Carter or Kohler Carburetor for use with the Bottom High Speed Fuel Adjuster - This is a simple, low cost and foolproof conversion that works very well.
|
|||||||
Brass Main Jets/Nozzles (Emulsion Tubes).
Fits all OEM Carter and Kohler and aftermarket #26, #28 and #30 carburetors
used on Kohler K-series K241, K301, K321, K341, K361, early Magnum engine
models M10, M12, M14, M16, and all Kohler KT-series opposed twin cylinder
engine carburetors. Each drilled .0625" for gas. NOTE: When rebuilding
a plain, stock Carter or Kohler carburetor, in most cases, there's no need
to remove the main jet/nozzle. If it won't come out, then don't worry about
it. All that needs to be done is to make sure the bottom hole (jet) and the
emulsion/side holes are open and clear of debris. To check if the emulsion/side
holes are open, simply spray WD-40 or carburetor cleaner through the small
hole below the choke plate and observe if the spray exits out through the
main nozzle and into the throttle bore and out the jet hole in the bottom
of the carburetor. But if the screwdriver slot in the main jet/nozzle is
slightly stripped and it able to be removed, for easier reinstallation, with
the main jet/nozzle gently clamped in a bench vise with a clothe (to prevent
damage), use a hacksaw blade to cut a slightly deeper screwdriver slot in
the main jet/nozzle. And if modifying a carburetor to bore the
venturi, the main jet/nozzle must be removed.
Click here to learn
how to remove the main jet/nozzle.
[Return To Previous Paragraph or
Section]
|
|||||||
 Kohler
Anti-Backfire/Engine Shut-Off Solenoid Valve Kit. This anti-backfire
solenoid valve fits in the carburetor and shuts off the engine when the ignition
is turned off. The solenoid is energized the entire time the ignition switch
is turned on to allow incoming air in the float bowl so the engine will run.
When the ignition is turned off, it blocks off the incoming air in the float
bowl to create a vacuum in the float bowl to prevent fuel from entering the
combustion chamber, so the engine eventually shuts down. And with no raw
fuel in the hot muffler, there is no possibility of a backfire. When the
solenoid fails to function, the engine will not start. This particular part
is designed for Kohler engine models K181 with specification numbers 13802,
13803, 13804, 13805, 13806, 13807, 13808, 13809, 13810, 13811, 13812, 13813,
13814, 13815, 13816, 13817, 13818, 13820, 30671, 30715, 30739; M18 with
specification numbers 24610, 24637, 24652; M20 with specification numbers
49547, 49564, 49605; K582 with specification numbers 36246, 36249, 36261,
36266, 36268, 36285, 36310, 36327, 36337, 36350, 36371, 36373, 36374, 36376,
36382, 36392, 24600, 24603. OEM Kohler part # 25 755 05-S. $101.45
each, plus shipping & handling. Kohler
Anti-Backfire/Engine Shut-Off Solenoid Valve Kit. This anti-backfire
solenoid valve fits in the carburetor and shuts off the engine when the ignition
is turned off. The solenoid is energized the entire time the ignition switch
is turned on to allow incoming air in the float bowl so the engine will run.
When the ignition is turned off, it blocks off the incoming air in the float
bowl to create a vacuum in the float bowl to prevent fuel from entering the
combustion chamber, so the engine eventually shuts down. And with no raw
fuel in the hot muffler, there is no possibility of a backfire. When the
solenoid fails to function, the engine will not start. This particular part
is designed for Kohler engine models K181 with specification numbers 13802,
13803, 13804, 13805, 13806, 13807, 13808, 13809, 13810, 13811, 13812, 13813,
13814, 13815, 13816, 13817, 13818, 13820, 30671, 30715, 30739; M18 with
specification numbers 24610, 24637, 24652; M20 with specification numbers
49547, 49564, 49605; K582 with specification numbers 36246, 36249, 36261,
36266, 36268, 36285, 36310, 36327, 36337, 36350, 36371, 36373, 36374, 36376,
36382, 36392, 24600, 24603. OEM Kohler part # 25 755 05-S. $101.45
each, plus shipping & handling.
NOTE: Being the solenoid (OEM Kohler part # 25 755 06-S) for Kohler engine models M18 with specification numbers: 24563, 24568, 24574, 24577, 24592, 24594, 24599, 24619, 24630, 24631, 24636, 24646, 24655, 24656, 24659, 24664, 24674, 24696, 49514, 49544, 49545, 49565, 49569, 49570, 49572; M20 with specification numbers: 49584, 49595, 49599, 49608, 49623, 49624, 49629; MV20 with specification numbers: 57501-57514, 57527, 57528 is no longer available, to convert these engines without use of the solenoid, remove the failed solenoid and valve, cut short 3/8" threads in the hole (remove the float bowl first and use compressed air with an air blow gun nozzle to clear out the metal cuttings afterwards), and install a short 3/8" Allen set screw in the hole. Don't thread the set screw deep into the hole, or it will block off outside atmospheric air from entering the float bowl. Without a solenoid and with the conversion, the engine will require a different ignition switch to shut off the spark. And the engine should be idled down before shutting it off to lessen the chance of a backfire out the muffler. |
|||||||
  Compression Pressure Spring for Idle Air/Fuel Mixture Adjustment
Screws (listed further below ). Fits all Carter
Model N #13, #16, #18, #20, #22 carburetors, and Carter and Kohler #26, #28
and #30 carburetors. OEM Kohler part #'s 200380-S or 25 089 04-S. (Identical
parts with different part numbers.) Compression Pressure Spring for Idle Air/Fuel Mixture Adjustment
Screws (listed further below ). Fits all Carter
Model N #13, #16, #18, #20, #22 carburetors, and Carter and Kohler #26, #28
and #30 carburetors. OEM Kohler part #'s 200380-S or 25 089 04-S. (Identical
parts with different part numbers.)
  Neoprene Rubber O-Ring for Aftermarket Idle Air/Fuel Mixture
Adjustment Screw (above) when used on the OEM Carter or Kohler #28 or #30
carburetors. This is an add-on item; Carter and Kohler carburetors did not
originally come with an O-ring on the idle mixture screw. Install this part
to help the engine start quicker (with throttle in idle position), idle smoothly,
and idle down upon deceleration without stalling. .25¢ each,
plus shipping & handling. Neoprene Rubber O-Ring for Aftermarket Idle Air/Fuel Mixture
Adjustment Screw (above) when used on the OEM Carter or Kohler #28 or #30
carburetors. This is an add-on item; Carter and Kohler carburetors did not
originally come with an O-ring on the idle mixture screw. Install this part
to help the engine start quicker (with throttle in idle position), idle smoothly,
and idle down upon deceleration without stalling. .25¢ each,
plus shipping & handling.
 Idle Air/Fuel Mixture Adjustment
Screw w/Long Stepped End. Fits Carter or Kohler #26 carburetors with 1.07"
throttle bore used with Kohler engine models K241, K301 and K330/K331. Designed
specifically for Kohler carburetors with following numbers stamped on mounting
flange: 47 053 07, 47 053 08, 47 053 12, 47 053 13, 47 053 14, 47 053 15,
47 053 16, 47 053 24, 47 053 29, 47 053 35, 47 053 40, 47 053 62, 47 053
80, 52 053 60. If there's no numbers anywhere on the carburetor body,
then it's definitely an aftermarket carburetor. Because Carter, Kohler and
Walbro ALWAYS stamp a part number on the flange of all their carburetors.
Long step tip. Dimensions: .260" tip length x 8-40 NS (special size threads)
x .925" overall length. Being this is an OEM part, a rubber O-ring is not
required. Not available in aftermarket. Used and in excellent condition.
Discontinued Kohler part # 235006-S. $15.00 each, plus shipping &
handling. (When available or in stock.) Idle Air/Fuel Mixture Adjustment
Screw w/Long Stepped End. Fits Carter or Kohler #26 carburetors with 1.07"
throttle bore used with Kohler engine models K241, K301 and K330/K331. Designed
specifically for Kohler carburetors with following numbers stamped on mounting
flange: 47 053 07, 47 053 08, 47 053 12, 47 053 13, 47 053 14, 47 053 15,
47 053 16, 47 053 24, 47 053 29, 47 053 35, 47 053 40, 47 053 62, 47 053
80, 52 053 60. If there's no numbers anywhere on the carburetor body,
then it's definitely an aftermarket carburetor. Because Carter, Kohler and
Walbro ALWAYS stamp a part number on the flange of all their carburetors.
Long step tip. Dimensions: .260" tip length x 8-40 NS (special size threads)
x .925" overall length. Being this is an OEM part, a rubber O-ring is not
required. Not available in aftermarket. Used and in excellent condition.
Discontinued Kohler part # 235006-S. $15.00 each, plus shipping &
handling. (When available or in stock.)
 Idle Air/Fuel Mixture Adjustment
Screw w/Pointed End. Fits Kohler carburetors used on Kohler KT-series engine
models KT17 (first design), KT17 Series II, KT19 (first design), KT19 Series
II, KT21, and models K482, K532 and K582. Designed specifically for Kohler
carburetors with following numbers stamped on mounting flange: 48 053 06
(K582), 52 053 09, 52 053 18, 52 053 28. If there's no numbers anywhere
on the carburetor body, then it's definitely an aftermarket carburetor. Because
Carter, Kohler and Walbro ALWAYS stamp a part number on the flange of all
their carburetors. Long tapered tip. Dimensions: .404" tip length. x
8-40 NS (special size threads) x 1.026" overall length. Being this is an
OEM part, a rubber O-ring is not required. Not available in aftermarket.
Used and in excellent condition. Discontinued Kohler part # 277210-S.
$7.45 each, plus shipping & handling. (When available or in
stock.) Idle Air/Fuel Mixture Adjustment
Screw w/Pointed End. Fits Kohler carburetors used on Kohler KT-series engine
models KT17 (first design), KT17 Series II, KT19 (first design), KT19 Series
II, KT21, and models K482, K532 and K582. Designed specifically for Kohler
carburetors with following numbers stamped on mounting flange: 48 053 06
(K582), 52 053 09, 52 053 18, 52 053 28. If there's no numbers anywhere
on the carburetor body, then it's definitely an aftermarket carburetor. Because
Carter, Kohler and Walbro ALWAYS stamp a part number on the flange of all
their carburetors. Long tapered tip. Dimensions: .404" tip length. x
8-40 NS (special size threads) x 1.026" overall length. Being this is an
OEM part, a rubber O-ring is not required. Not available in aftermarket.
Used and in excellent condition. Discontinued Kohler part # 277210-S.
$7.45 each, plus shipping & handling. (When available or in
stock.) |
|||||||
 Compression
Pressure Spring for High Speed Air/Fuel Adjustment Screws (listed further
below). Fits all Carter Model N #13, #16, #18, #20, #22 carburetors, and
Carter and Kohler #26, #28 and #30 carburetors. OEM Kohler part # 200383-S. Compression
Pressure Spring for High Speed Air/Fuel Adjustment Screws (listed further
below). Fits all Carter Model N #13, #16, #18, #20, #22 carburetors, and
Carter and Kohler #26, #28 and #30 carburetors. OEM Kohler part # 200383-S.
 High Speed Air/Fuel Mixture
Needle Adjustment Screw. Fits certain Carter or Kohler #28, #30 carburetors
used on Kohler K-series and early Magnum single cylinder engine models K321,
K341 and K361. 3-3/8" overall length. Has two tiny holes midway on the stem
(this is important so the engine will idle correctly) and one hole on lower
stem. Lower hole enlarged to help the engine start quicker (with throttle
in idle position), idle smoothly, and idle down upon deceleration without
stalling. There's no need to do this on adjusters with two lower holes. Designed
specifically for Kohler carburetors with following numbers stamped on mounting
flange: 4174S (Carter), 45 053 08, 45 053 12, 45 053 20, 45 053 26, 45 053
68, 45 053 70, 45 053 76, 45 053 77 and 47 053 11. IMPORTANT - Please check
numbers on carburetor before ordering and go here to identify the correct
part for any particular carburetor:
Kohler
Carburetor Reference Manual. If there's no numbers anywhere on the
carburetor body, then it's definitely an aftermarket carburetor. Because
Carter, Kohler and Walbro ALWAYS stamp a part number on the flange of all
their carburetors. High Speed Air/Fuel Mixture
Needle Adjustment Screw. Fits certain Carter or Kohler #28, #30 carburetors
used on Kohler K-series and early Magnum single cylinder engine models K321,
K341 and K361. 3-3/8" overall length. Has two tiny holes midway on the stem
(this is important so the engine will idle correctly) and one hole on lower
stem. Lower hole enlarged to help the engine start quicker (with throttle
in idle position), idle smoothly, and idle down upon deceleration without
stalling. There's no need to do this on adjusters with two lower holes. Designed
specifically for Kohler carburetors with following numbers stamped on mounting
flange: 4174S (Carter), 45 053 08, 45 053 12, 45 053 20, 45 053 26, 45 053
68, 45 053 70, 45 053 76, 45 053 77 and 47 053 11. IMPORTANT - Please check
numbers on carburetor before ordering and go here to identify the correct
part for any particular carburetor:
Kohler
Carburetor Reference Manual. If there's no numbers anywhere on the
carburetor body, then it's definitely an aftermarket carburetor. Because
Carter, Kohler and Walbro ALWAYS stamp a part number on the flange of all
their carburetors.
 High Speed Air/Fuel Mixture
Needle Adjustment Screw. Fits certain Carter #30 carburetors used on certain
Kohler engine models K321, and Kohler #26, 1.07" throttle bore carburetors
used on Kohler engine models K482, K532 and K582. 3-3/8" overall length.
Each have no tiny holes midway on the stem (this is important so the engine
will idle correctly) and one lower hole on stem. Lower hole enlarged to help
the engine start quicker (with throttle in idle position), idle smoothly,
and idle down upon deceleration without stalling. There's no need to do this
on adjusters with two lower holes. Designed specifically for certain Carter
and Kohler carburetors with following numbers stamped on mounting flange:
A236636 (Carter #30), 47 053 03, 47 053 09, 47 053 15, 47 053 16, 47 053
17, 47 053 20, 47 053 30, 47 053 41, 47 053 63 and 47 053 78. IMPORTANT -
Please check numbers on carburetor before ordering and go here to identify
the correct part for any particular carburetor:
Kohler
Carburetor Reference Manual. But if there's no numbers stamped anywhere
on the carburetor body, then it is definitely an aftermarket carburetor.
Because Carter, Kohler and Walbro ALWAYS stamp a part number on their
carburetors. High Speed Air/Fuel Mixture
Needle Adjustment Screw. Fits certain Carter #30 carburetors used on certain
Kohler engine models K321, and Kohler #26, 1.07" throttle bore carburetors
used on Kohler engine models K482, K532 and K582. 3-3/8" overall length.
Each have no tiny holes midway on the stem (this is important so the engine
will idle correctly) and one lower hole on stem. Lower hole enlarged to help
the engine start quicker (with throttle in idle position), idle smoothly,
and idle down upon deceleration without stalling. There's no need to do this
on adjusters with two lower holes. Designed specifically for certain Carter
and Kohler carburetors with following numbers stamped on mounting flange:
A236636 (Carter #30), 47 053 03, 47 053 09, 47 053 15, 47 053 16, 47 053
17, 47 053 20, 47 053 30, 47 053 41, 47 053 63 and 47 053 78. IMPORTANT -
Please check numbers on carburetor before ordering and go here to identify
the correct part for any particular carburetor:
Kohler
Carburetor Reference Manual. But if there's no numbers stamped anywhere
on the carburetor body, then it is definitely an aftermarket carburetor.
Because Carter, Kohler and Walbro ALWAYS stamp a part number on their
carburetors.
1/32" x 1-3/8" High Speed Steel
Spiral Drill Bit. Use this to enlarge the [single] lower hole (orifice) in
the high speed air/fuel needle adjuster in Carter Model N #13, #16, #18,
#20, #22 carburetors, and Carter or Kohler #26, #28, #30 carburetors to create
a stronger suction of fuel through the tube and idle fuel passageway to help
engine start quicker (with throttle in idle position), idle smoother, and
idle down upon deceleration without stalling. No need to use this on adjuster
with two lower holes. IMPORTANT: Carefully and gently enlarge hole
by hand with drill bit clamped in a
mini micro pin vise hand drill chuck. After enlarging hole,
clear out any metal cuttings/debris from inside adjuster tube with 150±
P.S.I. compressed air and an
air blow gun nozzle. $1.60 each, plus shipping
& handling. |
|||||||
Welch Plugs for Various Small Engine Carburetors.
Concave/dish-shaped. Each expands .002"-.003" larger in diameter when installed
and flattened out in counterbore hole. No sealant required. By the way
- on the Carter and Kohler #26, #28 and #30 carburetors, the smaller plug
just above the idle fuel adjusting needle does not need to be replaced for
cleaning of the idle fuel passageway, and there is no replacement for this
plug.
|
|||||||
 Carburetor Mounting
Screws/Bolts w/Slotted Head and Flat Washers. Fits Kohler engine models K141,
K160/K161, KV161,
L160/L161,
L181, K181 and M8 with Carter Model N #13, #16, #18, #20, #22,
or Walbro WHL #36, #44 carburetor. NOTE: Use small slotted screwdriver
to start screws in threaded holes. Size: 1/4-20 UNC x 3/4" thread length. Carburetor Mounting
Screws/Bolts w/Slotted Head and Flat Washers. Fits Kohler engine models K141,
K160/K161, KV161,
L160/L161,
L181, K181 and M8 with Carter Model N #13, #16, #18, #20, #22,
or Walbro WHL #36, #44 carburetor. NOTE: Use small slotted screwdriver
to start screws in threaded holes. Size: 1/4-20 UNC x 3/4" thread length.
|
|||||||
 A worn/loose throttle shaft is the #1 cause of most engines wearing out and
burning/consuming [crankcase] oil prematurely, and this is also what could
cause the [high dollar] cylinder head to overheat and crack on a flathead
engine. If a carburetor has a worn throttle shaft, this will create a vacuum
leak through the throttle shaft and carburetor body, and the engine will
idle poorly, if at all at times. With a worn throttle shaft, the engine will
draw in dusty and dirty outside air (through the throttle shaft and carburetor
body), which will cause increased wear to the throttle shaft and possibly
carburetor body, intake valve face/seat and score the cylinder wall, and
engine will eventually burn oil, blow blue/gray smoke out the exhaust, be
hard to start and it will lose power. More than .010" of free-play/looseness
is considered too much for throttle shaft wear. Although the throttle shaft
can be moved and checked by hand, the most accurate way to check for the
amount of wear is with a
dial indicator. Plus, at normal top governed operating
speed ((3,200 RPM for a fixed/non-adjustable high speed main jet, and 3,600
RPM for a fully adjustable high speed main jet), the extra incoming air will
cause the engine to run lean on fuel (lean out the air/fuel mixture), which
will overheat the combustion chamber and cause the cylinder head to warp
and possibly burn-out, resulting in a blown head gasket. Plus, the piston
and rings will also wear prematurely, eventually resulting in severe engine
wear, excessive oil burning, engine smoking and loss of power.
A worn/loose throttle shaft is the #1 cause of most engines wearing out and
burning/consuming [crankcase] oil prematurely, and this is also what could
cause the [high dollar] cylinder head to overheat and crack on a flathead
engine. If a carburetor has a worn throttle shaft, this will create a vacuum
leak through the throttle shaft and carburetor body, and the engine will
idle poorly, if at all at times. With a worn throttle shaft, the engine will
draw in dusty and dirty outside air (through the throttle shaft and carburetor
body), which will cause increased wear to the throttle shaft and possibly
carburetor body, intake valve face/seat and score the cylinder wall, and
engine will eventually burn oil, blow blue/gray smoke out the exhaust, be
hard to start and it will lose power. More than .010" of free-play/looseness
is considered too much for throttle shaft wear. Although the throttle shaft
can be moved and checked by hand, the most accurate way to check for the
amount of wear is with a
dial indicator. Plus, at normal top governed operating
speed ((3,200 RPM for a fixed/non-adjustable high speed main jet, and 3,600
RPM for a fully adjustable high speed main jet), the extra incoming air will
cause the engine to run lean on fuel (lean out the air/fuel mixture), which
will overheat the combustion chamber and cause the cylinder head to warp
and possibly burn-out, resulting in a blown head gasket. Plus, the piston
and rings will also wear prematurely, eventually resulting in severe engine
wear, excessive oil burning, engine smoking and loss of power.
FYI - All Carter or Kohler and Walbro carburetors didn't come with a throttle shaft bushing installed by the factory. A new bushing (and [oiled] foam rubber seal; listed below) must be installed when the throttle shaft is worn/loose in the carburetor body, or if the throttle shaft is severely worn thin, a new bushing along with a new throttle shaft (and foam rubber seal) must be installed. The oil on the foam rubber seal traps and blocks any dust and dirt from entering past the bushing and throttle shaft. If there's a counterbore (recession in the carburetor body) where the throttle shaft is, a short, flat bronze bushing can be installed, and if the original throttle shaft isn't worn much, it can be reused. But if there's no counterbore, the carburetor body will need to be precision aligned-bored for installation of a bronze sleeve bushing, and chances are, a new throttle shaft will also need to be installed. Precise machining of the carburetor body is required for installation of the sleeve bushing. And aLL Carter and Kohler #26, #28 and #30, and the older Walbro WHG #52, #60 and #64 carburetors have the counterbore. Only the newer Walbro WHG #52, #60, #64, and the aftermarket carburetors don't have the counterbore. If the carburetor has the counterbore, the throttle shaft will need to be removed, the dirt and debris will need to be cleaned out from the counterbore, and then the short, flat bushing can be installed. The [oiled] foam rubber seal will need to be installed on the throttle shaft before installing in the carburetor body. But if there's no counterbore, the upper hole in the carburetor body will need to be bored out in precision alignment with the lower hole in a milling machine, and then a bronze sleeve bushing can be installed. Along with regular maintenance, proper repair of a worn throttle shaft is required to help an engine last a long time. Furthermore, the lower hole for the throttle shaft in the carburetor body rarely wears because most of the pressure is on the upper part of the shaft. If the bottom part of the throttle shaft itself is worn, a new throttle shaft will need to be installed. To find if the lower hole is worn, remove the throttle shaft, and insert a rod that measures exactly 1/4" into the hole and try to wiggle it around. If it doesn't wiggle, then the throttle shaft is worn. But if it does wiggle, then I don't have a fix to repair the lower throttle shaft hole. You will need to acquire another carburetor body or a complete carburetor (that matches yours) in good condition. I have new throttle shafts in stock and used carburetor bodies in good condition. [Return To Previous Paragraph or Section] |
|||||||
NOTE: Usually the short, flat bronze bushing will snug up a worn throttle shaft. With oil for lubrication, the bushing and shaft should last a long time. However, the newer Walbro and the aftermarket carburetors have no counterbore for the bushing, and sometimes in these carburetors, especially the Walbro, the [upper] throttle shaft hole will wear oblong. Sometimes the throttle shaft will wear, too. When the hole wears oblong, just installing a new shaft will not fix the problem. To repair a worn, oblong hole, it must be precision align-bored precisely aligned with the [unworn] lower hole, and a bronze sleeve bushing would need to be installed along with a new throttle shaft. On other makes of carburetors, if the original shaft is worn and a new throttle shaft isn't available, then a new throttle shaft would need to be machined/fabricated. The throttle lever can be reused and welded to the new machined/fabricated shaft. And if necessary, a slightly oversized throttle shaft can be installed instead of the original diameter shaft. I can do all of these things for $50.00± each for parts and labor each, plus return shipping & handling.
Throttle and Choke Plate Replacement Retaining
Screws Listed Below |
|
|||||||
| IMPORTANT: Click here to
learn how to remove the Carter or Kohler OEM soft brass throttle or choke
plate retaining screws without breaking them off.
And click here to learn how to install
the throttle plate correctly.
New Style Throttle Shaft Conversion Kits. Convert OEM Carter #26, #28 or #30 carburetors with a broken or cracked old-style two-piece cast aluminum throttle shaft clamp/lever and idle speed screw w/spring to the new style one-piece Kohler-type throttle shaft with integrated lever and idle speed adjustment screw w/compression spring in carburetor body. The OEM Carter carburetors were used on the early Kohler engine models K241, K301, K321 and K330/K331. Reuse the OEM Carter throttle plate with either kit below.
How to Convert the Carter #26, #28 or #30 Carburetor to the New Style Throttle Shaft:
|
|||||||
| IMPORTANT: Click here to
learn how to remove the Carter or Kohler OEM soft brass throttle or choke
plate retaining screws without breaking them off.
And click here to learn how to reinstall
the throttle plate correctly.
Throttle Plate. Fits Walbro WHG #52 carburetor with 1.07" diameter throttle bore that's originally installed on Kohler Magnum engine models M10, M12, KT17 (first design), KT17 Series II, KT19 (first design), KT19 Series II, KT21, MV16, M18, MV18, M20 and MV20. Fits OEM Walbro throttle shaft with 5/8" screw hole spacing.
Throttle Plate. Fits Walbro #60 and #64 carburetors with 1.2" diameter throttle bore that's originally installed on Kohler Magnum engine models M14 and M16. Designed to be used with OEM Walbro throttle shaft with 3/4" screw hole spacing. OEM Kohler part # 47 146 10-S.
|
|||||||
| IMPORTANT:
Click here to
learn how to remove the Carter or Kohler OEM soft brass throttle or choke
plate retaining screws without breaking them off.
|
|||||||
| IMPORTANT:
Click here to
learn how to remove the Carter or Kohler OEM soft brass throttle or choke
plate retaining screws without breaking them off.
A-1 Miller's Professional Repair Service - Reverse the lever on YOUR choke shaft for downward or upward swing to match the position of the choke lever on your original carburetor or choke cable on your garden tractor. (This is a distinctive A-1 Miller's service that others do not offer.) $15.00 labor each, plus return shipping & handling. Click here to contact A-1 Miller's Performance Enterprises to place an order, send your parts for repairing, and/or for FREE professional and honest technical customer service assistance and support and payment options. |
|||||||
| NOTE: The choke shaft detent ball and spring are required
only for hand-operation of the choke shaft/plate to keep it in the open position
on stand-alone engines without a remote control cable, such as a garden tiller,
go-kart, portable generator/welder, truck-mounted air compressor, portable
water pump, competition garden pulling tractor, etc. Replace if lost so the
choke will remain open while the engine is running. But if the choke shaft/plate
is operated remotely by a cable, such as on a lawn & garden tractor,
then these parts aren't required and will serve no purpose
whatsoever.
|
|||||||
| Small Engine Remote Fuel Primer Bulb
System Kits. A proven, ingenious and innovative concept for use
on various small engine equipment, lawn and garden tractors, small motorized
vehicles or competition pulling tractors.
|
|||||||
Advertisement for Governor Springs, Throttle Link Bushings, Throttle/Governor Linkages, Throttle Cable Clamps, Throttle Cable Assemblies and Governor Gear Assemblies and Related Parts - Click here to contact A-1 Miller's Performance Enterprises to place an order, send your parts for repairing, and/or for FREE professional and honest technical customer service assistance and support and payment options. If you need a part or parts that's not listed in this website, please contact A-1 Miller's and we'll see if we can get it at a reasonable price. | [Top of Page] (Prices are subject to change without notice.)
   Throttle
Stabilizer/Anti-Surge Springs. Install either of these lightweight springs
between the governor lever and throttle lever to remove free play (looseness)
in the linkage end connections to reduce erratic engine behavior at top governed
speed due to throttle flutter for a smoother running engine and reduce wear
to throttle shaft. Can be used on virtually any Briggs & Stratton, Kohler
K-series, Magnum or Command single- or twin-cylinder cast iron or aluminum
block engine. May need to drill a small hole with
chamfered edges in either lever close to linkage connection
to install spring. A must for a generator, welder or a 4,000 RPM± governed
competition pulling engine. With a governed pulling engine, throttle flutter
causes the engine RPM to momentarily spike, which could cause the
rear tires to momentarily lose traction
(jerk), resulting in a possible shorter distance pull. Throttle
Stabilizer/Anti-Surge Springs. Install either of these lightweight springs
between the governor lever and throttle lever to remove free play (looseness)
in the linkage end connections to reduce erratic engine behavior at top governed
speed due to throttle flutter for a smoother running engine and reduce wear
to throttle shaft. Can be used on virtually any Briggs & Stratton, Kohler
K-series, Magnum or Command single- or twin-cylinder cast iron or aluminum
block engine. May need to drill a small hole with
chamfered edges in either lever close to linkage connection
to install spring. A must for a generator, welder or a 4,000 RPM± governed
competition pulling engine. With a governed pulling engine, throttle flutter
causes the engine RPM to momentarily spike, which could cause the
rear tires to momentarily lose traction
(jerk), resulting in a possible shorter distance pull.
|
|
 Coiled
Governor Spring to regulate and maintain safe engine RPM. Fits later
Kohler engine model K181 with specification numbers 301000-301045, and various
Kohler Magnum engine model M8 with specification numbers 301500-301651.
Approximately 4-1/2" overall length. OEM Kohler part # 41 089 12-S. $9.90
each, plus shipping & handling.
[Return to previous section] Coiled
Governor Spring to regulate and maintain safe engine RPM. Fits later
Kohler engine model K181 with specification numbers 301000-301045, and various
Kohler Magnum engine model M8 with specification numbers 301500-301651.
Approximately 4-1/2" overall length. OEM Kohler part # 41 089 12-S. $9.90
each, plus shipping & handling.
[Return to previous section] |
 26 Coil Governor Spring
to regulate and maintain safe engine RPM. Fits most Kohler engine models
K241, M10, K301, M12, K321, M14, K341, M16 and K361. Used in Cub Cadet garden
tractor models: 70, 71, 72, 73, 86, 100, 102, 104, 105, 106, 107, 108, 109,
122, 123, 124, 125, 126, 127, 128, 129, 149, 169, 1050, 1204, 1210 and 1211.
This particular spring can also be used on various Kohler engine models KT17
(first design), KT17 Series II, KT19 (first design), KT19 Series II, KT21,
M18 and M20. Because these twin cylinder engines use the same governor gear
assembly as the single cylinder engines, which is calibrated for this spring.
2-5/8" overall length. Go
here to learn how to set the engine governor RPM speed on a single cylinder
Kohler K-series or Magnum engine. Replaces discontinued Kohler part #'s
45 091 01-S, 52 091 04-S and 52 091 06-S (23 coil [2-7/16" length] governor
spring). OEM Kohler part # 235496-S. $15.90 each, plus shipping &
handling. 26 Coil Governor Spring
to regulate and maintain safe engine RPM. Fits most Kohler engine models
K241, M10, K301, M12, K321, M14, K341, M16 and K361. Used in Cub Cadet garden
tractor models: 70, 71, 72, 73, 86, 100, 102, 104, 105, 106, 107, 108, 109,
122, 123, 124, 125, 126, 127, 128, 129, 149, 169, 1050, 1204, 1210 and 1211.
This particular spring can also be used on various Kohler engine models KT17
(first design), KT17 Series II, KT19 (first design), KT19 Series II, KT21,
M18 and M20. Because these twin cylinder engines use the same governor gear
assembly as the single cylinder engines, which is calibrated for this spring.
2-5/8" overall length. Go
here to learn how to set the engine governor RPM speed on a single cylinder
Kohler K-series or Magnum engine. Replaces discontinued Kohler part #'s
45 091 01-S, 52 091 04-S and 52 091 06-S (23 coil [2-7/16" length] governor
spring). OEM Kohler part # 235496-S. $15.90 each, plus shipping &
handling. |
 34 Coil Extended-Length
Governor Spring to regulate and maintain safe engine RPM. Fits Kohler AQS
"Quiet Line" engine models K241, K301, K321, K341 and K361, and certain Kohler
Magnum engine models M10, M12, M14 and M16. Used on Cub Cadet garden tractor
models: 680, 1000, 1200, 1210, 1250, 1282, 1450 and 1650; John Deere AQS
"Quiet Line" models, and other makes and models of garden tractors or small
engine equipment. Most common for general lawn and garden use or snow removal.
8" overall length.
Go
here to learn how to set the engine governor RPM speed on a single cylinder
Kohler K-series or Magnum engine. Discontinued Kohler part # 47 091
01-S. $20.00 each, plus shipping & handling. (When available
or in stock.) 34 Coil Extended-Length
Governor Spring to regulate and maintain safe engine RPM. Fits Kohler AQS
"Quiet Line" engine models K241, K301, K321, K341 and K361, and certain Kohler
Magnum engine models M10, M12, M14 and M16. Used on Cub Cadet garden tractor
models: 680, 1000, 1200, 1210, 1250, 1282, 1450 and 1650; John Deere AQS
"Quiet Line" models, and other makes and models of garden tractors or small
engine equipment. Most common for general lawn and garden use or snow removal.
8" overall length.
Go
here to learn how to set the engine governor RPM speed on a single cylinder
Kohler K-series or Magnum engine. Discontinued Kohler part # 47 091
01-S. $20.00 each, plus shipping & handling. (When available
or in stock.) |
 23 Coil Extended-Length
Governor Spring to regulate and maintain safe engine RPM. Fits various Kohler
KT-series and Magnum opposed twin cylinder engine models KT17 (first design),
KT17 Series II, KT19 (first design), KT19 Series II, KT21, M18 and M20. 23/64"
O.D. x 5" overall length. Used and in excellent condition. Hard to find part.
Not distorted or stretched-out. Discontinued Kohler part # 52 091 05-S.
$20.00 each, plus shipping & handling. (When available or in
stock.) 23 Coil Extended-Length
Governor Spring to regulate and maintain safe engine RPM. Fits various Kohler
KT-series and Magnum opposed twin cylinder engine models KT17 (first design),
KT17 Series II, KT19 (first design), KT19 Series II, KT21, M18 and M20. 23/64"
O.D. x 5" overall length. Used and in excellent condition. Hard to find part.
Not distorted or stretched-out. Discontinued Kohler part # 52 091 05-S.
$20.00 each, plus shipping & handling. (When available or in
stock.) |
New Style Nylon Throttle Lever to Governor Lever Link Retaining Bushings
listed below. Each fits Kohler engine models M8, K241, M10, K301, M12,
K321, M14, K341, M16, K361, KT17 (first design), KT17 Series II, KT19 (first
design), KT19 Series II, KT21, MV16, M18, MV18, M20, MV20, CH11, CH12.5,
CH13, CH14, CH15, CH16, CH18, CH20, CH22, CH25, CH410, CH430, CH450, CH5,
CH620, CH621, CH640, CH641, CH670, CH680, CH730, CH735, CH740, CH745, CH750,
CH940, CH960, CH980, CH1000, CV11, CV12.5, CV13, CV14, CV15, CV16, CV18,
CV20, CV22, CV25, CV430, CV450, CV460, CV493, CV620, CV640, CV670, CV680,
CV730, CV740, CV745, CV750, CV940, CV960, CV980, CV1000, ECV740, ECV749,
ECV850, ECV860, ECV870, ECV880, ECV940, ECV980, ELH775, KS530, KS540, KS590,
KS595, KT600, KT610, KT620, KT715, KT725, KT730, KT735, KT740, KT745, LH630,
LH640, LH685, LH690, LH750, LH755, LH775, LV680, PCV850, PCV860, SV470, SV471,
SV480, SV530, SV540, SV541, SV590, SV591, SV601, SV620, SV710, SV715, SV720,
SV725, SV730, SV735, SV740, SV810, SV820, SV830, SV840, TH16, TH18, TH575,
ZT710, ZT720, ZT730 and ZT740 with a Carter/Kohler #26, #28, #30 carburetor
or Walbro WHG #52, #60, #64 carburetor with 3/16" hole in governor lever
and throttle lever and without integrated ball on throttle lever.
|
| FYI - Piano or music wire, which is very hard solid steel wire, can be used to replace most obsolete OEM throttle and/or choke wire links for various small engines. Usually .080" (5/64" or 2mm) is the most common size. A torch will be needed to make any bends and the "Z" bend at each end. Actually, this type of wire can be used for many different things. Just because it's called "piano or music wire", don't mean it's just for pianos or musical instruments. Piano or music wire is available online and at most Ace Hardware stores. |
 Throttle Lever to Governor
Lever Wire Link. Fits Kohler engine models K90/K91 with a 3/32" hole in governor
lever and throttle lever. Dimensions: .080" diameter x 1-5/8" overall length.
OEM Kohler part # 220380-S. $17.20 each, plus shipping & handling. Throttle Lever to Governor
Lever Wire Link. Fits Kohler engine models K90/K91 with a 3/32" hole in governor
lever and throttle lever. Dimensions: .080" diameter x 1-5/8" overall length.
OEM Kohler part # 220380-S. $17.20 each, plus shipping & handling. |
 Throttle Link. Fits Kohler
engine models K141, K160/K161,
L160/L161, L181, K181
and certain Kohler Magnum M8 with a 3/32" hole in governor lever and throttle
lever. Dimensions: .080" diameter x 2-1/2" overall length. OEM Kohler part
# 230078-S. $17.30 each, plus shipping & handling. Throttle Link. Fits Kohler
engine models K141, K160/K161,
L160/L161, L181, K181
and certain Kohler Magnum M8 with a 3/32" hole in governor lever and throttle
lever. Dimensions: .080" diameter x 2-1/2" overall length. OEM Kohler part
# 230078-S. $17.30 each, plus shipping & handling. |
 New Style Throttle Link.
Fits Kohler Magnum engine model M8 with a 3/16" hole in governor lever and
throttle lever. Requires new style nylon throttle link retaining bushings
listed above. Dimensions: .080" diameter x 2-1/2" length. OEM Kohler part
# 25 079 01-S. $18.55 each, plus shipping & handling. New Style Throttle Link.
Fits Kohler Magnum engine model M8 with a 3/16" hole in governor lever and
throttle lever. Requires new style nylon throttle link retaining bushings
listed above. Dimensions: .080" diameter x 2-1/2" length. OEM Kohler part
# 25 079 01-S. $18.55 each, plus shipping & handling. |
 New Style Throttle Link.
Fits Kohler engine models K241, M10, K301, M12, K321, M14, K341, M16 and
K361 with Carter/Kohler or Walbro carburetor with a 3/16" hole in governor
lever and without ball integrated with throttle lever. Requires new style
nylon throttle link retaining bushings listed above. Dimensions: .080" diameter
x 3" length. OEM Kohler part # 47 079 11-S. $11.20 each, plus shipping
& handling. New Style Throttle Link.
Fits Kohler engine models K241, M10, K301, M12, K321, M14, K341, M16 and
K361 with Carter/Kohler or Walbro carburetor with a 3/16" hole in governor
lever and without ball integrated with throttle lever. Requires new style
nylon throttle link retaining bushings listed above. Dimensions: .080" diameter
x 3" length. OEM Kohler part # 47 079 11-S. $11.20 each, plus shipping
& handling. |
 Choke Lever to Bellcrank
Lever on Flywheel Shroud Wire Link. Fits Kohler AQS "Quiet Line" engine models
K241, K301, K321, K341 and K361. Used on Cub Cadet garden tractor models
800, 100, 1200, 1250, 1450 and 1650, including certain John Deere garden
tractors. OEM Kohler part # 47 079 01-S. $11.20 each, plus shipping
& handling. Choke Lever to Bellcrank
Lever on Flywheel Shroud Wire Link. Fits Kohler AQS "Quiet Line" engine models
K241, K301, K321, K341 and K361. Used on Cub Cadet garden tractor models
800, 100, 1200, 1250, 1450 and 1650, including certain John Deere garden
tractors. OEM Kohler part # 47 079 01-S. $11.20 each, plus shipping
& handling. |
 Old Style Throttle Lever
to Governor Lever Wire Link. Originally used on Kohler engine models KT17
(first design), KT17 Series II, KT19 (first design), KT19 Series II and KT21
engines, but also fits models M18 and M20 with .080" hole in throttle lever
and governor lever. Does NOT require new style nylon throttle link retaining
bushings listed above. Dimensions: .080" thickness x 4-1/2" length from inside
bends. A-1 Miller's fabricated part; made of heat-treated, hardened steel.
Replaces discontinued Kohler part # 52 354 02-S. $15.00 each, plus
shipping & handling. Old Style Throttle Lever
to Governor Lever Wire Link. Originally used on Kohler engine models KT17
(first design), KT17 Series II, KT19 (first design), KT19 Series II and KT21
engines, but also fits models M18 and M20 with .080" hole in throttle lever
and governor lever. Does NOT require new style nylon throttle link retaining
bushings listed above. Dimensions: .080" thickness x 4-1/2" length from inside
bends. A-1 Miller's fabricated part; made of heat-treated, hardened steel.
Replaces discontinued Kohler part # 52 354 02-S. $15.00 each, plus
shipping & handling.
 New Style Throttle Lever to
Governor Lever Wire Link. Originally used on Kohler engine models M18 and
M20 engines, but also fits models KT17 (first design), KT17 Series II, KT19
(first design), KT19 Series II and KT21 with 3/16" hole in throttle lever
and governor lever. Requires new style nylon throttle link retaining bushings
listed above. Dimensions: .080" thickness x 4-1/2" length. OEM Kohler part
# 52 079 11-S. $17.35 each, plus shipping & handling. New Style Throttle Lever to
Governor Lever Wire Link. Originally used on Kohler engine models M18 and
M20 engines, but also fits models KT17 (first design), KT17 Series II, KT19
(first design), KT19 Series II and KT21 with 3/16" hole in throttle lever
and governor lever. Requires new style nylon throttle link retaining bushings
listed above. Dimensions: .080" thickness x 4-1/2" length. OEM Kohler part
# 52 079 11-S. $17.35 each, plus shipping & handling. |
 3/16" Throttle Link Rod.
Fits Kohler engine models K241, K301, K330/K331, K321, K341 and K361. Connects
throttle lever to governor lever. 3/16" Throttle Link Rod.
Fits Kohler engine models K241, K301, K330/K331, K321, K341 and K361. Connects
throttle lever to governor lever.
|
 3/16" Throttle Ball Joint
w/Integrated Ball/Threaded Stud. Fits Kohler engine models K241, K301, K330/K331,
K321, K341 and K361 with early style throttle link/rod. 10-32 UNF male and
female threads. Fits Carter/Kohler #26, #28, #30 and Walbro WHG #52, #60,
#64 carburetors without ball integrated with throttle lever. Connects throttle
lever to governor lever. Can also be used on the carburetor of mini rods,
hot rods, race cars, etc. 10-32 UNF male and female threads. NOTE: Apply
motor oil inside ball joint to reduce wear and for smoother throttle
operation. 3/16" Throttle Ball Joint
w/Integrated Ball/Threaded Stud. Fits Kohler engine models K241, K301, K330/K331,
K321, K341 and K361 with early style throttle link/rod. 10-32 UNF male and
female threads. Fits Carter/Kohler #26, #28, #30 and Walbro WHG #52, #60,
#64 carburetors without ball integrated with throttle lever. Connects throttle
lever to governor lever. Can also be used on the carburetor of mini rods,
hot rods, race cars, etc. 10-32 UNF male and female threads. NOTE: Apply
motor oil inside ball joint to reduce wear and for smoother throttle
operation.
|
 Quick Disconnect/Snap-On
Throttle Ball Joint Assembly for Carter/Kohler or Walbro carburetor used
on Kohler engine models K241, K301, K321, K341 and K361 with 3/16" hole in
throttle lever. 10-32 UNF male and female threads. Fits Carter or Kohler
#26, #28, #30 and Walbro WHG #52, #60, #64 carburetors without ball integrated
with throttle lever. Connects throttle lever to governor lever. Can also
be used on the carburetor of mini rods, hot rods, race cars, etc. NOTE:
Apply motor oil inside ball joint body to reduce wear and for smoother throttle
operation. High quality aftermarket. Replaces Kohler part # 45 208 03-S
(discontinued; snap-on ball joint body) and 48 194 01-S (ball stud).
$13.00 per assembly, plus shipping & handling. Quick Disconnect/Snap-On
Throttle Ball Joint Assembly for Carter/Kohler or Walbro carburetor used
on Kohler engine models K241, K301, K321, K341 and K361 with 3/16" hole in
throttle lever. 10-32 UNF male and female threads. Fits Carter or Kohler
#26, #28, #30 and Walbro WHG #52, #60, #64 carburetors without ball integrated
with throttle lever. Connects throttle lever to governor lever. Can also
be used on the carburetor of mini rods, hot rods, race cars, etc. NOTE:
Apply motor oil inside ball joint body to reduce wear and for smoother throttle
operation. High quality aftermarket. Replaces Kohler part # 45 208 03-S
(discontinued; snap-on ball joint body) and 48 194 01-S (ball stud).
$13.00 per assembly, plus shipping & handling. |
 Throttle Ball w/Threaded
Stud for Quick Disconnect/Snap-On Ball Joint Body listed above used on Kohler
engine models K241, K301, K321, K341, K361, K482, K532 and K582 . Fits Carter
or Kohler #26, #28, #30 and Walbro WHG #52, #60, #64 carburetors with 3/16"
hole in throttle lever. Includes nut and lock washer. Can also be used on
the carburetor of mini rods, hot rods, race cars, etc. NOTE: Apply motor
oil inside ball joint to reduce wear and for smoother throttle operation.
High quality aftermarket. Dimensions: 1/4" diameter ball x 10-32 UNF threads.
(Same size as OEM ball/stud on Carter, Kohler and Walbro carburetors.) Replaces
discontinued Kohler part # 48 194 01-S. Replaced with Kohler part # 237130-S
(ball joint w/integrated ball/stud). $4.50 each, plus shipping &
handling. Throttle Ball w/Threaded
Stud for Quick Disconnect/Snap-On Ball Joint Body listed above used on Kohler
engine models K241, K301, K321, K341, K361, K482, K532 and K582 . Fits Carter
or Kohler #26, #28, #30 and Walbro WHG #52, #60, #64 carburetors with 3/16"
hole in throttle lever. Includes nut and lock washer. Can also be used on
the carburetor of mini rods, hot rods, race cars, etc. NOTE: Apply motor
oil inside ball joint to reduce wear and for smoother throttle operation.
High quality aftermarket. Dimensions: 1/4" diameter ball x 10-32 UNF threads.
(Same size as OEM ball/stud on Carter, Kohler and Walbro carburetors.) Replaces
discontinued Kohler part # 48 194 01-S. Replaced with Kohler part # 237130-S
(ball joint w/integrated ball/stud). $4.50 each, plus shipping &
handling. |
| Quick Disconnect/Snap-On
Throttle Ball Joint Assembly for Carter/Kohler or Walbro carburetor used
on Kohler engine models K241, K301, K321, K341 and K361 with 3/16" hole in
throttle lever. 10-32 UNF male and female threads. Fits Carter or Kohler
#26, #28, #30 and Walbro WHG #52, #60, #64 carburetors without ball integrated
with throttle lever. Connects throttle lever to governor lever. Can also
be used on the carburetor of mini rods, hot rods, race cars, etc. NOTE:
Apply motor oil inside ball joint body to reduce wear and for smoother throttle
operation. High quality aftermarket. Replaces Kohler part # 45 208 03-S
(discontinued; snap-on ball joint body) and 48 194 01-S (ball stud).
$13.00 per assembly, plus shipping & handling. |
 Quick Disconnect Throttle
Rod (Link) with Snap-On Ball Joint and E-Clip Assembly. Fits Kohler engine
models K241, K301, K321, K341 and K361. Commonly used on K-series AQS "Quiet
Line" engines. Connects throttle lever to governor lever. Assembled with
Kohler part #'s 235277-S (rod), X-70-3 (nut), discontinued 45 208 03-S (snap-on
ball joint body) and 235278-S (E-clip). High quality aftermarket.
$20.00 per assembly, plus shipping & handling. Quick Disconnect Throttle
Rod (Link) with Snap-On Ball Joint and E-Clip Assembly. Fits Kohler engine
models K241, K301, K321, K341 and K361. Commonly used on K-series AQS "Quiet
Line" engines. Connects throttle lever to governor lever. Assembled with
Kohler part #'s 235277-S (rod), X-70-3 (nut), discontinued 45 208 03-S (snap-on
ball joint body) and 235278-S (E-clip). High quality aftermarket.
$20.00 per assembly, plus shipping & handling.
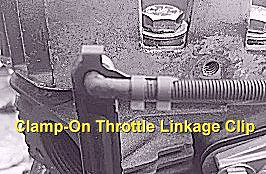   Governor Rod/Throttle
Link Clamp-On and E-Clip Retainers. Each fits early style 3/16" throttle
link rod (above) used on Kohler engine models K241, K301, K330/K331, K321,
K341 and K361. Governor Rod/Throttle
Link Clamp-On and E-Clip Retainers. Each fits early style 3/16" throttle
link rod (above) used on Kohler engine models K241, K301, K330/K331, K321,
K341 and K361.
|
 Quick Disconnect/Snap-On
Ball Joint Throttle Link Assembly. Fits Kohler engine models K482, K532 and
K582 after serial # 6373502 (1974 and newer). Connects throttle lever to
governor lever on carburetor. Assembled with Kohler part #'s 45 208 03-S
(discontinued; two snap-on ball joint bodies) and 271151-S (double threaded
rod). $26.25 per assembly, plus shipping & handling. Quick Disconnect/Snap-On
Ball Joint Throttle Link Assembly. Fits Kohler engine models K482, K532 and
K582 after serial # 6373502 (1974 and newer). Connects throttle lever to
governor lever on carburetor. Assembled with Kohler part #'s 45 208 03-S
(discontinued; two snap-on ball joint bodies) and 271151-S (double threaded
rod). $26.25 per assembly, plus shipping & handling. |
 Snap-On Throttle/Choke Cable
Clip (Clamp). Use to secure throttle or choke cable conduit to extended OEM
Kohler angled bracket on engine block of various Kohler engine models K141,
K160/K161, L160/L161,
L181, K181, K241, K301, K321, K341, M10, M12, M14, M16, K482, K532
and K582. OEM Kohler part # 235603-S. $5.65 each, plus shipping &
handling. Snap-On Throttle/Choke Cable
Clip (Clamp). Use to secure throttle or choke cable conduit to extended OEM
Kohler angled bracket on engine block of various Kohler engine models K141,
K160/K161, L160/L161,
L181, K181, K241, K301, K321, K341, M10, M12, M14, M16, K482, K532
and K582. OEM Kohler part # 235603-S. $5.65 each, plus shipping &
handling. |
  Dual Conduit Throttle/Choke Cable Clamps. Either can be used
with one or two cables. Can be used instead of clamp listed above to secure
3/16" or 7/32" diameter cable conduit(s) to throttle or choke bracket on
engine block, or to carburetor side of flywheel shroud with drilled hole
and nut tack-welded to inside of shroud. Each made of heavy gauge zinc-plated
steel. Dual Conduit Throttle/Choke Cable Clamps. Either can be used
with one or two cables. Can be used instead of clamp listed above to secure
3/16" or 7/32" diameter cable conduit(s) to throttle or choke bracket on
engine block, or to carburetor side of flywheel shroud with drilled hole
and nut tack-welded to inside of shroud. Each made of heavy gauge zinc-plated
steel.
|
  Loop-Type Throttle/Choke Cable Clamps. Use to secure wire(s),
battery cable, throttle or choke cable conduit, small fuel hose (for remote
fuel primer) or bundle of wires along frame for safe routing. Each listed
below requires 3/16" mounting screw. Loop-Type Throttle/Choke Cable Clamps. Use to secure wire(s),
battery cable, throttle or choke cable conduit, small fuel hose (for remote
fuel primer) or bundle of wires along frame for safe routing. Each listed
below requires 3/16" mounting screw.
|
Advertisement for Gas Caps, Fuel level Gauges, Fuel Filters and Related Parts - Click here to contact A-1 Miller's Performance Enterprises to place an order, send your parts for repairing, and/or for FREE professional and honest technical customer service assistance and support and payment options. If you need a part or parts that's not listed in this website, please contact A-1 Miller's and we'll see if we can get it at a reasonable price. | [Top of Page] (Prices are subject to change without notice.)
Vented Metal Fuel/Gas Caps. Replace
deteriorated, damaged or missing gas cap for safety. Each gas cap below fits
OEM gas tank on I-built Cub Cadet garden tractor models 70, 71, 72, 73, 86,
100, 102, 104, 105, 106, 107, 108, 109, 122, 123, 124, 125, 126, 127, 128,
129, 147, 149, 169, including 800, 1000, 1200, 1250, 1450 and 1650 with serial
number 560209 and lower. Also fits larger Briggs & Stratton, Clinton,
Tecumseh, Lauson, Wisconsin and various other makes and models of small engine
gas tanks with a 1-3/4" inlet. Unpainted; apply coat of paint to prevent
rusting.
Wire Connections - Complete Kit. $45.00 each, plus shipping & handling. |
|||||
 Small Size Plastic
Inline Fuel Filters w/fine mesh metal screen. Replace clogged, deteriorated
or damaged filter to prevent fuel flow problems. Each filter installs either
direction. Dimensions of each filter: 1/4" barbed fuel hose fittings x 1-3/8"
maximum diameter x 1-3/4" overall length. Each replaces Kohler part # 25
050 07-S1. Small Size Plastic
Inline Fuel Filters w/fine mesh metal screen. Replace clogged, deteriorated
or damaged filter to prevent fuel flow problems. Each filter installs either
direction. Dimensions of each filter: 1/4" barbed fuel hose fittings x 1-3/8"
maximum diameter x 1-3/4" overall length. Each replaces Kohler part # 25
050 07-S1.
|
|||||
 Medium Size Plastic
Inline Fuel Filter w/pleated paper filtering material. Replace clogged and/or
deteriorated filter to prevent fuel flow problems. Suitable for use with
gravity feed fuel system, crankcase vacuum-operated/pulse-type fuel pump,
mechanical fuel pump or a 12 volt electric fuel
pump. Install before fuel pump to lessen dirt/debris wear to poppet or
reed valves within pump. Dimensions: 1/4" and 5/16" barbed fittings x 1-1/2"
maximum diameter x 4-3/8" overall length. Medium Size Plastic
Inline Fuel Filter w/pleated paper filtering material. Replace clogged and/or
deteriorated filter to prevent fuel flow problems. Suitable for use with
gravity feed fuel system, crankcase vacuum-operated/pulse-type fuel pump,
mechanical fuel pump or a 12 volt electric fuel
pump. Install before fuel pump to lessen dirt/debris wear to poppet or
reed valves within pump. Dimensions: 1/4" and 5/16" barbed fittings x 1-1/2"
maximum diameter x 4-3/8" overall length.
|
|||||
   Fuel Hose Clamps.
Fits 1/4" I.D. x 1/2" O.D. reinforced fuel hose (to the right). Necessary
for safety when using a fuel pump in a pressurized fuel line and to prevent
a vacuum leak at the suction end. Fuel Hose Clamps.
Fits 1/4" I.D. x 1/2" O.D. reinforced fuel hose (to the right). Necessary
for safety when using a fuel pump in a pressurized fuel line and to prevent
a vacuum leak at the suction end.
|
 1/4" I.D. x
1/2" O.D. Black
Neoprene
Rubber Fuel Hose. Reinforced with braided rayon weaving. Necessary for safety
when using a fuel pump in a pressurized fuel line. Compatible with 100% gasoline,
gas w/10% alcohol, E85 or methanol
fuels. Maximum burst pressure: 15 P.S.I. 1/4" I.D. x
1/2" O.D. Black
Neoprene
Rubber Fuel Hose. Reinforced with braided rayon weaving. Necessary for safety
when using a fuel pump in a pressurized fuel line. Compatible with 100% gasoline,
gas w/10% alcohol, E85 or methanol
fuels. Maximum burst pressure: 15 P.S.I.
|
||||
 Hard Rubber Sleeve
for metal fuel line and compression fittings. Fits certain early Kohler engine
models K90/K91, K141, K160/K161, K181, M8, K301, K321, K341, K482, K532,
K582 and K660. Replace deteriorated, cracked and dry-rotted rubber sleeve
to prevent dangerous and hazardous fuel leak. Dimensions: 7/32" I.D. x .255"
O.D. (Other parts shown in drawing to the right -> have been discontinued
from Kohler.) Hard Rubber Sleeve
for metal fuel line and compression fittings. Fits certain early Kohler engine
models K90/K91, K141, K160/K161, K181, M8, K301, K321, K341, K482, K532,
K582 and K660. Replace deteriorated, cracked and dry-rotted rubber sleeve
to prevent dangerous and hazardous fuel leak. Dimensions: 7/32" I.D. x .255"
O.D. (Other parts shown in drawing to the right -> have been discontinued
from Kohler.)
|
|||||
 Fuel Hose
Conversion/Upgrade Kit. This kit replaces the fuel sediment bowl assembly,
U-shaped metal fuel line and fuel fittings with the hard rubber compression
sleeves (above). Suitable for Kohler and virtually any small engine with
gravity fuel feed and carburetor positioned lower than any part of the gas
tank. This conversion/upgrade kit includes 1/4" I.D. x 12" length reinforced
black fuel hose, small inline fuel filter, one new straight 1/4" barbed fuel
hose fitting x 1/8" NPT male threads fitting, one new 90º 1/8" NPT male
threads x 1/4" barbed fuel hose fitting, and four spring-type fuel hose clamps.
The 90º fitting goes in the carburetor with the barbed end facing downward,
the straight fitting fastens in the gas tank, the fuel filter goes just below
the gas tank close to the straight fitting, and the rest of the fuel hose
routes underneath the carburetor and connects to the 90º fitting. Use
plumber's thread sealing tape to guarantee a leak-proof
seal. $12.00 per kit, plus shipping & handling. Fuel Hose
Conversion/Upgrade Kit. This kit replaces the fuel sediment bowl assembly,
U-shaped metal fuel line and fuel fittings with the hard rubber compression
sleeves (above). Suitable for Kohler and virtually any small engine with
gravity fuel feed and carburetor positioned lower than any part of the gas
tank. This conversion/upgrade kit includes 1/4" I.D. x 12" length reinforced
black fuel hose, small inline fuel filter, one new straight 1/4" barbed fuel
hose fitting x 1/8" NPT male threads fitting, one new 90º 1/8" NPT male
threads x 1/4" barbed fuel hose fitting, and four spring-type fuel hose clamps.
The 90º fitting goes in the carburetor with the barbed end facing downward,
the straight fitting fastens in the gas tank, the fuel filter goes just below
the gas tank close to the straight fitting, and the rest of the fuel hose
routes underneath the carburetor and connects to the 90º fitting. Use
plumber's thread sealing tape to guarantee a leak-proof
seal. $12.00 per kit, plus shipping & handling. |
|||||
 Nylon Inline
Fuel Shut-Off Valve w/alcohol-resistant neoprene seal and 1/4" barbed fuel
hose fittings. alcohol-resistant. No filter. Lever rotates 90º OFF/ON
position. Use for a leaky carburetor or
long term storage
of equipment. This part is required by certain garden tractor pulling
associations/clubs for safety. A-1 Miller's part # 24-1036. $3.00
each, plus shipping & handling. Nylon Inline
Fuel Shut-Off Valve w/alcohol-resistant neoprene seal and 1/4" barbed fuel
hose fittings. alcohol-resistant. No filter. Lever rotates 90º OFF/ON
position. Use for a leaky carburetor or
long term storage
of equipment. This part is required by certain garden tractor pulling
associations/clubs for safety. A-1 Miller's part # 24-1036. $3.00
each, plus shipping & handling. |
 Heavy Duty, All
Metal Inline Fuel Shut-Off Valve with 1/4" barbed fuel hose fittings.
Alcohol-resistant. No filter. Lever rotates 90º OFF/ON position. Use
for a leaky carburetor or
long term storage
of equipment. This part is required by certain garden tractor pulling
associations/clubs for safety. A-1 Miller's part # 24-1166. $16.00
each, plus shipping & handling. Heavy Duty, All
Metal Inline Fuel Shut-Off Valve with 1/4" barbed fuel hose fittings.
Alcohol-resistant. No filter. Lever rotates 90º OFF/ON position. Use
for a leaky carburetor or
long term storage
of equipment. This part is required by certain garden tractor pulling
associations/clubs for safety. A-1 Miller's part # 24-1166. $16.00
each, plus shipping & handling. |
||||
 Heavy Duty, 90º
1/8" NPT Threads gas tank-Mounted Shut-Off Valve w/Fine Mesh Brass Filter
Screen and 1/4" Barbed Fuel Hose Fitting. Threads into bottom of metal gas
tank. To be used with metal gas tanks on various Kohler engine models K90/K91,
K141, K160/K161,
L160/L161, L181, K181, K241, K301, K341,
M8, M14, M20, CH15, CH22, CH23, CH680 and ECH730. Use for a leaky carburetor
or long term storage of
equipment. This part is required by certain pulling associations/clubs
for safety. Replaces: AMF 42879; Bolens 1703896, 1718029; Briggs & Stratton
396244, 399517, 698182; Gravely 18563; John Deere AM31850, PT8655; Kohler
220764-S; Lawn Boy 677052; Noma 42879; Scag 48056; Snapper 2-4507, 3-4212,
24507, 34212, 7024507, 7034212; Tecumseh 27689, 27803, 28571, 29683, 430137,
430209; Toro 304-71. Heavy Duty, 90º
1/8" NPT Threads gas tank-Mounted Shut-Off Valve w/Fine Mesh Brass Filter
Screen and 1/4" Barbed Fuel Hose Fitting. Threads into bottom of metal gas
tank. To be used with metal gas tanks on various Kohler engine models K90/K91,
K141, K160/K161,
L160/L161, L181, K181, K241, K301, K341,
M8, M14, M20, CH15, CH22, CH23, CH680 and ECH730. Use for a leaky carburetor
or long term storage of
equipment. This part is required by certain pulling associations/clubs
for safety. Replaces: AMF 42879; Bolens 1703896, 1718029; Briggs & Stratton
396244, 399517, 698182; Gravely 18563; John Deere AM31850, PT8655; Kohler
220764-S; Lawn Boy 677052; Noma 42879; Scag 48056; Snapper 2-4507, 3-4212,
24507, 34212, 7024507, 7034212; Tecumseh 27689, 27803, 28571, 29683, 430137,
430209; Toro 304-71.
|
|||||
Alcohol-Resistant
Neoprene
Rubber Gas Tank Fuel Fitting Bushings (Grommets). Replace deteriorated, cracked,
dry-rotted, hardened bushing/grommet, which can cause dangerous and hazardous
fuel leak. Along with either fuel fitting listed further below, this part
can be used to repair (replace) the integrated fuel fitting on a plastic
gas tank. Use oil or grease for easy installation into hole in bottom of
plastic gas tank. Fuel fittings and fuel shut-off valves that plugs into
these parts listed below. In addition to these fittings, for competition
pulling only, this part can also be used as a fuel return system on top of
gas tank with a high pressure fuel pump when burning E85
or methanol fuels to prevent carburetor flooding.
Each below have a 23/64" I.D. hole for a 3/8" fuel fitting.
|
|||||
 90º Metal
Plug-In gas tank Fitting w/o Filter Screen. Fits Cub Cadet "Quiet Line" models
and Kohler Magnum engines. Use with inline fuel filter. 1/2" barbed fitting
fastens in neoprene rubber bushing/grommet (above
È) in bottom of plastic gas tank. Along
with the grommet above, this part can be used to repair (replace) the fuel
fitting on a plastic gas tank. In addition to the grommet listed above, for
competition pulling only, this part can also be used as a fuel return system
on top of gas tank with a high pressure fuel pump when burning
E85 or methanol fuels to prevent
carburetor flooding. Use oil or grease for easy installation. 1/4" barbed
fuel hose fitting. Replaces Cub Cadet part # IH-109042-C2 (except w/o shut-off
valve); Wheel Horse 04048 (except w/o shut-off valve and filter screen). 90º Metal
Plug-In gas tank Fitting w/o Filter Screen. Fits Cub Cadet "Quiet Line" models
and Kohler Magnum engines. Use with inline fuel filter. 1/2" barbed fitting
fastens in neoprene rubber bushing/grommet (above
È) in bottom of plastic gas tank. Along
with the grommet above, this part can be used to repair (replace) the fuel
fitting on a plastic gas tank. In addition to the grommet listed above, for
competition pulling only, this part can also be used as a fuel return system
on top of gas tank with a high pressure fuel pump when burning
E85 or methanol fuels to prevent
carburetor flooding. Use oil or grease for easy installation. 1/4" barbed
fuel hose fitting. Replaces Cub Cadet part # IH-109042-C2 (except w/o shut-off
valve); Wheel Horse 04048 (except w/o shut-off valve and filter screen).
|
|||||
 90º Metal
Plug-In gas tank Shut-Off Valve w/o Filter Screen. Fits Cub Cadet AQS "Quiet
Line" models and Kohler Magnum engines. Use with inline fuel filter. 1/2"
barbed fitting fastens in neoprene rubber bushing (above
È) in bottom of plastic gas tank. Along
with the grommet above, this part can be used to repair (replace) the fuel
fitting on a plastic gas tank. Use oil or grease for easy installation. 1/4"
barbed fuel hose fitting. Use for a leaky carburetor or
long term storage of
equipment. Replaces Cub Cadet part # IH-109042-C2 and Kohler part # 25
462 01-S (except w/o filter screen); Wheel Horse 104048 (except w/o filter
screen). 90º Metal
Plug-In gas tank Shut-Off Valve w/o Filter Screen. Fits Cub Cadet AQS "Quiet
Line" models and Kohler Magnum engines. Use with inline fuel filter. 1/2"
barbed fitting fastens in neoprene rubber bushing (above
È) in bottom of plastic gas tank. Along
with the grommet above, this part can be used to repair (replace) the fuel
fitting on a plastic gas tank. Use oil or grease for easy installation. 1/4"
barbed fuel hose fitting. Use for a leaky carburetor or
long term storage of
equipment. Replaces Cub Cadet part # IH-109042-C2 and Kohler part # 25
462 01-S (except w/o filter screen); Wheel Horse 104048 (except w/o filter
screen).
|
|||||
 90º Metal
Plug-In gas tank Shut-Off Valve w/Fine Mesh Filter Screen. Fits Briggs &
Stratton, Cub Cadet AQS "Quiet Line" models and Kohler Magnum engines. 1/2"
barbed fitting fastens in neoprene rubber bushing (above
È) in bottom of plastic gas tank. Along
with the grommet above, this part can be used to repair (replace) the fuel
fitting on a plastic gas tank. Use oil or grease for easy installation. 1/4"
barbed fuel hose fitting. Use for a leaky carburetor or
long term storage of
equipment. Replaces Cub Cadet part # IH-109042-C2; Wheel Horse 104048
(except w/filter screen). 90º Metal
Plug-In gas tank Shut-Off Valve w/Fine Mesh Filter Screen. Fits Briggs &
Stratton, Cub Cadet AQS "Quiet Line" models and Kohler Magnum engines. 1/2"
barbed fitting fastens in neoprene rubber bushing (above
È) in bottom of plastic gas tank. Along
with the grommet above, this part can be used to repair (replace) the fuel
fitting on a plastic gas tank. Use oil or grease for easy installation. 1/4"
barbed fuel hose fitting. Use for a leaky carburetor or
long term storage of
equipment. Replaces Cub Cadet part # IH-109042-C2; Wheel Horse 104048
(except w/filter screen).
|
|||||
 High Quality 90º
Plastic Plug-In gas tank Shut-Off Valve w/Fine Mesh Filter Screen and
Alcohol-Resistant
Neoprene
Rubber Grommet Kit. Fits Briggs & Stratton, Cub Cadet AQS "Quiet Line"
models and Kohler Magnum engine gas tanks. Neoprene rubber grommet plugs
into bottom of plastic gas tank, and fuel fitting fastens in the grommet.
These parts can also be used to repair a damaged threaded fuel outlet hole
on the bottom of a plastic gas tank by drilling out threads with a 9/16"
drill bit, then install grommet and fitting. Use oil or grease for easy insertion
of each part. 1/4" and 5/16" stepped barbed fuel hose fitting. Replaces Cub
Cadet part # IH-109042-C2; Wheel Horse 104048 (except w/filter screen). High Quality 90º
Plastic Plug-In gas tank Shut-Off Valve w/Fine Mesh Filter Screen and
Alcohol-Resistant
Neoprene
Rubber Grommet Kit. Fits Briggs & Stratton, Cub Cadet AQS "Quiet Line"
models and Kohler Magnum engine gas tanks. Neoprene rubber grommet plugs
into bottom of plastic gas tank, and fuel fitting fastens in the grommet.
These parts can also be used to repair a damaged threaded fuel outlet hole
on the bottom of a plastic gas tank by drilling out threads with a 9/16"
drill bit, then install grommet and fitting. Use oil or grease for easy insertion
of each part. 1/4" and 5/16" stepped barbed fuel hose fitting. Replaces Cub
Cadet part # IH-109042-C2; Wheel Horse 104048 (except w/filter screen).
|
|||||
 1/8" NPT x 1/8"
NPT x 3/4" length [close] steel pipe connector. Use to fasten fuel shut-off
/filter/sediment bowl assembly (listed below
Ê) to gas tank. Use
plumber's thread sealing tape to guarantee a leak-proof
seal. 1/8" NPT x 1/8"
NPT x 3/4" length [close] steel pipe connector. Use to fasten fuel shut-off
/filter/sediment bowl assembly (listed below
Ê) to gas tank. Use
plumber's thread sealing tape to guarantee a leak-proof
seal.
|
|||||
 Fuel
Shut-Off/Filter/Sediment Bowl Assembly. Allows for fuel to be filtered and
any heavy dirt or debris, or water content in the fuel to be settled in the
glass bowl. 100% cleanable. Fits Cub Cadet garden tractor models 70, 71,
72, 73, 100, 102, 104, 105, 106, 107, 122, 123, 124, 125, 126, 127, 147,
and replacement for various other makes and models of older lawn and garden
small engines. Threads into bottom of gas tank. Use for a leaky carburetor
or long term storage of
equipment. This part is required by certain pulling associations/clubs
for safety. Dimensions - overall height: 3"; maximum width (not including
shut-off valve): 1-3/4"; thread fittings: inlet (top) and outlet (side) are
both 1/8" NPT. Use
plumber's thread sealing tape on fittings to guarantee
a leak-proof seal. Use fuel hose conversion/upgrade kit (above
È) instead if you wish. Complete assembly
discontinued from Kohler. Replaces Kohler A-210101, 25 755 22-S; Briggs &
Stratton 293964, 295913, 295977, 296005, 393169, 690612; Clinton 293-32-500,
293-32-5; Gravely 010313; John Deere PT4337; Tecumseh 24449, 24459, 32164,
32439, 32984, 32984A, 34279, 34279A, 34279B; Wisconsin LP43. High quality
aftermarket. A-1 Miller's part # 21-1009. $11.50 each, plus shipping
& handling. Fuel
Shut-Off/Filter/Sediment Bowl Assembly. Allows for fuel to be filtered and
any heavy dirt or debris, or water content in the fuel to be settled in the
glass bowl. 100% cleanable. Fits Cub Cadet garden tractor models 70, 71,
72, 73, 100, 102, 104, 105, 106, 107, 122, 123, 124, 125, 126, 127, 147,
and replacement for various other makes and models of older lawn and garden
small engines. Threads into bottom of gas tank. Use for a leaky carburetor
or long term storage of
equipment. This part is required by certain pulling associations/clubs
for safety. Dimensions - overall height: 3"; maximum width (not including
shut-off valve): 1-3/4"; thread fittings: inlet (top) and outlet (side) are
both 1/8" NPT. Use
plumber's thread sealing tape on fittings to guarantee
a leak-proof seal. Use fuel hose conversion/upgrade kit (above
È) instead if you wish. Complete assembly
discontinued from Kohler. Replaces Kohler A-210101, 25 755 22-S; Briggs &
Stratton 293964, 295913, 295977, 296005, 393169, 690612; Clinton 293-32-500,
293-32-5; Gravely 010313; John Deere PT4337; Tecumseh 24449, 24459, 32164,
32439, 32984, 32984A, 34279, 34279A, 34279B; Wisconsin LP43. High quality
aftermarket. A-1 Miller's part # 21-1009. $11.50 each, plus shipping
& handling. |
|||||
Alcohol-resistant
neoprene
rubber O-ring seal for shut-off valve shaft in fuel shut-off/filter/sediment
bowl assembly listed above È. Replace
deteriorated, cracked and dry-rotted O-ring or leather packing, which can
cause dangerous and hazardous leaking fuel. Dimensions: 1/8" I.D. x 1/4"
O.D.
|
 Replacement
glass bowl for fuel shut-off/filter/sediment bowl assembly listed above
È. Dimensions: 1-1/2" maximum width
x 1-1/8" height. Replaces: Briggs & Stratton # 298683; John Deere # PT4271. Replacement
glass bowl for fuel shut-off/filter/sediment bowl assembly listed above
È. Dimensions: 1-1/2" maximum width
x 1-1/8" height. Replaces: Briggs & Stratton # 298683; John Deere # PT4271.
|
||||
 Gasket
(Alcohol-Resistant Neoprene Rubber Seal) for fuel shut-off/filter/sediment
bowl assembly listed above È. Dimensions:
1-1/4" I.D. x 1-1/2" O.D. x .060" thickness. Gasket
(Alcohol-Resistant Neoprene Rubber Seal) for fuel shut-off/filter/sediment
bowl assembly listed above È. Dimensions:
1-1/4" I.D. x 1-1/2" O.D. x .060" thickness.
|
 Fine Mesh Brass
Filter Screen for Fuel Sediment Bowl Assembly listed above
È. 1-1/4" O.D. Fine Mesh Brass
Filter Screen for Fuel Sediment Bowl Assembly listed above
È. 1-1/4" O.D.
|
||||
Wing nuts, Pleated Air Filters and Reticulated Foam Wraps/Pre-Filters -
| Click here to contact A-1 Miller's Performance Enterprises to place an order, send your parts for repairing, and/or for FREE professional and honest technical customer service assistance and support and payment options. Please contact A-1 Miller's if you need a part or parts, or service(s) performed that's not listed or mentioned in this website. | |
 Each wingnut
listed below recommended for side-mounted air cleaner covers or battery hold-down
studs. Do not use on top-mounted air cleaner covers due to rain water seeping
into intake or when washing off engine. 1/4-20 UNC threads. Each replaces
Kohler part #'s X-276-7 and 25 100 15-S. Each wingnut
listed below recommended for side-mounted air cleaner covers or battery hold-down
studs. Do not use on top-mounted air cleaner covers due to rain water seeping
into intake or when washing off engine. 1/4-20 UNC threads. Each replaces
Kohler part #'s X-276-7 and 25 100 15-S.
 Heavy Gauge Stamped Steel Wingnuts
with Adhered Rubber Seal. Recommended for top-mounted air cleaner covers
to prevent rain water from seeping into intake or when washing off engine.
Also, rubber seal prevents wingnut from loosening. 1/4-20 UNC threads. Heavy Gauge Stamped Steel Wingnuts
with Adhered Rubber Seal. Recommended for top-mounted air cleaner covers
to prevent rain water from seeping into intake or when washing off engine.
Also, rubber seal prevents wingnut from loosening. 1/4-20 UNC threads.
|
|
  Pleated Air Filter Elements and Reticulated Foam Wraps/Pre-Filters.
Fits certain Kohler K-series engine models K91, K141, K161 and K181.
Non-restricting flame retardant filtering material. Performance engineered
for increased breathing. Air filter: Kohler 230840-S; Cub Cadet 385163R2;
Clinton 002-0233-00; Gravely 20299; John Deere AM31034; Massey 1035-991-M1;
Tecumseh 30804. Foam Wrap/Pre-Filter: Kohler 234870-S; John Deere AM31034;
Massey Ferguson 1035-991. Air filter element dimensions (±): 4-3/8"
O.D. x 3" I.D. x 1-1/2" overall height. Pleated Air Filter Elements and Reticulated Foam Wraps/Pre-Filters.
Fits certain Kohler K-series engine models K91, K141, K161 and K181.
Non-restricting flame retardant filtering material. Performance engineered
for increased breathing. Air filter: Kohler 230840-S; Cub Cadet 385163R2;
Clinton 002-0233-00; Gravely 20299; John Deere AM31034; Massey 1035-991-M1;
Tecumseh 30804. Foam Wrap/Pre-Filter: Kohler 234870-S; John Deere AM31034;
Massey Ferguson 1035-991. Air filter element dimensions (±): 4-3/8"
O.D. x 3" I.D. x 1-1/2" overall height.
NOTE: To clean the foam wrap/pre-filter, use brake parts cleaner, electrical/electronic contact cleaner, cleaning solvent or paint thinner (these leave behind no oily residue) and 150± P.S.I. compressed air with an air blow gun nozzle, allow to thoroughly dry, but do not add oil in an attempt to trap the dust and dirt. Oil is not recommended because some of the oil could be drawn into the paper element while the engine is running, partially clogging it. |
|
 Pleated Air Filters and Reticulated Foam Wraps/Pre-Filters. Fits
certain Kohler K-series engine model K181. Non-restricting flame retardant
filtering material. Performance engineered for increased breathing. Air filter:
Kohler 231847-S; Cub Cadet 548436R1; Gravely 15373; John Deere AM30800; Tecumseh
31925; Onan 140-1188, 140-188; Rol Air 431. Foam Wrap/Pre-Filter: Kohler
234869-S (K-series), 41 083 04-S (Magnum). Air filter element dimensions
(±): 4-3/8" O.D. x 3" I.D. x 2-5/16" overall height. Pleated Air Filters and Reticulated Foam Wraps/Pre-Filters. Fits
certain Kohler K-series engine model K181. Non-restricting flame retardant
filtering material. Performance engineered for increased breathing. Air filter:
Kohler 231847-S; Cub Cadet 548436R1; Gravely 15373; John Deere AM30800; Tecumseh
31925; Onan 140-1188, 140-188; Rol Air 431. Foam Wrap/Pre-Filter: Kohler
234869-S (K-series), 41 083 04-S (Magnum). Air filter element dimensions
(±): 4-3/8" O.D. x 3" I.D. x 2-5/16" overall height.
NOTE: To clean the foam wrap/pre-filter, use brake parts cleaner, electrical/electronic contact cleaner, cleaning solvent or paint thinner (these leave behind no oily residue) and 150± P.S.I. compressed air with an air blow gun nozzle, allow to thoroughly dry, but do not add oil in an attempt to trap the dust and dirt. Oil is not recommended because some of the oil could be drawn into the paper element while the engine is running, partially clogging it. |
|
 Pleated Air Filter Elements and Reticulated Foam Wraps/Pre-Filters.
Fits various Kohler engine models K141, K161, K181, M8, K241, M10, K301,
M12 and K321, M14 with the short
round metal air cleaner/filter assembly. Non-restricting flame retardant
filtering material. Performance engineered for increased breathing. Air filter:
Kohler 235116-S; Cub Cadet 385168R2. Foam Wrap/Pre-Filter: Kohler 237421-S.
Air filter element dimensions (±): 6" O.D. x 4-11/16" I.D. x 1-7/8"
overall height. Pleated Air Filter Elements and Reticulated Foam Wraps/Pre-Filters.
Fits various Kohler engine models K141, K161, K181, M8, K241, M10, K301,
M12 and K321, M14 with the short
round metal air cleaner/filter assembly. Non-restricting flame retardant
filtering material. Performance engineered for increased breathing. Air filter:
Kohler 235116-S; Cub Cadet 385168R2. Foam Wrap/Pre-Filter: Kohler 237421-S.
Air filter element dimensions (±): 6" O.D. x 4-11/16" I.D. x 1-7/8"
overall height.
NOTE: To clean the foam wrap/pre-filter, use brake parts cleaner, electrical/electronic contact cleaner, cleaning solvent or paint thinner (these leave behind no oily residue) and 150± P.S.I. compressed air with an air blow gun nozzle, allow to thoroughly dry, but do not add oil in an attempt to trap the dust and dirt. Oil is not recommended because some of the oil could be drawn into the paper element while the engine is running, partially clogging it. |
|
 Pleated Air Filter Elements and Reticulated Foam Wraps/Pre-Filters.
Fits certain Kohler and Magnum engine models K241, K301, K321, K341, CH11-15,
KT17 (first design), KT19 (first design), and M18-20 engines with the
AQS "Quiet Line" oblong/egg-shaped
metal air cleaner/filter assembly. Fits Kohler AQS "Quiet Line" series
engines in Cub Cadet models 680, 1000, 1050, 1200, 1204, 1211, 1250, 1282,
1450 and 1650. Non-restricting flame retardant filtering material. Performance
engineered for increased breathing. Air filter: Kohler 47 083 01-S; Cub Cadet
117210-C1, 759-3547, 959-3547; Gravely 032494, John Deere M83646, Lesco 012596.
Foam Wrap/Pre-Filter: Kohler 52 083 01-S. Air filter element dimensions
(±): 7" O.D. x 5-1/2" I.D. x 1-3/4" overall height. Pleated Air Filter Elements and Reticulated Foam Wraps/Pre-Filters.
Fits certain Kohler and Magnum engine models K241, K301, K321, K341, CH11-15,
KT17 (first design), KT19 (first design), and M18-20 engines with the
AQS "Quiet Line" oblong/egg-shaped
metal air cleaner/filter assembly. Fits Kohler AQS "Quiet Line" series
engines in Cub Cadet models 680, 1000, 1050, 1200, 1204, 1211, 1250, 1282,
1450 and 1650. Non-restricting flame retardant filtering material. Performance
engineered for increased breathing. Air filter: Kohler 47 083 01-S; Cub Cadet
117210-C1, 759-3547, 959-3547; Gravely 032494, John Deere M83646, Lesco 012596.
Foam Wrap/Pre-Filter: Kohler 52 083 01-S. Air filter element dimensions
(±): 7" O.D. x 5-1/2" I.D. x 1-3/4" overall height.
NOTE: To clean the foam wrap/pre-filter, use brake parts cleaner, electrical/electronic contact cleaner, cleaning solvent or paint thinner (these leave behind no oily residue) and 150± P.S.I. compressed air with an air blow gun nozzle, allow to thoroughly dry, but do not add oil in an attempt to trap the dust and dirt. Oil is not recommended because some of the oil could be drawn into the paper element while the engine is running, partially clogging it. |
|
 Pleated Air Filter Elements and Reticulated Foam Wraps/Pre-Filters.
Fits Kohler engine models K341, CH18-25, CV18-22, KT17 Series II, KT19 Series
II and M18-20; for 17 thru 22hp engines with the
AQS "Quiet Line" oblong/egg-shaped
metal air cleaner/filter assembly. Fits Kohler AQS "Quiet Line" series
engines. Non-restricting flame retardant filtering material. Performance
engineered for increased breathing. Air filter: Kohler 47 083 03-S; John
Deere M47494 (fits JD models 200, 210, 212, 214, 216, 300, 312, 314, 316,
400); Woods 71803. Foam Wrap/Pre-Filter: Kohler 41 083 04-S. Air filter
element dimensions (±): 7" O.D. x 5-1/2" I.D. x 2-7/16" overall
height. Pleated Air Filter Elements and Reticulated Foam Wraps/Pre-Filters.
Fits Kohler engine models K341, CH18-25, CV18-22, KT17 Series II, KT19 Series
II and M18-20; for 17 thru 22hp engines with the
AQS "Quiet Line" oblong/egg-shaped
metal air cleaner/filter assembly. Fits Kohler AQS "Quiet Line" series
engines. Non-restricting flame retardant filtering material. Performance
engineered for increased breathing. Air filter: Kohler 47 083 03-S; John
Deere M47494 (fits JD models 200, 210, 212, 214, 216, 300, 312, 314, 316,
400); Woods 71803. Foam Wrap/Pre-Filter: Kohler 41 083 04-S. Air filter
element dimensions (±): 7" O.D. x 5-1/2" I.D. x 2-7/16" overall
height.
NOTE: To clean the foam wrap/pre-filter, use brake parts cleaner, electrical/electronic contact cleaner, cleaning solvent or paint thinner (these leave behind no oily residue) and 150± P.S.I. compressed air with an air blow gun nozzle, allow to thoroughly dry, but do not add oil in an attempt to trap the dust and dirt. Oil is not recommended because some of the oil could be drawn into the paper element while the engine is running, partially clogging it. |
|
 Pleated Air Filter Elements and Reticulated Foam Wraps/Pre-Filters.
Fits Kohler Command CH25, CV18, CV20 and CV22. Non-restricting flame retardant
filtering material. Performance engineered for increased breathing. Air filter:
Kohler 24 083 09-S; John Deere GY20576. Foam Wrap/Pre-Filter: Kohler 24 083
02-S. Air filter element dimensions (±): 7" O.D. x 5-1/2" I.D. x
3" overall height. Pleated Air Filter Elements and Reticulated Foam Wraps/Pre-Filters.
Fits Kohler Command CH25, CV18, CV20 and CV22. Non-restricting flame retardant
filtering material. Performance engineered for increased breathing. Air filter:
Kohler 24 083 09-S; John Deere GY20576. Foam Wrap/Pre-Filter: Kohler 24 083
02-S. Air filter element dimensions (±): 7" O.D. x 5-1/2" I.D. x
3" overall height.
NOTE: To clean the foam wrap/pre-filter, use brake parts cleaner, electrical/electronic contact cleaner, cleaning solvent or paint thinner (these leave behind no oily residue) and 150± P.S.I. compressed air with an air blow gun nozzle, allow to thoroughly dry, but do not add oil in an attempt to trap the dust and dirt. Oil is not recommended because some of the oil could be drawn into the paper element while the engine is running, partially clogging it. |
|
 Pleated Air Filter Elements and Reticulated Foam Wraps/Pre-Filters.
Fits certain Kohler engine models M8, K321, M14, K341, M16, KT17 Series II,
MV16, M18, MV18, M20 and MV20 with the
tall round metal air cleaner/filter
assembly. Can also
be used on a competition garden pulling tractors, mini rod pulling vehicles,
hot rods, etc., with an automotive engine. Non-restricting flame retardant
filter. Performance engineered for increased breathing. Air filter: Kohler
45 083 02-S; Cub Cadet 759-3359. Foam Wrap/Pre-Filter: Kohler 45 083 01-S.
Air filter element dimensions (±): 6" O.D. x 4-11/16" I.D. x 3" overall
height. Pleated Air Filter Elements and Reticulated Foam Wraps/Pre-Filters.
Fits certain Kohler engine models M8, K321, M14, K341, M16, KT17 Series II,
MV16, M18, MV18, M20 and MV20 with the
tall round metal air cleaner/filter
assembly. Can also
be used on a competition garden pulling tractors, mini rod pulling vehicles,
hot rods, etc., with an automotive engine. Non-restricting flame retardant
filter. Performance engineered for increased breathing. Air filter: Kohler
45 083 02-S; Cub Cadet 759-3359. Foam Wrap/Pre-Filter: Kohler 45 083 01-S.
Air filter element dimensions (±): 6" O.D. x 4-11/16" I.D. x 3" overall
height.
NOTE: To clean the foam wrap/pre-filter, use brake parts cleaner, electrical/electronic contact cleaner, cleaning solvent or paint thinner (these leave behind no oily residue) and 150± P.S.I. compressed air with an air blow gun nozzle, allow to thoroughly dry, but do not add oil in an attempt to trap the dust and dirt. Oil is not recommended because some of the oil could be drawn into the paper element while the engine is running, partially clogging it. |
|
 Pleated Air Filter Elements and Reticulated Foam Wraps/Pre-Filters.
Fits various Kohler engine models K241, K301, K341, K482, K532 and K582 with
the tall round-shaped metal
air cleaner/filter assembly. Can also be used on mini rod pulling vehicles,
hot rods, etc. with an automotive engine. Non-restricting flame retardant
filtering material. Performance engineered for increased breathing. Air filter:
Kohler 277138-S. Foam Wrap/Pre-Filter: Kohler 277593-S. Air filter element
dimensions (±): 6" O.D. x 4-3/4" I.D. x 4" overall height. Pleated Air Filter Elements and Reticulated Foam Wraps/Pre-Filters.
Fits various Kohler engine models K241, K301, K341, K482, K532 and K582 with
the tall round-shaped metal
air cleaner/filter assembly. Can also be used on mini rod pulling vehicles,
hot rods, etc. with an automotive engine. Non-restricting flame retardant
filtering material. Performance engineered for increased breathing. Air filter:
Kohler 277138-S. Foam Wrap/Pre-Filter: Kohler 277593-S. Air filter element
dimensions (±): 6" O.D. x 4-3/4" I.D. x 4" overall height.
NOTE: To clean the foam wrap/pre-filter, use brake parts cleaner, electrical/electronic contact cleaner, cleaning solvent or paint thinner (these leave behind no oily residue) and 150± P.S.I. compressed air with an air blow gun nozzle, allow to thoroughly dry, but do not add oil in an attempt to trap the dust and dirt. Oil is not recommended because some of the oil could be drawn into the paper element while the engine is running, partially clogging it. |
Never Over-Tighten the Mounting Bolts or Use Multiple Gaskets When Fastening the Carburetor to the Engine! (Updated 11/26/16)
 When installing the carburetor
to an engine, the use of two or more gaskets and then torquing the mounting
bolts to specifications, or just over-tightening the bolts will severely
warp the mounting flange on a carburetor, causing it to bend, which will
create a vacuum leak, or worse yet, being cast aluminum don't bend or flex
too easily, the flange could break. So remember, before installing any
carburetor, first resurface the mounting flange on a wide, flat
belt sander, large flat
sanding disc or on the side of an abrasive metal cutting
wheel on an
electric chop saw (the kind that automotive muffler shops
use) (use eye protection!) to remove any warpage and restore flatness (be
sure to use eye protection!), and for general lawn and garden use, install
just one thin (.030" thickness) gasket or one (5/32" thickness)
heat isolator gasket. And be sure to use
the "two-bolt torque" sequence! To do this, lightly tighten the first bolt,
then lightly tighten the second bolt, and tighten the first bolt securely,
and then tighten the second bolt securely.
When installing the carburetor
to an engine, the use of two or more gaskets and then torquing the mounting
bolts to specifications, or just over-tightening the bolts will severely
warp the mounting flange on a carburetor, causing it to bend, which will
create a vacuum leak, or worse yet, being cast aluminum don't bend or flex
too easily, the flange could break. So remember, before installing any
carburetor, first resurface the mounting flange on a wide, flat
belt sander, large flat
sanding disc or on the side of an abrasive metal cutting
wheel on an
electric chop saw (the kind that automotive muffler shops
use) (use eye protection!) to remove any warpage and restore flatness (be
sure to use eye protection!), and for general lawn and garden use, install
just one thin (.030" thickness) gasket or one (5/32" thickness)
heat isolator gasket. And be sure to use
the "two-bolt torque" sequence! To do this, lightly tighten the first bolt,
then lightly tighten the second bolt, and tighten the first bolt securely,
and then tighten the second bolt securely.
If a Carter or Kohler or Walbro carburetor body is broken and/or damaged beyond repair, the carburetor body is 100% scrap metal. (If the threads for the float bowl retaining bolt are stripped-out, read below Ê.) But the parts on the carburetor body are considered valuable and can be used on another carburetor body that's in good condition (if some of the parts are in fact reusable). Parts such as: throttle and choke shafts and plates, choke friction (detent) ball and spring, idle speed adjusting screw and spring, idle fuel mixture screw and spring, high speed air/fuel needle adjuster and spring, main jet/nozzle (emulsion tube), fuel inlet valve and seat (if not worn and leaks fuel), float, float pin, float bowl, neoprene rubber O-ring seal, fuel baffle/splash shield, bowl retaining screw, and fuel hose fitting. The OEM (US) manufacturers are phasing out many parts for flathead engines due to EPA smog emissions. But some parts may still be available in aftermarket.
How to Repair Stripped-Out Float Bowl Retaining Bolt Threads in a Carter or Kohler or Walbro Carburetor -


 But if the threads
for the float bowl retaining bolt are stripped-out in a Carter Model N #13,
#16, #18, #20, #22 carburetor, an 8mm fine thread (M8 x 1.25 pitch) metric
bolt can be used. But if the metric threads become stripped-out, then a 3/8-24
UNF bowl retaining bolt (for the Carter or Kohler #26, #28, #30 or Walbro
WHL #36, #44 and WHG #52, #60, #64 carburetors) can be used. For the 8mm
metric bolt, an 8mm x 1.25
bottom hand tap will need to be used. But for a 3/8-24
bolt, the stripped-out hole will need to be enlarged with a 21/64" drill
bit (be careful not to drill into the main jet; there's no need to remove
the main jet/nozzle), and new threads will need to be cut
perpendicular
to the carburetor body with a 3/8-24 UNF
bottom hand tap. A bottom tap cuts the threads deeper with
very little taper at the end. Do not complete the tapping process with just
a taper or plug tap because the threads may not go deep enough for the bigger
bolt. However, the threads can be started with a taper or plug tap, but will
need to be finished with the bottom tap. Then use 150± P.S.I. compressed
air with an air blow gun nozzle to thoroughly clear out the metal
drilling/cuttings from the main jet/nozzle (emulsion tube) and entire carburetor!
A 3/8" I.D. fiber washer will need to be used with the 3/8" bolt, and the
hole in the float bowl will need to be drilled out to 3/8" to match the bolt
in the carburetor, or use a float bowl with a 3/8" hole. And do not over-tighten
the metric bolt to prevent from stripping the new threads. If the metric
threads strip out, the carburetor body is scrap metal.
But if the threads
for the float bowl retaining bolt are stripped-out in a Carter Model N #13,
#16, #18, #20, #22 carburetor, an 8mm fine thread (M8 x 1.25 pitch) metric
bolt can be used. But if the metric threads become stripped-out, then a 3/8-24
UNF bowl retaining bolt (for the Carter or Kohler #26, #28, #30 or Walbro
WHL #36, #44 and WHG #52, #60, #64 carburetors) can be used. For the 8mm
metric bolt, an 8mm x 1.25
bottom hand tap will need to be used. But for a 3/8-24
bolt, the stripped-out hole will need to be enlarged with a 21/64" drill
bit (be careful not to drill into the main jet; there's no need to remove
the main jet/nozzle), and new threads will need to be cut
perpendicular
to the carburetor body with a 3/8-24 UNF
bottom hand tap. A bottom tap cuts the threads deeper with
very little taper at the end. Do not complete the tapping process with just
a taper or plug tap because the threads may not go deep enough for the bigger
bolt. However, the threads can be started with a taper or plug tap, but will
need to be finished with the bottom tap. Then use 150± P.S.I. compressed
air with an air blow gun nozzle to thoroughly clear out the metal
drilling/cuttings from the main jet/nozzle (emulsion tube) and entire carburetor!
A 3/8" I.D. fiber washer will need to be used with the 3/8" bolt, and the
hole in the float bowl will need to be drilled out to 3/8" to match the bolt
in the carburetor, or use a float bowl with a 3/8" hole. And do not over-tighten
the metric bolt to prevent from stripping the new threads. If the metric
threads strip out, the carburetor body is scrap metal.
 If the threads for the float
bowl retaining bolt are stripped-out in a Carter or Kohler #26, #28, #30,
Walbro WHL #36, #44 and WHG #52, #60, #64 or virtually any other carburetor
that use a 3/8"-24 UNF float bowl retaining bolt, a 10mm fine thread (M10
x 1.25 pitch) x 3/8" thread length bolt can be used. If a 3/8" length metric
bolt can't be found, a longer bolt that's made of mild steel can be machined
down (shortened) in a metal lathe. IMPORTANT:
If you don't feel comfortable using a metal lathe, please consult a professional
and experienced machinist with a lathe. Being the stripped-out
hole is already large enough for the M10 x 1.25 threads to be cut, so it
won't need to be drilled out. But if it does need drilling out (enlarging),
use an 8.8 mm or 11/32" drill bit (be careful not to drill into the main
jet; there's no need to remove the main jet/nozzle), then new threads will
need to be cut
perpendicular
to the carburetor body with a M10 x 1.25
bottom hand tap. A bottom tap cuts the threads deeper
with very little taper at the end. Do not complete the tapping process with
just a taper or plug tap because the threads may not go deep enough for the
metric bolt. However, the threads can be started with a taper or plug tap,
but will need to be finished with the bottom tap. Then use 150± P.S.I.
compressed air with an air blow gun nozzle to thoroughly clear out the metal
drilling/cuttings from the main jet/nozzle and entire carburetor! Also, the
holes in the fiber washer and in the float bowl for the retaining bolt will
need to be enlarged to 13/32" to match the bolt in the carburetor. And do
not over-tighten the metric bolt to prevent from stripping the new threads.
If the metric threads strip out, the carburetor body is scrap metal. But
save everything off of it because they can be used on another carburetor
body that's in good condition.
If the threads for the float
bowl retaining bolt are stripped-out in a Carter or Kohler #26, #28, #30,
Walbro WHL #36, #44 and WHG #52, #60, #64 or virtually any other carburetor
that use a 3/8"-24 UNF float bowl retaining bolt, a 10mm fine thread (M10
x 1.25 pitch) x 3/8" thread length bolt can be used. If a 3/8" length metric
bolt can't be found, a longer bolt that's made of mild steel can be machined
down (shortened) in a metal lathe. IMPORTANT:
If you don't feel comfortable using a metal lathe, please consult a professional
and experienced machinist with a lathe. Being the stripped-out
hole is already large enough for the M10 x 1.25 threads to be cut, so it
won't need to be drilled out. But if it does need drilling out (enlarging),
use an 8.8 mm or 11/32" drill bit (be careful not to drill into the main
jet; there's no need to remove the main jet/nozzle), then new threads will
need to be cut
perpendicular
to the carburetor body with a M10 x 1.25
bottom hand tap. A bottom tap cuts the threads deeper
with very little taper at the end. Do not complete the tapping process with
just a taper or plug tap because the threads may not go deep enough for the
metric bolt. However, the threads can be started with a taper or plug tap,
but will need to be finished with the bottom tap. Then use 150± P.S.I.
compressed air with an air blow gun nozzle to thoroughly clear out the metal
drilling/cuttings from the main jet/nozzle and entire carburetor! Also, the
holes in the fiber washer and in the float bowl for the retaining bolt will
need to be enlarged to 13/32" to match the bolt in the carburetor. And do
not over-tighten the metric bolt to prevent from stripping the new threads.
If the metric threads strip out, the carburetor body is scrap metal. But
save everything off of it because they can be used on another carburetor
body that's in good condition.
 On a used (and supposedly clean) carburetor, if the float bowl
retaining bolt will not effortlessly tighten against the float bowl to secure
it in place, DO NOT FORCE THE BOLT TO TIGHTEN! Doing this may cause the thin-wall
metal to split, possibly rendering the carburetor useless. The resistance
in threading the bolt in the hole is caused by debris "gumming up" the threads
in the carburetor body (or in the threads of the bolt). Instead, clean the
threads in the carburetor body with a 3/8-24 UNF BOTTOM hand tap, then use
150± P.S.I. compressed air with an air blow gun nozzle to clear out
the debris. With a bottom tap, there's no need to remove the main jet/nozzle
(emulsion tube). But if the protruding part where the float bowl bolt threads
into is previously cracked or does split, a spring-loaded 1/2" fuel hose
clamp can be installed over the protruding part with the opening in the clamp
opposite the crack. This will reinforce the aluminum, squeeze the tube back
to its original size and prevent the crack from spreading when the bolt is
tightened. After the clamp is installed, grind the protruding tangs flush
with the clamp so they will not make contact with and interfere with the
operation of the float. The clamp will then become a permanent part of the
carburetor. And if any part of the clamp blocks off the fuel feed holes,
a new 3/32" fuel feed hole will need to be drilled through the opening in
the clamp so fuel from the float bowl can reach the main jet/nozzle. This
size hole should be big enough to allow plenty of fuel to enter through the
main jet.
On a used (and supposedly clean) carburetor, if the float bowl
retaining bolt will not effortlessly tighten against the float bowl to secure
it in place, DO NOT FORCE THE BOLT TO TIGHTEN! Doing this may cause the thin-wall
metal to split, possibly rendering the carburetor useless. The resistance
in threading the bolt in the hole is caused by debris "gumming up" the threads
in the carburetor body (or in the threads of the bolt). Instead, clean the
threads in the carburetor body with a 3/8-24 UNF BOTTOM hand tap, then use
150± P.S.I. compressed air with an air blow gun nozzle to clear out
the debris. With a bottom tap, there's no need to remove the main jet/nozzle
(emulsion tube). But if the protruding part where the float bowl bolt threads
into is previously cracked or does split, a spring-loaded 1/2" fuel hose
clamp can be installed over the protruding part with the opening in the clamp
opposite the crack. This will reinforce the aluminum, squeeze the tube back
to its original size and prevent the crack from spreading when the bolt is
tightened. After the clamp is installed, grind the protruding tangs flush
with the clamp so they will not make contact with and interfere with the
operation of the float. The clamp will then become a permanent part of the
carburetor. And if any part of the clamp blocks off the fuel feed holes,
a new 3/32" fuel feed hole will need to be drilled through the opening in
the clamp so fuel from the float bowl can reach the main jet/nozzle. This
size hole should be big enough to allow plenty of fuel to enter through the
main jet.
How to Repair the (3hp) Vacu-Jet and (3.5 or 4hp) Pulsa-Jet Automatic Choke Carburetors on a Briggs & Stratton Vertical Shaft Flathead Engine - [Top of Page]


 The first design Vacu-Jet carburetor
have a manual choke and no diaphragm. The carburetor body is fastened to
the gas tank with a single gasket. The second design Vacu-Jet carburetor
have a manual choke and a neoprene diaphragm with a bellow for easier operation
of the choke. The third design Vacu-Jet carburetor have an automatic choke
and a diaphragm. The diaphragm acts like a gasket between the carburetor
body and gas tank. And the Pulsa-Jet carburetor have a diaphragm and built-in
fuel pump to deliver fuel to the combustion chamber. The Vacu-Jet and Pulsa-Jet
carburetors operates off of intake vacuum to deliver fuel to the combustion
chamber. Both of the [newest design] Vacu-Jet and Pulsa-Jet carburetors have
a diaphragm and automatic choke. If either of the [newest design] Vacu-Jet
and Pulsa-Jet carburetors run rich on fuel, and if the choke will not open
after starting the engine, what has happened is where the carburetor is fastened
to the gas tank, these two "mating surfaces" have become warped. This is
caused by over-tightening of the air filter housing screw. To fix this...
The first design Vacu-Jet carburetor
have a manual choke and no diaphragm. The carburetor body is fastened to
the gas tank with a single gasket. The second design Vacu-Jet carburetor
have a manual choke and a neoprene diaphragm with a bellow for easier operation
of the choke. The third design Vacu-Jet carburetor have an automatic choke
and a diaphragm. The diaphragm acts like a gasket between the carburetor
body and gas tank. And the Pulsa-Jet carburetor have a diaphragm and built-in
fuel pump to deliver fuel to the combustion chamber. The Vacu-Jet and Pulsa-Jet
carburetors operates off of intake vacuum to deliver fuel to the combustion
chamber. Both of the [newest design] Vacu-Jet and Pulsa-Jet carburetors have
a diaphragm and automatic choke. If either of the [newest design] Vacu-Jet
and Pulsa-Jet carburetors run rich on fuel, and if the choke will not open
after starting the engine, what has happened is where the carburetor is fastened
to the gas tank, these two "mating surfaces" have become warped. This is
caused by over-tightening of the air filter housing screw. To fix this...
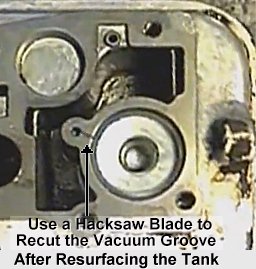 After resurfacing, use a
hacksaw blade to recut (or deepen) the shallow groove from the choke bellow
well to the vacuum port. Doing this will allow the choke plate to open
immediately when the engine starts. Failure to do this will allow the choke
plate to open very slowly or not open at all, which will cause the engine
to flood out and die.
After resurfacing, use a
hacksaw blade to recut (or deepen) the shallow groove from the choke bellow
well to the vacuum port. Doing this will allow the choke plate to open
immediately when the engine starts. Failure to do this will allow the choke
plate to open very slowly or not open at all, which will cause the engine
to flood out and die.
How to Repair the Pulsa-Jet Carburetor on a 5hp Briggs & Stratton Vertical or Horizontal Shaft Flathead Engine - [Top of Page]
If a 5hp Briggs & Stratton engine has excellent spark and adequate compression, but doesn't run right, then the problem is obviously in the carburetor. To fix the problem...
 Install a new fuel pump
diaphragm, carburetor to tank gasket and carburetor to block gasket, set
the fuel mixture adjustment screw about 1-1/2 turns out, and make the final
adjustment after the engine runs.
Install a new fuel pump
diaphragm, carburetor to tank gasket and carburetor to block gasket, set
the fuel mixture adjustment screw about 1-1/2 turns out, and make the final
adjustment after the engine runs.
 Whenever I perform a complete
tune-up, on an older Briggs & Stratton engine, I usually perform a
professional valve job, too. I always include cleaning and lubricating the
ratchet starter clutch and recoil starter spring. I completely disassemble
the starter clutch, use a flat blade screwdriver to rotate a clean shop towel
through the center of the square part to remove any dirt and debris, and
if necessary, I use fine emery cloth to remove any scale from the stub shaft
on the crankshaft. Then I lightly lubricate the catch balls, the stub shaft
and felt filter with lightweight oil, such as 3-IN-ONE oil or automotive
power steering fluid (which is 10 weight hydraulic oil). This have always
worked very well and provided superior lubrication for many years to prevent
the clutch from squealing on the crankshaft, which a lot of times scared
the crap out of my customers. (Some customers told me their lawn mower is
possessed because of the squealing.)
Whenever I perform a complete
tune-up, on an older Briggs & Stratton engine, I usually perform a
professional valve job, too. I always include cleaning and lubricating the
ratchet starter clutch and recoil starter spring. I completely disassemble
the starter clutch, use a flat blade screwdriver to rotate a clean shop towel
through the center of the square part to remove any dirt and debris, and
if necessary, I use fine emery cloth to remove any scale from the stub shaft
on the crankshaft. Then I lightly lubricate the catch balls, the stub shaft
and felt filter with lightweight oil, such as 3-IN-ONE oil or automotive
power steering fluid (which is 10 weight hydraulic oil). This have always
worked very well and provided superior lubrication for many years to prevent
the clutch from squealing on the crankshaft, which a lot of times scared
the crap out of my customers. (Some customers told me their lawn mower is
possessed because of the squealing.)
If the starter clutch still squeals after a short time of running the engine at full governed speed, remove the starter clutch, an lightly run a fine tooth file around the stub shaft and then use fine emery cloth to polish the shaft. And then again, rotate the clean shop towel inside the square hub to ensure that it's absolutely clean. May need to run a 1/2" drill bit inside the square hub to remove any burrs. Now place the square hub on the shaft and rotate it by hand to check if that's any friction or binding. If it rotates freely, lightly oil the shaft and inside the square hub. Don't be too generous with the oil though, because some of it could run down between the tapers and cause the flywheel key to shear.
How I Install a New Nylon Rope/String in an Older Briggs & Stratton Recoil Starter with the Ratchet Type Clutch - (Added 2/16/22) [Top of Page]
I fabricated a recoil spring wind-up tool from the square hub/ratchet out
of an old Briggs starter clutch with broken off ears. I welded a T-shaped
handle to the ratchet and use it to easily and effortlessly wind up the spring
by hand. Then I clamp a small needle-nose Vise Grip pliers on the end of
the spring while I'm winding it inside the housing to guarantee the end will
not go inside the housing. (If this happens, I'll have to start all over.)
And with the recoil housing of the flywheel shroud lightly clamped in a bench
vise, once the spring is wind up and the hole in the starter pulley is aligned
with the starter housing grommet opening, to prevent the pulley from unwinding,
I drilled a 9/32" hole through the ratchet for a 1/4" steel rod to hold it
in place so I can feed the rope/string through the opening and into the pulley
and secure it with a double knot. And then I lubricate the spring with motor
oil through the oil hole in the pulley and pull the rope several times to
evenly distribute the oil and test the starter. (Work smarter, not
harder.)
How to clean the main jet in a 16hp/18hp flathead opposed twin cylinder Briggs & Stratton engine -
The main jet is located in the float bowl of the carburetor. To access and clean it...
Your engine should rev up without using the choke afterwards! This may have to be done every few years because these type of carburetors are notorious for having tiny particles of dirt/debris that passes through the fuel filter settle at the bottom of the float bowl. The main jet is real close to the bottom of the float bowl too, which allows dirt/debris to clog it over time.
To place an order, send your item(s) for repairing, and/or
for customer service assistance, and FREE honest and accurate technical support,
please contact: A-1 Miller's Performance Enterprises, 12091 N Route B,
Hallsville, MO (Missouri) 65255-9604 USA. Please call in your order or send
an email with a list parts you need and your contact information.
Phone: 1-573-881-7229 (cell;
call, text or leave voicemail). Please call Monday-Friday, 9am to 5pm, Central
time zone, except holidays. If no answer, please try again later.
E-mail:
pullingtractor@aol.com. A-1 Miller's
shop is open to the public Monday-Friday, 9am to 5pm, Central time zone,
with an appointment on weekends, except holidays. If you're the kind of person
who don't trust delivery/shipping companies (mis)handling your high-dollar
and fragile merchandise, you can make the long drive to A-1 Miller's new
shop (click image to the right) to personally purchase parts, or drop off
and/or pick up your carburetor, clutch assembly, and/or other parts for repairing
and/or rebuilding. Or visit our new shop to drop off your parts. Please contact
us before coming so we'll be at our shop waiting for your arrival. When you
visit our shop, you will be dealing directly with the owner for the best
customer service. "The road to a [trusted] friend's house (or shop) is
never long." Don't sacrifice quality workmanship for distance.
Payment Options below.
Photos
of our new building/shop are posted here!
12091 N Route B, Hallsville, MO - Google Maps.
[Return To Previous Paragraph, Section
or Website]
Payment Options, and We Ship to Canada and
Worldwide 
Item(s) in a package or cushioned envelope weighing less than 1 lb. is sent
by US Postal Service Airmail Letter Post for a 4-7 days delivery. Packaged
item(s) weighing over 1 lb. and up to 66 lb. is sent by US Postal Service
Airmail Parcel Post for a 4-10 days delivery. I cannot use the US Postal
Services' Flat Rate Priority Mail envelopes and boxes to ship outside U.S.
territories. Item(s) weighing over 67 lbs. or more is sent by FedEx Ground
or equivalent services. We try to keep our shipping cost to customers within
reason. Therefore, we don't ship our products in a fancy-looking package
with our company name and/or logo on it because most customers will just
toss it in the trash after they remove the contents. And being there is no
USPS tracking number outside the US, all I can do is make sure I write your
address correctly on the customs form and on your package.
My websites are not set up to process orders and accept payments. Therefore, to place an order with me, please call either number above or send an email with a list of parts you need, with your name, complete and correct postal mailing address and phone number. For payment options, I accept cash (in person), USPS Postal Money Orders, cashier's checks, business checks, MasterCard, VISA, Discover, American Express (please add 2.5% to the total amount for the credit/debit card processor's surcharge). If paying with a credit/debit card, please call me at either number above. Or to make a payment to me through PayPal, please click this link: https://www.paypal.com. Or use Cash App (username: pullingtractor) or Venmo (username: Pullingtractor) to make a payment to me. And be sure to mention a description of what the payment is for with your full name, postal address, phone number and email address. If sending a money order or cashier's check, please include a note in the envelope with your name, complete mailing address, phone number, email address and a description of what the payment is for. I'll make a note of your order when I have all your information, and I may have to order some of the parts on your list, which should take a few days to come in, but I will send everything to you as soon as I have the parts in stock after I receive your payment.


Return To Previous Website | Top of Page | Copyright © 1996-Present. This website created, designed and maintained by A-1 Miller's Performance Enterprises
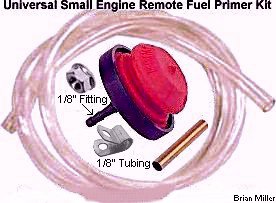

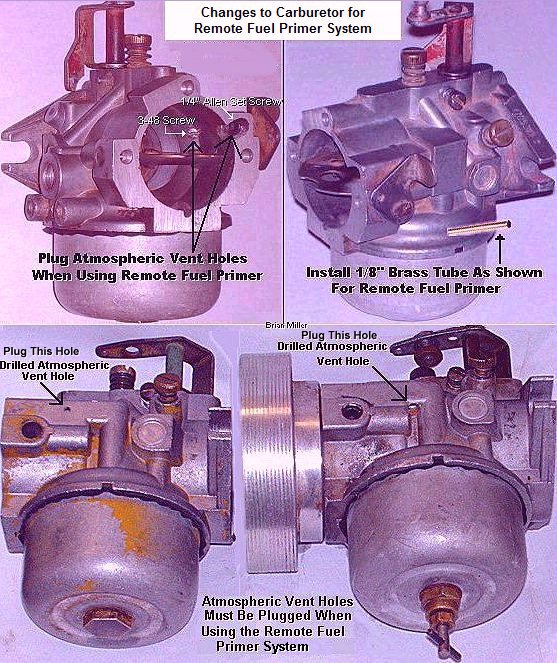 Remove the carburetor from the
engine, remove the float bowl and float.
Remove the carburetor from the
engine, remove the float bowl and float.


 FYI - Until
the late 1960s, certain Chevrolet small block
FYI - Until
the late 1960s, certain Chevrolet small block
 OEM Kohler
part # 47 559 10-S. $163.15 each, plus shipping & handling.
OEM Kohler
part # 47 559 10-S. $163.15 each, plus shipping & handling.
 Most commonly
used. OEM Kohler part # 47 559 11-S. $216.80 each, plus shipping &
handling.
Most commonly
used. OEM Kohler part # 47 559 11-S. $216.80 each, plus shipping &
handling.
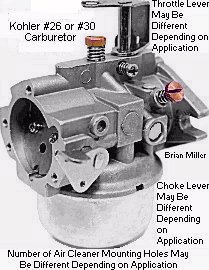
 Rebuild and/or Repair YOUR Carter, Kohler or Walbro Carburetor.
Nothing performs better than the OEM carburetor that originally came on the
engine. This is a basic rebuild service with no "high-performance" modifications
performed whatsoever. Work includes: Complete disassembly of carburetor,
thoroughly clean carburetor body and all associated parts in an
Rebuild and/or Repair YOUR Carter, Kohler or Walbro Carburetor.
Nothing performs better than the OEM carburetor that originally came on the
engine. This is a basic rebuild service with no "high-performance" modifications
performed whatsoever. Work includes: Complete disassembly of carburetor,
thoroughly clean carburetor body and all associated parts in an
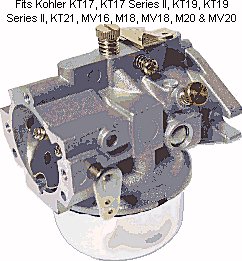

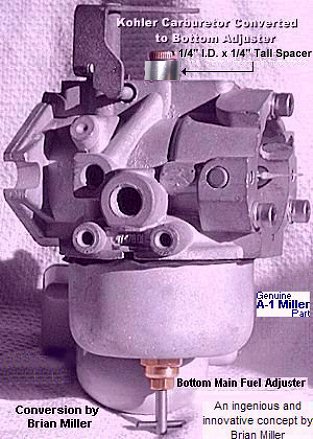 These carburetors are
modified internally for maximum performance to increase airflow into the
combustion chamber to build up maximum compression. If everything else is
set up correctly on the engine, they will allow the engine to run at maximum
RPM with no misfire whatsoever.
These carburetors are
modified internally for maximum performance to increase airflow into the
combustion chamber to build up maximum compression. If everything else is
set up correctly on the engine, they will allow the engine to run at maximum
RPM with no misfire whatsoever.
 Float Bowls with 3/8" Hole.
Fits all Carter and Kohler #26, #28, #30 carburetors used on Kohler engine
models K241, K301, K330/K331, K321, K341, K361, KT17 (first design), KT17
Series II, KT19 (first design), KT19 Series II, KT21, K482, K532 and K582.
Also fits Briggs and Stratton 7hp-12hp vertical shaft flathead engine
carburetors. NOTE: The Briggs & Stratton steel float bowl has the
exact same dimensions as the Carter or Kohler aluminum float bowl. Either
are interchangeable. (In fact, the early B&S 7-12hp vertical shaft flathead
engine float carburetors was designed and made by the
Float Bowls with 3/8" Hole.
Fits all Carter and Kohler #26, #28, #30 carburetors used on Kohler engine
models K241, K301, K330/K331, K321, K341, K361, KT17 (first design), KT17
Series II, KT19 (first design), KT19 Series II, KT21, K482, K532 and K582.
Also fits Briggs and Stratton 7hp-12hp vertical shaft flathead engine
carburetors. NOTE: The Briggs & Stratton steel float bowl has the
exact same dimensions as the Carter or Kohler aluminum float bowl. Either
are interchangeable. (In fact, the early B&S 7-12hp vertical shaft flathead
engine float carburetors was designed and made by the
 3/8" I.D. Float Bowl Retaining
Bolt Sealing Gaskets. Each listed below fits Carter or Kohler #26, #28, #30
carburetors, Walbro WHL #36, #44 carburetors, WHG #52, #60, #64 carburetors.
Also fits certain larger Briggs & Stratton and various other makes and
models of small engine carburetors. Kits Kohler engine models K241, K301,
K321, K330/K331, K341, K361, KT17 (first design), KT17 Series II, KT19 (first
design), KT19 Series II, KT21, K482, K532 and K582, M10, M12, M14, M16, MV16,
M18, MV18, M20 and MV20. Included with aftermarket and OEM Carter or Kohler
carburetor overhaul/rebuild kits. Each washer listed below .
3/8" I.D. Float Bowl Retaining
Bolt Sealing Gaskets. Each listed below fits Carter or Kohler #26, #28, #30
carburetors, Walbro WHL #36, #44 carburetors, WHG #52, #60, #64 carburetors.
Also fits certain larger Briggs & Stratton and various other makes and
models of small engine carburetors. Kits Kohler engine models K241, K301,
K321, K330/K331, K341, K361, KT17 (first design), KT17 Series II, KT19 (first
design), KT19 Series II, KT21, K482, K532 and K582, M10, M12, M14, M16, MV16,
M18, MV18, M20 and MV20. Included with aftermarket and OEM Carter or Kohler
carburetor overhaul/rebuild kits. Each washer listed below .
 Float Bowl Retaining Bolts.
Fits Carter Model N #13, #16, #18, #20, #22 carburetors used on Kohler engine
models K90/K91, K141, K160/K161,
Float Bowl Retaining Bolts.
Fits Carter Model N #13, #16, #18, #20, #22 carburetors used on Kohler engine
models K90/K91, K141, K160/K161,
 Actually, virtually the same bottom
high speed fuel adjuster design that's mentioned here was used on Briggs
& Stratton's 7-12.5hp vertical shaft flathead engine carburetors, which
was designed and made by the
Actually, virtually the same bottom
high speed fuel adjuster design that's mentioned here was used on Briggs
& Stratton's 7-12.5hp vertical shaft flathead engine carburetors, which
was designed and made by the
 Use pliers to break off the
tip of the high speed [long needle] main fuel top adjuster at the lower idle
fuel feed hole (orifice). (It's made of soft brass.) Doing this turns
the high speed adjuster into just an idle fuel vacuum tube. Preferably,
use an adjuster with a damaged tip for this conversion. There's no need to
ruin a good adjuster for this.
Use pliers to break off the
tip of the high speed [long needle] main fuel top adjuster at the lower idle
fuel feed hole (orifice). (It's made of soft brass.) Doing this turns
the high speed adjuster into just an idle fuel vacuum tube. Preferably,
use an adjuster with a damaged tip for this conversion. There's no need to
ruin a good adjuster for this.
 Idle Air/Fuel Mixture Adjustment
Screw w/Short Stepped End. Fits Carter Model N #13, #16, #18, #20, #22
carburetors with following numbers stamped on top of carburetor body: G-220517,
C-231738, B-231739, 41 053 01, 41 053 13, 41 053 18, 41 053 20 used with
Kohler engine models K90/K91, K141, K160/K161,
Idle Air/Fuel Mixture Adjustment
Screw w/Short Stepped End. Fits Carter Model N #13, #16, #18, #20, #22
carburetors with following numbers stamped on top of carburetor body: G-220517,
C-231738, B-231739, 41 053 01, 41 053 13, 41 053 18, 41 053 20 used with
Kohler engine models K90/K91, K141, K160/K161,
 High Speed Air/Fuel Mixture
Needle Adjustment Screws. Fits Carter Model N #13, #16, #18, #20 and #22
carburetors that's used on Kohler engine models K90/K91, K141,
K160/K161,
High Speed Air/Fuel Mixture
Needle Adjustment Screws. Fits Carter Model N #13, #16, #18, #20 and #22
carburetors that's used on Kohler engine models K90/K91, K141,
K160/K161, High Speed Air/Fuel Mixture
Needle Adjustment Screw. Fits certain Carter or Kohler #26, #28, #30 carburetors
used on Kohler K-series and early Magnum flathead engine models K241, K301,
K330/K331, K321, KT17 (first design), KT17 Series II, KT19 (first design),
KT19 Series II, KT21, MV16, M18, MV18, M20, MV20 and certain K532 and K582
engines. 3-3/8" overall length. Has four tiny holes midway on the stem (this
is important so the engine will idle correctly) and two holes on lower stem.
Interchangeable with discontinued Kohler high speed air/fuel adjuster part
# 52 103 01-S, which has four tiny holes midway on the stem and one hole
on lower stem. Single lower hole enlarged to help the engine start quicker
(with throttle in idle position), idle smoothly, and idle down upon deceleration
without stalling. There's no need to do this on adjusters with two lower
holes. Designed specifically for Kohler carburetors with following numbers
stamped on mounting flange: 47 053 07, 47 053 08, 47 053 12, 47 053 13, 47
053 14, 47 053 24, 47 053 29, 47 053 35, 47 053 40, 47 053 62, 47 053 80,
48 053 06 (K582), 52 053 01, 52 053 02, 52 053 09, 52 053 10, 52 053 11,
52 053 16, 52 053 18 and 52 053 28. IMPORTANT - Please check numbers on
carburetor before ordering and go here to identify the correct part for any
particular carburetor:
High Speed Air/Fuel Mixture
Needle Adjustment Screw. Fits certain Carter or Kohler #26, #28, #30 carburetors
used on Kohler K-series and early Magnum flathead engine models K241, K301,
K330/K331, K321, KT17 (first design), KT17 Series II, KT19 (first design),
KT19 Series II, KT21, MV16, M18, MV18, M20, MV20 and certain K532 and K582
engines. 3-3/8" overall length. Has four tiny holes midway on the stem (this
is important so the engine will idle correctly) and two holes on lower stem.
Interchangeable with discontinued Kohler high speed air/fuel adjuster part
# 52 103 01-S, which has four tiny holes midway on the stem and one hole
on lower stem. Single lower hole enlarged to help the engine start quicker
(with throttle in idle position), idle smoothly, and idle down upon deceleration
without stalling. There's no need to do this on adjusters with two lower
holes. Designed specifically for Kohler carburetors with following numbers
stamped on mounting flange: 47 053 07, 47 053 08, 47 053 12, 47 053 13, 47
053 14, 47 053 24, 47 053 29, 47 053 35, 47 053 40, 47 053 62, 47 053 80,
48 053 06 (K582), 52 053 01, 52 053 02, 52 053 09, 52 053 10, 52 053 11,
52 053 16, 52 053 18 and 52 053 28. IMPORTANT - Please check numbers on
carburetor before ordering and go here to identify the correct part for any
particular carburetor:
 Carburetor Mounting Screws/Bolts
w/Slotted Head and Flat Washers. Fits Kohler engine models K241, K301, K330/K331,
K321, K341, K361, M10, M12, M14 and M16 with Carter or Kohler #26, #28, #30,
or Walbro WHG #52, #60, #64 carburetor. NOTE: Use small slotted screwdriver
to start screws in threaded holes. Size: 5/16-18 UNC x 1" thread length.
Carburetor Mounting Screws/Bolts
w/Slotted Head and Flat Washers. Fits Kohler engine models K241, K301, K330/K331,
K321, K341, K361, M10, M12, M14 and M16 with Carter or Kohler #26, #28, #30,
or Walbro WHG #52, #60, #64 carburetor. NOTE: Use small slotted screwdriver
to start screws in threaded holes. Size: 5/16-18 UNC x 1" thread length.
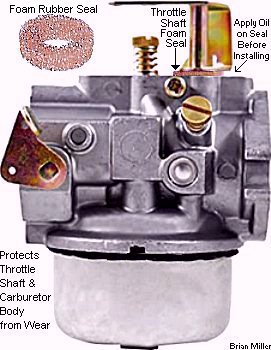
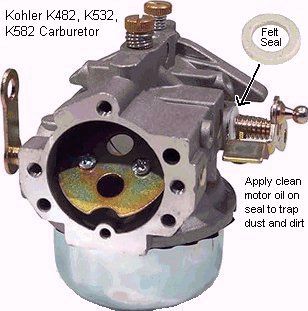 Protective Throttle Shaft
Felt Seal. Made of interconnected cloth fibers. Blocks out dust and dirt
from entering between throttle shaft and carburetor body to prevent wear
to throttle shaft and/or hole in carburetor body. Before installing, apply
clean motor oil on seal to trap dust and dirt. Fits all Kohler K482, K532,
K582 carburetors, and certain Briggs & Stratton and Tecumseh carburetors.
Dimensions (±): 7/32" I.D. (will stretch over a 1/4" shaft) x 3/8" O.D.
x 1/8" thick.
Protective Throttle Shaft
Felt Seal. Made of interconnected cloth fibers. Blocks out dust and dirt
from entering between throttle shaft and carburetor body to prevent wear
to throttle shaft and/or hole in carburetor body. Before installing, apply
clean motor oil on seal to trap dust and dirt. Fits all Kohler K482, K532,
K582 carburetors, and certain Briggs & Stratton and Tecumseh carburetors.
Dimensions (±): 7/32" I.D. (will stretch over a 1/4" shaft) x 3/8" O.D.
x 1/8" thick.
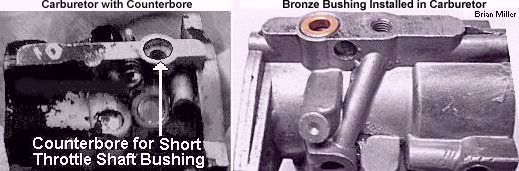
 NOTE: All Carter and Kohler #26, #28 and
#30, and early Walbro WHG #52, #60, #64 carburetors have a 1/8" depth x 7/16"
diameter counterbore to accept this short, flat bushing. If there's a [worn
or dry-rotted] rubber seal in the counterbore, this bushing will replace
it. Apply clean motor oil on throttle shaft before installing for smoother
throttle operation and less wear to shaft and/or bushing. Also, my aftermarket
flat bushings have a slight taper on the inside, but they'll still work just
fine. When I ordered them, I was disappointed when I received them. I ordered
500 of these several years ago, and there was nothing that could be done
about their design. But just install the bushing with the taper down, lubricate
it, and it should last a long time. Dimensions: 1/4" I.D. x 7/16" O.D. x
1/8" height.
NOTE: All Carter and Kohler #26, #28 and
#30, and early Walbro WHG #52, #60, #64 carburetors have a 1/8" depth x 7/16"
diameter counterbore to accept this short, flat bushing. If there's a [worn
or dry-rotted] rubber seal in the counterbore, this bushing will replace
it. Apply clean motor oil on throttle shaft before installing for smoother
throttle operation and less wear to shaft and/or bushing. Also, my aftermarket
flat bushings have a slight taper on the inside, but they'll still work just
fine. When I ordered them, I was disappointed when I received them. I ordered
500 of these several years ago, and there was nothing that could be done
about their design. But just install the bushing with the taper down, lubricate
it, and it should last a long time. Dimensions: 1/4" I.D. x 7/16" O.D. x
1/8" height.

 Throttle Shaft
Sleeve Bushings. Use each bushing listed below to repair a worn throttle
shaft through-hole in carburetor body for various makes and models of small
engines to prevent a vacuum leak, which can cause poor idling and engine
damage at higher RPMs. Bushing and throttle shaft will last longer with the
Throttle Shaft
Sleeve Bushings. Use each bushing listed below to repair a worn throttle
shaft through-hole in carburetor body for various makes and models of small
engines to prevent a vacuum leak, which can cause poor idling and engine
damage at higher RPMs. Bushing and throttle shaft will last longer with the
 3-48 UNC x 3/16" thread length
Phillips head throttle and choke plate retaining screws w/split lock washers
(liquid threadlocker not required). Fits Carter Model N #13, #16, #18, #20
or #22 carburetors installed on Kohler K-series engine models K90/K91, K141,
K160/K161,
3-48 UNC x 3/16" thread length
Phillips head throttle and choke plate retaining screws w/split lock washers
(liquid threadlocker not required). Fits Carter Model N #13, #16, #18, #20
or #22 carburetors installed on Kohler K-series engine models K90/K91, K141,
K160/K161, 

 1/4" OEM Kohler
Throttle Shafts. Fits Carter/Kohler #26, #28 and #30, and Walbro WHG #52,
#60 and #64 carburetors used on Kohler engine models K241, K301, K330/K331,
K321, K341, K361, M10, M12, M14 and M16. Lever not included; reuse lever
off of old shaft and weld on new shaft. Throttle plate not included (listed
further below) reuse OEM throttle plate. NOTE: When replacing a worn throttle
shaft in the Walbro #52 (1.07") carburetor with this particular throttle
shaft, the 1.07" aftermarket throttle plate (with 11/16" screw hole spacing
must also be used. Or when replacing a worn throttle shaft in the Walbro
#60 or #64 (1.2") carburetor with this particular throttle shaft, the holes
in the OEM Walbro throttle plate will need to be made oblong to match the
(11/16") screw hole spacing in this shaft.
1/4" OEM Kohler
Throttle Shafts. Fits Carter/Kohler #26, #28 and #30, and Walbro WHG #52,
#60 and #64 carburetors used on Kohler engine models K241, K301, K330/K331,
K321, K341, K361, M10, M12, M14 and M16. Lever not included; reuse lever
off of old shaft and weld on new shaft. Throttle plate not included (listed
further below) reuse OEM throttle plate. NOTE: When replacing a worn throttle
shaft in the Walbro #52 (1.07") carburetor with this particular throttle
shaft, the 1.07" aftermarket throttle plate (with 11/16" screw hole spacing
must also be used. Or when replacing a worn throttle shaft in the Walbro
#60 or #64 (1.2") carburetor with this particular throttle shaft, the holes
in the OEM Walbro throttle plate will need to be made oblong to match the
(11/16") screw hole spacing in this shaft.
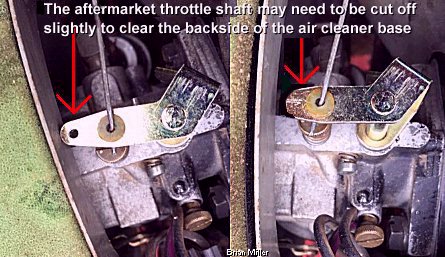
 1/4" Diameter Anodized Steel Throttle Shaft with 3/16"
hole in lever, 11/16" throttle plate screw hole spacing and small
hole in lever for throttle return or throttle stabilizer spring. Fits
Carter/Kohler #26, #28 and #30, and Walbro WHG #52, #60 and #64 carburetors
used on Kohler engine models K241, K301, K330/K331, K321, K341, K361, M10,
M12, M14 and M16. Includes screws and lock washers for throttle plate. Throttle
plate not included (listed further below) reuse OEM throttle plate. NOTE:
When replacing a worn throttle shaft in the Walbro #52 (1.07") carburetor
with this particular throttle shaft, the 1.07" aftermarket throttle plate
(with 11/16" screw hole spacing must also be used. Or when replacing a worn
throttle shaft in the Walbro #60 or #64 (1.2") carburetor with this particular
throttle shaft, the holes in the OEM Walbro throttle plate will need to be
made oblong to match the (11/16") screw hole spacing in this shaft. New.
High quality aftermarket. Replaces Kohler part #'s 47 144 35-S (discontinued)
and 47 144 36-S. $25.00 each, plus shipping & handling.
1/4" Diameter Anodized Steel Throttle Shaft with 3/16"
hole in lever, 11/16" throttle plate screw hole spacing and small
hole in lever for throttle return or throttle stabilizer spring. Fits
Carter/Kohler #26, #28 and #30, and Walbro WHG #52, #60 and #64 carburetors
used on Kohler engine models K241, K301, K330/K331, K321, K341, K361, M10,
M12, M14 and M16. Includes screws and lock washers for throttle plate. Throttle
plate not included (listed further below) reuse OEM throttle plate. NOTE:
When replacing a worn throttle shaft in the Walbro #52 (1.07") carburetor
with this particular throttle shaft, the 1.07" aftermarket throttle plate
(with 11/16" screw hole spacing must also be used. Or when replacing a worn
throttle shaft in the Walbro #60 or #64 (1.2") carburetor with this particular
throttle shaft, the holes in the OEM Walbro throttle plate will need to be
made oblong to match the (11/16") screw hole spacing in this shaft. New.
High quality aftermarket. Replaces Kohler part #'s 47 144 35-S (discontinued)
and 47 144 36-S. $25.00 each, plus shipping & handling.
 1/4" Diameter Anodized Steel
Throttle Shaft with 1/4" ball integrated with lever and 11/16"
throttle plate screw hole spacing. Fits OEM Kohler #26, #28 and #30, or Walbro
WHG #52, #60 and #64 carburetors used on Kohler engine models K241, K301,
K330/K331, K321, K341, K361, M10, M12, M14 and M16. Replaces OEM Kohler AQS
"Quiet Line" #26, #28 and #30 carburetor throttle shafts. Includes screws
and lock washers for throttle plate. Throttle plate not included (listed
further below) reuse OEM throttle plate. NOTE: When replacing a worn throttle
shaft in the Walbro #52 (1.07") carburetor with this particular throttle
shaft, the 1.07" aftermarket throttle plate (with 11/16" screw hole spacing
must also be used. Or when replacing a worn throttle shaft in the Walbro
#60 or #64 (1.2") carburetor with this particular throttle shaft, the holes
in the OEM Walbro throttle plate can be made oblong to match the (11/16")
screw hole spacing in this shaft. New. High quality aftermarket. Replaces
Kohler part #'s 47 144 35-S (discontinued) and 47 144 36-S. $26.00
each, plus shipping & handling.
1/4" Diameter Anodized Steel
Throttle Shaft with 1/4" ball integrated with lever and 11/16"
throttle plate screw hole spacing. Fits OEM Kohler #26, #28 and #30, or Walbro
WHG #52, #60 and #64 carburetors used on Kohler engine models K241, K301,
K330/K331, K321, K341, K361, M10, M12, M14 and M16. Replaces OEM Kohler AQS
"Quiet Line" #26, #28 and #30 carburetor throttle shafts. Includes screws
and lock washers for throttle plate. Throttle plate not included (listed
further below) reuse OEM throttle plate. NOTE: When replacing a worn throttle
shaft in the Walbro #52 (1.07") carburetor with this particular throttle
shaft, the 1.07" aftermarket throttle plate (with 11/16" screw hole spacing
must also be used. Or when replacing a worn throttle shaft in the Walbro
#60 or #64 (1.2") carburetor with this particular throttle shaft, the holes
in the OEM Walbro throttle plate can be made oblong to match the (11/16")
screw hole spacing in this shaft. New. High quality aftermarket. Replaces
Kohler part #'s 47 144 35-S (discontinued) and 47 144 36-S. $26.00
each, plus shipping & handling.
 Throttle Shaft Conversion Kit
#1. Includes: High quality aftermarket new style anodized steel throttle
shaft with 3/16" hole in lever (no integrated ball), two throttle
plate retaining screws, idle speed screw and compression spring.
$28.00 each, plus shipping & handling.
Throttle Shaft Conversion Kit
#1. Includes: High quality aftermarket new style anodized steel throttle
shaft with 3/16" hole in lever (no integrated ball), two throttle
plate retaining screws, idle speed screw and compression spring.
$28.00 each, plus shipping & handling.

 Remove the old-style Carter throttle shaft.
 Throttle Plate. Fits Carter Model
N #13 and #16 carburetors with a .810" diameter throttle bore that's originally
installed on Kohler K-series engine models K90/K91 and certain low RPM K141.
Hard to find part. Obsolete OEM Carter or Kohler part number.
Throttle Plate. Fits Carter Model
N #13 and #16 carburetors with a .810" diameter throttle bore that's originally
installed on Kohler K-series engine models K90/K91 and certain low RPM K141.
Hard to find part. Obsolete OEM Carter or Kohler part number.
 Throttle Plate. Fits Carter Model
N #18, #20 and #22 carburetors with .823" diameter throttle bore that's
originally installed on Kohler K-series engine models K141, K160/K161,
Throttle Plate. Fits Carter Model
N #18, #20 and #22 carburetors with .823" diameter throttle bore that's
originally installed on Kohler K-series engine models K141, K160/K161,
 Throttle Plate. Fits Carter
and Kohler #26, and aftermarket carburetors with 1.07" diameter throttle
bore that's originally installed on Kohler K-series engine models K241, K301,
K330/K331, KT17 (first design), KT17 Series II, KT19 (first design), KT19
Series II, KT21, K482 and K532. To be used with OEM Carter, Kohler or aftermarket
throttle shafts with 11/16" screw hole spacing (listed above).
Throttle Plate. Fits Carter
and Kohler #26, and aftermarket carburetors with 1.07" diameter throttle
bore that's originally installed on Kohler K-series engine models K241, K301,
K330/K331, KT17 (first design), KT17 Series II, KT19 (first design), KT19
Series II, KT21, K482 and K532. To be used with OEM Carter, Kohler or aftermarket
throttle shafts with 11/16" screw hole spacing (listed above).
 Throttle Plate. Fits early Carter
#28 and aftermarket carburetors with 1.17" diameter throttle bore that's
originally installed on early Kohler K-series engine model K321 with the
1-1/8" exhaust valve and small intake port. Designed to be used with OEM
Carter, Kohler or aftermarket throttle shafts with 11/16" screw hole spacing
(listed above). Anodized steel.
Throttle Plate. Fits early Carter
#28 and aftermarket carburetors with 1.17" diameter throttle bore that's
originally installed on early Kohler K-series engine model K321 with the
1-1/8" exhaust valve and small intake port. Designed to be used with OEM
Carter, Kohler or aftermarket throttle shafts with 11/16" screw hole spacing
(listed above). Anodized steel.
 Throttle Plate. Fits Carter
and Kohler #30 carburetors with 1.2" diameter throttle bore that's originally
installed on Kohler engine models K321 (later model with the 1-3/8" exhaust
valve and large intake port), K341 and K582. Designed to be used with OEM
Carter, Kohler or aftermarket throttle shafts with 11/16" screw hole spacing
(listed above).
Throttle Plate. Fits Carter
and Kohler #30 carburetors with 1.2" diameter throttle bore that's originally
installed on Kohler engine models K321 (later model with the 1-3/8" exhaust
valve and large intake port), K341 and K582. Designed to be used with OEM
Carter, Kohler or aftermarket throttle shafts with 11/16" screw hole spacing
(listed above).
 Choke
Plate. Fits Carter Model N #13 and #16 carburetors with the .810" throttle
bore that's originally installed on Kohler engine models K90/K91. Hard to
find part.
Choke
Plate. Fits Carter Model N #13 and #16 carburetors with the .810" throttle
bore that's originally installed on Kohler engine models K90/K91. Hard to
find part.
 Choke
Plate. Fits Carter Model N #18, #20 and #22 carburetors with the .823"" throttle
bore that's originally installed on Kohler engine models K141, K160/K161,
Choke
Plate. Fits Carter Model N #18, #20 and #22 carburetors with the .823"" throttle
bore that's originally installed on Kohler engine models K141, K160/K161,
 Choke
Plates. Fits Carter and Kohler #26 carburetors with the 1.07" throttle bore
that's originally installed on Kohler engine models K241, K301, K330/K331,
KT17 (first design), KT17 Series II, KT19 (first design), KT19 Series II,
KT21, MV16, M18, MV18, M20 and MV20.
Choke
Plates. Fits Carter and Kohler #26 carburetors with the 1.07" throttle bore
that's originally installed on Kohler engine models K241, K301, K330/K331,
KT17 (first design), KT17 Series II, KT19 (first design), KT19 Series II,
KT21, MV16, M18, MV18, M20 and MV20.
 Choke
Plate. Fits Carter and Kohler #28 carburetors with the 1.17" throttle bore
that's originally installed on early Kohler engine model K321 with the 1-1/8"
exhaust valve and small intake port. Hard to find part.
Choke
Plate. Fits Carter and Kohler #28 carburetors with the 1.17" throttle bore
that's originally installed on early Kohler engine model K321 with the 1-1/8"
exhaust valve and small intake port. Hard to find part.
 Choke
Plate. Fits Carter and Kohler #30 carburetors with 1.2" and 1.25" throttle
bore that's originally installed on Kohler K-series engine models K321 (later
models with the 1-3/8" exhaust valve and large intake port), K341, K361,
K482, K532 and K582.
Choke
Plate. Fits Carter and Kohler #30 carburetors with 1.2" and 1.25" throttle
bore that's originally installed on Kohler K-series engine models K321 (later
models with the 1-3/8" exhaust valve and large intake port), K341, K361,
K482, K532 and K582.
 Choke Shafts w/Lever. Fits Kohler
engine models KT17 (first design), KT17 Series II, KT19 (first design), KT19
Series II, KT21, MV16, M18, MV18, M20 and MV20. Each includes retaining screws
w/lock washers for choke plate. NOTE - The Walbro choke plate retaining
screw holes will need to be elongated or made oblong to line up with the
screw holes in the aftermarket choke shaft. And apply clean motor
oil on shaft before installing for smooth operation and less wear to shaft
and/or carburetor body.
Choke Shafts w/Lever. Fits Kohler
engine models KT17 (first design), KT17 Series II, KT19 (first design), KT19
Series II, KT21, MV16, M18, MV18, M20 and MV20. Each includes retaining screws
w/lock washers for choke plate. NOTE - The Walbro choke plate retaining
screw holes will need to be elongated or made oblong to line up with the
screw holes in the aftermarket choke shaft. And apply clean motor
oil on shaft before installing for smooth operation and less wear to shaft
and/or carburetor body.
 1/8" Diameter x 1/2" Length
Choke Shaft Friction (Detent) Compression Spring. Fits Carter and Kohler
#26, #28 and #30 carburetors. Also fits gear shifter in Peerless transaxle
model 2300. Reinstall lost/misplaced ball or broken spring so shifter will
remain engaged.
1/8" Diameter x 1/2" Length
Choke Shaft Friction (Detent) Compression Spring. Fits Carter and Kohler
#26, #28 and #30 carburetors. Also fits gear shifter in Peerless transaxle
model 2300. Reinstall lost/misplaced ball or broken spring so shifter will
remain engaged.
 5/32" Diameter Choke Shaft Friction
(Detent) Ball. Fits Walbro WHG #52, #60 and #64 carburetors.
5/32" Diameter Choke Shaft Friction
(Detent) Ball. Fits Walbro WHG #52, #60 and #64 carburetors.
 5/32" Diameter x 1/2" Length
Choke Shaft Friction (Detent) Compression Spring. Fits Walbro WHG #52, #60
and #64 carburetors.
5/32" Diameter x 1/2" Length
Choke Shaft Friction (Detent) Compression Spring. Fits Walbro WHG #52, #60
and #64 carburetors.


 Push-In Nylon
Throttle Link Retaining Bushing. Can be replaced with either bushing below.
OEM Kohler part # 25 158 08-S. $4.95 each, plus shipping & handling.
Push-In Nylon
Throttle Link Retaining Bushing. Can be replaced with either bushing below.
OEM Kohler part # 25 158 08-S. $4.95 each, plus shipping & handling.
 NOTE: The tiny metal push-on
self-locking retaining clip/ring (part # 25 141 03-S) shown to the right
for the .080" diameter throttle link is no longer available from Kohler.
Use either of the nylon bushings listed above as a perfect replacement.
NOTE: The tiny metal push-on
self-locking retaining clip/ring (part # 25 141 03-S) shown to the right
for the .080" diameter throttle link is no longer available from Kohler.
Use either of the nylon bushings listed above as a perfect replacement. 1-3/4" metal vented ordinary
fuel/gas caps w/alcohol-resistant paper-like anti-splash sealing gasket.
1-3/4" metal vented ordinary
fuel/gas caps w/alcohol-resistant paper-like anti-splash sealing gasket.
 1-3/4" metal vented safety fuel/gas
cap w/alcohol-resistant neoprene rubber sealing gasket, fuel baffle/splash
shield and foam rubber
(
1-3/4" metal vented safety fuel/gas
cap w/alcohol-resistant neoprene rubber sealing gasket, fuel baffle/splash
shield and foam rubber
( Alcohol-resistant neoprene rubber
O-ring for inside of 1-3/4" fuel/gas caps. Provides a better seal against
the rim of a slightly bent or damaged filler neck on gas tank to lessen loss
of fuel when tank is full. For a better seal, pry out and install under
paper-like gasket material in gas cap. Fits snug in gas cap. $1.00
each, plus shipping & handling.
Alcohol-resistant neoprene rubber
O-ring for inside of 1-3/4" fuel/gas caps. Provides a better seal against
the rim of a slightly bent or damaged filler neck on gas tank to lessen loss
of fuel when tank is full. For a better seal, pry out and install under
paper-like gasket material in gas cap. Fits snug in gas cap. $1.00
each, plus shipping & handling.
 Vented Gas Cap/Fuel Level Gauge
w/Ribbing. Replace deteriorated, damaged or missing gas cap for safety. Fits
I-built Cub Cadet garden tractor models 70, 71, 72, 73, 86, 100, 102, 104,
105, 106, 107, 108, 109, 122, 123, 124, 125, 126, 127, 128, 129, 147, 149,
169, 1100, including Cub Cadet AQS "Quiet Line" garden tractor models 800,
1000, 1200, 1250, 1450 and 1650 with serial number 560209 and lower. Replaces
gas caps (without gauge) listed above. Fits metal and plastic gas tanks with
1-3/4" threaded inlet and 5" depth. 5-1/2" overall length.
Vented Gas Cap/Fuel Level Gauge
w/Ribbing. Replace deteriorated, damaged or missing gas cap for safety. Fits
I-built Cub Cadet garden tractor models 70, 71, 72, 73, 86, 100, 102, 104,
105, 106, 107, 108, 109, 122, 123, 124, 125, 126, 127, 128, 129, 147, 149,
169, 1100, including Cub Cadet AQS "Quiet Line" garden tractor models 800,
1000, 1200, 1250, 1450 and 1650 with serial number 560209 and lower. Replaces
gas caps (without gauge) listed above. Fits metal and plastic gas tanks with
1-3/4" threaded inlet and 5" depth. 5-1/2" overall length.
 Vented Gas Caps/Fuel Level
Gauge w/Projected Grips. Replace deteriorated, damaged or missing gas cap
for safety. Fits I-built Cub Cadet AQS "Quiet Line" garden tractor models
800, 1000, 1200, 1250, 1450 and 1650 with serial number 560210 and higher.
Fits plastic gas tank with 2" threaded inlet and 5" depth. 5-1/2" overall
length.
Vented Gas Caps/Fuel Level
Gauge w/Projected Grips. Replace deteriorated, damaged or missing gas cap
for safety. Fits I-built Cub Cadet AQS "Quiet Line" garden tractor models
800, 1000, 1200, 1250, 1450 and 1650 with serial number 560210 and higher.
Fits plastic gas tank with 2" threaded inlet and 5" depth. 5-1/2" overall
length.
 Vented Gas Caps/Fuel Level Gauge
w/Projected Grips. Replace deteriorated, damaged or missing gas cap for safety.
Fits Cub Cadet garden tractor models 482, 580, 582, 582 Special, 680, 682,
782, 784, 982, 984, 986, 1204, 1210, 1211, 1282, 1604, 1606, 1710, 1711,
1712, 1806, 1810, 1811, 1812, 1872, 1912, 1914 and 2072. Fits plastic gas
tank with 2" threaded inlet and 10" depth. 10-5/8" overall length.
Vented Gas Caps/Fuel Level Gauge
w/Projected Grips. Replace deteriorated, damaged or missing gas cap for safety.
Fits Cub Cadet garden tractor models 482, 580, 582, 582 Special, 680, 682,
782, 784, 982, 984, 986, 1204, 1210, 1211, 1282, 1604, 1606, 1710, 1711,
1712, 1806, 1810, 1811, 1812, 1872, 1912, 1914 and 2072. Fits plastic gas
tank with 2" threaded inlet and 10" depth. 10-5/8" overall length.
 Universal Electric Fuel Level
Gauge Kit. 2" gauge can be mounted in dash of tractor or control panel of
equipment. (Use a 2"
Universal Electric Fuel Level
Gauge Kit. 2" gauge can be mounted in dash of tractor or control panel of
equipment. (Use a 2"
 Fits 33/64" (1/2") hole in
bottom of gas tank. (Most common size.) Designed for IH Cub Cadet
AQS "Quiet Line" garden tractors and MTD-built Cub Cadet garden tractors.
Replaces AMF 42690; Ariens 07509300, 07511400; Bolens 1738433; Briggs Power
Products 78299GS; Exmark 1-513645; Ferris 22151; Lawn-Boy 104047, 708331,
46-6560; GW-B1738433, 581615; MTD (Cub Cadet) 735-0149, 751-3008, 935-0149;
Murray 42690; Noma 44847; Scag 48309; Simplicity 1654930; Snapper 12337,
74158, 7012337, 7074158; Tecumseh 33679; Toro 46-6560, 1-513645, E513645;
Wheel Horse/Toro 104047, 104047P.
Fits 33/64" (1/2") hole in
bottom of gas tank. (Most common size.) Designed for IH Cub Cadet
AQS "Quiet Line" garden tractors and MTD-built Cub Cadet garden tractors.
Replaces AMF 42690; Ariens 07509300, 07511400; Bolens 1738433; Briggs Power
Products 78299GS; Exmark 1-513645; Ferris 22151; Lawn-Boy 104047, 708331,
46-6560; GW-B1738433, 581615; MTD (Cub Cadet) 735-0149, 751-3008, 935-0149;
Murray 42690; Noma 44847; Scag 48309; Simplicity 1654930; Snapper 12337,
74158, 7012337, 7074158; Tecumseh 33679; Toro 46-6560, 1-513645, E513645;
Wheel Horse/Toro 104047, 104047P.
 Fits 35/64" (9/16") hole
in bottom of gas tank. Designed for fuel tank on Kohler Magnum engines.
Fits 35/64" (9/16") hole
in bottom of gas tank. Designed for fuel tank on Kohler Magnum engines.