 |
|
 |
|
|
|
Nowadays, prices are subject to change without notice. Click
Refresh to see any
changes or updates. Optimized for 1152 x 864 computer screen resolution.
To search for a word or phrase in any of my websites, press the CTRL
 and F
and F  keys on
your keyboard simultaneously to open the Find or Search dialog box in your
web browser. And being I have no
apprentice to update and pay for my websites so they'll
continue to be on the Internet, they will be removed forever when I'm no
longer around.
keys on
your keyboard simultaneously to open the Find or Search dialog box in your
web browser. And being I have no
apprentice to update and pay for my websites so they'll
continue to be on the Internet, they will be removed forever when I'm no
longer around.
| How to Widen OEM Stamped Steel Wheels | How to Change a Tire on a Wheel | How to Patch a Pin Hole in an Inner Tube |
The Differences Between Turf and Lug Tread Tires:
|
 LUG or
"Chevron" tread tires have the traditional farm tractor
or agricultural type of tread with angled and protruding bars. Lug tread
provides superior traction on clay/dirt for pulling heavy loads, but it'll
tear up grass around turns. LUG or
"Chevron" tread tires have the traditional farm tractor
or agricultural type of tread with angled and protruding bars. Lug tread
provides superior traction on clay/dirt for pulling heavy loads, but it'll
tear up grass around turns.
|
The rule of thumb for ALL competition pulling tractors is to get the front end as low as possible for better weight distribution and leverage. By doing this, the rear of the tractor and hitch is "raised up," and when the weight box on the sled starts to place pressure on the hitch, this will make it harder to raise the front end, causing the rear tires to bite or dig in more. Also, the front tires should be smaller (shorter in height) because all they do is support the front end and steer the tractor. And the rear tires should be bigger because they must support most of the weight of the entire tractor when pulling and provide the traction.
Always try to purchase pulling tires in a MATCHED SET!
Being rubber expands and decompresses as it cools, not all tires are manufactured to have the same exact height. Most reputable tire dealers that sell professional pulling tires offer them in pairs of the same height so the tractor will pull straight down the track. This is why it's important to try to match pulling tires that have the same height so one tire won't be slightly taller than the other. The most accurate way to know the height of each tire is to mount them on the same width wheel with about 10 psi of air pressure, then use a tape measure to measure the circumference at the center of the tread, and write the height in the tire. The circumference of each tire can vary when not mounted and properly inflated. Because when tires are stored stacked on one another or side by side on a rack, the circumference can't be accurately measured (when it isn't mounted and properly inflated).
If you plan to use Carlisle's 23-8.50x12 or 23-10.50x12 tires for competition pulling, you really need a set of the 4-ply tires to be competitive. Avoid using 2-ply lug tires for competition pulling! The lugs on 2-ply tires will bend back when the tires dig in the dirt, causing the tires to lose valuable traction, and being 4-ply tires are "firmer," the lugs on 4-ply tires will stay rigid when the tires dig in the dirt. The 4 ply tires stiffens the entire tire, including the lugs. 6- or even 8-ply tires works even better for pulling! And always match the wheels to the size (width) of the tire! For example: for 8-1/2" wide wheels, it's best to use 23-8.50x12 tires. The middle number in the tire size represents the width of the sidewall bulge when the tire is fully inflated and mounted on the proper width wheel.
FYI - For appearance reasons, the 4.10/3.50x4 front tires is the correct proportional size to the 23-10.50x12 rear tires. The 4.10/3.50x6, 13-5.00x6 or 3.50x6 (Tri-Rib) front tires is the correct proportional size to the 26-12.00x12 rear tires. And the 3.50x8 (Tri-Rib) front tires is more suited or looks better on a "big wheel" mini-rod competition pulling tractor with the 18.4-16.1 rear tires.
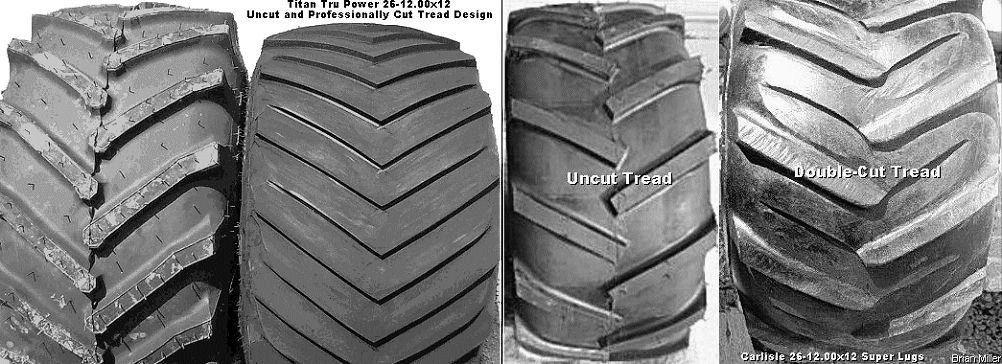
And if you're running a set of new 26-12.00x12 Carlisle tires, well, these tires can pull with the best of them when the lugs are professionally "double-cut." Cut or angled lugs act like a wedge that digs in and grip the dirt better to pull the vehicle further. To double-cut the lugs for more traction, first cut the backside of the lugs so they'll be at a 45º angle, more or less (slope them back). If a 45º angle don't look quite right, sharpen the lugs at a 30º angle, more or less. Then cut a wedge between the lugs (the flat part) about 1/4" deep so this area will grip the dirt, too.
If you're wondering how to cut, sharpen or reshape tire lugs, use a 4" handheld angle grinder with a metal tire tread cutting disc to cut or reshape our tire lugs. Tread cutting or grinding makes a big mess, so you may want to do outside your shop. You can also use an electric wood planer to cut the lugs. Electric wood planers works great and they make little smoke.
"Professional" VS "Non-Professional" Pulling Tires -
Certain pulling club's sanctioning rules state that "no professional pulling tires shall be used in a stock class," Ever wondered what the difference between a "professional" and "non-professional" pulling tire is? Well, professional pulling tires come from the factory with molded/sharpened lugs. They're used mainly on the higher horsepower tractors for better traction. And non-professional pulling tires have squared/unsharpened lugs. They're used mainly on stock competition pulling tractors (when rules require them), probably for economical reasons.
Non-professional garden tractor
pulling tires are:
Carlisle Tru Power,
Duro HF255,
Firestone Flotation 23, Carlisle Super Lug (no longer
available), etc. Mostly in the 26-12.00x12 size (26" overall height, 12.00"
sidewall width, and 12" rim diameter when fully inflated), but some garden
tractor pulling clubs/associations require a maximum tire size of 23-10.50x12
in certain class(es). (23" overall height, 10.50" sidewall width, and 12"
rim diameter when fully inflated.)
Professional garden tractor
pulling tires are:
Mayhill Giant Puller (formally Pioneer and Dick Cepek),
LawnTec,
Nichols Pulling Edge and
Vogel's VM. Mostly in the 26-12.00x12 size.
And when it comes to "hardening the tread," most new tires come with soft rubber on the outer edge of the tread. As the thread wears, the rubber gets harder further down into the tread. All tires are like this, even automotive tires. For a pulling tire to grip the dirt better and to prevent the lugs from "bending or laying back" when under pressure, the process of hardening the tread is to draw the oil from the rubber so the outer part of the tread will be harder. And the older a pulling tire gets, the better edge it will hold because the oil dries out and the rubber gets hard.
Adjust or Set the Air Pressure According to Track Conditions for Best Traction!
 When inflating your [rear] tires, add air pressure so that the entire width
of the tread will lay flat and evenly on the ground. Too little pressure
will allow the outside edges of the tread to make most contact with the ground
resulting in poor traction, plus the tire will be shortened in overall height.
The opposite will happen with too much pressure. With too little pressure,
the hitch height will also be lowered when the weight of the sled comes up
on the tractor while the tractor is pulling down the track.
When inflating your [rear] tires, add air pressure so that the entire width
of the tread will lay flat and evenly on the ground. Too little pressure
will allow the outside edges of the tread to make most contact with the ground
resulting in poor traction, plus the tire will be shortened in overall height.
The opposite will happen with too much pressure. With too little pressure,
the hitch height will also be lowered when the weight of the sled comes up
on the tractor while the tractor is pulling down the track.
As tire pressure varies from one tire manufacturer to another, and depending on the width of the wheels that's being used, it seems that Carlisle tires seems to work best with about 10 p.s.i. Pioneer (formerly Dick Cepek) seems to work best with 4-6 p.s.i., when mounted on 12"-13" wide wheels. But use your own judgment when inflating tires! Actually, this is how to tell if the pressure is right: on a hard, dry track, immediately after making a pull, look at the tread for uneven scraping before moving the tractor away from the sled (as this will destroy any evidence on the tread). If there's a lot of scraping in the center of the tread, let some air out of the tires.
 If a tire slips on the rim when
pulling due to running low air pressure, then the wheel needs to be screwed
to the tire. Although RTV silicone adhesive can be used, the best way to
prevent tire/rim slippage is to install tire screws. Tire screws are very
short and self-tapping. Install 6 screws per wheel equally spaced apart only
on one side of each wheel. If using an inner tube, and if the wheel slips
on the tire, without tire screws, the slippage could rip off the valve stem
and ruin the tube. Tire screws can be acquired at a local auto parts store
or off of eBay.
If a tire slips on the rim when
pulling due to running low air pressure, then the wheel needs to be screwed
to the tire. Although RTV silicone adhesive can be used, the best way to
prevent tire/rim slippage is to install tire screws. Tire screws are very
short and self-tapping. Install 6 screws per wheel equally spaced apart only
on one side of each wheel. If using an inner tube, and if the wheel slips
on the tire, without tire screws, the slippage could rip off the valve stem
and ruin the tube. Tire screws can be acquired at a local auto parts store
or off of eBay.
Pulling tire sizes are determined by the overall height, maximum width (including the side wall bulge) and the inside diameter. For example, 26-12.00x12 size represents that the tire is 26" tall (when fully inflated), has an overall width of 12" (bulge of sidewalls) and mounts on a 12" diameter wheel. These tires originally mount on 10.5" wide wheels, but for pulling purposes, it's best to mount them on 12" or 13" (which is better) wide wheels so the tread will lay flat. And mount 23-10.50x12 tires on 11" wide wheels so the tread will have better ground contact.
 As far as wheel width is concerned, the correct width for most 26x12.00-12
pulling tires is 13" (when measured inside the wheel rims - see drawing).
Actually, the correct wheel width for any pulling tire should be equal
to or slightly more than the middle number of the tire size (maximum side
wall bulge). This allows all of the tread to lay flat on the ground when
the tire is inflated to about 10 p.s.i. air pressure. If a wheel is too narrow,
the center of the tread will make most contact with the ground. Air pressure
can be reduced with narrow wheels for improved ground contact, but this will
cause the circumference of the tires to become smaller and it'll also cause
the hitch to lower when the
sled's weight is on the tractor, losing valuable
ground speed, traction and proper weight transfer.
As far as wheel width is concerned, the correct width for most 26x12.00-12
pulling tires is 13" (when measured inside the wheel rims - see drawing).
Actually, the correct wheel width for any pulling tire should be equal
to or slightly more than the middle number of the tire size (maximum side
wall bulge). This allows all of the tread to lay flat on the ground when
the tire is inflated to about 10 p.s.i. air pressure. If a wheel is too narrow,
the center of the tread will make most contact with the ground. Air pressure
can be reduced with narrow wheels for improved ground contact, but this will
cause the circumference of the tires to become smaller and it'll also cause
the hitch to lower when the
sled's weight is on the tractor, losing valuable
ground speed, traction and proper weight transfer.
If a pulling club's rules require that 23-10.50x12 lug tires to be used, then these tires can be mounted on 12" wide wheels. I've seen this done many times on competition pulling tractors with great results. The wider wheels will allow the tire tread to lay flatter for better traction, but it'll also shorten the overall tire height slightly which will reduce the tractor's ground speed. Therefore, to regain the ground speed, if it's a Cub Cadet garden tractor, perhaps installing 10% overdrive gears should do the trick. Also, 23-10.50x12 inner tubes may need to be installed to get the tire(s) to take air due to the wider wheels and narrow tires.
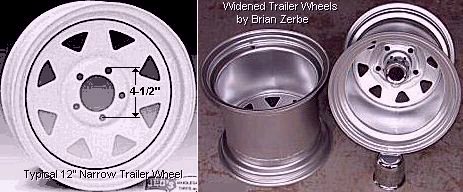
 To determine the bolt pattern of a wheel (or mounting flange),
measure from the outer edge of one bolt hole to the center of another that's
farthest away. Most 5-hole stamped steel garden tractor wheels have a bolt
pattern (circle diameter) of 4-1/2". This is the same bolt pattern used on
most early domestic (American made) Ford car wheels, domestic (American made)
Chrysler, Dodge, Plymouth cars and 1/2 ton trucks, and most 5-hole utility
trailer wheels have the 4-1/2" bolt pattern. For garden tractors, virtually
any 12" trailer wheel can be widened to whatever width it needs to be to
match the tire to be mounted on it.
To determine the bolt pattern of a wheel (or mounting flange),
measure from the outer edge of one bolt hole to the center of another that's
farthest away. Most 5-hole stamped steel garden tractor wheels have a bolt
pattern (circle diameter) of 4-1/2". This is the same bolt pattern used on
most early domestic (American made) Ford car wheels, domestic (American made)
Chrysler, Dodge, Plymouth cars and 1/2 ton trucks, and most 5-hole utility
trailer wheels have the 4-1/2" bolt pattern. For garden tractors, virtually
any 12" trailer wheel can be widened to whatever width it needs to be to
match the tire to be mounted on it.
Adapting Wheels for Use with a Different Axle Flange Bolt Pattern -
When adapting Douglas or Real Racing aluminum wheels or stamped steel garden tractor wheels to an axle flange with a different bolt pattern, new holes will need to be drilled in the flanges. For precision accuracy and so the wheels will not run off-center or move "up and down" when rotating, the holes in the flanges must be drilled in a super spacer that's fastened on the table of a milling machine. The bolt pattern for most 5 hole stamped steel garden tractor wheels is 4.500". This means that the center of the super spacer needs to be moved 2.250" offset. Then each hole will need to be drilled precisely in five positions, starting at 0°, then at 72°, 144°, 216° and finally at 288°. If the holes are not drilled this way, the wheels will not be centered with the axles. Automotive wheels can be adapted to another vehicle using this method too, as long as the flange is big enough to accept a larger bolt pattern. IE: Using early Chevy car wheels with the 4-3/4" bolt pattern on a Ford 9" truck rear end axles with 5-1/2" bolt pattern. New Chevy bolt holes can be drilled between the Ford wheel holes.
Using Garden Tractor Wheels on a Small Wheel (26-12.00x12 tire size) Mini-Rod with an Automotive Rear End -
All 5 hole 12" stamped steel garden tractor and utility trailer wheels have the 4.500" (4-1/2") bolt pattern. An early model 8" or 9" Ford car axle flange will work with 12" stamped steel garden tractor and utiliity trailer wheels because these have the same bolt pattern. But to use a Ford truck or GM car or truck axle with 12" steel garden tractor wheels, the centers will need to be removed from each rim (wheel), and then true-up and weld-in the automotive centers in the 12" wheels. 1/4" thickness plate steel made perfectly round with the 5 hole 4-1/2" bolt pattern precisely centered can be welded in stamped steel garden tractor rims (wheels), too. Make sure the offset back-spacing is set correctly, too! Go here: Wheel Bolt Pattern Cross Reference Database and Conversion Guide. To find a set of wheels with the bolt pattern that's needed, try a local automotive salvage yard, search eBay or Craigslist.
Vehicles with the 5 x 4.5" (Garden Tractor) Wheel Bolt Pattern -
| 1998-03 ACURA 3.2 CL V-6 1996 ACURA 3.2TL, 3.5RL 1997-01 ACURA INTEGRA TYPE-R 1991-05 ACURA LEGEND 2001 ACURA MDX 1991-05 ACURA NSX 1996-04 ACURA RL 3.5 2001-06 ACURA RSX 2004-08 ACURA TL 1996-03 ACURA TL 3.2 2004-08 ACURA TSX
1989 AMC EAGLE TALON AUSTIN HEALEY 3000 2004 BENTLEY CONTINENTAL GT
1998 CHRYSLER 300M 1997 DAEWOO LEGANZA, PRINCE
1949-85 DODGE ALL 1/2 TON TRUCK, VAN
1968-84 FORD 1/2 TON E-100 VAN
1998 HONDA ACCORD (V-6) All HUDSON
2006-08 HYUNDAI AZERA
2004-08 INFINITI FX35/45 1997-02 ISUZU OASIS
1980 JEEP CHEROKEE |
2004-08 KIA AMANTI 2007-08 KIA OPTIMA 2.4L, 2.7L 2007-08 KIA RONDO LX, EX 2002-05 KIA SEDONA 2007-08 KIA SENTRY 2005-8 KIA SPORTAGE LX, EX
2002 LAND ROVER FREELANDER
1992-06 LEXUS ES 330
2003-05 LINCOLN AVIATOR
2004 MAZDA 3
1995-96 NISSAN 240SX, SE |
Remember - when choosing or widening a set of stamped steel garden tractor or small trailer wheels, purchase them or have them made/modified so they'll set as close as possible to the tractor frame. This will allow for a narrow wheel base width on the rear because it's hard to guide a tractor with one's body weight when the wheels set out a lot. The reason for this is if a tractor starts heading toward the boundary line, one would need to shift their body weight or lean less with tires that set inward or closer together. Narrowing of the fenders may need to be done also in order to position the wheels close as possible to the frame. This way, the operator can lean less and have better control of the tractor. Move and reweld the centers in steel wheels if necessary to accomplish this.
![]() To Move or Relocate the Centers
in Stamped Steel Wheels...
To Move or Relocate the Centers
in Stamped Steel Wheels...
What does "offset" of the wheel mean?
The offset of a wheel is where the center section is positioned in the wheel. If a 12" diameter x 12" wide wheel have a 4" x 8" offset, this means that the center is positioned or measured 4" from the backside and 8" from the outer side. This particular offset positions the wheels outward from the tractor frame, for a wider track width, and used with external axle/disc brakes. But the 6" x 6" wheels are centered and not offset. The center section is positioned or measured 6" from the backside and 6" from the outer side. This positions the wheels closer to the frame of the tractor for a narrow and track width, and can be used with an internal brake (IH Cub Cadet garden tractor).
Using Aluminum Wheels On A Cub Cadet Garden Tractor That's Equipped With External Brakes -
The deep or small diameter drop-center section in the older Douglas aluminum wheels will not clear the external/axle brakes on Cub Cadet garden tractors. If you're a weight-conscience puller, use steel, aluminum or hard solid plastic wheel spacers that's 5/16" thickness to provide clearance for the external/axle brakes, tractor frame and/or fenders. Drill holes in each spacer for the wheel studs and use longer (and hardened) bolts as studs or threaded rods (Allthread) to mount the wheels. But the new style Douglas wheels with the larger diameter drop-center section will allow adequate clearance for Cub Cadet garden tractors with external/axle brakes without the need for wheel spacers. And if you are concerned about the rotating mass weight of using STEEL wheel spacers, the diameter of the spacers are so small and close to the center of the wheel, they will not effect the centrifugal force or spinning weight, which slow down high speed tires. It's not the same as using large diameter wheel weights.

 If you're using the older Douglas 6" x 6" centered or 4"
x 8" offset aluminum wheels with the deep or small diameter drop-center section,
be leery about using [26-12.00x12] inner tubes with them. It'll be better
to run the tires tubeless with silicone tire sealant applied around the rims
and on the tire beads. Because with tubes, the deep, drop-center section
could stretch the tube a little too much and cause it to eventually blow
out. But if you're using the newer style Douglas aluminum wheels with a larger
diameter drop-center, then it should be fine with inner tubes.
If you're using the older Douglas 6" x 6" centered or 4"
x 8" offset aluminum wheels with the deep or small diameter drop-center section,
be leery about using [26-12.00x12] inner tubes with them. It'll be better
to run the tires tubeless with silicone tire sealant applied around the rims
and on the tire beads. Because with tubes, the deep, drop-center section
could stretch the tube a little too much and cause it to eventually blow
out. But if you're using the newer style Douglas aluminum wheels with a larger
diameter drop-center, then it should be fine with inner tubes.
How to Widen OEM Steel Wheels | By the way - the actual width of ALL wheels is measured from inside rim to rim, and NOT the outside of the rims. See the photo to the right for a better understanding. Top of Page
 When a factory wheel is widened
to accept a wider tire, the process involves cutting the wheels in half parallel
to the drop-center and then welding in a piece of rolled flat steel between
the two halves. If you have a set of 5" wide wheels (measured on the inside
lip of the rim), then 8" wide of rolled metal will need to be added in the
wheels to make them 13" wide. To do this, you will need to...
When a factory wheel is widened
to accept a wider tire, the process involves cutting the wheels in half parallel
to the drop-center and then welding in a piece of rolled flat steel between
the two halves. If you have a set of 5" wide wheels (measured on the inside
lip of the rim), then 8" wide of rolled metal will need to be added in the
wheels to make them 13" wide. To do this, you will need to...
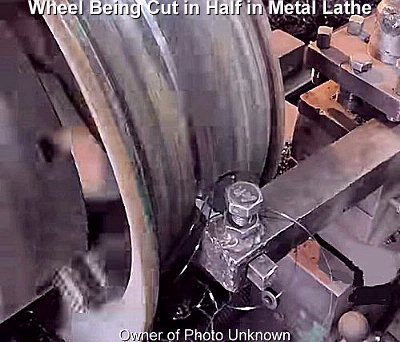
 To cut the wheels in half or in two, securely fasten the outside
edge of the rim in a
large metal lathe with a 3-jaw chuck with a minimum 14"
swing to get a true cut with no wobble. IMPORTANT - Make sure the wheels
won't slip and "pop out" of the chuck jaws when cutting them in half!
Or better yet, a [broken/twisted off] OEM Cub Cadet garden tractor axle that's
not bent can be used as a spindle in the lathe to get a true cut with no
wobble. The wheels can be cut from the inside or from the outside.
IMPORTANT: If you're inexperienced and don't
feel comfortable using a large metal lathe yourself (these can be very dangerous
in the wrong hands), then consult a professional and experienced machinist
with a large lathe. If a large lathe isn't available, each
wheel can be fastened to the rear axle of a garden tractor with the rear
end blocked up, and then each wheel can be slowly rotated by hand while using
a
plasma cutter to cut/separate the wheel(s) into two halves.
Make sure the tractor is stationary and the tip of the
plasma cutter is positioned/mounted rigid in alignment
with the drop-center of the wheel, or the cut could be crooked, zig-zag or
wobbly. FYI - Plasma cutters cut faster and more precisely with a thinner
kerf (slit) and with less slag than cutting with an oxy-acetylene torch.
IMPORTANT: If you're inexperienced and don't
feel comfortable using a plasma cutter yourself, then consult a professional
and experienced welder/metal fabricator with a plasma
cutter.
To cut the wheels in half or in two, securely fasten the outside
edge of the rim in a
large metal lathe with a 3-jaw chuck with a minimum 14"
swing to get a true cut with no wobble. IMPORTANT - Make sure the wheels
won't slip and "pop out" of the chuck jaws when cutting them in half!
Or better yet, a [broken/twisted off] OEM Cub Cadet garden tractor axle that's
not bent can be used as a spindle in the lathe to get a true cut with no
wobble. The wheels can be cut from the inside or from the outside.
IMPORTANT: If you're inexperienced and don't
feel comfortable using a large metal lathe yourself (these can be very dangerous
in the wrong hands), then consult a professional and experienced machinist
with a large lathe. If a large lathe isn't available, each
wheel can be fastened to the rear axle of a garden tractor with the rear
end blocked up, and then each wheel can be slowly rotated by hand while using
a
plasma cutter to cut/separate the wheel(s) into two halves.
Make sure the tractor is stationary and the tip of the
plasma cutter is positioned/mounted rigid in alignment
with the drop-center of the wheel, or the cut could be crooked, zig-zag or
wobbly. FYI - Plasma cutters cut faster and more precisely with a thinner
kerf (slit) and with less slag than cutting with an oxy-acetylene torch.
IMPORTANT: If you're inexperienced and don't
feel comfortable using a plasma cutter yourself, then consult a professional
and experienced welder/metal fabricator with a plasma
cutter.
How to Weld the Flat Steel to the Drop-Center Section of the Wheel Halves:
 Use
a large
"slip roll" to curve or "curl" the flat steel until it's
the same diameter as the drop-center section of the wheel.
Use
a large
"slip roll" to curve or "curl" the flat steel until it's
the same diameter as the drop-center section of the wheel.
Go here for YouTube videos on steel wheel widening.
If inner tubes are going to be used (which is highly recommended for welded-together wheels), grind the bead of weld smooth. But if they're going to be tubeless, grind off the "high spots" in the weld so the bead of the tire won't get damaged when mounting the tire on the wheel. NOTE: It's best to use inner tubes with welded-together wheels. Because if it's not a superior welding job, air can seep out through the bead of weld. And as with any tubeless tire, it's best to sand smooth the inside rims of the wheel, paint the inside for lasting protection and then apply "tire bead sealant" or silicone sealant on the inside of the rims to prevent air leakage. If the tire slowly looses air over time, try some SLIME Flat Tire Repair. This stuff works great!
How to Change a Tire on a Wheel | Top of Page
How to Manually Dismount a Tire off the Wheel, the Old-Fashioned Way -
DISCLAIMER: The below is how most older automotive service stations did it many years ago before the pneumatic tire changing machine was invented. It's the old-fashioned manual way to mount and dismount tires. As long as you're careful, take your time, this still works great today, especially with steel wheels. But if you don't feel comfortable pounding a hammer next to an expensive aluminum wheel, spend a few bucks and take them to a reputable automotive tire repair shop and have them mount or dismount the tires with a pneumatic tire changing machine. And if the tires are mounted tubeless, ask the tire tech person apply plenty of tire mounting lubricant/sealant on both the tire beads and wheel rims for a leakproof seal. Otherwise, it may leak and eventually go flat.
 Place the tire/wheel on the
floor with the valve stem facing upward. (On most non-reversed or
standard-offset wheels, this will place the drop-center part of the wheel
upward.) Place one foot on the sidewall (balance or brace yourself), then
push down with the heel of your other foot from inside the wheel until the
bead of the tire is in the drop-center part of the wheel and at the same
time, wedge one of the
tire irons under the bead to pry one half of the tire off
the wheel. May have to use the hammer to drive the tire iron under the bead.
Use the
tire irons to pry the bead to the outside of the rim until
one side of the tire is on the outside of the wheel. Pry around the wheel
until the entire one half of the tire is off the wheel.
Place the tire/wheel on the
floor with the valve stem facing upward. (On most non-reversed or
standard-offset wheels, this will place the drop-center part of the wheel
upward.) Place one foot on the sidewall (balance or brace yourself), then
push down with the heel of your other foot from inside the wheel until the
bead of the tire is in the drop-center part of the wheel and at the same
time, wedge one of the
tire irons under the bead to pry one half of the tire off
the wheel. May have to use the hammer to drive the tire iron under the bead.
Use the
tire irons to pry the bead to the outside of the rim until
one side of the tire is on the outside of the wheel. Pry around the wheel
until the entire one half of the tire is off the wheel.
How to Manually Mount a Tire on the Wheel, the Old-Fashioned Way -
 Use a
small manual bead breaker tool to break the bead seal from
the wheel. This tool is designed for go-kart tires, but can also be used
for the front tires/wheels on riding mowers, lawn & garden tractors,
garden tractors, ATVs or UTVs. This portable tool can be used on a workbench
or work table. The tire will need to be removed from the wheel in a separate
process.
Use a
small manual bead breaker tool to break the bead seal from
the wheel. This tool is designed for go-kart tires, but can also be used
for the front tires/wheels on riding mowers, lawn & garden tractors,
garden tractors, ATVs or UTVs. This portable tool can be used on a workbench
or work table. The tire will need to be removed from the wheel in a separate
process.
And use a bigger manual bead breaker and tire changer to remove the tire from the wheel and change tires on ATVs, UTVs, rear garden tractors, automobiles and light trucks. For stability of this tool, fasten it stationary to a concrete floor or on a wide, heavy steel plate with hardened bolts/studs. YouTube videos: How to Use the Harbor Freight Tire Changer. Here's another useful video: Easy and safe way to break a tire bead. Take advantage of Harbor Freight's Money Saving Coupons, Coupon Codes, and Promo Codes!
How to Patch a Pin Hole in an Inner Tube | Top of Page
Purchase an
inner tube patch kit. Before you smear the sealant on the
tube, be sure to thoroughly clean the patch area first with brake cleaner
or cleaning solvent, and if the sealant requires that it be lit with a match,
let it burn for a few seconds, blow it out and then apply the patch while
the tube is hot. Use the roller supplied with the kit to press/secure the
patch in place. This is called hot patching. It secures and seals the patch
better than cold patching. Go here for more information:
inner tube hot patch kit. But if the inner tube is old
and has dry-rotted cracks/tears, then it will need to be replaced with a
new tube.
FYI - When sharpening the tread on a pulling tire, sometimes the grinding disc will cut through the cords of the tire, creating a hole in the tread area of the tire. When this happens, all hope for the [expensive] tire is not lost. Simply have an automotive tire repair shop install a boot, which is a large, thick patch, over the cut place on the inside of the tire and then install an inner tube in the tire. The purpose of "boot repair" is to fix a tear in the tread.
 By the way - Freon tanks make
good, low cost and light-weight compressed air tanks. There's kits available
to convert them into an air tank.
By the way - Freon tanks make
good, low cost and light-weight compressed air tanks. There's kits available
to convert them into an air tank.
By the way - most people call wheels "rims." This is wrong! A "rim" is the outer edge of a wheel that holds the tire bead in place. And a "wheel" is the whole thing, including the rim and the center section or flange.
Webster's dictionary defines the word Rim as:
Rim (noun)
[Middle English, from Old English rima; akin to Old Norse rimi strip of land]
First appeared 13th Century
1: the outer often curved or circular edge or border of something
2: the outer part of a wheel joined to the hub usually by spokes
3: a removable outer metal band on an automobile wheel to which the tire
is attached.
Also see: Rim (wheel) (From Wikipedia, the free encyclopedia)
Suppliers of quality 12" diameter x 12" wide aluminum garden pulling tractor wheels are: Douglas Wheels, VM Wheels (Vogel Manufacturing) (both made in China) and Keizer Wheels (made in USA). Here's the differences and similarities between Douglas and VM wheels...
|
|
Make it much easier to mount wheels on the rear of a garden tractor by installing studs in the axle flanges -
| For the IH Cub Cadet garden tractors with coarse or 1" fine spline axles,
a set of 7/16-20 (fine thread) grade 8 bolts can be installed from the backside
of the axle flanges to serve as wheel studs. These make for much easier mounting
of wheels on a garden tractor than the OEM thread-in factory bolts. With
these fine thread studs, nice-appearing automotive-style plain steel or
chrome-plated steel lug nut can be used. Threaded rods (below) will need
to be installed if wheel spacers are to be used. This will not work on IH-built
Cub Cadet garden tractors with the external brake disc welded to axles.
|
For the MTD-built Cub Cadet garden tractors with 30mm fine spline axles,
a set of 7/16-20 (fine thread) automotive wheel studs can be installed in
the axle flanges. With the fine thread studs, nice-appearing automotive-style
chrome-plated steel lug nuts can be used. The OEM MTD brake discs can be
used with these studs. No drilling-out/enlarging of the holes in the flanges
required. Longer studs will need to be installed if wheel spacers are to
be used.
|
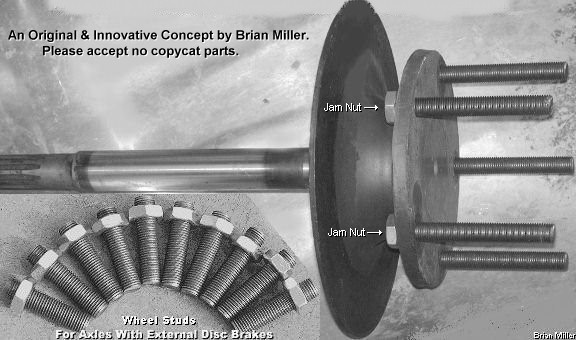 For the IH-built Cub Cadet garden
tractors with external axle/disc brakes, a set of 7/16-20 (fine thread),
hardened threaded rods (All-Thread) with a jam nut tightened on the backside
of the flange (between brake disc and axle flange) can be installed. Longer
studs will need to be installed if wheel spacers are to be used. Also, these
make for much easier mounting of the wheels on a garden tractor. Use with
nice-appearing automotive-style plain steel or chrome-plated steel lug nuts.
For the IH-built Cub Cadet garden
tractors with external axle/disc brakes, a set of 7/16-20 (fine thread),
hardened threaded rods (All-Thread) with a jam nut tightened on the backside
of the flange (between brake disc and axle flange) can be installed. Longer
studs will need to be installed if wheel spacers are to be used. Also, these
make for much easier mounting of the wheels on a garden tractor. Use with
nice-appearing automotive-style plain steel or chrome-plated steel lug nuts.


 By installing studs to mount the wheels, this makes it much
easier to use plain zinc-plated steel or chrome-plated taper seat automotive
lug nuts to secure stamped steel garden tractor wheels. To use taper seat
lug nuts with stamped steel wheels, because of the larger diameter taper
that's on the automotive lug nuts, drill the mounting holes in the wheels
to 21/32" so the wheels will be centered with the axle and not run off-center
with the axles. A
21/32" drill bit can be purchased
online, or a local hardware store may have one in stock
or they can order one for you. No other size bit will allow the lug nuts
to seat properly, keep them tight and keep the wheel centered with the mounting
studs. Torque each nut to 50 ft. lb.
By installing studs to mount the wheels, this makes it much
easier to use plain zinc-plated steel or chrome-plated taper seat automotive
lug nuts to secure stamped steel garden tractor wheels. To use taper seat
lug nuts with stamped steel wheels, because of the larger diameter taper
that's on the automotive lug nuts, drill the mounting holes in the wheels
to 21/32" so the wheels will be centered with the axle and not run off-center
with the axles. A
21/32" drill bit can be purchased
online, or a local hardware store may have one in stock
or they can order one for you. No other size bit will allow the lug nuts
to seat properly, keep them tight and keep the wheel centered with the mounting
studs. Torque each nut to 50 ft. lb.
For aluminum wheels with 1/2" mounting holes and axle flanges with 7/16" threaded holes, for the wheels to be centered with the axles, drill-out the holes in the flanges to 29/64", and use a 1/2-20 UNF TAPER hand tap to cut new 1/2-20 UNF threads, and then install a set of 1/2-20 grade 8 bolts from the backside of the flanges to serve as studs, and install a set of 1/2-20 UNF threaded [stainless steel] flat seat nuts and wide flat washers (to prevent from scratching/marring the wheels with a socket). Torque each nut to 50 ft. lb. A 29/64" drill bit can be purchased online, or a local hardware store may have one in stock or they can order one for you. Click or tap here to learn how to cut new threads, the professional way.
Advertisement:
| Click here to contact A-1 Miller's Performance Enterprises to place an order, send your parts for repairing, and/or for FREE professional and honest technical customer service assistance and support and payment options. Please contact A-1 Miller's if you need a part or parts, or service(s) performed that's not listed or mentioned in this website. |
 Heavy Duty Flanged
Oil-Impregnated Metal Graphite Wheel Bushings. Fits Cub Cadet garden tractors
models 70, 71, 72, 73, 86, 100, 102, 104, 105, 106, 107, 108, 109, 122, 123,
124, 125, 126, 127, 128, 129, 147, 149, 169, 800, 1000, 1100, 1200, 1250,
1300, 1405 and 1650 with serial number 632501 and below. Can also be used
on other various makes and models of lawn and garden tractors and small low
speed motorized vehicles with 3/4" spindle shafts and 1-3/8" I.D. wheel hubs.
Dimensions: 3/4" I.D. (19mm) x 1-3/8" O.D. (35mm) x 9/16" overall width (1/2"
fits inside wheel hub) x 1-1/2" O.D. flange. Will hold up to a lot of
weight and rough abuse. Oil impregnated means the hardened metal is porous
to absorb oil and grease so it will last longer. For
preventive maintenance, lubricate these parts through
Zerk grease fitting with an
automotive grease gun once a year. If there is no
grease fitting in the wheel hub, then one should be installed. A-1 Miller
part # 09-3305-3/4. Replaces Cub Cadet part # IH-384881-R94. $24.00
per set of 4 bushings, plus shipping & handling. Heavy Duty Flanged
Oil-Impregnated Metal Graphite Wheel Bushings. Fits Cub Cadet garden tractors
models 70, 71, 72, 73, 86, 100, 102, 104, 105, 106, 107, 108, 109, 122, 123,
124, 125, 126, 127, 128, 129, 147, 149, 169, 800, 1000, 1100, 1200, 1250,
1300, 1405 and 1650 with serial number 632501 and below. Can also be used
on other various makes and models of lawn and garden tractors and small low
speed motorized vehicles with 3/4" spindle shafts and 1-3/8" I.D. wheel hubs.
Dimensions: 3/4" I.D. (19mm) x 1-3/8" O.D. (35mm) x 9/16" overall width (1/2"
fits inside wheel hub) x 1-1/2" O.D. flange. Will hold up to a lot of
weight and rough abuse. Oil impregnated means the hardened metal is porous
to absorb oil and grease so it will last longer. For
preventive maintenance, lubricate these parts through
Zerk grease fitting with an
automotive grease gun once a year. If there is no
grease fitting in the wheel hub, then one should be installed. A-1 Miller
part # 09-3305-3/4. Replaces Cub Cadet part # IH-384881-R94. $24.00
per set of 4 bushings, plus shipping & handling.
NOTE: Other sizes and styles of wheel bearings and bushings are available. Please let us know what you need and we can probably get it for you at a reasonable price. Click here to contact A-1 Miller's for FREE honest and accurate technical support and/or for ordering information and payment options. Please contact A-1 Miller's if you need a part or parts, or service performed that's not listed or mentioned in this website. [Top of Page] |
The Importance and Safety of Having Wheelie Bars Installed on a Competition Pulling Tractor -[Top of Page]
 If a competition pulling tractor
is going to run a 13" drawbar height with 26x12.00-12 tires, it must have
wheelie bars properly installed, even if a club or pull site doesn't require
them. Because a competition pulling tractor can flip back so quickly, without
warning. The rear tires are rotating in one direction, which forces the tractor
to want to rotate in the opposite direction. ("For every action, there's
an equal and opposite reaction." -
Newton's third law of motion.) So for safety sake, it's
best to have wheelie bars installed for pulling regardless of the height
of the drawbar or tire size. Wheelie bars are sometimes referred to as a
"no-tip device." Wheelie bars are one of the easiest things to install on
a competition pulling tractor. Only an idiot or someone with a death wish
would pull a tractor without wheelie bars!
If a competition pulling tractor
is going to run a 13" drawbar height with 26x12.00-12 tires, it must have
wheelie bars properly installed, even if a club or pull site doesn't require
them. Because a competition pulling tractor can flip back so quickly, without
warning. The rear tires are rotating in one direction, which forces the tractor
to want to rotate in the opposite direction. ("For every action, there's
an equal and opposite reaction." -
Newton's third law of motion.) So for safety sake, it's
best to have wheelie bars installed for pulling regardless of the height
of the drawbar or tire size. Wheelie bars are sometimes referred to as a
"no-tip device." Wheelie bars are one of the easiest things to install on
a competition pulling tractor. Only an idiot or someone with a death wish
would pull a tractor without wheelie bars!
The pads or wheels for the ground contact needs to be of adequate size too, to prevent from sinking into soft earth. The pads need to be a minimum of 3" square x 1/8" thickness and wheels need to be a minimum of 4" diameter x 1" wide. Most pullers prefer to use wheels on the wheelie bars. They allow the tractor to gain an inch or two because they "roll." The pads on the other hand scrape on the ground and doesn't allow the tractor to get much further. And it's a good idea for stock tractors to run a 10" drawbar height anyway to prevent breaking a stock rear end.
For best stability of the tractor when the front end raises upward, most club's rules state that the bottom of the wheelie bar wheels or skid plates are supposed to a maximum of 5" from the ground. And the rear of the wheelie bar wheels or skid plates are supposed to be a minimum of 5" from the tread of the rear tires. Scroll down to see drawing for a better explanation. Check out this YouTube link: When it's important to have wheelie bars on a competition pulling tractor!
For safety reasons, make your wheelie bar bracket material rigid and not spring-loaded. They must be made of heavy wall (minimum 1/8" thickness) tubing and reinforced for strength. Also, bolt on the wheelie bar brackets and don't weld them to the frame. So they can be adjusted if necessary. See the photos below Ê for what typical wheelie bar brackets look or click here for a Google image search on competition pulling tractor wheelie bars.
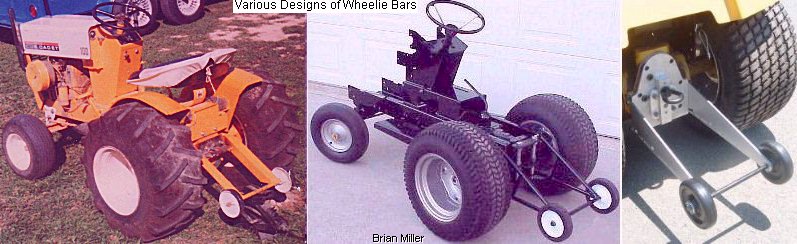
FYI: The wheelie bar brackets shown above were fabricated by the individual
who owns each tractor.
And be aware when using flat
aluminum wheelie bar braces. If the tractor were to stop suddenly on the
track, and the sled bumps the rear of the tractor, the braces could bend
sideways due to the impact. And straightening them so they'll look original
again is almost impossible. Therefore, we think it's better to use 1-1/2"
x 1-1/2" x 1/8" wall square tubing as wheelie bars. When the sled bumps wheelie
bars made of heavy wall square tubing, the whole rear of the tractor will
move sideways slightly, and the wheelie bars won't suffer any damage.
How to set the wheelie bars for proper height so the front end won't be too high or too low when the front tires comes off the ground:
 About Rear Safety Bumpers -
When a high speed garden tractor gets going down the track really good, and all of a sudden it's engine stalls and the tractor comes to a complete stop, what's going to happen? Chances are the sled will bump the rear of the tractor. Most sled operators can't put the brakes on in time or react fast enough because this can happen so quickly. Therefore, it's a good idea to install a couple of heavy-duty rear "bumpers" mounted on or incorporated into the wheelie bar brackets located a minimum of 6" above the wheels or pads. (Most club's rules and regulations will or should specify the location.) These bumpers will keep the sled from possibly getting up on top of the rear tires, causing damage to the tractor and/or injury to the driver. And the bumpers will prevent the pull chain from getting "wrapped" around one of the rear tires should the tractor go sideways to the extreme.
All tractor pulling participants, despite their age, needs to be educated on safety requirements and proper operation of a competition pulling tractor. Because many of them, when the tractor they're sitting on is hooked to the sled, will rev it up and give it all it's got, and they'll do whatever it takes to win. Some even get injured by doing so. They think it's a "no-holds-barred" contest.
We've seen a few garden tractor pullers would launch the sled (not our sled) at the sting line, when all of a sudden their tractor would flip backwards and sometimes the puller will hit the back of their head dirt shield that's on the front of the skid pan because no wheelie bars were installed on their tractor. They weren't seriously injured. But it's scary to actually witness something like that in person! It's not a funny thing to happen and certainly not part of the show!
We were at a pull several years ago [with a now defunct pulling club that was based in central Missouri], when an inexperienced adult person on a stock garden tractor was pulling the sled [not our sled] down the track when all of a sudden the front of the tractor reared up and stood on end, then it caught on fire. What caused this is the tractor had 26-12.00x12 lug tires, about a 16" drawbar height and no wheelie bars. It also had a loose-fitting gas cap with a full tank of gas, which was positioned on top of the engine, and the battery, which was positioned between the gas tank and steering column, wasn't fastened down. When the tractor stood on end, the gas cap fell off, gas spilled out onto the battery and on the driver. Then the battery tipped back, shorting out the posts against the metal steering column support, which ignited the fuel. It was a horrible sight! The flames were immediately extinguished and the puller had to be air-lifted to the nearest hospital with a burn unit. He recovered from his injuries, but he now has scars on his chest and groin area to remind him of that horrible day at a tractor pull when he was just trying to have some fun with his friends. Not to mention the mental scars it left, too. An official of this particular pull should have inspected that tractor and all other tractors for safety, and not allow the puller to participate if the tractor wasn't safe or legal, or if an adjustment wasn't made.
Tell your friends and family about this story. And tell them to definitely install sturdy wheelie bars with skid plates or wheels, whether if they feel they need them or not, or if the rules require them or not. Remember - friends don't let friends pull without wheelie bars (and other safety equipment). And NEVER allow a young person to participate in a pulling event without wheelie bars (and of course, other safety equipment) properly installed and maintained.
We've been to a lot of garden
tractor pulls over the years and noticed that some tractors leak fuel in
places where a fuel leak shouldn't be. Therefore, we think that safety
inspections needs to include checking the fuel lines for dry-rotting, cracks,
fuel leaks, loose fittings, etc. (The tractors should have sturdy wheelie
bars, too.) The inspectors needs to grab hold of the fuel line(s) with their
hand and wiggle it around and slightly jerk on it to check for durability.
This is important. Especially in a kid's class. Don't wait until an issue
becomes a problem, and then turn into a catastrophe. If pullers would build
their tractors right to begin with and maintain them properly, there wouldn't
be any injuries, fires, or fear of a fire.

 To place an order, send your item(s) for repairing, and/or
for customer service assistance, and FREE honest and accurate technical support,
please contact: A-1 Miller's Performance Enterprises, 12091 N Route B,
Hallsville, MO (Missouri) 65255-9604 USA. Please call in your order or send
an email with a list parts you need and your contact information.
To place an order, send your item(s) for repairing, and/or
for customer service assistance, and FREE honest and accurate technical support,
please contact: A-1 Miller's Performance Enterprises, 12091 N Route B,
Hallsville, MO (Missouri) 65255-9604 USA. Please call in your order or send
an email with a list parts you need and your contact information.
 Phone: 1-573-881-7229 (cell;
call, text or leave voicemail). Please call Monday-Friday, 9am to 5pm, Central
time zone, except holidays. If no answer, please try again later.
Phone: 1-573-881-7229 (cell;
call, text or leave voicemail). Please call Monday-Friday, 9am to 5pm, Central
time zone, except holidays. If no answer, please try again later.
 E-mail:
pullingtractor@aol.com. A-1 Miller's
shop is open to the public Monday-Friday, 9am to 5pm, Central time zone,
with an appointment on weekends, except holidays. If you're the kind of person
who don't trust delivery/shipping companies (mis)handling your high-dollar
and fragile merchandise, you can make the long drive to A-1 Miller's new
shop (click image to the right) to personally purchase parts, or drop off
and/or pick up your carburetor, clutch assembly, and/or other parts for repairing
and/or rebuilding. Or visit our new shop to drop off your parts. Please contact
us before coming so we'll be at our shop waiting for your arrival. When you
visit our shop, you will be dealing directly with the owner for the best
customer service. "The road to a [trusted] friend's house (or shop) is
never long." Don't sacrifice quality workmanship for distance.
Payment Options below.
Photos
of our new building/shop are posted here!
12091 N Route B, Hallsville, MO - Google Maps.
[Return To Previous Paragraph, Section
or Website]
E-mail:
pullingtractor@aol.com. A-1 Miller's
shop is open to the public Monday-Friday, 9am to 5pm, Central time zone,
with an appointment on weekends, except holidays. If you're the kind of person
who don't trust delivery/shipping companies (mis)handling your high-dollar
and fragile merchandise, you can make the long drive to A-1 Miller's new
shop (click image to the right) to personally purchase parts, or drop off
and/or pick up your carburetor, clutch assembly, and/or other parts for repairing
and/or rebuilding. Or visit our new shop to drop off your parts. Please contact
us before coming so we'll be at our shop waiting for your arrival. When you
visit our shop, you will be dealing directly with the owner for the best
customer service. "The road to a [trusted] friend's house (or shop) is
never long." Don't sacrifice quality workmanship for distance.
Payment Options below.
Photos
of our new building/shop are posted here!
12091 N Route B, Hallsville, MO - Google Maps.
[Return To Previous Paragraph, Section
or Website]
Payment Options, and We Ship to Canada and
Worldwide 
Item(s) in a package or cushioned envelope weighing less than 1 lb. is sent
by US Postal Service Airmail Letter Post for a 4-7 days delivery. Packaged
item(s) weighing over 1 lb. and up to 66 lb. is sent by US Postal Service
Airmail Parcel Post for a 4-10 days delivery. I cannot use the US Postal
Services' Flat Rate Priority Mail envelopes and boxes to ship outside U.S.
territories. Item(s) weighing over 67 lbs. or more is sent by FedEx Ground
or equivalent services. We try to keep our shipping cost to customers within
reason. Therefore, we don't ship our products in a fancy-looking package
with our company name and/or logo on it because most customers will just
toss it in the trash after they remove the contents. And being there is no
USPS tracking number outside the US, all I can do is make sure I write your
address correctly on the customs form and on your package.
My websites are not set up to process orders and accept payments. Therefore, to place an order with me, please call either number above or send an email with a list of parts you need, with your name, complete and correct postal mailing address and phone number. For payment options, I accept cash (in person), USPS Postal Money Orders, cashier's checks, business checks, MasterCard, VISA, Discover, American Express (please add 2.5% to the total amount for the credit/debit card processor's surcharge). If paying with a credit/debit card, please call me at either number above. Or to make a payment to me through PayPal, please click this link: https://www.paypal.com. Or use Cash App (username: pullingtractor) or Venmo (username: Pullingtractor) to make a payment to me. And be sure to mention a description of what the payment is for with your full name, postal address, phone number and email address. If sending a money order or cashier's check, please include a note in the envelope with your name, complete mailing address, phone number, email address and a description of what the payment is for. I'll make a note of your order when I have all your information, and I may have to order some of the parts on your list, which should take a few days to come in, but I will send everything to you as soon as I have the parts in stock after I receive your payment.


Return To Previous Website | Top of Page | Copyright © 1996-Present. This website created, designed and maintained by A-1 Miller's Performance Enterprises

 TURF tread tires are
typically found on most common riding mowers and lawn and garden tractors
(mainly grass cutting equipment). Turf tread doesn't provide good traction
on clay/dirt for pulling heavy loads, but it's easy on grass around turns.
TURF tread tires are
typically found on most common riding mowers and lawn and garden tractors
(mainly grass cutting equipment). Turf tread doesn't provide good traction
on clay/dirt for pulling heavy loads, but it's easy on grass around turns.

 Heavy Duty Flanged Oil-Impregnated
Metal Graphite Wheel Bushings. Fits IH Cub Cadet "Original" garden tractor
with 7/8" spindle shafts and 1-3/8" I.D. wheel hubs. Dimensions: 7/8" I.D.
x 1-3/8" O.D. x 9/16" overall width (1/2" fits inside wheel hub) x 1-1/2"
O.D. flange. Will hold up to a lot of weight and rough abuse. Oil impregnated
means the hardened metal is porous to absorb oil and grease so it will last
longer. Also, the oil acts as a cushion between the bearing and shaft, adding
resistance to wear. For
Heavy Duty Flanged Oil-Impregnated
Metal Graphite Wheel Bushings. Fits IH Cub Cadet "Original" garden tractor
with 7/8" spindle shafts and 1-3/8" I.D. wheel hubs. Dimensions: 7/8" I.D.
x 1-3/8" O.D. x 9/16" overall width (1/2" fits inside wheel hub) x 1-1/2"
O.D. flange. Will hold up to a lot of weight and rough abuse. Oil impregnated
means the hardened metal is porous to absorb oil and grease so it will last
longer. Also, the oil acts as a cushion between the bearing and shaft, adding
resistance to wear. For
 Heavy Duty Flanged Oil-Impregnated
Metal Graphite Wheel Bushings. Fits Cub Cadet garden tractors with Douglas
front aluminum wheels and small low speed motorized vehicles with 1" spindle
shafts and 1-3/8" I.D. wheel hubs. Dimensions: 1" I.D. x 1-3/8" O.D. x 9/16"
overall width (1/2" fits inside wheel hub) x 1-1/2" O.D. flange. Will
hold up to a lot of weight and rough abuse. Oil impregnated means the hardened
metal is porous to absorb oil and grease so it will last longer. Also, the
oil acts as a cushion between the bearing and shaft, adding resistance to
wear. For
Heavy Duty Flanged Oil-Impregnated
Metal Graphite Wheel Bushings. Fits Cub Cadet garden tractors with Douglas
front aluminum wheels and small low speed motorized vehicles with 1" spindle
shafts and 1-3/8" I.D. wheel hubs. Dimensions: 1" I.D. x 1-3/8" O.D. x 9/16"
overall width (1/2" fits inside wheel hub) x 1-1/2" O.D. flange. Will
hold up to a lot of weight and rough abuse. Oil impregnated means the hardened
metal is porous to absorb oil and grease so it will last longer. Also, the
oil acts as a cushion between the bearing and shaft, adding resistance to
wear. For
 Extreme Duty Flanged Sealed
Wheel Bearings. Fits Cub Cadet garden tractors models 70, 71, 72, 73, 86,
100, 102, 104, 105, 106, 107, 108, 109, 122, 123, 124, 125, 126, 127, 128,
129, 147, 149, 169, 800, 1000, 1100, 1200, 1250, 1300, 1405 and 1650 with
serial number 632501 and below. Can also be used on various other makes and
models of lawn and garden tractors, go-karts and small motorized vehicles
with 3/4" spindle shafts and 1-3/8" I.D. wheel hubs. Dimensions: 3/4" I.D.
(19mm) x 1-3/8" O.D. (35mm) x 1/2" width (3/8" fits inside wheel hub) x 1-1/2"
O.D. flange.
Extreme Duty Flanged Sealed
Wheel Bearings. Fits Cub Cadet garden tractors models 70, 71, 72, 73, 86,
100, 102, 104, 105, 106, 107, 108, 109, 122, 123, 124, 125, 126, 127, 128,
129, 147, 149, 169, 800, 1000, 1100, 1200, 1250, 1300, 1405 and 1650 with
serial number 632501 and below. Can also be used on various other makes and
models of lawn and garden tractors, go-karts and small motorized vehicles
with 3/4" spindle shafts and 1-3/8" I.D. wheel hubs. Dimensions: 3/4" I.D.
(19mm) x 1-3/8" O.D. (35mm) x 1/2" width (3/8" fits inside wheel hub) x 1-1/2"
O.D. flange.
 Extreme Duty Flanged Sealed
Wheel Bearings. Fits Cub Cadet garden tractor models 482, 580, 582, 680,
682, 782, 782D, 784, 882, 1000, 1050, 1100, 1200, 1204, 1210, 1211, 1250,
1282, 1450, 1512, 1604, 1606, 1650, 1710, 1711, 1712, 1806, 1810, 1811, 1812
with serial # 632502 and above. Also fits Cub Cadet garden tractor models
GT2000, GT2042, GT2050, GT2100, GT2148, GTX2154 and GTX2154LE. Can also be
used on various other makes and models of garden tractors, go-karts, mini-rod
pulling vehicles and small motorized vehicles with 1" spindle shafts and
2" I.D. wheel hubs. Dimensions: 1" I.D. (25.4mm) x 2" O.D. (50.8mm) x 9/16"
overall width (1/2" fits inside wheel hub) x 2-1/8" O.D. flange.
Extreme Duty Flanged Sealed
Wheel Bearings. Fits Cub Cadet garden tractor models 482, 580, 582, 680,
682, 782, 782D, 784, 882, 1000, 1050, 1100, 1200, 1204, 1210, 1211, 1250,
1282, 1450, 1512, 1604, 1606, 1650, 1710, 1711, 1712, 1806, 1810, 1811, 1812
with serial # 632502 and above. Also fits Cub Cadet garden tractor models
GT2000, GT2042, GT2050, GT2100, GT2148, GTX2154 and GTX2154LE. Can also be
used on various other makes and models of garden tractors, go-karts, mini-rod
pulling vehicles and small motorized vehicles with 1" spindle shafts and
2" I.D. wheel hubs. Dimensions: 1" I.D. (25.4mm) x 2" O.D. (50.8mm) x 9/16"
overall width (1/2" fits inside wheel hub) x 2-1/8" O.D. flange.