How to Weight a Competition Garden
Pulling Tractor (so it will pull better)
How to Weight a Competition Garden
Pulling Tractor (so it will pull better)
How to Weight a Competition Garden
Pulling Tractor (so it will pull better)
How to Weight a Competition Garden
Pulling Tractor (so it will pull better)
Educating and Inspiring Small Engine, Lawn & Garden, and Garden
Pulling Tractor Enthusiasts Since 1996. Where Science and Common Sense Come
Together for Safety and Improved Engine/Tractor Performance |
A-1
Miller's Performance Enterprises - Parts & Services
Webstore |  Overstocked Kohler Engine Parts & Cub Cadet Garden Tractor
Parts | Available Soon - Detailed
Illustrated Plans on How to Construct Professional Pulling Sleds
Overstocked Kohler Engine Parts & Cub Cadet Garden Tractor
Parts | Available Soon - Detailed
Illustrated Plans on How to Construct Professional Pulling Sleds
Nowadays, prices are subject to change without notice. Click
Refresh to see any
changes or updates. Optimized for 1152 x 864 computer screen resolution.
To search for a word or phrase in any of my websites, press the CTRL
 and F
and F  keys on
your keyboard simultaneously to open the Find or Search dialog box in your
web browser. And being I have no
apprentice to update and pay for my websites so they'll
continue to be on the Internet, they will be removed forever when I'm no
longer around.
keys on
your keyboard simultaneously to open the Find or Search dialog box in your
web browser. And being I have no
apprentice to update and pay for my websites so they'll
continue to be on the Internet, they will be removed forever when I'm no
longer around.

 There's a cheater in every sport, and competition garden
tractor pulling is no different. Honest pullers who ignore the cheater(s)
are fools. And when there's prize money involved, a fool and their money
are soon parted. Anyway, to make competition pulling a fun, fair and enjoyable
sport and experience for the entire family, be protective of your equipment!
Honest pullers who ignore the cheater(s) are fools. And when there's prize
money involved, a fool and their money are soon parted. Anyway, to make
competition pulling a fun and fair sport for the entire family, while at
the pulls, keep an eye on your competition's tractors. It's been known that
certain disgruntled pullers (cheaters or
sore losers
There's a cheater in every sport, and competition garden
tractor pulling is no different. Honest pullers who ignore the cheater(s)
are fools. And when there's prize money involved, a fool and their money
are soon parted. Anyway, to make competition pulling a fun, fair and enjoyable
sport and experience for the entire family, be protective of your equipment!
Honest pullers who ignore the cheater(s) are fools. And when there's prize
money involved, a fool and their money are soon parted. Anyway, to make
competition pulling a fun and fair sport for the entire family, while at
the pulls, keep an eye on your competition's tractors. It's been known that
certain disgruntled pullers (cheaters or
sore losers  ) belonging
to various associations/clubs, virtually anywhere and everywhere, will, while
on the weighing scale at the pull sites, have been known to remove ballast
weights from their own pulling tractor to get the tractor's (with driver)
weight down to a specified weight limit for any particular class, then when
nobody is watching the scales, or looking after the tractor leaves the scales,
the [owner or operator of the tractor] will place the (removed) weight(s)
back on the tractor. This is why it's important that when at the pulls, it's
best to appoint (by the [honest] president) or vote-in (by the pullers) a
trusting and honest "designated scale watcher" person in a pulling club or
association to keep an eye on the pulling tractors/vehicles while on the
scales, and especially when they leave the scales and when they park their
tractors while they're waiting their turn to pull. Because nobody likes a
cheater. All a cheater needs is an opportunity in an attempt to gain an advantage
on the track. This is also the fastest way for a pulling association or club
to gain a bad reputation and lose honest pullers. (Bad news travels fast.)
This type of behavior doesn't happen often, but you need to be prepared if
or when it does happen. But then again, if the winning tractor is
suspected of cheating on the track (illegal fuel, engine, weight, etc.),
there's always the protest rule. But only if it's enforced by the pulling
association. Remember - cheating is devious theft with a sly smirk.
Heck, some pulling associations/clubs vote-in and/or change certain rules
in a meeting during the off-season, lock them in for several years, but don't
even enforce or follow their own rules during the pulling season! They change
their rules so often, they might as well just write them in pencil! Another
thing I don't understand is when a prominent and one who has seniority with
obviously "deep pockets" puller of an association/club ask the president
of the club if an illegal part can be used in his engine or tractor for pulling,
and the president says, "yeah, sure!" But the pulling association/club's
sanctioning rules, the very same rules that the members (pullers) of the
association/club discussed about and voted-on in a meeting, clearly states
in black and white that such a part cannot be used. When this happens,
maybe some rules should be written in pencil and not printed with ink. Go
here for more information:
Do some garden tractor pullers act like spoiled brats?
) belonging
to various associations/clubs, virtually anywhere and everywhere, will, while
on the weighing scale at the pull sites, have been known to remove ballast
weights from their own pulling tractor to get the tractor's (with driver)
weight down to a specified weight limit for any particular class, then when
nobody is watching the scales, or looking after the tractor leaves the scales,
the [owner or operator of the tractor] will place the (removed) weight(s)
back on the tractor. This is why it's important that when at the pulls, it's
best to appoint (by the [honest] president) or vote-in (by the pullers) a
trusting and honest "designated scale watcher" person in a pulling club or
association to keep an eye on the pulling tractors/vehicles while on the
scales, and especially when they leave the scales and when they park their
tractors while they're waiting their turn to pull. Because nobody likes a
cheater. All a cheater needs is an opportunity in an attempt to gain an advantage
on the track. This is also the fastest way for a pulling association or club
to gain a bad reputation and lose honest pullers. (Bad news travels fast.)
This type of behavior doesn't happen often, but you need to be prepared if
or when it does happen. But then again, if the winning tractor is
suspected of cheating on the track (illegal fuel, engine, weight, etc.),
there's always the protest rule. But only if it's enforced by the pulling
association. Remember - cheating is devious theft with a sly smirk.
Heck, some pulling associations/clubs vote-in and/or change certain rules
in a meeting during the off-season, lock them in for several years, but don't
even enforce or follow their own rules during the pulling season! They change
their rules so often, they might as well just write them in pencil! Another
thing I don't understand is when a prominent and one who has seniority with
obviously "deep pockets" puller of an association/club ask the president
of the club if an illegal part can be used in his engine or tractor for pulling,
and the president says, "yeah, sure!" But the pulling association/club's
sanctioning rules, the very same rules that the members (pullers) of the
association/club discussed about and voted-on in a meeting, clearly states
in black and white that such a part cannot be used. When this happens,
maybe some rules should be written in pencil and not printed with ink. Go
here for more information:
Do some garden tractor pullers act like spoiled brats?
 The rule of thumb for ALL pulling
tractors is to get the front end as low as possible for better weight
distribution and leverage. By doing this, the rear of the tractor and with
a 13" hitch height, the drawbar is higher than the centerline of the rear
axles. When the progressive weight of the sled begins to place pressure on
the drawbar, this will make it harder to raise the front end of the tractor,
allowing the tread on the rear tires to grip the ground more.
(Newton's third law of motion.) To lower the front of the
tractor, either install small diameter tires on the front axle and/or install
lowered or reversed spindles. Use your best judgment because there is no
exact percentage or inches of rake of how much the front end should be lowered.
Just make sure that any part of the front of the tractor don't drag the ground,
especially the extended weight bar.
The rule of thumb for ALL pulling
tractors is to get the front end as low as possible for better weight
distribution and leverage. By doing this, the rear of the tractor and with
a 13" hitch height, the drawbar is higher than the centerline of the rear
axles. When the progressive weight of the sled begins to place pressure on
the drawbar, this will make it harder to raise the front end of the tractor,
allowing the tread on the rear tires to grip the ground more.
(Newton's third law of motion.) To lower the front of the
tractor, either install small diameter tires on the front axle and/or install
lowered or reversed spindles. Use your best judgment because there is no
exact percentage or inches of rake of how much the front end should be lowered.
Just make sure that any part of the front of the tractor don't drag the ground,
especially the extended weight bar.
The best place to position weights is towards the front of the tractor on an extension and underneath the transaxle, for a lower center of gravity, so the tractor won't go from side to side down the track as much. If the weights are positioned high on the tractor, that would make it top heavy, causing it to go from side to side down the tractor, especially high speed tractors. Weights mounted high have no effect on slower pulling tractors.
The same thing here applies to the big pulling tractors as well. All pulling tractors need to avoid using wheel weights and place the majority of the weight under the tractor for a lower center of gravity for better stability of the tractor while going down the track.
 A pulling tractor will pull
best when most of its weight is on the rear tires
and the front tires barely make contact on the track. To "balance the tractor"
for various to track conditions, weight may need to be "juggled" from front
to rear and vice-versa. On a hard, dry or loose track, weight will need to
be removed from the front of a tractor placed at the rear (and you'll need
to pull in a slightly faster
gear). And on a moistened
or "biting" track, weight will need to be removed from the rear of a tractor
and placed on the front (and you'll need to pull in a slightly slower
gear).
A pulling tractor will pull
best when most of its weight is on the rear tires
and the front tires barely make contact on the track. To "balance the tractor"
for various to track conditions, weight may need to be "juggled" from front
to rear and vice-versa. On a hard, dry or loose track, weight will need to
be removed from the front of a tractor placed at the rear (and you'll need
to pull in a slightly faster
gear). And on a moistened
or "biting" track, weight will need to be removed from the rear of a tractor
and placed on the front (and you'll need to pull in a slightly slower
gear).
"Balancing" a pulling tractor greatly depends on which class the tractor pulls in. A stock tractor will not balance like a highly modified and vice-versa. In the stock class(es), a tractor require more weight toward the front because the rear tires turns slower, causing them to dig in more, which will cause the front of the tractor to raise easier. But as you move up in the classes, when the tractor has a more powerful engine and more ground speed, the tractor will need less weight on the front and more on the rear because due to the increase in engine torque, the tires want to break traction easier.
The weights need to be "juggled" so there'll be adequate weight on the rear tires for traction and sufficient amount of weight on the front of the tractor to hold the front end down. But then again, you want the front tires to barely skim on the surface. This places about 90-95% of the weight on the rear tires for most traction. You can also use your upper body weight to lean forward, backward and to either side to guide the tractor straight down the track.
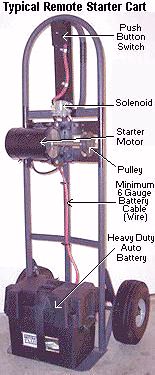
 To reduce weight on a garden pulling tractor, remove all starting
mechanisms, install a small
motorcycle battery or a small, lightweight and rechargeable
12 volt sealed lead acid (SLA) battery with a minimum 4AH
(Amp Hour) rating on the tractor, use a machined billet aluminum starter
pulley on the crankshaft PTO end, then use a 2 wheel remote starter cart
with an automotive or tractor starter motor with a V-belt pulley, high amperage
push-button [starter] switch and an automotive 12 volt battery motor to crank
the engine to start it. The battery on the tractor is used to power the ignition
and/or electric fuel pump only. And with no charging system, a remote
battery charger will need to be used to keep the battery
fully charged when the tractor and starter cart are not in use. Also, keep
in mind if using a high-output/performance coil, because these draw more
amps from the battery. The average life expectancy of most standby batteries
is between 3-5 years.
To reduce weight on a garden pulling tractor, remove all starting
mechanisms, install a small
motorcycle battery or a small, lightweight and rechargeable
12 volt sealed lead acid (SLA) battery with a minimum 4AH
(Amp Hour) rating on the tractor, use a machined billet aluminum starter
pulley on the crankshaft PTO end, then use a 2 wheel remote starter cart
with an automotive or tractor starter motor with a V-belt pulley, high amperage
push-button [starter] switch and an automotive 12 volt battery motor to crank
the engine to start it. The battery on the tractor is used to power the ignition
and/or electric fuel pump only. And with no charging system, a remote
battery charger will need to be used to keep the battery
fully charged when the tractor and starter cart are not in use. Also, keep
in mind if using a high-output/performance coil, because these draw more
amps from the battery. The average life expectancy of most standby batteries
is between 3-5 years.
All starter carts crank the engine from the right side of the tractor, when sitting on the tractor. All Ford tractor starter motors turn clockwise when facing the shaft, and 99% of all small gas engines also turn clockwise when facing the flywheel. So make sure that the starter is installed so it'll turn the same direction as the engine. Position the starter motor on the cart as shown here, with the shaft facing your left when standing behind the cart. But if you have a different type of starter motor on a starter cart that rotates in reverse of normal engine rotation, then the belt will need to be reversed to resemble a figure 8 to rotate the engine in the right direction.
To fabricate a remote starter cart, use a 6 volt starter motor that's made for a 2N, 8N or 9N Ford farm tractor. A 12 volt starter won't have enough strength to crank over an average pulling engine. Then attach a 2" diameter steel or cast iron V-groove belt pulley on the shaft of the starter. Position a heavy duty 12 volt automotive battery at the base of the cart, a starter solenoid to activate the starter and a heavy-duty push-button type switch to activate the solenoid. And always fully charge the battery before every pull! 6 volt Ford starter motors are available on eBay if one is needed for a starter cart.
A high-torque Chevrolet V8 starter motor also works great for use on an auxiliary starter cart. A small diameter V-groove pulley in the starter mounting housing will need to installed in place of the starter drive and the V-belt will need to be installed on the pulley inside the housing.
Steer Your Tractor Straight Down the Track Using Your Body Weight!
Sometimes there is no "best way" to make both rear tires to pull equally or straight down the track. If your tractor start to head toward the boundary line, use your body weight to try to steer the tractor straight. Don't slide your butt from side to side in the seat. Doing that could cause the tractor to jerk and lose traction. Just lean your chest or upper part of your body from side to side. Lean to one side or the other. Lean the same direction the tractor is going and not the opposite way! If the tractor is headed to the right, lean to the right. In other words, lean your body toward the outside of the track. Lean a lot if you must! And it would help to lean forward too, because the front of the tractor is obviously too light. By leaning your body to either side, this places less weight on the [rear] tire that has the most traction. Also, try to place "enough" physical weight on the front of the tractor so the front tires can more or less steer the tractor straight down the track. Having a narrow rear wheel base (when the rear tires set close to the tractor frame) will help in guiding the tractor straight down the track, too.
If the front of the tractor seems too light all the time, you could...
 Obviously, remove weight(s) from the rear
of the tractor and place it/them on the front.
Obviously, remove weight(s) from the rear
of the tractor and place it/them on the front.
If you don't already have one installed, and
if rules allow this, use an extendable or telescopic front weight bar. An
extended front weight bar helps to balance the tractor better so the rear
tires can dig in more. Make it the maximum length to whatever your clubs'
rules allow. Because the further out the weight extends from the rear tires,
the better the balancing effect it will have. And being most garden tractors
have somewhat of a short wheelbase, the front weight bar extension will give
a tractor the proper "balancing effect" or "front end weight flotation" that
is so critical when attempting to control the direction of the tractor on
the track. Scroll down or Click
or tap here for more information on various designs of the extendable
front weight bar.
Fabricate and install a solid steel front
axle that pivots in the center. A solid steel axle weighs about 14 lb.
It's heavier and much more durable than the [fragile] OEM cast iron piece.
Reposition the front axle to the extreme front
of the frame of the tractor. This makes the tractor look better, and it
gives it that "stretched" look. If the axle is moved forward, don't forget
to reinforce the frame where the engine
mounting bolt holes are or the bolt holes will break out due to normal engine
vibration and pulling stress. To move the front axle forward on a narrow
frame Cub Cadet garden tractor, first remove the engine. Then on the frame
on the narrow frame tractors, weld a brace across the frame or install an
old oil pan to keep the frame from spreading when the brace is removed.
Otherwise, the engine mounting bolt holes will not be aligned. Then raise
the front of the tractor with an overhead hoist, and use a cutting torch
and disc grinder to remove the axle support from the frame, and then locate
it forward and weld it securely in place.
 Reposition the transaxle assembly
to the extreme rear of the frame, by drilling four new holes in the frame.
This will lengthen the tractor's appearance and wheelbase. The transaxle
can be moved rearward as far as 6", using only 4 bolts to fasten it to the
frame. And instead of making a new, longer
driveshaft, you can use the present one by fabricating
a longer coupler made of .626" i.d. x 9" long heavy wall steel tubing. Run
the tubing about 1" up on the driveshaft for better stability. Exception:
The tubular coupler used on models 800, 1000, 1200 and 582 can be made just
6" longer, because these couplers already have a lot of contact with the
driveshaft, if original driveshaft dimensions are used. The brake linkage
and maybe the shift lever will also need to be lengthened 6". And unless
the driver/operator is a very tall person with long legs (to reach the pedals),
leave the seat and fenders in their original position.
Reposition the transaxle assembly
to the extreme rear of the frame, by drilling four new holes in the frame.
This will lengthen the tractor's appearance and wheelbase. The transaxle
can be moved rearward as far as 6", using only 4 bolts to fasten it to the
frame. And instead of making a new, longer
driveshaft, you can use the present one by fabricating
a longer coupler made of .626" i.d. x 9" long heavy wall steel tubing. Run
the tubing about 1" up on the driveshaft for better stability. Exception:
The tubular coupler used on models 800, 1000, 1200 and 582 can be made just
6" longer, because these couplers already have a lot of contact with the
driveshaft, if original driveshaft dimensions are used. The brake linkage
and maybe the shift lever will also need to be lengthened 6". And unless
the driver/operator is a very tall person with long legs (to reach the pedals),
leave the seat and fenders in their original position.
Advertisement:
| Click here to contact A-1 Miller's Performance Enterprises to place an order, send your parts for repairing, and/or for FREE professional and honest technical customer service assistance and support and payment options. Please contact A-1 Miller's if you need a part or parts, or service(s) performed that's not listed or mentioned in this website. |
 Bolts for Driveshaft Couplers
below Ê. Makes for easier installation
and removal of driveshaft assembly, or disconnection of coupler when changing
top input pinion gear/shaft. Bolt: 1/4" diameter x 1-3/4" length, partial
thread. Includes nylon-inserted lock nut. Bolts for Driveshaft Couplers
below Ê. Makes for easier installation
and removal of driveshaft assembly, or disconnection of coupler when changing
top input pinion gear/shaft. Bolt: 1/4" diameter x 1-3/4" length, partial
thread. Includes nylon-inserted lock nut.
|
 OEM stock-length (replaces
Cub Cadet part # IH-394036-R1) or 3" aftermarket rigid tubular carbon steel
driveshaft one-piece rigid tubular couplers for Cub Cadet garden tractor
models 70, 71, 72, 73, 86, 100, 102, 104, 106, 108, 122, 124, 126 and 128.
And one-piece couplers to replace rubber flex coupler(s) and T-arms on "Quiet
Line" Cub Cadet garden tractor models 800, 1000, 1050 and 1200 when using
solid motor mounts (The 800, 1000 and 1200
coupler will come with two roll pin holes for single or double rubber flex
coupler(s).) Also custom-length rigid tubular driveshaft couplers, up to
6" in length are available. For a custom-length coupler, exact locations
where the spiral/roll pin holes need to be drilled are required. To find
the location of the spiral/roll pin holes, install the driveshaft in the
tractor with the engine fastened to the frame with a couple of bolts, make
sure the clutch disc is midway on the drive pins, then measure precisely
from the rear spiral/roll pin hole on the driveshaft to the spiral/roll pin
hole in the input shaft in the transaxle, then add 3/4" for the overall length
of the coupler. NOTE: The
3" aftermarket coupler is used only for competition pulling tractors
with a shortened driveshaft so the input pinion gear/shaft can be changed
to vary the ground speed of the tractor. And when ordering,
please specify model of Cub Cadet garden tractor, overall length and spiral/roll
pin hole locations. OEM stock-length (replaces
Cub Cadet part # IH-394036-R1) or 3" aftermarket rigid tubular carbon steel
driveshaft one-piece rigid tubular couplers for Cub Cadet garden tractor
models 70, 71, 72, 73, 86, 100, 102, 104, 106, 108, 122, 124, 126 and 128.
And one-piece couplers to replace rubber flex coupler(s) and T-arms on "Quiet
Line" Cub Cadet garden tractor models 800, 1000, 1050 and 1200 when using
solid motor mounts (The 800, 1000 and 1200
coupler will come with two roll pin holes for single or double rubber flex
coupler(s).) Also custom-length rigid tubular driveshaft couplers, up to
6" in length are available. For a custom-length coupler, exact locations
where the spiral/roll pin holes need to be drilled are required. To find
the location of the spiral/roll pin holes, install the driveshaft in the
tractor with the engine fastened to the frame with a couple of bolts, make
sure the clutch disc is midway on the drive pins, then measure precisely
from the rear spiral/roll pin hole on the driveshaft to the spiral/roll pin
hole in the input shaft in the transaxle, then add 3/4" for the overall length
of the coupler. NOTE: The
3" aftermarket coupler is used only for competition pulling tractors
with a shortened driveshaft so the input pinion gear/shaft can be changed
to vary the ground speed of the tractor. And when ordering,
please specify model of Cub Cadet garden tractor, overall length and spiral/roll
pin hole locations.
|
Lower the hitch height
slightly or reposition the hook point closer toward the transaxle. The
best position for the hook point is 6-1/2" to 8" rearward from the centerline
of the rear axle.
Pull in a slightly faster
gear.
Install a smaller diameter
steering wheel so the driver/operator
can lean forward more.
Use aluminum wheels on the rear. Scroll
down or Click or tap here for more
information.
Fabricate and install aluminum or fiberglass
rear fenders. For safety reasons, do not remove the fenders entirely!
And be aware if using fiberglass. It has been known to crack due to normal
engine/tractor vibration. When fastening it, use some fender washers to
distribute the load.
Fabricate and install an aluminum seat with
a short raised back (approximately 3").
Use less oil in the transaxle. To do this,
don't fill the transaxle full of oil (to the full level hole). Instead, tap
another fill hole 2" (on the rear cover) below the original one and fill
it up to there. The lower driven gears and the ring gear will still pick
up plenty of oil and sling it on the upper moving parts, keeping them well
lubricated. A grease fitting may need to be tapped into each axle housing
end to help keep them lubricated as well.
 Install a set of cast aluminum axle housings off of certain models of older
IH Cub Cadet garden tractors. They'll about 12 lb. lighter than the cast
iron ones. And the aluminum axle housings are just as strong as the cast
iron ones. There's no way to break one. They can be machined for the larger
Chrysler axle bearing and oil seal, too.
Install a set of cast aluminum axle housings off of certain models of older
IH Cub Cadet garden tractors. They'll about 12 lb. lighter than the cast
iron ones. And the aluminum axle housings are just as strong as the cast
iron ones. There's no way to break one. They can be machined for the larger
Chrysler axle bearing and oil seal, too.
 To save even more on weight, use an aluminum transaxle case and an aluminum
reduction gear housing that's available on certain later models of Cub Cadet
garden tractors and aftermarket ones made by
Midwest Super Cub. By the way
- the aluminum transaxle housing and casings are definitely strong enough
for competition pulling. Just remember when installing the bolts, use bolts
with threads that's long enough to go deep into the aluminum so they won't
strip out under stress or pressure.
To save even more on weight, use an aluminum transaxle case and an aluminum
reduction gear housing that's available on certain later models of Cub Cadet
garden tractors and aftermarket ones made by
Midwest Super Cub. By the way
- the aluminum transaxle housing and casings are definitely strong enough
for competition pulling. Just remember when installing the bolts, use bolts
with threads that's long enough to go deep into the aluminum so they won't
strip out under stress or pressure.
The IH Cub Cadet garden tractor cast iron complete transaxle without any internal parts weighs about 97 lb. And the aftermarket aluminum reduction housing, transaxle case and Cub Cadet garden tractor aluminum axle housings all together weighs about 49 lb.
Set the rear tires (wheels) inward or closer
to the frame so the driver/operator can lean with less body weight and guide
the tractor better. To do this with steel wheels, the centers will need
to be moved in the wheels. There's also aluminum wheels available with various
offsets for doing this. The fact that a lot of pullers like to use aluminum
wheels instead of steel ones isn't necessarily because
they look nice, it's because they're much lighter in weight then steel. They
create less rotating mass that robs the engine of power, and they help the
weight-conscience puller. Two steel 5-hole garden tractor wheels (Cub Cadet,
John Deere, Sears Suburban, Wheel Horse, etc.) that's been widened to 13"
weighs about 42 lb. And two 12" wide rear (Douglas) aluminum wheels weigh
in at a mere 12 lb.
Doing any of the three options listed below
Ê will add "leverage" to the front end.
In other words, it'll place more pressure on the drawbar and rear tires (making
them dig in more), and making it somewhat difficult for the front end to
rise when pulling. Otherwise, with the frame somewhat parallel with the ground,
the tractor is [kind of like] already doing a wheelie, even when it's not
in motion. So with the frame level and when it actually does a wheelie (while
pulling the sled), very little weight will be transferred upon the rear tires.
Now if the front end seems too heavy or if the front tires won't "float" down the track or barely make contact with the track when pulling, what could be done to lighten the front end is...
Obviously, remove weight(s) from the front
of the tractor and place it/them on the rear.
Sharpen the tire tread if rules allow, use
a different type of tire with better tread (softer or harder rubber compound;
according to track conditions) or adjust the tire pressure accordingly.
Remove all unnecessary (mower deck) brackets,
hangers, pulleys, etc. from the front or midway of the tractor.
Don't install the battery or fuel tank on
the extreme front end of the tractor. Or perhaps use a smaller fuel tank,
if you prefer it to be mounted on the front.
Reposition the drawbar
further back or away from the transaxle. The best position for the drawbar
is 6-1/2" to 8" rearward from the center of the rear axle.
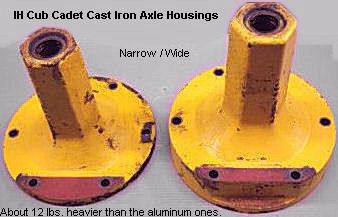 If your tractor has cast aluminum axle housings, install a set of cast iron
axle housings off the early models of Cub Cadet garden tractors. The cast
iron ones that will interchange with the aluminum housings that come on all
IH models of Cub Cadet garden tractors. There's about a 12 lb. difference
between the aluminum housings and the cast iron ones. To add even more weight
on the rear, use a cast iron transaxle case and a cast iron reduction gear
housing that also come on all IH models of Cub Cadet garden tractors. By
the way - the IH Cub Cadet garden tractor cast iron complete transaxle without
any internal parts weighs about 97 lb. And the aftermarket aluminum reduction
housing, transaxle case and Cub Cadet garden tractor aluminum axle housings
all together weighs about 49 lb.
If your tractor has cast aluminum axle housings, install a set of cast iron
axle housings off the early models of Cub Cadet garden tractors. The cast
iron ones that will interchange with the aluminum housings that come on all
IH models of Cub Cadet garden tractors. There's about a 12 lb. difference
between the aluminum housings and the cast iron ones. To add even more weight
on the rear, use a cast iron transaxle case and a cast iron reduction gear
housing that also come on all IH models of Cub Cadet garden tractors. By
the way - the IH Cub Cadet garden tractor cast iron complete transaxle without
any internal parts weighs about 97 lb. And the aftermarket aluminum reduction
housing, transaxle case and Cub Cadet garden tractor aluminum axle housings
all together weighs about 49 lb.
Remove the starter/generator (if equipped)
and install the smaller gear starter with a large diameter ring gear type
flywheel. There's a 22 lb. difference between the starter/generator. bracket
and PTO pulley versus the small gear starter.
Remove all starting mechanisms and use a remote
starter cart. Click or tap here for
more information on this subject.
Install a seat with a short(er) back support
so the driver/operator can lean back more.
Use small diameter aluminum wheels with small,
lightweight tires on the front.
If it's a slow moving stock tractor with low
tire speed, use steel wheels on the rear.
Fabricate and install a thin-wall [reinforced]
aluminum or steel tubular front axle that pivots in the center.
Fabricate and install a [reinforced] aluminum,
thin-wall steel or fiberglass hood/grille support. Be aware if using
fiberglass! It has been known to crack due to normal engine vibration. When
fastening it, install a wide flat washer with a large diameter rubber washer
on each mounting bolt against the fiberglass to cushion and distribute the
load.
If it's a high-tire-speed pulling tractor, avoid using
wheel weights or fluid in the rear tires for competition
pulling! But if you prefer to use wheel weights, the most easiest and inexpensive
way is to use barbell weights. They can be mounted by drilling a 27/64" hole
in the center of each axle (it should be soft metal), then cut some 1/2-13
threads in the drilled holes. Then install a hardened 1/2" diameter
 threaded steel rod
(All Thread) into the threaded holes, cut the rods off so
they won't protrude too far out past the tire, slide the weights onto the
rod, and then fasten them in place with a large flat washer and wing nut.
Never run wheel weights or fluid in the rear tires
except in or on a slow moving stock tractor! In a high speed pulling tractor,
the extra rotating weight will slow the tractor down A LOT! It's based on
one of the laws of physics and mechanics: it takes more force (as in torque
and horsepower) to set a heavy object in motion than it would to spin a
lightweight object. Therefore, in pulling, the wheel weights will cause the
rear tires to lose a lot of momentum (speed) and they'll rob the engine of
valuable power. Actually, the engine would be straining because of the extra
weight.
threaded steel rod
(All Thread) into the threaded holes, cut the rods off so
they won't protrude too far out past the tire, slide the weights onto the
rod, and then fasten them in place with a large flat washer and wing nut.
Never run wheel weights or fluid in the rear tires
except in or on a slow moving stock tractor! In a high speed pulling tractor,
the extra rotating weight will slow the tractor down A LOT! It's based on
one of the laws of physics and mechanics: it takes more force (as in torque
and horsepower) to set a heavy object in motion than it would to spin a
lightweight object. Therefore, in pulling, the wheel weights will cause the
rear tires to lose a lot of momentum (speed) and they'll rob the engine of
valuable power. Actually, the engine would be straining because of the extra
weight.
Fabricate a heavy duty box, and place weight
between the rear tires, under the transaxle. This lowers the center of gravity
for the overall rear weight of the tractor and lessens the chance having
a "teeter-totter" effect, or raring up and down of the front end. And instead
of using hang-on weights that's out in the open where the competition can
see the number of weights on the tractor, it'll be better to use a sturdy
weight box with a lid on the front weight extension and at the rear of the
tractor to hide the number of weights inside.
To
fabricate weights yourself, find a friend with a cutting torch, cut-off saw
or chop saw and welder then check with scrap metal recycling centers. That's
what I did, and saved a bundle! Of course, I have my own acetylene cutting
torch, 14" chop saw and a wire welder.
When placing weight on a pulling tractor, include some smaller pieces of weights, (1 lb., 2 lb.) instead of just large, massive weights or use thick and thin weights. While on the scales, smaller pieces of weights makes it much easier to remove, add or juggle down to a pound or two. And always mark your weights so you'll know how much each one weighs. This way, it takes the guess work out of adding or removing weight as needed. And it'll be a good idea to put your name on your weights, so another puller can't claim them as theirs.

 Sometimes automotive tire dealerships or tire repair shops
will give away 5 gallon buckets of used lead wheel balancing weights. Or
they'll sell a bucket full of lead weights for very little. Believe me, you
can hardly lift a full bucket of these weights! Lead wheel weights can be
easily melted down over low heat in a Teflon-coated cooking pan, a stainless
steel pan or skillet that's been coated with a non-stick cooking spray, such
as PAM® Cooking Spray
or Baker's Joy, and
then the lead can be poured into a steel or aluminum container (such as an
ice cube tray) to make certain shapes of small weights. But do this in a
well-ventilated area (outdoors) because molten lead produces caustic and
deadly gases! And don't worry about the steel clip on the weights. They won't
melt, they'll just mix in with the lead and add a little extra weight. For
more information and how-to videos on this subject, click here:
How To Melt Lead For Weights - YouTube.
Sometimes automotive tire dealerships or tire repair shops
will give away 5 gallon buckets of used lead wheel balancing weights. Or
they'll sell a bucket full of lead weights for very little. Believe me, you
can hardly lift a full bucket of these weights! Lead wheel weights can be
easily melted down over low heat in a Teflon-coated cooking pan, a stainless
steel pan or skillet that's been coated with a non-stick cooking spray, such
as PAM® Cooking Spray
or Baker's Joy, and
then the lead can be poured into a steel or aluminum container (such as an
ice cube tray) to make certain shapes of small weights. But do this in a
well-ventilated area (outdoors) because molten lead produces caustic and
deadly gases! And don't worry about the steel clip on the weights. They won't
melt, they'll just mix in with the lead and add a little extra weight. For
more information and how-to videos on this subject, click here:
How To Melt Lead For Weights - YouTube.
Fabricating the Front Extendable Weight Bar (Boom Extension) -
 If using the "stack or "hang
on" type of weights on the front weight bar, for stack weights, a rubber
strap could be used to secure the weights in place. Or better yet, and to
make it look fancy, run a 3/8" diameter steel rod over the top of all the
weights to secure them in place. This rod can be used for the hang on type
of weights, too. Then use a hair pin clip on each end of the rod to secure
it place.
If using the "stack or "hang
on" type of weights on the front weight bar, for stack weights, a rubber
strap could be used to secure the weights in place. Or better yet, and to
make it look fancy, run a 3/8" diameter steel rod over the top of all the
weights to secure them in place. This rod can be used for the hang on type
of weights, too. Then use a hair pin clip on each end of the rod to secure
it place.
Being there are many different ways to fabricate the front weight bar extension, the below Ê is how I like to do it. (This is much easier to do on a platform work table.)
FYI - The average 1,050 lb. competition garden pulling tractor needs approximately 60-65 lb. of weight on the front weight bar. This includes the tubing to construct the weight bar extension, weight box and/or bracket. Return È

 A
Spring-Loaded Pull Pin can be used to retain the front
weight bar extension in place on a pulling tractor. A spring-loaded pull
pin allows quick and easy retraction and engagement of the locking pin or
plunger to slide the front weight extension in and out with less effort.
Easily installed. Align holes and weld base to the outer weight bar extension
housing. Pulling on the handle of the plunger assembly retracts the plunger
into the housing. Releasing the handle allows the spring-loaded plunger to
extend. The lockout design allows the handle to be pulled and rotated 1/4
turn to hold the plunger in the retracted position.
A
Spring-Loaded Pull Pin can be used to retain the front
weight bar extension in place on a pulling tractor. A spring-loaded pull
pin allows quick and easy retraction and engagement of the locking pin or
plunger to slide the front weight extension in and out with less effort.
Easily installed. Align holes and weld base to the outer weight bar extension
housing. Pulling on the handle of the plunger assembly retracts the plunger
into the housing. Releasing the handle allows the spring-loaded plunger to
extend. The lockout design allows the handle to be pulled and rotated 1/4
turn to hold the plunger in the retracted position.
To make a place to add weights on the rear of your tractor, fabricate an 1/8" flat steel plate above the drawbar to place some "hang on" weights onto. And use a rubber strap or fasten a steel rod over the top of the weights to secure them in place. Or fabricate a long, narrow metal box with a locking lid to place odd shapes of weight into.
To add even more weight and to "balance" the tractor out a little better, a bracket could be fabricated under the frame/in front of each rear tire to hang some weight onto. Or better yet, when at a pull, walk around and look over the competitive (winning) pulling tractors, to get some idea on how and where they place their weights.
And if only if the same person pulls the same tractor all the time, or if one don't need to remove weight(s) from a tractor often, you could "disguise" the weight(s) or hide it/them by fabricating a heavier, thicker steel grille/hood support or front axle, fabricate some heavier, thicker steel fenders, fasten weight inside the frame rails, etc. Also, avoid using inside mounted rear wheel weights.
Weight of Various Materials
-
If you don't have a scale to weigh your steel or lead, here's the formulas to figure the weight of these metals: (All measurements shown are in inches. And it's best to use a calculator for these.)
When placing ballast weight in the weight box(es) of a pulling tractor, try to avoid using material that's very porous or has a lot of "empty space" inside it. The empty space takes up a lot of valuable room that could be filled with other metal. Therefore, it's best to use solid blocks or plates of steel, cast iron or better yet, lead.
Contact us - [Return To Previous Paragraph, Section or Website]
 To
place an order, please send your item(s) for repairing, and/or for customer
service assistance, and FREE honest and accurate technical support, contact:
A-1 Miller's Performance Enterprises, 12091 N Route B, Hallsville, MO (Missouri)
65255-9604 USA. Please call in your order or send an email with a list parts
you need and your contact information.
To
place an order, please send your item(s) for repairing, and/or for customer
service assistance, and FREE honest and accurate technical support, contact:
A-1 Miller's Performance Enterprises, 12091 N Route B, Hallsville, MO (Missouri)
65255-9604 USA. Please call in your order or send an email with a list parts
you need and your contact information.
 Phone: 1-573-881-7229 (cell;
call, text or leave voicemail). Please call Monday-Friday, 9am to 5pm, Central
time zone, except holidays. If no answer, please try again later.
Phone: 1-573-881-7229 (cell;
call, text or leave voicemail). Please call Monday-Friday, 9am to 5pm, Central
time zone, except holidays. If no answer, please try again later.
 E-mail:
pullingtractor@aol.com. A-1 Miller's
shop is open to the public Monday-Friday, 9am to 5pm, Central time zone,
with an appointment on weekends, except holidays. If you're the kind of person
who don't trust delivery/shipping companies (mis)handling your high-dollar
and fragile merchandise, you can make the long drive to A-1 Miller's new
shop (click image to the right) to personally purchase parts, or drop off
and/or pick up your carburetor, clutch assembly, and/or other parts for repairing
and/or rebuilding. Or visit our new shop to drop off your parts. Please contact
us before coming so we'll be at our shop waiting for your arrival. When you
visit our shop, you will be dealing directly with the owner for the best
customer service. "The road to a [trusted] friend's house (or shop) is
never long." Don't sacrifice quality workmanship for distance.
Payment Options below.
Photos
of our new building/shop are posted here!
12091 N Route B, Hallsville, MO - Google Maps.
E-mail:
pullingtractor@aol.com. A-1 Miller's
shop is open to the public Monday-Friday, 9am to 5pm, Central time zone,
with an appointment on weekends, except holidays. If you're the kind of person
who don't trust delivery/shipping companies (mis)handling your high-dollar
and fragile merchandise, you can make the long drive to A-1 Miller's new
shop (click image to the right) to personally purchase parts, or drop off
and/or pick up your carburetor, clutch assembly, and/or other parts for repairing
and/or rebuilding. Or visit our new shop to drop off your parts. Please contact
us before coming so we'll be at our shop waiting for your arrival. When you
visit our shop, you will be dealing directly with the owner for the best
customer service. "The road to a [trusted] friend's house (or shop) is
never long." Don't sacrifice quality workmanship for distance.
Payment Options below.
Photos
of our new building/shop are posted here!
12091 N Route B, Hallsville, MO - Google Maps.
Payment Options, and We Ship to Canada and
Worldwide 
Item(s) in a package or cushioned envelope weighing less than 1 lb. is sent
by US Postal Service Airmail Letter Post for a 4-7 days delivery. Packaged
item(s) weighing over 1 lb. and up to 66 lb. is sent by US Postal Service
Airmail Parcel Post for a 4-10 days delivery. I cannot use the US Postal
Services' Flat Rate Priority Mail envelopes and boxes to ship outside U.S.
territories. Item(s) weighing over 67 lb. or more is sent by FedEx Ground
or equivalent services. We try to keep our shipping cost to customers within
reason. Therefore, we don't ship our products in a fancy-looking package
with our company name and/or logo on it because most customers will just
toss it in the trash after they remove the contents. And being there is no
USPS tracking number outside the US, all I can do is make sure I write your
address correctly on the customs form and on your package.
My websites are not set up to process orders and accept payments. Therefore, I will need your name, complete and correct postal mailing address and phone number. And for payment options, I accept cash (in person), USPS Postal Money Orders, cashier's checks and business checks. I do not accept credit/debit cards. Or to make a payment to me through PayPal, please click this link: https://www.paypal.com (username: pullingtractor@aol.com). And please use PayPal's "Friends and Family" option to ensure that I receive the full amount or add 3% to the total amount to cover PayPal's processing surcharge. I also accept Venmo (username: Pullingtractor) and Cash App (username: pullingtractor) please add 2% for Cash App's surcharge as well). And be sure to mention a description of what the payment is for with your full name, postal address, phone number and email address. If sending a money order or cashier's check, please include a note in the envelope with your name, complete mailing address, phone number, email address and a description of what the payment is for. I'll make a note of your order when I have all your information, and I may have to order some of the parts on your list, which should take a few days to come in, but I will send everything to you as soon as the parts are in stock after I receive your payment.


Return To Previous Website | Top of Page | Copyright © 1996-Present. This website created, designed and maintained by A-1 Miller's Performance Enterprises