 How to Repair, Improve and Modify the Steering
on a Cub Cadet and Other Makes and Models of Garden Tractors
How to Repair, Improve and Modify the Steering
on a Cub Cadet and Other Makes and Models of Garden Tractors
How to Repair, Improve and Modify the Steering
on a Cub Cadet and Other Makes and Models of Garden Tractors
How to Repair, Improve and Modify the Steering
on a Cub Cadet and Other Makes and Models of Garden Tractors
Educating and Inspiring Small Engine, Lawn & Garden, and Garden
Pulling Tractor Enthusiasts Since 1996. Where Science and Common Sense Come
Together for Safety and Improved Engine/Tractor Performance |
A-1
Miller's Performance Enterprises - Parts & Services
Webstore |  Available Soon - Detailed Illustrated Plans
on How to Construct Professional Pulling Sleds
Available Soon - Detailed Illustrated Plans
on How to Construct Professional Pulling Sleds
Nowadays, prices are subject to change without notice. Click
Refresh to see any
changes or updates. Optimized for 1152 x 864 computer screen resolution.
To search for a word or phrase in any of my websites, press the CTRL
 and F
and F  keys on
your keyboard simultaneously to open the Find or Search dialog box in your
web browser. And being I have no
apprentice to update and pay for my websites so they'll
continue to be on the Internet, they will be removed forever when I'm no
longer around.
keys on
your keyboard simultaneously to open the Find or Search dialog box in your
web browser. And being I have no
apprentice to update and pay for my websites so they'll
continue to be on the Internet, they will be removed forever when I'm no
longer around.
Before attempting to rebuild a Ross steering assembly, it will need to be removed from the tractor (this is much easier performed with the tractor on a platform work table), completely disassembled, and then thoroughly clean all the parts, inspect them, and then you can determine which parts need to be replaced. When building a competition pulling garden tractor, it's best to remove and disassemble everything. This is one important thing many pullers-to-be overlook. Steering is very important, especially in pulling, and should never be overlooked or neglected. Loose or worn steering parts can be dangerous. A puller may just tighten the steering box adjustments, inspect the tie rods and that's it. But there's more to it than just making proper adjustments...
How to Remove the Steering Wheel from a Cub Cadet or Virtually Any Garden Tractor with a ROSS Steering Assembly - There are several ways to remove the steering wheel -


 DO NOT STRIKE THE SPLINED END OF THE STEERING
SHAFT WITH A BIG HAMMER IN AN ATTEMPT TO REMOVE THE STEERING
WHEEL! Doing this could cause the internal threads in
the lower part of the cast aluminum steering box housing to split and crack
the case or break off entirely. Or if the housing is cracked, the bottom
of the steering box could break off entirely later, which would be dangerous
because the tractor could go out of control, especially when pulling on the
track.
DO NOT STRIKE THE SPLINED END OF THE STEERING
SHAFT WITH A BIG HAMMER IN AN ATTEMPT TO REMOVE THE STEERING
WHEEL! Doing this could cause the internal threads in
the lower part of the cast aluminum steering box housing to split and crack
the case or break off entirely. Or if the housing is cracked, the bottom
of the steering box could break off entirely later, which would be dangerous
because the tractor could go out of control, especially when pulling on the
track.
To prevent damage to the threads on the steering shaft, install an ordinary length 5/8-18 UNF nut on the shaft threaded down until flush with the end of the threads, and while pulling upward on the steering wheel with your hands (assistance/help may be needed), give the nut a short blast with an air chisel. Do not use the short OEM steering wheel retaining jam nut because threads on the shaft may become damaged. AND DO NOT USE A BIG HAMMER! If the end of the steering shaft was hammered on without the nut installed in an effort to remove the steering wheel, which caused the threads to become flared-out or "mushroomed", well, there two ways to fix this... (A-1 Miller's provides this repair service, too.)
The easy way to fix this is...
 Use a
hacksaw or
reciprocating saw (also known as a
saw-saw) to cut the damaged threads off the steering shaft
next to the splines.
Use a
hacksaw or
reciprocating saw (also known as a
saw-saw) to cut the damaged threads off the steering shaft
next to the splines.
The more complicated way to fix this and retain the OEM look of the stud with the retaining nut is...
 Remove the steering shaft from
the steering box assembly.
Remove the steering shaft from
the steering box assembly.
 Use either a
steering wheel puller (with bolts) or an
automotive harmonic balancer/vibration damper puller (with
bolts) and a
bearing separator, or use only a
3-jaw gear puller to "pull" the steering wheel off the
shaft. To prevent damage to the steering wheel, make sure the jaws of a gear
puller won't break or crack the plastic around the hub.
Use either a
steering wheel puller (with bolts) or an
automotive harmonic balancer/vibration damper puller (with
bolts) and a
bearing separator, or use only a
3-jaw gear puller to "pull" the steering wheel off the
shaft. To prevent damage to the steering wheel, make sure the jaws of a gear
puller won't break or crack the plastic around the hub.
 As the last resort, if the steering
shaft itself must be literary cut-off with a
hacksaw or
reciprocating saw (also known as a
saw-saw), just under the steering wheel, the splined part
of the shaft can be replaced with the steering shaft (that's in good condition)
out of a 1949 to 1994 GM (General Motors) car or truck. Only a short section
of the splined end of the shaft will need to be used. The GM automotive shaft
next to the splines will need to be machined down fit inside the ROSS [hollow]
steering shaft, then the GM shaft can be pressed inside the ROSS shaft with
an 1/8" gap. Fill in the gap with welding around where the two shafts meet.
The lump of weld will need to be either machined down (in a metal lathe;
for use of a solid metal bushing) or ground down (with a hand grinder for
use of a ball bearing) so the upper bushing or bearing will slide on the
shaft. Installation of the steering wheel and hub adapter are explained below
Ê.
As the last resort, if the steering
shaft itself must be literary cut-off with a
hacksaw or
reciprocating saw (also known as a
saw-saw), just under the steering wheel, the splined part
of the shaft can be replaced with the steering shaft (that's in good condition)
out of a 1949 to 1994 GM (General Motors) car or truck. Only a short section
of the splined end of the shaft will need to be used. The GM automotive shaft
next to the splines will need to be machined down fit inside the ROSS [hollow]
steering shaft, then the GM shaft can be pressed inside the ROSS shaft with
an 1/8" gap. Fill in the gap with welding around where the two shafts meet.
The lump of weld will need to be either machined down (in a metal lathe;
for use of a solid metal bushing) or ground down (with a hand grinder for
use of a ball bearing) so the upper bushing or bearing will slide on the
shaft. Installation of the steering wheel and hub adapter are explained below
Ê.
 Replace
that worn, cracked (and not to mention unsightly and boring/plain looking)
OEM (Original Equipment Manufacturer) steering wheel with an attractive,
small diameter (10" or 12") automotive-style/hot rod
custom steering wheel or a
chrome spoke steering wheel! A custom or chrome spoke steering
wheel will, without a doubt, improve the overall appearance of the entire
tractor.
Replace
that worn, cracked (and not to mention unsightly and boring/plain looking)
OEM (Original Equipment Manufacturer) steering wheel with an attractive,
small diameter (10" or 12") automotive-style/hot rod
custom steering wheel or a
chrome spoke steering wheel! A custom or chrome spoke steering
wheel will, without a doubt, improve the overall appearance of the entire
tractor.
 To adapt a custom steering wheel
to the ROSS [splined end] steering shaft, and if the splines and threads
on the shaft are in good condition, the only custom automotive steering wheel
installation adapter kit I found that fits close on the ROSS splined steering
shaft is an aftermarket early GM automotive steering wheel hub adapter kit,
Grant part # 3196, that's made for most General Motors
cars and trucks from 1949 to 1994 without telescopic steering. Leave out
the horn switch plate and install multiple flat washers on the supplied steering
wheel mounting bolts so the steering wheel will install tight against the
hub.
To adapt a custom steering wheel
to the ROSS [splined end] steering shaft, and if the splines and threads
on the shaft are in good condition, the only custom automotive steering wheel
installation adapter kit I found that fits close on the ROSS splined steering
shaft is an aftermarket early GM automotive steering wheel hub adapter kit,
Grant part # 3196, that's made for most General Motors
cars and trucks from 1949 to 1994 without telescopic steering. Leave out
the horn switch plate and install multiple flat washers on the supplied steering
wheel mounting bolts so the steering wheel will install tight against the
hub.
The GM automotive adapter center spline has the correct diameter, but the number of splines are not a perfect fit, so it will need to be gently tapped onto the steering shaft. Or the center splined hub from a 1949 to 1994 OEM GM steering wheel can be used instead. But the three small holes in the hub will need to be enlarged and tapped for three 1/4" bolts for installation of the custom steering wheel. But if you don't want to use the GM adapter, the splined hub from an early model Cub Cadet steering wheel with the spokes cut off, and a large flat washer (with three tapped 1/4" bolt holes for installation of the custom steering wheel) welded to the adapter can be used. Once the steering wheel is removed, position the front tires forward, fasten the splined adapter on the steering shaft (with the choice of hardware listed below Ê), then fasten the steering wheel with the adapter facing in the straight ahead position.
Use the OEM ROSS (Cub Cadet, John Deere, etc.) steering wheel retaining nut or an aftermarket 5/8-18 UNF nylon insert jam nut with a thin flat washer to secure the steering wheel and hub to the steering shaft. For easier installation of the steering wheel retaining nut, use a 5/8-18 UNF threading die and die holder wrench to straighten damaged threads on the shaft, and for much easier removal of the steering wheel (for whatever reason), apply anti-seize compound/lubricant in the splines of the steering wheel hub and on the splines of the steering shaft, then torque the nut to 65 ft. lb.
 Install the three 1/4" bolts
from the bottom up, install the steering wheel, then install
stainless steel acorn nuts with a split lock washer to
the bolts (studs) to fasten the steering wheel for a nice looking and
(rust-proof) professional look. Then to hide the (unsightly) large center
retaining nut, install a 15/16"
stainless steel lug nut cover. These are made for semi
tractor-trailers, which are available at most truck stops and on eBay. Or,
to hide the three bolts and retaining nut, install a
Install the three 1/4" bolts
from the bottom up, install the steering wheel, then install
stainless steel acorn nuts with a split lock washer to
the bolts (studs) to fasten the steering wheel for a nice looking and
(rust-proof) professional look. Then to hide the (unsightly) large center
retaining nut, install a 15/16"
stainless steel lug nut cover. These are made for semi
tractor-trailers, which are available at most truck stops and on eBay. Or,
to hide the three bolts and retaining nut, install a
 chrome-plated universal custom
automotive horn button (center cap). To do this, machine a large flat washer
in a metal lathe so the washer will be slightly larger than the inside diameter
of the horn button. Fasten the washer in the steering wheel to the three
1/4" bolts with a couple of stacked smaller flat washers under the large
washer. Snap the horn button onto the washer and that's it! Snap the horn
button onto the washer and that's it!
chrome-plated universal custom
automotive horn button (center cap). To do this, machine a large flat washer
in a metal lathe so the washer will be slightly larger than the inside diameter
of the horn button. Fasten the washer in the steering wheel to the three
1/4" bolts with a couple of stacked smaller flat washers under the large
washer. Snap the horn button onto the washer and that's it! Snap the horn
button onto the washer and that's it!
|
|
|
|
|
|
How To Fix Loose or "Sloppy" Steering Parts -
To improve the steering on a Cub Cadet garden tractor, is to remove, disassemble, clean, inspect, repair as necessary, reassemble, adjust, then lubricate the steering box unit with automotive grease through the Zerk grease fitting. By the way - adjustments are made much easier with the steering box assembly out of the tractor. Remember - Zerk grease fittings provide preventive maintenance when used regularly. Because grease cost less than any major repair of equipment.
Don't Be A Slob When Rebuilding A Steering Unit!
Always be professional whenever building or rebuilding anything! Before reassembling a steering unit, always take the time to provide a neat and absolutely clean work environment. Make sure that your tools, shop/business towels, steering parts and hands are clean, too. Don't allow any dust or dirt to enter the work bench or table, including the steering box and it's parts. If necessary, place the parts on a large, clean cloth or cardboard to keep them clean and organized until they're ready to be installed. The reason everything should be kept as clean as possible is because even the smallest bit of dirt inside a steering box will "grind away" at the internal parts, causing unnecessary wear.
How to remove the steering box/column unit from the tractor - (This is much easier to do on a platform work table.)
How to disassemble the steering unit -
How to reassemble the steering unit -
NOTE: If new internal steering box parts are needed in a rebuild, you can get them at virtually any Cub Cadet garden tractor dealer. Most John Deere lawn & garden service centers and parts stores offers the same parts for the steering box in their models 110, 112, 120, 140, 200, 210, 212, 214, 216, 300, 312, 316 and 317. The steering box in these tractors, which is made by ROSS, are very similar to the ones used in the Cub Cadet garden tractors, except for the mounting holes. The internal parts are basically the same, but new John Deere parts are more expensive than new Cub Cadet garden tractor parts.
Ever had the steering column tube get pulled out of the steering box on a Cub Cadet garden tractor? Well, doing the below Ê will guarantee that it will never get pulled out again -
 automotive exhaust pipe expander/spreader tool. (Available
at virtually any auto parts store and on eBay.)
automotive exhaust pipe expander/spreader tool. (Available
at virtually any auto parts store and on eBay.)
NOTE: If the upper part of the steering tube becomes damaged from removing the steering wheel, it can be straightened back to its original shape with the automotive exhaust pipe expander/spreader tool and a 2-3 lb. hammer. The internal steering shaft must be removed, so the tool will work.
 Tie rods are an integral part of a vehicle's steering.
Just as its name suggests, a tie rod connects the vehicle's steering linkage
to the steering arm, and the steering arm is attached to the front spindle.
Tie rods are an integral part of a vehicle's steering.
Just as its name suggests, a tie rod connects the vehicle's steering linkage
to the steering arm, and the steering arm is attached to the front spindle.
If a tie rod is badly worn loose and performing
the below doesn't "tighten" it, and you have doubts that it may fail in the
future, then by all means, replace it with a known good used one or a new
one. Actually, for heavy lawn and garden use or for a competition pulling
tractor, it's best to use aircraft-quality ball-joint ends, which are called
Heim joints, with a flat washer and rubber dust/dirt shields installed.
How to "Tighten" a Worn Tie Rod -
 A-1 Miller's Professional Rebuild/Repair
Service for ROSS Steering Box/Column Assemblies for International
Cub Cadet "Original" garden tractor, IH- and MTD-built Cub Cadet, Ford LGT,
Jacobsen, John Deere, Massey Ferguson, MTD Farm King, Snapper, Wheel Horse
and various other makes and models of garden tractors with the ROSS or
CCC (Cub Cadet Corporation) aluminum housing manual steering box.
IMPORTANT: For
preventive maintenance and smoother steering, lubricate
steering box and all steering parts through Zerk
grease fitting with an
automotive grease gun once a year. A-1 Miller's Professional Rebuild/Repair
Service for ROSS Steering Box/Column Assemblies for International
Cub Cadet "Original" garden tractor, IH- and MTD-built Cub Cadet, Ford LGT,
Jacobsen, John Deere, Massey Ferguson, MTD Farm King, Snapper, Wheel Horse
and various other makes and models of garden tractors with the ROSS or
CCC (Cub Cadet Corporation) aluminum housing manual steering box.
IMPORTANT: For
preventive maintenance and smoother steering, lubricate
steering box and all steering parts through Zerk
grease fitting with an
automotive grease gun once a year.
FOR SALE: Professionally Rebuilt ROSS IH Cub Cadet Garden Tractor Steering Assemblies - (When available.)
|
Front Axle Pivot Pin, Tie Rod, Heim Joints, Drag Link Steering Joints and Custom-Made Steering Links - NOTE: Before ordering any of the parts listed below, it'll be best to completely disassemble your steering assembly and thoroughly clean all the parts to determine exactly which replacement part(s) it will need. Because certain parts wear more than others, while other parts don't wear at all.
 Zinc-Plated Steel Nylon
Insert Steering Wheel Retaining Jam Locknut. Will not loosen under normal
circumstances. Fits all Cub Cadet garden tractors and other makes and models
of garden tractors with 5/8-18 UNF threads on steering shaft. IMPORTANT
- For easier installation of this nut, use a 5/8-18 UNF
threading die and
die holder wrench to straighten damaged threads on shaft,
and for much easier removal of steering wheel, apply
anti-seize compound/lubricant on splines of steering wheel
hub and steering shaft, then torque nut to 65 ft. lb. High quality
aftermarket. Replaces discontinued Cub Cadet part # 912-3021. $3.00
each, plus shipping & handling. Zinc-Plated Steel Nylon
Insert Steering Wheel Retaining Jam Locknut. Will not loosen under normal
circumstances. Fits all Cub Cadet garden tractors and other makes and models
of garden tractors with 5/8-18 UNF threads on steering shaft. IMPORTANT
- For easier installation of this nut, use a 5/8-18 UNF
threading die and
die holder wrench to straighten damaged threads on shaft,
and for much easier removal of steering wheel, apply
anti-seize compound/lubricant on splines of steering wheel
hub and steering shaft, then torque nut to 65 ft. lb. High quality
aftermarket. Replaces discontinued Cub Cadet part # 912-3021. $3.00
each, plus shipping & handling.
|
 Felt Sealing Washer for
Upper Steering Column Shaft. Blocks contamination of dust and dirt that can
wear the upper bushing. Apply oil to trap more dust and dirt. Not required
with sealed bearing listed further below. Fits all models of IH- and MTD-built
Cub Cadet garden tractors and other makes and models of garden tractors with
a 3/4" steering shaft. Made of interwoven wool. Dimensions: 3/4" I.D. x 1-1/4"
O.D. x 1/4" thick. Felt Sealing Washer for
Upper Steering Column Shaft. Blocks contamination of dust and dirt that can
wear the upper bushing. Apply oil to trap more dust and dirt. Not required
with sealed bearing listed further below. Fits all models of IH- and MTD-built
Cub Cadet garden tractors and other makes and models of garden tractors with
a 3/4" steering shaft. Made of interwoven wool. Dimensions: 3/4" I.D. x 1-1/4"
O.D. x 1/4" thick.
|
 Teflon Thrust Washers for Steering Knuckles and Front
Axle. These washers are made of very tough, long wearing and slippery
polytetrafluoroethylene
(PTFE), and not ordinary nylon or plastic. Reduces steering effort about
85% and eliminates metal to metal friction, which can result in hard steering
and wear to axle and steering knuckles (even when knuckles are lubricated
once a year). Installs where steering knuckles makes contact with underneath
of axle (load-bearing and friction area), and is centered by the steel
bushings/spacers (listed below). Teflon provides easier steering with physical
effort needed to turn the steering wheel, especially with a snow plow or
front end loader bucket. Teflon is self-lubricating, meaning it resists binding
even if grease dries out. Unlike needle bearings, which often require grinding
down the axle casting to fit, solid Teflon washers cannot get packed with
grass clipping dust or debris. Each Teflon thrust washer listed below fits
various makes and models of garden tractors with 3/4", 7/8" or 1" diameter
front vertical spindle shafts. Apply automotive grease when installing. Go
here for more information:
Polytetrafluoroethylene (PTFE): Complete Guide. Teflon Thrust Washers for Steering Knuckles and Front
Axle. These washers are made of very tough, long wearing and slippery
polytetrafluoroethylene
(PTFE), and not ordinary nylon or plastic. Reduces steering effort about
85% and eliminates metal to metal friction, which can result in hard steering
and wear to axle and steering knuckles (even when knuckles are lubricated
once a year). Installs where steering knuckles makes contact with underneath
of axle (load-bearing and friction area), and is centered by the steel
bushings/spacers (listed below). Teflon provides easier steering with physical
effort needed to turn the steering wheel, especially with a snow plow or
front end loader bucket. Teflon is self-lubricating, meaning it resists binding
even if grease dries out. Unlike needle bearings, which often require grinding
down the axle casting to fit, solid Teflon washers cannot get packed with
grass clipping dust or debris. Each Teflon thrust washer listed below fits
various makes and models of garden tractors with 3/4", 7/8" or 1" diameter
front vertical spindle shafts. Apply automotive grease when installing. Go
here for more information:
Polytetrafluoroethylene (PTFE): Complete Guide.
|
 Bearing/Race Sets for ROSS and CCC Steering
Boxes. Fits Cub Cadet "Original" garden tractor, and Cub Cadet garden
tractor models 70, 71, 72, 73, 86, 100, 102, 104, 105, 106, 107, 108, 109,
122, 123, 124, 125, 126, 127, 128, 129, 147, 149, 169, 482, 580, 582, 680,
682, 782, 782D, 784, 800, 882, 982, 984, 986, 1912, 1914, 1000, 1100, 1200,
1210, 1211, 1250, 1282, 1450, 1512, 1572, 1604, 1606, 1650, 1710, 1711, 1712,
1772, 1806, 1810, 1811, 1812, 1872, 2072, including Cub Lo Boy models 154,
184 and 185; Ford LGT; Jacobsen; John Deere models 60, 70, 100, 110, 112,
120, 140, 200, 208, 210, 212, 214, 216, 300, 312, 314, 316, 317 and 400;
Massey Ferguson / Harris MF models 14, 16, 1200, 1450, 1650, 1655 and 1855;
MTD Farm King; Snapper; Wheel Horse; and various other makes and models of
garden tractors with the ROSS or CCC aluminum housing steering box.
NOTE: The rounded or curved cup/race is OEM Cub Cadet (discontinued),
and the bearing sets that is offered here come with the flat cup/race, which
are aftermarket. These aftermarket cups/races are interchangeable with the
OEM Cub Cadet cups/races, so either will fit and function equally. IMPORTANT:
For
preventive maintenance and smoother steering, lubricate
steering box and all steering parts through Zerk
grease fitting with an
automotive grease gun once a year. Dimensions of each
part: 5/16" balls; nylon cages/spacers: 1.500" O.D.; cups/races: 1.550" O.D.
[Top of Page]
Bearing/Race Sets for ROSS and CCC Steering
Boxes. Fits Cub Cadet "Original" garden tractor, and Cub Cadet garden
tractor models 70, 71, 72, 73, 86, 100, 102, 104, 105, 106, 107, 108, 109,
122, 123, 124, 125, 126, 127, 128, 129, 147, 149, 169, 482, 580, 582, 680,
682, 782, 782D, 784, 800, 882, 982, 984, 986, 1912, 1914, 1000, 1100, 1200,
1210, 1211, 1250, 1282, 1450, 1512, 1572, 1604, 1606, 1650, 1710, 1711, 1712,
1772, 1806, 1810, 1811, 1812, 1872, 2072, including Cub Lo Boy models 154,
184 and 185; Ford LGT; Jacobsen; John Deere models 60, 70, 100, 110, 112,
120, 140, 200, 208, 210, 212, 214, 216, 300, 312, 314, 316, 317 and 400;
Massey Ferguson / Harris MF models 14, 16, 1200, 1450, 1650, 1655 and 1855;
MTD Farm King; Snapper; Wheel Horse; and various other makes and models of
garden tractors with the ROSS or CCC aluminum housing steering box.
NOTE: The rounded or curved cup/race is OEM Cub Cadet (discontinued),
and the bearing sets that is offered here come with the flat cup/race, which
are aftermarket. These aftermarket cups/races are interchangeable with the
OEM Cub Cadet cups/races, so either will fit and function equally. IMPORTANT:
For
preventive maintenance and smoother steering, lubricate
steering box and all steering parts through Zerk
grease fitting with an
automotive grease gun once a year. Dimensions of each
part: 5/16" balls; nylon cages/spacers: 1.500" O.D.; cups/races: 1.550" O.D.
[Top of Page]
|
 Foam Rubber Dust/Grease Seal.
Fits Cub Cadet "Original" garden tractor steering box. Replace or install
this part when old one is deteriorated, torn or missing to prevent dust and
dirt from entering inside steering box. May also fit various other early
makes and models of garden tractors. Will not fit later models of Cub Cadet
garden tractors, Ford LGT, Jacobsen, John Deere, Massey Ferguson, MTD Farm
King, Snapper, Wheel Horse or Cub Lo-Boy. If the opening in your steering
box match this part, then it will fit. Part of discontinued Cub Cadet part
# IH-376478-R91. $20.00± each, depending on source and availability,
plus shipping & handling. (When available or in stock.) Foam Rubber Dust/Grease Seal.
Fits Cub Cadet "Original" garden tractor steering box. Replace or install
this part when old one is deteriorated, torn or missing to prevent dust and
dirt from entering inside steering box. May also fit various other early
makes and models of garden tractors. Will not fit later models of Cub Cadet
garden tractors, Ford LGT, Jacobsen, John Deere, Massey Ferguson, MTD Farm
King, Snapper, Wheel Horse or Cub Lo-Boy. If the opening in your steering
box match this part, then it will fit. Part of discontinued Cub Cadet part
# IH-376478-R91. $20.00± each, depending on source and availability,
plus shipping & handling. (When available or in stock.)
|
  1/2" Diameter Cam Follower (Adjustable Steering Pin). Replace
worn cam follower for "tighter" and less "sloppy" or "loose" steering, and
for safer operation of tractor. Fits Cub Cadet "Original" garden tractor
and Cub Cadet garden tractor models 70, 71, 72, 73, 86, 100, 102, 104, 105,
106, 107, 108, 109, 122, 123, 124, 125, 126, 127, 128, 129, 147, 149, 169,
482, 580, 582, 582 Special, 680, 682, 782, 782D, 784, 800, 882, 1000, 1100,
1200, 1250, 1282, 1450, 1512, 1604, 1606, 1650, 1710, 1711, 1712, 1961, 1962,
1963. Also fits various Ford LGT, Jacobsen, John Deere, Massey Ferguson,
MTD Farm King, Snapper, Wheel Horse and various other early makes and models
of garden tractors. 1/2-20 UNF threads.
Jam nut sold extra (listed below). IMPORTANT: For
preventive maintenance and smoother steering, lubricate
steering box and all steering parts through Zerk
grease fitting with an
automotive grease gun once a year. 1/2" Diameter Cam Follower (Adjustable Steering Pin). Replace
worn cam follower for "tighter" and less "sloppy" or "loose" steering, and
for safer operation of tractor. Fits Cub Cadet "Original" garden tractor
and Cub Cadet garden tractor models 70, 71, 72, 73, 86, 100, 102, 104, 105,
106, 107, 108, 109, 122, 123, 124, 125, 126, 127, 128, 129, 147, 149, 169,
482, 580, 582, 582 Special, 680, 682, 782, 782D, 784, 800, 882, 1000, 1100,
1200, 1250, 1282, 1450, 1512, 1604, 1606, 1650, 1710, 1711, 1712, 1961, 1962,
1963. Also fits various Ford LGT, Jacobsen, John Deere, Massey Ferguson,
MTD Farm King, Snapper, Wheel Horse and various other early makes and models
of garden tractors. 1/2-20 UNF threads.
Jam nut sold extra (listed below). IMPORTANT: For
preventive maintenance and smoother steering, lubricate
steering box and all steering parts through Zerk
grease fitting with an
automotive grease gun once a year.
|
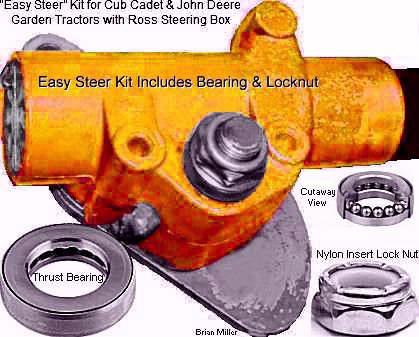 "Easy
Steer" Upgrade Kits. Provides easier steering with slightly less
effort, especially with a front end loader bucket. Fits all IH- and certain
MTD-built Cub Cadet, John Deere, Massey Ferguson, Ford LGT, Jacobsen, MTD
Farm King, Wheel Horse and various other makes and models of garden tractors
with the ROSS or CCC aluminum housing steering box, except Cub Lo-Boy.
Each kit listed below includes new high quality pre-lubricated sealed thrust
ball bearing and nylon-insert lock nut. Replaces double OEM
jam nuts
and
thrust
washer on 5/8" or 3/4" diameter pitman arm stud. Install bearing with
shielding (wording on bearing) against steering box, and tighten nut to remove
looseness, then back off nut until pitman arm rotates freely without binding.
NOTE: The Easy Steer Upgrade Kit will NOT work on the steering box with
the pivot shaft bolt NOT welded to the steering arm in MTD-built Cub Cadet
garden tractor models 782, 784, 786, 1340, 1440, 1535, 1541, 1810, 1811,
1861, 1863, 1912 and 1914 because the protruding threads are too short.
[Top of Page] "Easy
Steer" Upgrade Kits. Provides easier steering with slightly less
effort, especially with a front end loader bucket. Fits all IH- and certain
MTD-built Cub Cadet, John Deere, Massey Ferguson, Ford LGT, Jacobsen, MTD
Farm King, Wheel Horse and various other makes and models of garden tractors
with the ROSS or CCC aluminum housing steering box, except Cub Lo-Boy.
Each kit listed below includes new high quality pre-lubricated sealed thrust
ball bearing and nylon-insert lock nut. Replaces double OEM
jam nuts
and
thrust
washer on 5/8" or 3/4" diameter pitman arm stud. Install bearing with
shielding (wording on bearing) against steering box, and tighten nut to remove
looseness, then back off nut until pitman arm rotates freely without binding.
NOTE: The Easy Steer Upgrade Kit will NOT work on the steering box with
the pivot shaft bolt NOT welded to the steering arm in MTD-built Cub Cadet
garden tractor models 782, 784, 786, 1340, 1440, 1535, 1541, 1810, 1811,
1861, 1863, 1912 and 1914 because the protruding threads are too short.
[Top of Page]
|
 Adjustment Plug for ROSS
Steering Box. Fits all models of IH built (ROSS) and MTD-built (CCC) Cub
Cadet garden tractors; Cub Lo-Boy models 154, 184 and 185; Ford LGT; Jacobsen;
John Deere models 60, 70, 100, 110, 112, 120, 140, 200, 208, 210, 212, 214,
216, 300, 312, 314, 316, 317 and 400; Massey Ferguson / Harris MF models
14, 16, 1200, 1450, 1650, 1655 and 1855; MTD Farm King; Snapper; Wheel Horse;
and various other makes and models of garden tractors with the ROSS or
CCC aluminum housing steering box. Dimensions: 1.734" outside of threads
diameter. Used and in good condition. Discontinued Cub Cadet part # IH-394288-R1.
$30.00 each, plus shipping & handling. (When available or in
stock.) Adjustment Plug for ROSS
Steering Box. Fits all models of IH built (ROSS) and MTD-built (CCC) Cub
Cadet garden tractors; Cub Lo-Boy models 154, 184 and 185; Ford LGT; Jacobsen;
John Deere models 60, 70, 100, 110, 112, 120, 140, 200, 208, 210, 212, 214,
216, 300, 312, 314, 316, 317 and 400; Massey Ferguson / Harris MF models
14, 16, 1200, 1450, 1650, 1655 and 1855; MTD Farm King; Snapper; Wheel Horse;
and various other makes and models of garden tractors with the ROSS or
CCC aluminum housing steering box. Dimensions: 1.734" outside of threads
diameter. Used and in good condition. Discontinued Cub Cadet part # IH-394288-R1.
$30.00 each, plus shipping & handling. (When available or in
stock.) |
 Front Axle Center Pivot
Pin. Fits all IH Cub Cadet narrow and wide frame garden tractor models 70,
71, 72, 73, 86, 100, 102, 104, 105, 106, 107, 108, 109, 122, 123, 124, 125,
126, 127, 128 129, 147, 149, 169, 800, 1000, 1100, 1200, 1250, 1450 and 1650.
Made of hardened steel. Dimensions: 3/4" x 4-3/8" length. IMPORTANT: For
preventive maintenance, lubricate this part through
Zerk grease fitting in center of axle with
an
automotive grease gun once a year. Front Axle Center Pivot
Pin. Fits all IH Cub Cadet narrow and wide frame garden tractor models 70,
71, 72, 73, 86, 100, 102, 104, 105, 106, 107, 108, 109, 122, 123, 124, 125,
126, 127, 128 129, 147, 149, 169, 800, 1000, 1100, 1200, 1250, 1450 and 1650.
Made of hardened steel. Dimensions: 3/4" x 4-3/8" length. IMPORTANT: For
preventive maintenance, lubricate this part through
Zerk grease fitting in center of axle with
an
automotive grease gun once a year.
|
 Heavy Duty Tie Rod Steering
Joints with incorporated protective rubber dust seal. Each can be used on
riding mowers, lawn and garden tractors, ordinary garden tractors, go-karts,
King Midget micro cars, small motorized vehicles,
competition garden pulling tractors, small wheel mini-rod pulling tractors,
compact tractors, automotive throttle linkages, automotive transmission shifter
linkages, etc. Allows for up to 20º angle of misalignment without binding.
Before initial installation, apply clean motor oil under rubber dust seal
to help extend life of ball joint. Heavy Duty Tie Rod Steering
Joints with incorporated protective rubber dust seal. Each can be used on
riding mowers, lawn and garden tractors, ordinary garden tractors, go-karts,
King Midget micro cars, small motorized vehicles,
competition garden pulling tractors, small wheel mini-rod pulling tractors,
compact tractors, automotive throttle linkages, automotive transmission shifter
linkages, etc. Allows for up to 20º angle of misalignment without binding.
Before initial installation, apply clean motor oil under rubber dust seal
to help extend life of ball joint.
|
A-1 Miller's
Heavy Duty, Super Strong,
Custom-Made Linkage Assemblies. Tie rod linkage, drag
link, shifter linkage or clutch linkage for your ordinary garden tractor,
go-kart, small motorized vehicle, compact tractor, mini-rod, hot rod, etc.
NOTE: When ordering, please specify model of garden tractor, or exact
length of linkage from center of mounting studs (tie rods) or center of mounting
bolts (Heim joints), and size of tie rods or ball joints. Or better yet,
and if you wish, ship me your original linkage so I can duplicate it into
a heavy duty linkage. Available in 1/4", 5/16", 3/8", 1/2", 5/8" and
3/4" sizes. [Top of Page]
|
Click here to contact A-1 Miller's for FREE honest and accurate technical support and/or for ordering information and payment options. Please contact A-1 Miller's if you need a part or parts, or service performed that's not listed or mentioned in this website. [Top of Page]
  Steering Knuckle/Front Axle Spacers (Steel Sleeve Bushings).
Does not include bolts or castle nuts. Replace worn spacers for dilapidated
front tires and for easier steering. Each spacer listed below fits various
front axles in Cub Cadet garden tractor models 86, 108, 109, 128, 129, 149,
169, 482, 580, 582, 680, 682, 782, 782D, 784, 800, 882, 1000, 1050, 1100,
1200, 1204, 1210, 1211, 1250, 1450, 1512, 1604, 1606, 1650, 1710, 1711, 1712,
1806, 1810, 1811 and 1812. NOTE: The steering knuckles are supposed to
"clamp" against these spacers with the OEM bolts/nuts, and the bushings/spacers
are supposed to rotate/swivel in the axle housing with movement of the steering
knuckles. IMPORTANT: For
preventive maintenance and smoother steering, lubricate
these parts through Zerk grease fitting with
an
automotive grease gun once a year. Steering Knuckle/Front Axle Spacers (Steel Sleeve Bushings).
Does not include bolts or castle nuts. Replace worn spacers for dilapidated
front tires and for easier steering. Each spacer listed below fits various
front axles in Cub Cadet garden tractor models 86, 108, 109, 128, 129, 149,
169, 482, 580, 582, 680, 682, 782, 782D, 784, 800, 882, 1000, 1050, 1100,
1200, 1204, 1210, 1211, 1250, 1450, 1512, 1604, 1606, 1650, 1710, 1711, 1712,
1806, 1810, 1811 and 1812. NOTE: The steering knuckles are supposed to
"clamp" against these spacers with the OEM bolts/nuts, and the bushings/spacers
are supposed to rotate/swivel in the axle housing with movement of the steering
knuckles. IMPORTANT: For
preventive maintenance and smoother steering, lubricate
these parts through Zerk grease fitting with
an
automotive grease gun once a year.
|
  Steering
Knuckle/Front Axle Bronze Bushings. Replace worn bushings for dilapidated
front tires and for easier steering. Fits Cub Cadet garden tractor models
982, 984, 986, 1572, 1772, 1782, 1872, 1882, 1912, 1914, 2072, 2082, 2084,
2086, 2182 and 2284. Dimensions: 1" I.D. x 1.125" O.D. x 1" Length. Use these
to replace existing OEM worn bushings or repair worn (oblong) axle spindle
holes when no bushings are originally installed (when the spindles make metal
to metal contact with the cast iron axle). If no bushings were originally
installed in the axle, then spindle holes must be professionally
precision-aligned bored (machined) to accept bushings. Other sizes of bushings
are available. IMPORTANT: If no Zerk grease
fitting are installed in the axle to lubricate the spindle shafts for
easier steering and longevity of the bushings, it's recommended to install
these, too. For
preventive maintenance and smoother steering, lubricate
these parts through these parts through Zerk grease
fitting with an
automotive grease gun once a year. High quality
aftermarket. Replaces discontinued Cub Cadet part #'s 741-3005, 941-3005.
$18.00/set of 4 bushings, plus shipping & handling. Steering
Knuckle/Front Axle Bronze Bushings. Replace worn bushings for dilapidated
front tires and for easier steering. Fits Cub Cadet garden tractor models
982, 984, 986, 1572, 1772, 1782, 1872, 1882, 1912, 1914, 2072, 2082, 2084,
2086, 2182 and 2284. Dimensions: 1" I.D. x 1.125" O.D. x 1" Length. Use these
to replace existing OEM worn bushings or repair worn (oblong) axle spindle
holes when no bushings are originally installed (when the spindles make metal
to metal contact with the cast iron axle). If no bushings were originally
installed in the axle, then spindle holes must be professionally
precision-aligned bored (machined) to accept bushings. Other sizes of bushings
are available. IMPORTANT: If no Zerk grease
fitting are installed in the axle to lubricate the spindle shafts for
easier steering and longevity of the bushings, it's recommended to install
these, too. For
preventive maintenance and smoother steering, lubricate
these parts through these parts through Zerk grease
fitting with an
automotive grease gun once a year. High quality
aftermarket. Replaces discontinued Cub Cadet part #'s 741-3005, 941-3005.
$18.00/set of 4 bushings, plus shipping & handling. |
  Zerk Grease Fittings. For preventive
maintenance, if a grease fitting isn't already installed, one should be installed
in [one piece] wheel hubs or outer tubing of a rotating shaft so the [unshielded]
bearings/bushings or shaft will last longer when lubricated once a year with
an
automotive grease gun. Do not use a grease fitting on split
rim wheels. Remember - the moving part will likely wear more than the stationary
part. To install a grease fitting, drill a 13/64" hole, and use a 1/4-28
UNF TAPER hand tap to cut new threads for installation of the fitting.
Click or tap here to
learn how to professionally drill for and cut new threads. FYI - If a
grease fitting needs to be used in a thin-wall steel tubing (that's too thin
to cut deep enough threads into so the threads on the grease fitting will
not interfere with the inner shaft) to lubricate a moving inner shaft, weld
a
jam nut with 1/4-28 UNF threads on the tubing, then drill
a 3/16" hole nut/tubing, and install the grease fitting (with short threads)
in the nut. Remember - grease fittings provide
preventive maintenance when they're used regularly. Because
grease cost less than any major repair of equipment.
[Return to Previous Section, Paragraph
or Website] Zerk Grease Fittings. For preventive
maintenance, if a grease fitting isn't already installed, one should be installed
in [one piece] wheel hubs or outer tubing of a rotating shaft so the [unshielded]
bearings/bushings or shaft will last longer when lubricated once a year with
an
automotive grease gun. Do not use a grease fitting on split
rim wheels. Remember - the moving part will likely wear more than the stationary
part. To install a grease fitting, drill a 13/64" hole, and use a 1/4-28
UNF TAPER hand tap to cut new threads for installation of the fitting.
Click or tap here to
learn how to professionally drill for and cut new threads. FYI - If a
grease fitting needs to be used in a thin-wall steel tubing (that's too thin
to cut deep enough threads into so the threads on the grease fitting will
not interfere with the inner shaft) to lubricate a moving inner shaft, weld
a
jam nut with 1/4-28 UNF threads on the tubing, then drill
a 3/16" hole nut/tubing, and install the grease fitting (with short threads)
in the nut. Remember - grease fittings provide
preventive maintenance when they're used regularly. Because
grease cost less than any major repair of equipment.
[Return to Previous Section, Paragraph
or Website]
|
How to Fix a Loose-Fitting Drag Link Arm -
 To fix a
loose-fitting drag link arm on the narrow frame Cub Cadet garden tractor
models 70, 71, 72, 73, 100, 102, 104, 105, 106, 107, 122, 123, 124, 125,
126 or 147, the hub must be "clamped" to the horizontal spindle. To do this...
To fix a
loose-fitting drag link arm on the narrow frame Cub Cadet garden tractor
models 70, 71, 72, 73, 100, 102, 104, 105, 106, 107, 122, 123, 124, 125,
126 or 147, the hub must be "clamped" to the horizontal spindle. To do this...
How to Lengthen the Drag Link (link that goes between pitman arm to steering arm on spindle) When the Front Axle is Repositioned Forward:
 Measure
the distance the front axle was moved forward. Make a note of the measurement.
Measure
the distance the front axle was moved forward. Make a note of the measurement.
Front Axle Assembly for Cub Cadet Garden Tractor Models 70, 71, 72, 73,
100, 102, 104, 105, 106, 107, 122, 123, 124, 125, 126, 127 and 147
Front Axle Assembly for Cub Cadet Garden Tractor Models 86, 108, 109,
128, 129, 149, 169, 482, 582, 582 Special, 682, 782, 800, 1000, 1100, 1200,
1250, 1450 and 1650
Front Axle Assembly for Cub Cadet Garden Tractor Models 482, 580, 582,
582 Special, 680, 682, 782, 782D, 882, 1050, 1204, 1210, 1211, 1282 and
1512.

Front Axle Assembly for Cub Cadet Garden Tractor Models 982, 984, 986,
1572, 1772, 1782, 1872, 1882, 1912, 1914, 2072, 2082, 2084, 2086, 2165, 2182
and 2284
Front Axle Assembly for Cub Cadet Garden Tractor Models 1340, 1535, 1541,
1860 and 1862

Front Axle Assembly for Cub Cadet Garden Tractor Models 1440, 1861, 1863
and 1864
If the front tires on the narrow frame Cub Cadet garden tractor models listed above look "dilapidated" (tires tilt inward), this means the spindle shafts are bent from doing too many ground-pounding wheelies and weren't reinforced. If the spindle shafts are bent, they could possibly break off. Therefore, to prevent them from getting bent again or breaking off...

 Raise and support the front of the tractor, and remove the
front tires. This is much easier and safer to do on a
platform work table with
a sturdy, overhead beam or gantry crane and a chain hoist.
Raise and support the front of the tractor, and remove the
front tires. This is much easier and safer to do on a
platform work table with
a sturdy, overhead beam or gantry crane and a chain hoist.
On a narrow frame Cub Cadet garden tractor, to fix worn spindle shaft holes in the axle itself, the holes would need to be bored or reamed out and a couple of thin-wall bronze bushings will need to be pressed-in for the top and bottom ends of the hole. And remember - Zerk grease fittings provide preventive maintenance when used regularly. Because grease cost less than any major repair of equipment.
How to Lower the Front End 2-3/8"± on Cub Cadet Garden Tractor Models 86, 108, 109, 128, 129, 149, 169, 582, 582 Special, 680, 682, 782, 800, 882, 1000, 1050, 1100, 1200, 1204, 1210, 1211, 1250, 1282, 1450, 1512, 1535 and 1650 -

Pivoting Axle VS Solid-Mounted Axle for Competition Pulling -
I've seen competition garden pulling tractors with the OEM swivel front axle and I've seen some with a custom-made solid-mounted front axle, which is welded to the frame. And I noticed that one doesn't help the tractor to pull or steer down the track any better than the other. So it seems it's just the pullers' or tractor builder's preference if he or she wants an axle that swivels or not.
How to Repair Worn Pivot Pin Holes for the Front Axle -
 Sometimes,
due to many years of lack of lubrication (yearly general maintenance), the
pivoting pin will rust in the front axle and this will cause the 3/16" spiral
support pin in the pivoting pin and front hole of the mounting bracket to
break, and then the pivoting pin will pivot and wear the holes oblong in
the mounting bracket. Which causes the axle to become wobbly, unstable, and
have "sloppy" steering. The only way to fix the "looseness" of the pivoting
hole is to have the holes bored for installation of two welded-in steel reducer
spacer rings.
Sometimes,
due to many years of lack of lubrication (yearly general maintenance), the
pivoting pin will rust in the front axle and this will cause the 3/16" spiral
support pin in the pivoting pin and front hole of the mounting bracket to
break, and then the pivoting pin will pivot and wear the holes oblong in
the mounting bracket. Which causes the axle to become wobbly, unstable, and
have "sloppy" steering. The only way to fix the "looseness" of the pivoting
hole is to have the holes bored for installation of two welded-in steel reducer
spacer rings.
The front axle mounting bracket on all Cub Cadet garden tractors is welded to the frame, so either the welding would need to be ground away, or perhaps the bracket can be machined with it installed on the frame. Well, to repair a tractor with worn pivot holes like the ones in the photo to the right...
 To place an order, send your item(s) for repairing, and/or
for customer service assistance, and FREE honest and accurate technical support,
please contact: A-1 Miller's Performance Enterprises, 12091 N Route B,
Hallsville, MO (Missouri) 65255-9604 USA. Please call in your order or send
an email with a list parts you need and your contact information.
To place an order, send your item(s) for repairing, and/or
for customer service assistance, and FREE honest and accurate technical support,
please contact: A-1 Miller's Performance Enterprises, 12091 N Route B,
Hallsville, MO (Missouri) 65255-9604 USA. Please call in your order or send
an email with a list parts you need and your contact information.
 Phone: 1-573-881-7229 (cell;
call, text or leave voicemail). Please call Monday-Friday, 9am to 5pm, Central
time zone, except holidays. If no answer, please try again later.
Phone: 1-573-881-7229 (cell;
call, text or leave voicemail). Please call Monday-Friday, 9am to 5pm, Central
time zone, except holidays. If no answer, please try again later.
 E-mail:
pullingtractor@aol.com. A-1 Miller's
shop is open to the public Monday-Friday, 9am to 5pm, Central time zone,
with an appointment on weekends, except holidays. If you're the kind of person
who don't trust delivery/shipping companies (mis)handling your high-dollar
and fragile merchandise, you can make the long drive to A-1 Miller's new
shop (click image to the right) to personally purchase parts, or drop off
and/or pick up your carburetor, clutch assembly, and/or other parts for repairing
and/or rebuilding. Or visit our new shop to drop off your parts. Please contact
us before coming so we'll be at our shop waiting for your arrival. When you
visit our shop, you will be dealing directly with the owner for the best
customer service. "The road to a [trusted] friend's house (or shop) is
never long." Don't sacrifice quality workmanship for distance.
Payment Options below.
Photos
of our new building/shop are posted here!
12091 N Route B, Hallsville, MO - Google Maps.
[Return To Previous Paragraph, Section
or Website]
E-mail:
pullingtractor@aol.com. A-1 Miller's
shop is open to the public Monday-Friday, 9am to 5pm, Central time zone,
with an appointment on weekends, except holidays. If you're the kind of person
who don't trust delivery/shipping companies (mis)handling your high-dollar
and fragile merchandise, you can make the long drive to A-1 Miller's new
shop (click image to the right) to personally purchase parts, or drop off
and/or pick up your carburetor, clutch assembly, and/or other parts for repairing
and/or rebuilding. Or visit our new shop to drop off your parts. Please contact
us before coming so we'll be at our shop waiting for your arrival. When you
visit our shop, you will be dealing directly with the owner for the best
customer service. "The road to a [trusted] friend's house (or shop) is
never long." Don't sacrifice quality workmanship for distance.
Payment Options below.
Photos
of our new building/shop are posted here!
12091 N Route B, Hallsville, MO - Google Maps.
[Return To Previous Paragraph, Section
or Website]
Payment Options, and We Ship to Canada and
Worldwide 
Item(s) in a package or cushioned envelope weighing less than 1 lb. is sent
by US Postal Service Airmail Letter Post for a 4-7 days delivery. Packaged
item(s) weighing over 1 lb. and up to 66 lb. is sent by US Postal Service
Airmail Parcel Post for a 4-10 days delivery. I cannot use the US Postal
Services' Flat Rate Priority Mail envelopes and boxes to ship outside U.S.
territories. Item(s) weighing over 67 lbs. or more is sent by FedEx Ground
or equivalent services. We try to keep our shipping cost to customers within
reason. Therefore, we don't ship our products in a fancy-looking package
with our company name and/or logo on it because most customers will just
toss it in the trash after they remove the contents. And being there is no
USPS tracking number outside the US, all I can do is make sure I write your
address correctly on the customs form and on your package.
My websites are not set up to process orders and accept payments. Therefore, I will need your name, complete and correct postal mailing address and phone number. And for payment options, I accept cash (in person), USPS Postal Money Orders, cashier's checks and business checks. I do not accept credit/debit cards. Or to make a payment to me through PayPal, please click this link: https://www.paypal.com (username: pullingtractor@aol.com). And please use PayPal's "Friends and Family" option to ensure that I receive the full amount or add 3% to the total amount to cover PayPal's processing surcharge. I also accept Venmo (username: Pullingtractor) and Cash App (username: pullingtractor) please add 2% for Cash App's surcharge as well). And be sure to mention a description of what the payment is for with your full name, postal address, phone number and email address. If sending a money order or cashier's check, please include a note in the envelope with your name, complete mailing address, phone number, email address and a description of what the payment is for. I'll make a note of your order when I have all your information, and I may have to order some of the parts on your list, which should take a few days to come in, but I will send everything to you as soon as the parts are in stock after I receive your payment.


Return To Previous Website | Top of Page | Copyright © 1996-Present. This website created, designed and maintained by A-1 Miller's Performance Enterprises


 Zinc-Plated Steel Acorn/Crown/Dome
Steering Wheel Retaining Nut. When appearance matters. Fits all Cub Cadet
garden tractors and other makes and models of garden tractors with 5/8-18
UNF threads on steering shaft. IMPORTANT - For easier installation of
this nut, use a 5/8-18 UNF
Zinc-Plated Steel Acorn/Crown/Dome
Steering Wheel Retaining Nut. When appearance matters. Fits all Cub Cadet
garden tractors and other makes and models of garden tractors with 5/8-18
UNF threads on steering shaft. IMPORTANT - For easier installation of
this nut, use a 5/8-18 UNF
 Stainless Steel Flat Washer.
Will not rust or tarnish. Necessary to evenly distribute pressure from either
steering wheel retaining nuts listed above. 5/8" I.D. $1.00 each,
plus shipping & handling.
Stainless Steel Flat Washer.
Will not rust or tarnish. Necessary to evenly distribute pressure from either
steering wheel retaining nuts listed above. 5/8" I.D. $1.00 each,
plus shipping & handling. Oil-Impregnated Flanged Bronze
Bushing for Upper Steering Column Shaft/Tube. Replace worn OEM thin-wall
nylon bushing for easier steering and less wear to lower bearings in steering
box. Fits Cub Cadet "Original" garden tractor and Cub Cadet garden tractor
models 70, 71, 100, 102, 122 and 123, and various other early makes and models
of garden tractors upper steering column with a bushing originally installed
in metal retainer. OEM bushing and retainer can be replaced with flanged
bushing and bearing listed below. Oil impregnated means the hardened metal
is porous to absorb oil and grease so it will last longer. Also, the oil
acts as a cushion between the bushing and shaft, adding resistance to wear.
Dimensions: 3/4" I.D. x 1.003" O.D. x 3/4" height x 1-1/4" O.D. flange.
Replaces discontinued Cub Cadet part # IH-866105-R1. $2.00 each, plus
shipping & handling.
Oil-Impregnated Flanged Bronze
Bushing for Upper Steering Column Shaft/Tube. Replace worn OEM thin-wall
nylon bushing for easier steering and less wear to lower bearings in steering
box. Fits Cub Cadet "Original" garden tractor and Cub Cadet garden tractor
models 70, 71, 100, 102, 122 and 123, and various other early makes and models
of garden tractors upper steering column with a bushing originally installed
in metal retainer. OEM bushing and retainer can be replaced with flanged
bushing and bearing listed below. Oil impregnated means the hardened metal
is porous to absorb oil and grease so it will last longer. Also, the oil
acts as a cushion between the bushing and shaft, adding resistance to wear.
Dimensions: 3/4" I.D. x 1.003" O.D. x 3/4" height x 1-1/4" O.D. flange.
Replaces discontinued Cub Cadet part # IH-866105-R1. $2.00 each, plus
shipping & handling.

 Nylon Flanged Bushings for Upper Steering Column Shaft/Tube.
Replace worn upper OEM nylon bushing and retainer for smoother steering and
less wear to lower bearings in steering box. Fits Cub Cadet "Original" garden
tractor and certain Cub Cadet garden tractor models 72, 73, 86, 104, 105,
106, 107, 108, 109, 124, 125, 126, 127, 128, 129, 147, 149, 169, 582, 680,
782, 800, 982, 984, 986, 1000, 1100, 1200, 1250, 1450 and 1650, and various
other later makes and models of garden tractors without bushing retainer
at top of steering column tube.
Nylon Flanged Bushings for Upper Steering Column Shaft/Tube.
Replace worn upper OEM nylon bushing and retainer for smoother steering and
less wear to lower bearings in steering box. Fits Cub Cadet "Original" garden
tractor and certain Cub Cadet garden tractor models 72, 73, 86, 104, 105,
106, 107, 108, 109, 124, 125, 126, 127, 128, 129, 147, 149, 169, 582, 680,
782, 800, 982, 984, 986, 1000, 1100, 1200, 1250, 1450 and 1650, and various
other later makes and models of garden tractors without bushing retainer
at top of steering column tube.
 Oil-Impregnated Flanged Metal
Graphite Bushing for Upper Steering Column Shaft/Tube. Replace worn upper
OEM nylon bushing with a metal bushing for longer wear, easier steering and
less wear to lower bearings in steering box. Fits Cub Cadet "Original" garden
tractor and certain Cub Cadet garden tractor models 72, 73, 86, 104, 105,
106, 107, 108, 109, 124, 125, 126, 127, 128, 129, 147, 149, 169, 582, 680,
782, 800, 982, 984, 986, 1000, 1100, 1200, 1250, 1450 and 1650, and various
other later makes and models of garden tractors without bushing retainer
(see above). NOTE: Top of steering column tube must be swaged (crimped
inward to reduce diameter) with large pliers so bushing will fit snug inside
tube. Oil impregnated means the hardened metal is porous to absorb
oil and grease so it will last longer. Also, the oil acts as a cushion between
the bushing and shaft, adding resistance to wear. Dimensions: 3/4" I.D.
(19mm) x 1-3/8" O.D. (35mm) x 9/16" height x 1-1/2" O.D. flange. Replaces
Cub Cadet 941-3023. $3.50 each, plus shipping & handling.
Oil-Impregnated Flanged Metal
Graphite Bushing for Upper Steering Column Shaft/Tube. Replace worn upper
OEM nylon bushing with a metal bushing for longer wear, easier steering and
less wear to lower bearings in steering box. Fits Cub Cadet "Original" garden
tractor and certain Cub Cadet garden tractor models 72, 73, 86, 104, 105,
106, 107, 108, 109, 124, 125, 126, 127, 128, 129, 147, 149, 169, 582, 680,
782, 800, 982, 984, 986, 1000, 1100, 1200, 1250, 1450 and 1650, and various
other later makes and models of garden tractors without bushing retainer
(see above). NOTE: Top of steering column tube must be swaged (crimped
inward to reduce diameter) with large pliers so bushing will fit snug inside
tube. Oil impregnated means the hardened metal is porous to absorb
oil and grease so it will last longer. Also, the oil acts as a cushion between
the bushing and shaft, adding resistance to wear. Dimensions: 3/4" I.D.
(19mm) x 1-3/8" O.D. (35mm) x 9/16" height x 1-1/2" O.D. flange. Replaces
Cub Cadet 941-3023. $3.50 each, plus shipping & handling.
 Flanged Sealed Ball Bearing
for Upper Steering Column Shaft/Tube. Replace worn upper OEM nylon bushing
with a ball bearing for longer wear, easier steering and less wear to lower
bearings in steering box. Fits Cub Cadet "Original" garden tractor and certain
Cub Cadet garden tractor models 72, 73, 86, 104, 105, 106, 107, 108, 109,
124, 125, 126, 127, 128, 129, 147, 149, 169, 582, 680, 782, 800, 982, 984,
986, 1000, 1100, 1200, 1250, 1450 and 1650, and various other later makes
and models of garden tractors without bushing retainer (see above). Dimensions:
3/4" I.D. (19mm) x 1-3/8" O.D. (35mm) x 9/16" height x 1-1/2" O.D. flange.
NOTE: Top of steering column tube must be swaged (crimped inward to reduce
diameter) with large pliers so bearing will fit snug inside tube. These
have hardened, heated-treated steel races and balls, sealed on both sides
and pre-packed with grease for longer wear. These are NOT the low
quality flanged bearing that's available at most hardware stores. Replaces
Cub Cadet 941-3023. $8.00 each, plus shipping & handling.
Flanged Sealed Ball Bearing
for Upper Steering Column Shaft/Tube. Replace worn upper OEM nylon bushing
with a ball bearing for longer wear, easier steering and less wear to lower
bearings in steering box. Fits Cub Cadet "Original" garden tractor and certain
Cub Cadet garden tractor models 72, 73, 86, 104, 105, 106, 107, 108, 109,
124, 125, 126, 127, 128, 129, 147, 149, 169, 582, 680, 782, 800, 982, 984,
986, 1000, 1100, 1200, 1250, 1450 and 1650, and various other later makes
and models of garden tractors without bushing retainer (see above). Dimensions:
3/4" I.D. (19mm) x 1-3/8" O.D. (35mm) x 9/16" height x 1-1/2" O.D. flange.
NOTE: Top of steering column tube must be swaged (crimped inward to reduce
diameter) with large pliers so bearing will fit snug inside tube. These
have hardened, heated-treated steel races and balls, sealed on both sides
and pre-packed with grease for longer wear. These are NOT the low
quality flanged bearing that's available at most hardware stores. Replaces
Cub Cadet 941-3023. $8.00 each, plus shipping & handling. 5/16" Hardened Steel Ball. Replace
lost or worn ball(s) for tighter steering. High quality aftermarket. Replaces
John Deere part # AM26552. Irrelevant Kohler part number. .50¢
each, plus shipping & handling.
5/16" Hardened Steel Ball. Replace
lost or worn ball(s) for tighter steering. High quality aftermarket. Replaces
John Deere part # AM26552. Irrelevant Kohler part number. .50¢
each, plus shipping & handling.
 Foam Rubber Dust/Grease Seal.
Fits older ROSS and newer CCC aluminum housing steering boxes in Cub Cadet
garden tractor models 70, 71, 72, 73, 86, 100, 102, 104, 105, 106, 107, 108,
109, 122, 123, 124, 125, 126, 127, 128, 129, 147, 149, 169, 482, 580, 582,
680, 682, 782, 782D, 784, 800, 882, 1000, 1050, 1100, 1200, 1204, 1210, 1211,
1250, 1282, 1340, 1440, 1450, 1512, 1535, 1541, 1604, 1606, 1641, 1650, 1710,
1711, 1712, 1806, 1810, 1811, 1812, 1860, 1861, 1863 and 1864. Also fits
John Deere models 60, 70, 100, 110, 112, 120, 140, 200, 208, 210, 212, 214,
216, 300, 312, 314, 316 (Kohler engine models), 317 and 400, Ford LGT, Jacobsen,
Massey Ferguson, MTD Farm King, Snapper, Wheel Horse and various other early
makes and models of garden tractors. Will not fit Cub Cadet "Original" garden
tractor or Cub Lo-Boy. This part replaces the seal in metal thrust
plates/retainers IH-394936-R91 and 703-1031 (listed below). Replaces John
Deere part #'s M41917 and M45568. OEM Cub Cadet part # 923-3039.
$10.25 each, plus shipping & handling.
Foam Rubber Dust/Grease Seal.
Fits older ROSS and newer CCC aluminum housing steering boxes in Cub Cadet
garden tractor models 70, 71, 72, 73, 86, 100, 102, 104, 105, 106, 107, 108,
109, 122, 123, 124, 125, 126, 127, 128, 129, 147, 149, 169, 482, 580, 582,
680, 682, 782, 782D, 784, 800, 882, 1000, 1050, 1100, 1200, 1204, 1210, 1211,
1250, 1282, 1340, 1440, 1450, 1512, 1535, 1541, 1604, 1606, 1641, 1650, 1710,
1711, 1712, 1806, 1810, 1811, 1812, 1860, 1861, 1863 and 1864. Also fits
John Deere models 60, 70, 100, 110, 112, 120, 140, 200, 208, 210, 212, 214,
216, 300, 312, 314, 316 (Kohler engine models), 317 and 400, Ford LGT, Jacobsen,
Massey Ferguson, MTD Farm King, Snapper, Wheel Horse and various other early
makes and models of garden tractors. Will not fit Cub Cadet "Original" garden
tractor or Cub Lo-Boy. This part replaces the seal in metal thrust
plates/retainers IH-394936-R91 and 703-1031 (listed below). Replaces John
Deere part #'s M41917 and M45568. OEM Cub Cadet part # 923-3039.
$10.25 each, plus shipping & handling.
 Metal Thrust Plate / Retainer.
Fits Cub Cadet "Original" Garden Tractor Steering Box. May also fit various
other early makes and models of early garden tractors. Will not fit later
models of Cub Cadet garden tractors, Ford LGT, Jacobsen, John Deere, Massey
Ferguson, MTD Farm King, Snapper, Wheel Horse or Cub Lo-Boy. If the opening
in your steering box match this part, then it will fit. Part of discontinued
Cub Cadet part # IH-376478-R91. Used and in excellent condition.
$20.00± each, depending on source and availability, plus shipping
& handling. (When available or in stock.)
Metal Thrust Plate / Retainer.
Fits Cub Cadet "Original" Garden Tractor Steering Box. May also fit various
other early makes and models of early garden tractors. Will not fit later
models of Cub Cadet garden tractors, Ford LGT, Jacobsen, John Deere, Massey
Ferguson, MTD Farm King, Snapper, Wheel Horse or Cub Lo-Boy. If the opening
in your steering box match this part, then it will fit. Part of discontinued
Cub Cadet part # IH-376478-R91. Used and in excellent condition.
$20.00± each, depending on source and availability, plus shipping
& handling. (When available or in stock.)
 Metal Thrust Plate/Retainer. Fits
early ROSS aluminum housing steering box in Cub Cadet garden tractor models
70, 71, 72, 73, 86, 100, 102, 104, 105, 106, 107, 108, 109, 122, 123, 124,
125, 126, 127, 128, 129, 147, 149, 169, 482, 580, 582, 680, 682, 782, 782D,
784, 800, 882, 1000, 1100, 1200, 1210, 1211, 1250, 1282, 1450, 1512, 1604,
1606, 1650, 1710, 1711 and 1712. Also fits John Deere models 60, 70, 100,
110, 112, 120, 140, 200, 208, 210, 212, 214, 216, 300, 312, 314, 316 (Kohler
engine models), 317 and 400, Ford LGT, Jacobsen, Massey Ferguson, MTD Farm
King, Snapper, Wheel Horse and various other early makes and models of garden
tractors. Will not fit Cub Cadet "Original" garden tractor or Cub Lo-Boy.
Metal Thrust Plate/Retainer. Fits
early ROSS aluminum housing steering box in Cub Cadet garden tractor models
70, 71, 72, 73, 86, 100, 102, 104, 105, 106, 107, 108, 109, 122, 123, 124,
125, 126, 127, 128, 129, 147, 149, 169, 482, 580, 582, 680, 682, 782, 782D,
784, 800, 882, 1000, 1100, 1200, 1210, 1211, 1250, 1282, 1450, 1512, 1604,
1606, 1650, 1710, 1711 and 1712. Also fits John Deere models 60, 70, 100,
110, 112, 120, 140, 200, 208, 210, 212, 214, 216, 300, 312, 314, 316 (Kohler
engine models), 317 and 400, Ford LGT, Jacobsen, Massey Ferguson, MTD Farm
King, Snapper, Wheel Horse and various other early makes and models of garden
tractors. Will not fit Cub Cadet "Original" garden tractor or Cub Lo-Boy.
 Metal Thrust Plate Retainer.
Fits newer CCC aluminum housing steering box in Cub Cadet garden tractor
models 1050, 1204, 1210, 1211, 1340, 1440, 1535, 1541, 1641, 1806, 1810,
1811, 1812, 1860, 1861, 1863 and 1864. May fit various other makes and models
of garden tractors with the ROSS steering box. Will not fit Cub Cadet "Original"
garden tractor or Cub Lo-Boy. Discontinued Cub Cadet part # 703-1031.
$10.00± each, depending on source and availability, plus shipping
& handling. (When available or in stock.)
Metal Thrust Plate Retainer.
Fits newer CCC aluminum housing steering box in Cub Cadet garden tractor
models 1050, 1204, 1210, 1211, 1340, 1440, 1535, 1541, 1641, 1806, 1810,
1811, 1812, 1860, 1861, 1863 and 1864. May fit various other makes and models
of garden tractors with the ROSS steering box. Will not fit Cub Cadet "Original"
garden tractor or Cub Lo-Boy. Discontinued Cub Cadet part # 703-1031.
$10.00± each, depending on source and availability, plus shipping
& handling. (When available or in stock.) 1/2-20
UNF thread jam nuts -
1/2-20
UNF thread jam nuts -
 9/16" Diameter Cam Followers
(Adjustable Steering Pins). Replace worn cam follower for "tighter" and less
"sloppy" or "loose" steering, and for safer operation of tractor. Fits IH-
and MTD-built Cub Cadet garden tractor models 982, 984, 986, 1050, 1204,
1210, 1211, 1340, 1440, 1535, 1541, 1641, 1806, 1810, 1811, 1812, 1860, 1861,
1863, 1912, 1914. Also fits various Ford LGT, Jacobsen, John Deere, Massey
Ferguson, MTD Farm King, Snapper, Wheel Horse and various other early makes
and models of garden tractors. Replaces John Deere part # M45567.
9/16" Diameter Cam Followers
(Adjustable Steering Pins). Replace worn cam follower for "tighter" and less
"sloppy" or "loose" steering, and for safer operation of tractor. Fits IH-
and MTD-built Cub Cadet garden tractor models 982, 984, 986, 1050, 1204,
1210, 1211, 1340, 1440, 1535, 1541, 1641, 1806, 1810, 1811, 1812, 1860, 1861,
1863, 1912, 1914. Also fits various Ford LGT, Jacobsen, John Deere, Massey
Ferguson, MTD Farm King, Snapper, Wheel Horse and various other early makes
and models of garden tractors. Replaces John Deere part # M45567.
 Center Front Axle Pivot Pin
(Bolt). Fits all Cub Cadet spread frame garden tractor models 482, 580, 582,
582 Special, 680, 682, 782, 782D, 784, 982, 984, 986, 1204, 1210, 1211, 1282,
1340, 1440, 1541, 1572, 1604, 1606, 1641, 1710, 1711, 1712, 1772, 1782, 1806,
1810, 1811, 1812, 1860, 1861, 1862, 1863, 1864, 1872, 1882, 1912, 1914, 2072,
2082, 2084, 2086, 2182 and 2284. Hardened steel bolt with hole drilled through
threads for cotter pin. Reuse existing OEM castle nut with a new 1/8" x 1-1/2"
cotter pin. Dimensions: 5-1/4" total length under head, 4-3/8" shank length,
3/4-10 UNC x 7/8" thread length, with 1/8" hole for cotter pin. IMPORTANT:
For
Center Front Axle Pivot Pin
(Bolt). Fits all Cub Cadet spread frame garden tractor models 482, 580, 582,
582 Special, 680, 682, 782, 782D, 784, 982, 984, 986, 1204, 1210, 1211, 1282,
1340, 1440, 1541, 1572, 1604, 1606, 1641, 1710, 1711, 1712, 1772, 1782, 1806,
1810, 1811, 1812, 1860, 1861, 1862, 1863, 1864, 1872, 1882, 1912, 1914, 2072,
2082, 2084, 2086, 2182 and 2284. Hardened steel bolt with hole drilled through
threads for cotter pin. Reuse existing OEM castle nut with a new 1/8" x 1-1/2"
cotter pin. Dimensions: 5-1/4" total length under head, 4-3/8" shank length,
3/4-10 UNC x 7/8" thread length, with 1/8" hole for cotter pin. IMPORTANT:
For
 Aircraft Quality
 Protective Rubber Seals/Shields
for Heim joints listed above. These are a cup-shape neoprene rubber seal
bonded to an aircraft quality flat washer. When installed, rubber edge fits
snug against Heim joint body to prevent dust, dirt, debris and moisture from
entering the spherical ball, which will cause it to wear. Apply clean motor
oil on ball before installing seals for easier steering and to extend life
of Heim joint. Seals/shields for 1/4" Heim joint not available.
Protective Rubber Seals/Shields
for Heim joints listed above. These are a cup-shape neoprene rubber seal
bonded to an aircraft quality flat washer. When installed, rubber edge fits
snug against Heim joint body to prevent dust, dirt, debris and moisture from
entering the spherical ball, which will cause it to wear. Apply clean motor
oil on ball before installing seals for easier steering and to extend life
of Heim joint. Seals/shields for 1/4" Heim joint not available.
 Steel Jam Nuts. These are about
half the thickness/width of ordinary nuts. Use these to secure tie rods or
Heim joints to steering linkage or drag link to prevent loosening and maintain
proper toe-end alignment.
Steel Jam Nuts. These are about
half the thickness/width of ordinary nuts. Use these to secure tie rods or
Heim joints to steering linkage or drag link to prevent loosening and maintain
proper toe-end alignment.
