
 Information about the Cub Cadet Garden Tractor Creeper Drive
and How to Improve and Modify the Cub Cadet Transaxle for Heavy Duty Use
and/or for Competition Pulling
Information about the Cub Cadet Garden Tractor Creeper Drive
and How to Improve and Modify the Cub Cadet Transaxle for Heavy Duty Use
and/or for Competition Pulling
Information about the Cub Cadet Garden Tractor Creeper Drive
and How to Improve and Modify the Cub Cadet Transaxle for Heavy Duty Use
and/or for Competition Pulling
Information about the Cub Cadet Garden Tractor Creeper Drive
and How to Improve and Modify the Cub Cadet Transaxle for Heavy Duty Use
and/or for Competition Pulling
Educating and Inspiring Small Engine, Lawn & Garden, and Garden
Pulling Tractor Enthusiasts Since 1996. Where Science and Common Sense Come
Together for Safety and Improved Engine/Tractor Performance |
A-1
Miller's Performance Enterprises - Parts & Services
Webstore |  Overstocked Kohler Engine Parts & Cub Cadet Garden Tractor
Parts | Available Soon - Detailed
Illustrated Plans on How to Construct Professional Pulling Sleds
Overstocked Kohler Engine Parts & Cub Cadet Garden Tractor
Parts | Available Soon - Detailed
Illustrated Plans on How to Construct Professional Pulling Sleds
Nowadays, prices are subject to change without notice. Click
Refresh to see any
changes or updates. Optimized for 1152 x 864 computer screen resolution.
To search for a word or phrase in any of my websites, press the CTRL
 and F
and F  keys on
your keyboard simultaneously to open the Find or Search dialog box in your
web browser. And being I have no
apprentice to update and pay for my websites so they'll
continue to be on the Internet, they will be removed forever when I'm no
longer around. Click links below to jump down to the article or scroll
down in this website.
keys on
your keyboard simultaneously to open the Find or Search dialog box in your
web browser. And being I have no
apprentice to update and pay for my websites so they'll
continue to be on the Internet, they will be removed forever when I'm no
longer around. Click links below to jump down to the article or scroll
down in this website.
What type of oil should be used in the Cub Cadet garden tractor and other makes and models of gearboxes, transmissions and transaxles? [Top of Page]
 For the IH- and MTD-built Cub Cadet
garden tractor hydrostatic- and gear-drive transaxles, the official Cub Cadet
garden tractor repair manual says the recommended oil to use is Hy-Tran B-6,
Hy-Tran PLUS (MS-1207), Hy-Tran ULTRA or equivalent. "Equivalent" means that
it's safe to use any high quality, name-brand hydraulic oil that meets or
exceeds CASE
IH requirements. These oils can be used in both the hydrostatic (and
hydraulic) drive and gear drive transaxles. Most
Farm and Home retail stores should have Hy-Tran oil in
stock. When or if you do find Hy-Tran, look on the back label of the CASE
IH hydraulic oil containers. It should mention something about Hy-Tran. By
the way - Allegedly, IH Cub Cadet and CASE IH (and perhaps other
tractor/transaxle manufacturers) made a deal with the makers of Hy-Tran,
and this is why they highly recommend to use their oil. It's all about more
money for the big business. They figure what the public don't know makes
them more money.
For the IH- and MTD-built Cub Cadet
garden tractor hydrostatic- and gear-drive transaxles, the official Cub Cadet
garden tractor repair manual says the recommended oil to use is Hy-Tran B-6,
Hy-Tran PLUS (MS-1207), Hy-Tran ULTRA or equivalent. "Equivalent" means that
it's safe to use any high quality, name-brand hydraulic oil that meets or
exceeds CASE
IH requirements. These oils can be used in both the hydrostatic (and
hydraulic) drive and gear drive transaxles. Most
Farm and Home retail stores should have Hy-Tran oil in
stock. When or if you do find Hy-Tran, look on the back label of the CASE
IH hydraulic oil containers. It should mention something about Hy-Tran. By
the way - Allegedly, IH Cub Cadet and CASE IH (and perhaps other
tractor/transaxle manufacturers) made a deal with the makers of Hy-Tran,
and this is why they highly recommend to use their oil. It's all about more
money for the big business. They figure what the public don't know makes
them more money.
 But if Hy-Tran isn't available locally,
then it's absolutely safe to use virtually any brand of
Automatic Transmission Fluid (ATF), hydraulic oil, power
steering fluid, hydraulic jack oil (which is nothing but low viscosity/thinner
hydraulic oil) in a Cub Cadet garden tractor gear drive transaxle or hydrostatic
drive. Automatic Transmission Fluid is a very durable and high quality hydraulic
oil with a red dye and scent added to determine it from other oils when it
leaks from a vehicle or equipment. It also has a rust inhibitor and has a
cleaning agent, which helps keep the inside of a transaxle clean. By the
way - automatic transmission fluid protects automotive automatic transmission
parts, don't they? And auto transmissions work a lot harder and operate for
longer periods of time (while hauling heavy loads on the highway and up steep
grades) than any garden tractor transaxle ever will. Synthetic oils will
allow the internal moving parts to operate much cooler. And to prevent the
wear of gears in hydraulic pumps and motors, ALWAYS use a hydraulic type
of oil in a hydrostatic drive and hydraulic system because it's formulated
to flow more easily and freer past the moving parts.
But if Hy-Tran isn't available locally,
then it's absolutely safe to use virtually any brand of
Automatic Transmission Fluid (ATF), hydraulic oil, power
steering fluid, hydraulic jack oil (which is nothing but low viscosity/thinner
hydraulic oil) in a Cub Cadet garden tractor gear drive transaxle or hydrostatic
drive. Automatic Transmission Fluid is a very durable and high quality hydraulic
oil with a red dye and scent added to determine it from other oils when it
leaks from a vehicle or equipment. It also has a rust inhibitor and has a
cleaning agent, which helps keep the inside of a transaxle clean. By the
way - automatic transmission fluid protects automotive automatic transmission
parts, don't they? And auto transmissions work a lot harder and operate for
longer periods of time (while hauling heavy loads on the highway and up steep
grades) than any garden tractor transaxle ever will. Synthetic oils will
allow the internal moving parts to operate much cooler. And to prevent the
wear of gears in hydraulic pumps and motors, ALWAYS use a hydraulic type
of oil in a hydrostatic drive and hydraulic system because it's formulated
to flow more easily and freer past the moving parts.
For competition pulling only in a gear drive transaxle (not the creeper drive), don't use heavy, thick 80W90 gear oil. Gear oil will rob the engine of horsepower because the gears can't rotate freely at higher speeds due to the thicker oil. Therefore, Hy-Tran, hydraulic oil, automatic transmission fluid, or SAE 30, 10W30 or 10W40 motor oil should be used instead. These low viscosity (thinner) oils will allow the gears to spin more freely and provide adequate lubrication for all moving parts. So there's no need to worry about the gears, bearings and other internal parts wearing prematurely because of the thinner oil. The parts in garden tractor transaxles are made of extremely hardened material. And being gear drive transaxles don't have a hydraulic pump like the hydrostatic drive and hydraulic systems do, which build-up heat due to extreme pressure exerted from the pump (this is why certain hydrostatic drive and hydraulic systems have an oil cooler), the oil will never get hot.
For prolong and general yard and garden use, 75W90 or 80W90 gear oil should be used in the IH and MTD Cub Cadet garden tractor creeper drives, right-angle gearboxes, and Peerless, Wheel Horse and any other gear-drive transaxle, except the Cub Cadet garden tractor transaxle with an internal brake. The thicker 80W90 gear oil will not "thin out" for a long period of heavy duty use and will provide adequate lubrication and protection for the gears, bearings and oil seals.
When filling the Cub Cadet garden tractor internal brake transaxle with oil, 75W90 or 80W90 gear oil shouldn't be used. If heavy gear oil is used, the internal brake will not grip as well and the tractor will not stop as well. Instead, use Hy-Tran fluid. But 0W20 full synthetic, SAE 30 or 10W30 motor oils, power steering fluid, SAE 10 weight hydraulic oil, automatic transmission fluid (ATF) can be used as a substitute. These type of oils are much thinner than 75W90 and 80W90 gear oils, which will allow the brake to grip better, plus, thinner oil allows the gears to spin faster, freeing up horsepower in a high-speed competition pulling tractor. And don't worry about the internal parts wearing because of the thinner oil. They're made of extremely hardened material.
Oil for the International Cub Cadet "Original" garden tractor transaxle is installed through the oil fill hole on top of the transaxle, just behind the shift lever. And the oil level check hole is located on the lower right side of the transaxle, towards the front. Fill with oil until it runs out of the hole on the side. Oil for all other models of Cub Cadet garden tractor transaxles, including the gear drive and hydrostatic drive, is installed and added through the oil fill/level hole (with a 1/2" drive NPT tapered-thread plug) that's on the rear cover of the transaxle. An automotive automatic transmission funnel with a long, flexible tube may need to be used to put the oil in. Fill the transaxle until the oil starts to run out of the hole. On a transaxle that's just been rebuilt or modified, it's a lot easier and less effort to install the oil through the shift lever opening, before installing the shift lever housing, then check the level at the hole in the rear cover. Make sure the transaxle is positioned level too, for accuracy. And it takes 3-1/2 quarts of oil to fill an IH Cub Cadet garden tractor gear drive transaxle.
What is the Difference Between 75W90 and 80W90 Gear Oil?
75W90 gear oil provides better cold-weather flow and and longer life due to its generally synthetic, higher-quality base oil, while 80W90 gear oil is a mineral-based option with a thicker base oil and less reliance on polymers for viscosity, leading to more consistent viscosity, but less cold-weather performance. For mostly warm weather use, the 80W90 is suitable, but in warm and cold weather use, 75W90 is often a smarter, more protective option for overall efficiency, especially in creeper drives, gearboxes, transmissions, transaxles and differentials with components that benefit from a thinner, more consistent oil.
 What makes most hydrostatic drive
and driven parts and gears wear prematurely isn't because the wrong type
of oil is used, it's due to extreme
HEAT. Whenever petroleum
oil gets hot, it loses it's "thickness" or viscosity and turns very thin,
or "thins out," in other words. The hotter it gets, the thinner it gets.
This is called
thermal viscosity breakdown. Oil is supposed to keep all
internal moving engine parts and rotating gears safely lubricated and most
importantly, separated. But when oil gets hot, it gets thin, and this will
cause the moving parts (gears and such) to make physical contact with each
other (metal to metal contact) causing them to wear excessively. Extremely
hot oil will cause the rubber seals to harden and crack, too. No petroleum
oil, not even Hy-Tran, is immune from thermal viscosity breakdown. Synthetic
blend oil, also known as part-synthetic or semi-synthetic oil, is a mixture
of conventional mineral oil and full synthetic oil. Synthetic blend oil is
50% immune from thermal viscosity breakdown. But only full synthetic oil
, which is a motor oil engineered at the molecular level using chemically
synthesized base oils, rather than being derived from crude oil, is 100%
immune from thermal viscosity breakdown. So remember, it's very important
to keep the oil changed regularly, keep the cooling fins that's on the
hydrostatic pump/motor clean and free of debris, make sure the fan that blows
cooling air over the hydrostatic pump/motor is in good, working condition,
and perform thorough routine maintenance at least once a year before using
the tractor or equipment, and the hydrostatic unit will probably last forever.
By the way - it takes approximately 7 quarts of oil to fill the Cub Cadet
garden tractor hydrostatic drive transaxle and filter.
What makes most hydrostatic drive
and driven parts and gears wear prematurely isn't because the wrong type
of oil is used, it's due to extreme
HEAT. Whenever petroleum
oil gets hot, it loses it's "thickness" or viscosity and turns very thin,
or "thins out," in other words. The hotter it gets, the thinner it gets.
This is called
thermal viscosity breakdown. Oil is supposed to keep all
internal moving engine parts and rotating gears safely lubricated and most
importantly, separated. But when oil gets hot, it gets thin, and this will
cause the moving parts (gears and such) to make physical contact with each
other (metal to metal contact) causing them to wear excessively. Extremely
hot oil will cause the rubber seals to harden and crack, too. No petroleum
oil, not even Hy-Tran, is immune from thermal viscosity breakdown. Synthetic
blend oil, also known as part-synthetic or semi-synthetic oil, is a mixture
of conventional mineral oil and full synthetic oil. Synthetic blend oil is
50% immune from thermal viscosity breakdown. But only full synthetic oil
, which is a motor oil engineered at the molecular level using chemically
synthesized base oils, rather than being derived from crude oil, is 100%
immune from thermal viscosity breakdown. So remember, it's very important
to keep the oil changed regularly, keep the cooling fins that's on the
hydrostatic pump/motor clean and free of debris, make sure the fan that blows
cooling air over the hydrostatic pump/motor is in good, working condition,
and perform thorough routine maintenance at least once a year before using
the tractor or equipment, and the hydrostatic unit will probably last forever.
By the way - it takes approximately 7 quarts of oil to fill the Cub Cadet
garden tractor hydrostatic drive transaxle and filter.
A non-synthetic oil will provide superior lubrication as long as you keep the cooling fins and hydrostatic drive areas clean and free of grass and debris. Make sure the fan on the driveshaft is in good condition, too. Clean the fins and hydrostatic drive areas the beginning of every year and the hydrostatic drive system should last a lifetime. Return to [Top of Page]. È
Information About the Cub Cadet Garden Tractor Creeper Drive - [Top of Page]
 The
Cub Cadet garden tractor creeper drive is a small 2-speed
selective high/low gearbox. A creeper drive is required when mowing tall
(field) grass, using a
Haban sickle bar, plowing a garden, pushing snow, or hauling
heavy loads up a steep hill, doing all this especially with a small engine
and for safety. It fastens to the front of the Cub Cadet garden tractor
transaxle. When the shift lever is placed in LOW (reduction speed; 2:1 ratio),
all the gears in the transaxle are reduced by half, which means the tractor
will move half its speed, in forward and reverse. When the lever is placed
in HIGH (normal speed; 1:1 ratio), all the gears in the transaxle turn their
normal speeds.
The
Cub Cadet garden tractor creeper drive is a small 2-speed
selective high/low gearbox. A creeper drive is required when mowing tall
(field) grass, using a
Haban sickle bar, plowing a garden, pushing snow, or hauling
heavy loads up a steep hill, doing all this especially with a small engine
and for safety. It fastens to the front of the Cub Cadet garden tractor
transaxle. When the shift lever is placed in LOW (reduction speed; 2:1 ratio),
all the gears in the transaxle are reduced by half, which means the tractor
will move half its speed, in forward and reverse. When the lever is placed
in HIGH (normal speed; 1:1 ratio), all the gears in the transaxle turn their
normal speeds.
The creeper drive was optional equipment that was offered by Cub Cadet. The same cast iron housing creeper drive fits all models of clutch drive IH and MTD Cub Cadet garden tractors, except the International Cub Cadet "Original" garden tractor. This unit will fit models 70, 71, 72, 73, 86, 100, 102, 104, 106, 108, 122, 124, 126, 128, 582, 800, 1000, 1050, 1200, 1535, 1604, 1606 and 1806. A shorter driveshaft is required with a creeper drive.
If your Cub Cadet garden tractor didn't come with a creeper drive and you wish to install one, here's how to do it: (This is much easier to do on a platform work table.)
 Besides the creeper drive, the
additional parts needed to install the creeper drive are: (4) 3/8" x 1" UNC
bolts with split lock washers, mounting gasket, and 90 weight gear oil.
Besides the creeper drive, the
additional parts needed to install the creeper drive are: (4) 3/8" x 1" UNC
bolts with split lock washers, mounting gasket, and 90 weight gear oil.

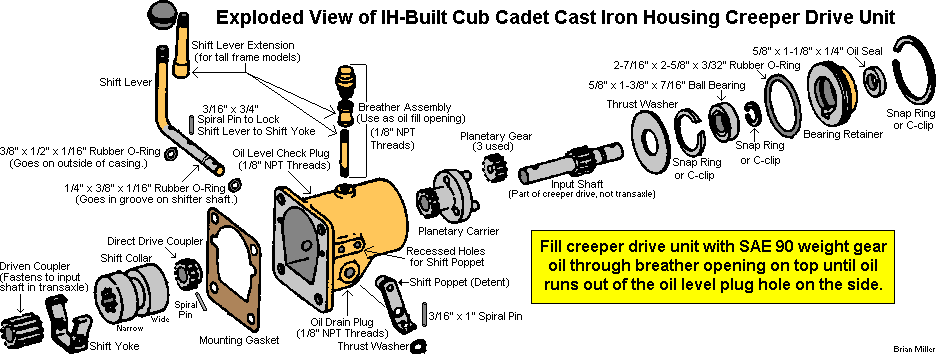
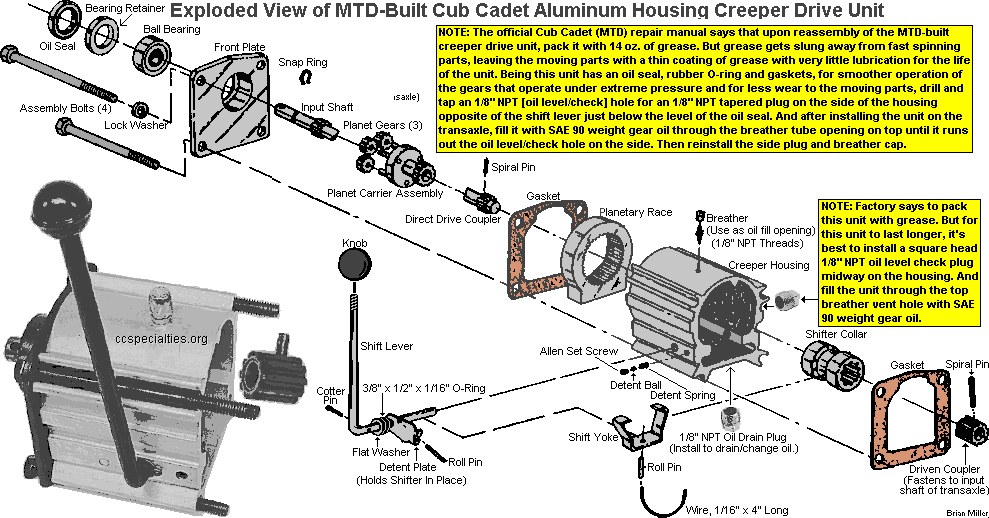
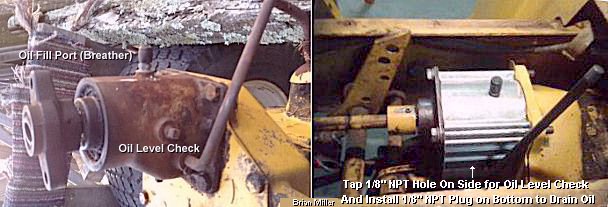
NOTE: The official Cub Cadet (MTD) repair manual says that upon reassembly of the MTD-built creeper drive, pack it with 14 oz. of grease. But grease gets slung away from fast spinning parts, leaving the moving parts with a thin coating of grease with very little lubrication for the life of the unit. Being this unit has a rubber O-ring seal, oil seal and gaskets, for smoother operation of the gears that operate under extreme pressure and for less wear to the moving parts, drill and tap an 1/8" NPT [oil level/check] hole for an 1/8" NPT tapered plug on the side of the housing opposite of the shift lever just below the level of the oil seal. And after installing the unit on the transaxle, fill it with SAE 90 weight gear oil through the breather tube opening on top until it runs out the oil level/check side hole on the side. Then replace the side plug and breather cap.
Also, the MTD-built creeper drive will fit and bolt right up to the older IH-built Cub Cadet garden tractor transaxles (except the International Cub Cadet "Original" garden tractor), but the upper part of the tractor frame on models 70, 71, 72, 73 and 100 will need to be modified to accommodate the taller MTD-built creeper drive housing and the driveshaft will need to be shortened by 4-3/4".
And as with all transmissions, transaxles, creeper drives and gear boxes, before shifting from one gear into another, ALWAYS bring the tractor or vehicle to a full complete stop with the clutch pedal fully depressed or the engaging lever fully disengaged to allow the gears to stop spinning and to avoid "grinding of the gears," which could break or wear the gear teeth or engaging splines.
Advertisement: (Prices are subject to change without notice.)
| Click here to contact A-1 Miller's Performance Enterprises to place an order, send your parts for repairing, and/or for FREE professional and honest technical customer service assistance and support and payment options. Please contact A-1 Miller's if you need a part or parts, or service(s) performed that's not listed or mentioned in this website. | |||||||||
Repair or Rebuild IH- or MTD-built Cub Cadet Garden Tractor Creeper Drive. Replace all worn parts so it will not leak oil and so it will shift into gear effortlessly with no problems. $75.00 labor only, plus return shipping & handling. Installation of new kit (shown above) are extra charge. Install Oil Level Check Plug on Side and Oil Drain Plug on Bottom of MTD-built creeper drive. This will allow it to be filled (and drained) with SAE 90 weight gear oil so parts will be well-lubricated and last much longer. This works much better than being sealed and packed with factory-recommended grease. Grease slings away from fast-moving parts. $30.00 extra. |
Gearing a Cub Cadet Competition Garden Pulling Tractor - [Top of Page]
In tractor pulling, understanding the concept of having the correct gearing to achieve adequate ground speed so the engine will have enough power to spin the tires on any given track conditions can be a challenge. Overdrive and underdrive gears either speed up or slow down the transmission gears in the transaxle. And by changing the transmission gears, this will give the puller a choice of slower or faster gears according to track conditions.
Having very slow ground speed or very high ground speed can sometimes hurt how well a tractor can pull. With a healthy engine, at the end of the track, if the engine is still revving like there's no load on it, then this means the gearing is too low. But if the engine bogs down and die, this means the gearing is too high. In other words, the gearing needs to be "balanced" to the strength of the engine so when the sled's weight is on the tractor (entire weight of tractor transferred over the rear tires), the tires will still spin some, but the engine will bog down slightly.
The reason to use the right gearing in a pulling tractor is to match an engine's ability to give the tractor momentum so it can pull the sled a little further down the track without sacrificing horsepower or increasing/decreasing torque at the rear wheels. In other words, if one pulls in a particular gear that is too fast, they increase the ground speed, but run out of horsepower in the end. If they pull in a gear that's too slow, they have plenty of power, but don't have the needed ground speed, meaning they may run out of traction at the end. The point here is to obtain a correct "balance" between an engines' power output and torque at its rear tires, which should result in a good pull every time.
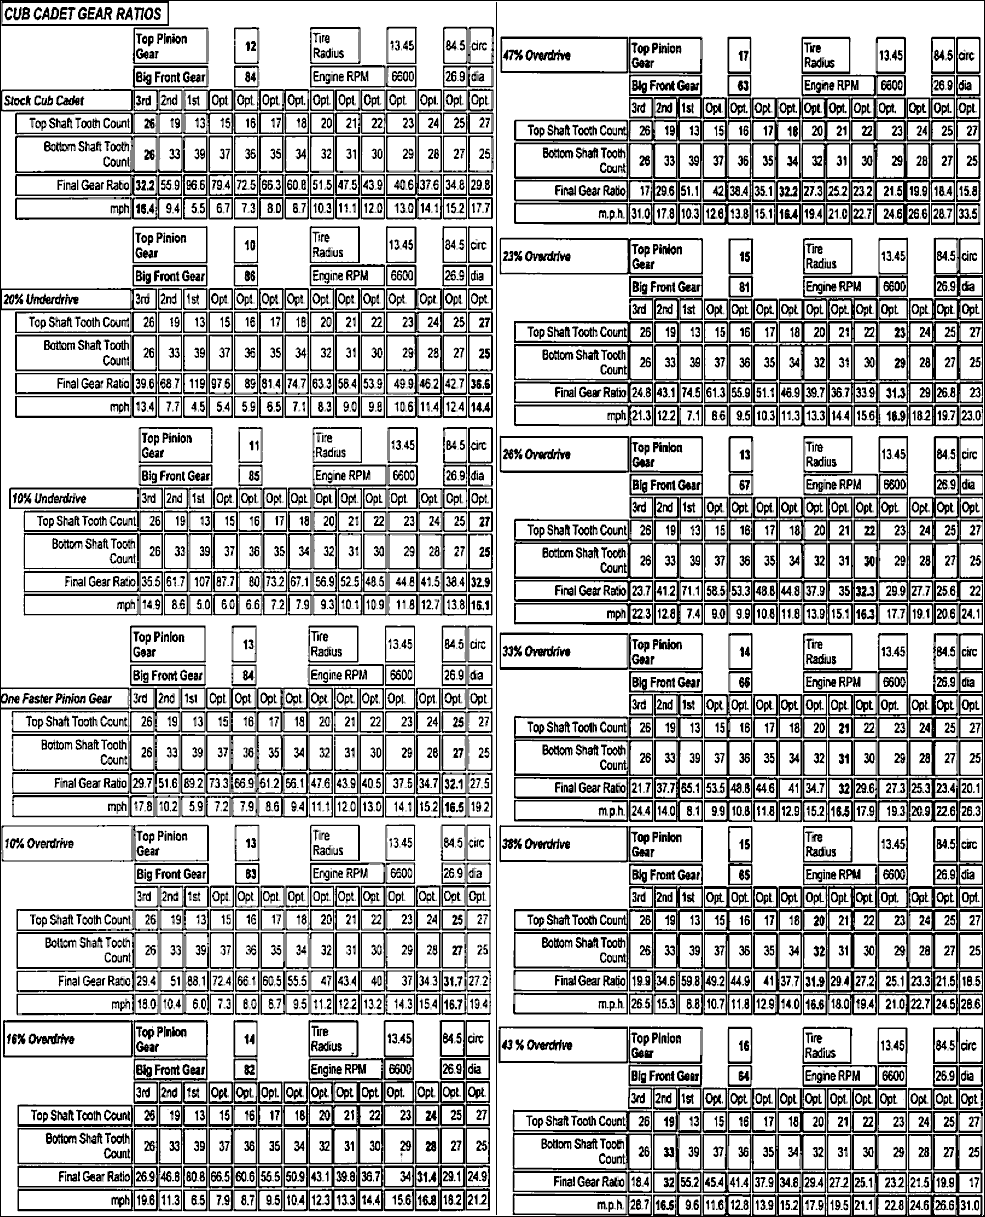
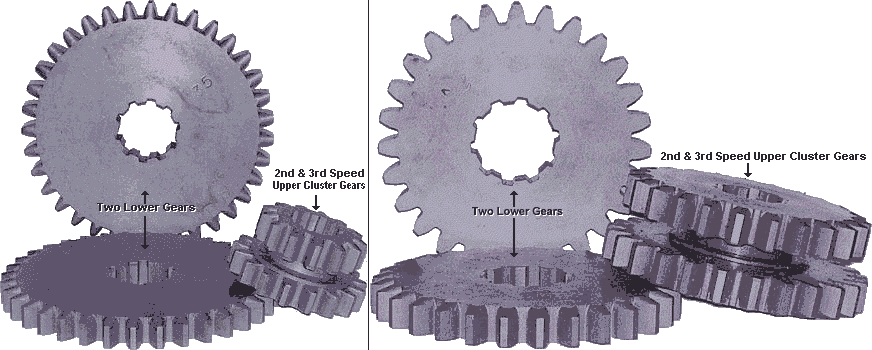
The teeth count of the upper and lower forward gears in a Cub Cadet transaxle must total 52 (example: 19t upper gear + 33t lower gear = 52 teeth total). Otherwise, if they don't total up to 52, one gear will be too big and the other too small, and the teeth won't mesh (engage) correctly. When referring to which gears are in a tractor, all pullers refer to the teeth count on the upper gears only. To count the teeth on the upper gear only, remove the shifter lever cover from the transaxle, and place a paint mark on one tooth (as reference for the starting point), then rotate the gear and count the rest of the teeth.
To find the gear ratio, always divide the number of teeth on the lower gear by the number of teeth on the upper gear. Place a mark on one tooth, then count the other teeth until you get back to the mark. The mating upper and lower gears together have a total of 52 teeth. There are no exceptions. For example: 2nd speed has 19 teeth on the upper gear and 33 teeth on the lower gear to equal 52 teeth total (19 + 33 = 52). And 3rd speed have two 26 tooth gears, resulting in a total of 52 teeth (26 + 26 = 52). And so forth. Factory stock OEM (Original Equipment Manufacturer) gear ratios are as follows:
The factory-installed gears that originally came in IH Cub Cadet transaxles (a "transaxle" is the union of a transmission and rear axle in one case) are 13 tooth 1st gear, 16, 17 or 19 tooth 2nd gear and 26 tooth 3rd gear. The "tooth" count are the number of teeth on each upper gear. The 16 tooth 2nd came out in the early 1960's, while the 17 and 19 tooth replaced it in later years.
The OEM (Original Equipment Manufacturer) Cub Cadet 2nd and 3rd upper sliding gears are made together, next to each other. This is why they're called cluster gears. They have the 2nd/3rd speed shift fork between them. The 2nd and 3rd bottom gears are separate, fixed in place, and is spaced apart with a spacer. And 1st sliding gear is used for forward and reverse. The 1st/Reverse shift fork fits over 1st gear. Cub Cadet garden tractors originally came with 16, 17 and 19 tooth second gears. (This is the upper sliding cluster 2nd speed gear; upper 3rd speed gear is 26 tooth in all models.)
The number of factors to take into consideration when choosing the right gearing for a garden pulling tractor are:
If a pulling club's rules require that 23-10.50x12 [Carlisle Super Lug or Vogel] tires to be used, then these tires can be mounted on 12" wide wheels. I've seen this done many times on pulling tractors with great results. The wider wheels will allow the tire tread to lay flatter for better traction, but it'll also shorten the overall tire height slightly which will reduce the tractor's ground speed. Therefore, to regain the ground speed, if it's a Cub Cadet, perhaps installing 10% overdrive gears should do the trick. Also, 23-10.50x12 inner tubes may need to be installed to get the tire(s) to take air due to the wider wheels and narrow tires.
 Rule of thumb in choosing the
right gear ratios are as follows: NOTE: The following statements
are meant only as a reference. The right gearing depends mainly on the strength
and/or size of the engine and track conditions. And when it comes to competition
pulling, nothing is really certain. Weights shown is with driver.
Rule of thumb in choosing the
right gear ratios are as follows: NOTE: The following statements
are meant only as a reference. The right gearing depends mainly on the strength
and/or size of the engine and track conditions. And when it comes to competition
pulling, nothing is really certain. Weights shown is with driver.

 The
OEM Cub Cadet 12 tooth pinion drive gear/shaft can be swapped out with an
aftermarket 13 tooth pinion drive gear/shaft and the OEM 84 tooth lower driven
gear can be reused. This will increase the drive gears about 1 tooth, resulting
in about a 5% increase in ground speed.
The
OEM Cub Cadet 12 tooth pinion drive gear/shaft can be swapped out with an
aftermarket 13 tooth pinion drive gear/shaft and the OEM 84 tooth lower driven
gear can be reused. This will increase the drive gears about 1 tooth, resulting
in about a 5% increase in ground speed.
 But if you want your tractor
to go even faster than the above mentioned, then both the upper and lower
gears in the transmission must be changed. The reason for a combination
2nd and 3rd speed gear set is to slow down the tires
in 2nd gear when pulling on a biting track (moistened and packed
surface), which will provide more traction and reserve engine power/torque,
because the tires probably wouldn't be able to spin as easily. And with a
slightly faster 3rd gear, (faster than the OEM 2nd
gear, but slower than factory stock 26 tooth 3rd gear), would
perform better on a hard, dry or loose track, which will allow the tires
to spin more easily, will provide more ground speed without sacrificing engine
power/torque. So having a double gear set is better than pulling in just
one gear (2nd or perhaps 1st) all the time, which is
either too slow or too fast.
But if you want your tractor
to go even faster than the above mentioned, then both the upper and lower
gears in the transmission must be changed. The reason for a combination
2nd and 3rd speed gear set is to slow down the tires
in 2nd gear when pulling on a biting track (moistened and packed
surface), which will provide more traction and reserve engine power/torque,
because the tires probably wouldn't be able to spin as easily. And with a
slightly faster 3rd gear, (faster than the OEM 2nd
gear, but slower than factory stock 26 tooth 3rd gear), would
perform better on a hard, dry or loose track, which will allow the tires
to spin more easily, will provide more ground speed without sacrificing engine
power/torque. So having a double gear set is better than pulling in just
one gear (2nd or perhaps 1st) all the time, which is
either too slow or too fast.
To replace the input shaft/pinion drive gear, first remove the cover from the reduction gear housing, and use a medium size hammer and deepwell socket that fits inside the needle bearing housing on the back-side of the reduction gear housing, and drive out the input shaft/pinion gear from the rear of the housing. The oil seal, shaft/gear and needle bearing will all come out as one unit. After the new shaft is installed, apply a thin bead of clear RTV silicone adhesive sealant to seal the bearing in the rear of the housing. By the way - it's best to use Clear RTV Silicone Adhesive Sealant for three reasons: Gaskets don't always seal the imperfections and irregularities between two mating metals, especially thin metal covers; being Clear RTV Silicone Adhesive Sealant is an adhesive or glue, it bonds parts together, forming a leak-proof seal; and being it's clear, it makes for a clean and professional-looking repair job. When applied sparingly, it can't be easily seen or noticed between the parts. Also, engine heat has very little effect on silicone rubber. It can withstand up to 2,500 degrees heat.
Or, to remove a pinion and not destroy any parts (seal, etc.) use a "slide hammer" and put an angle or channel steel to use as a lever. Using this method, you do not damage even the most stubborn pinion. You can reuse everything and don't have to worry about any leaks.
No machine work is required when installing overdrive gears. But some grinding inside the housing may be required when installing a large pinion drive gear. Otherwise, just remove the pinion drive gear and the lower driven gear and install the aftermarket gears in the reverse order of removal.
And when reassembling a Cub Cadet gear drive transaxle, there's no need to install any high-dollar gaskets that are prone to leaking oil. Instead, apply a thin bead of clear RTV silicone adhesive sealant to reassemble the entire transaxle case. Silicone rubber is what I've always used on my transaxles since 1989 and to this day, they haven't leaked a drop of oil. And by eliminating gaskets, the use of silicone "strengthens" the transaxle housings by securely "bonding" them together or having them make positive metal-to-metal contact, which keeps the bolts securely tight, plus the silicone fills in any irregularities or imperfections between the two metals, eliminating oil leaks. By the way - it's best to use Clear RTV Silicone Adhesive Sealant for three reasons: Gaskets don't always seal the imperfections and irregularities between two mating metals, especially thin metal covers; being Clear RTV Silicone Adhesive Sealant is an adhesive or glue, it bonds parts together, forming a leak-proof seal; and being it's clear, it makes for a clean and professional-looking repair job. When applied sparingly, it can't be easily seen or noticed between the parts. Also, engine heat has very little effect on silicone rubber. It can withstand up to 2,500 degrees heat.
FYI - If oil leaks from an engine, transmission/transaxle or steering box, causing an oily mess on a concrete floor, mineral spirits (paint thinner) can be used to dry out the oil. Just pour some thinner on the oil, use an old broom to thoroughly mix the thinner with the oil, and eventually the oil will dry with no signs of it ever being on the floor. Because of its low volatile flammability, paint thinner also works great as a cleaning solvent, which is used to clean oily or greasy mechanical parts.
Fabricate a Simple, yet Functional Shift Lever Lock (to prevent the tractor from "jumping out of gear" under pulling stress) -
 If you're using either old or new gears, due to severe stress that pulling
places on the gears, it's always a good idea to install a sturdy shifter
lock on the tractor frame to hold the lever in gear when pulling. If pulling
in just 2nd gear only, an
adjustable yoke end can be used, or a short U-shape shifter
lock can be made of minimum 1/8" thickness x 1" wide aluminum or steel. But
when pulling in only 2nd and 3rd gears, or with in
4 forward gear setup with no reverse, make the U-shape shifter lock taller
and tilted back so it'll be at a 90º angle with the shift lever for
positive locking (causing no movement) of the lever. Use two 1/4" bolts to
fasten the U-shape shifter lock to the tractor frame. The shift lever will
need to be in place on the tractor to properly align the pins in the shifter
lock and fasten the shifter lock bracket to the tractor frame in the right
spot. To ensure that the mating top and bottom gears are perfectly aligned
and fully engaged, and to prevent misalignment of the gears when they are
locked in position, accurately measure (twice), cut (once) and drill the
holes (once) before fabricating, welding and permanently installing the U-shape
shifter lock!
If you're using either old or new gears, due to severe stress that pulling
places on the gears, it's always a good idea to install a sturdy shifter
lock on the tractor frame to hold the lever in gear when pulling. If pulling
in just 2nd gear only, an
adjustable yoke end can be used, or a short U-shape shifter
lock can be made of minimum 1/8" thickness x 1" wide aluminum or steel. But
when pulling in only 2nd and 3rd gears, or with in
4 forward gear setup with no reverse, make the U-shape shifter lock taller
and tilted back so it'll be at a 90º angle with the shift lever for
positive locking (causing no movement) of the lever. Use two 1/4" bolts to
fasten the U-shape shifter lock to the tractor frame. The shift lever will
need to be in place on the tractor to properly align the pins in the shifter
lock and fasten the shifter lock bracket to the tractor frame in the right
spot. To ensure that the mating top and bottom gears are perfectly aligned
and fully engaged, and to prevent misalignment of the gears when they are
locked in position, accurately measure (twice), cut (once) and drill the
holes (once) before fabricating, welding and permanently installing the U-shape
shifter lock!
When pulling competitively, it's best to lock the shift lever in gear despite the best gears/shafts/bearing retainers installed and if the gears are properly aligned. Because sometimes they'll still jump out of gear under hard pulling pressure. I believe there's no bigger disappointment and embarrassment than having your tractor jump out of gear on the track, especially when you knew there was a chance that it would jump out of jump.
When building a Cub Cadet garden tractor from scratch (parts from other Cub Cadet garden tractors), remember - there's differences between the shift levers on IH-built Cub Cadets. Models International Cub Cadet "Original" garden tractor, Cub Cadet garden tractor models 70, 71, 72 and 100 use the same shift lever (part # IH-376214-R12). Models 73, 106 and 126 use the same shift lever (part # IH-528881-R1). Models 102, 104, 122 and 124 use the same shift lever (part # IH-392628-R11). And models 86, 108, 128, 582 (IH), 800, 1000 and 1200 use the same shift lever (part # IH-544135-R1).
How To Prevent Transmission Gears from Being Locked-Up Between Gears -

 When a Cub Cadet pulling tractor
is still hooked to the sled just after a pull, and with the clutch pedal
fully depressed, sometimes the fiber clutch disc
will momentarily not release, and at the same time, when the driver/operator
tries to force the shift lever into the neutral position, this may cause
the shifter slots to flare out and the transmission gears will become locked-up
between gears.
When a Cub Cadet pulling tractor
is still hooked to the sled just after a pull, and with the clutch pedal
fully depressed, sometimes the fiber clutch disc
will momentarily not release, and at the same time, when the driver/operator
tries to force the shift lever into the neutral position, this may cause
the shifter slots to flare out and the transmission gears will become locked-up
between gears.  FYI - Clutch
lock-up will never occur when a 5/8" zinc-plated split lock washer is installed
between the pressure plates. Because when the clutch pedal is fully depressed,
the spring-action of the lock washer force the pressure plates away from
the clutch disc, allowing it to release every time. The lock washer also
allows for smoother clutch engagement. (A-1 Miller's original concept.)
FYI - Clutch
lock-up will never occur when a 5/8" zinc-plated split lock washer is installed
between the pressure plates. Because when the clutch pedal is fully depressed,
the spring-action of the lock washer force the pressure plates away from
the clutch disc, allowing it to release every time. The lock washer also
allows for smoother clutch engagement. (A-1 Miller's original concept.)
Anyway, if the transmission gears become locked-up between gears, to permanently fix this, first, the transaxle will need to be removed from the tractor's frame (this is much easier to do on a platform work table), or just move it back enough so the shift lever cover will clear the frame and can be removed. After this, use a large flat screwdriver to move the shifters into their neutral positions. This is when the slots in the shift forks [where the shift lever ball end fits into] are aligned. Then, you'll see that the shift forks are flared out. Use a hammer to gently bring them back together so the shift lever ball will fit snugly inside them. Due to worn gears and pulling force, these slots will sometimes flare out on their own under the slightest pressure.
Shift forks get broken, too. I've welded many of them back together with success. And if they don't break, they get bent from someone trying to jam or force the shift lever into gear when the tractor is sitting still with two gear teeth aligned and not offset with each other. This is when the operator needs to lightly engage the clutch or physically roll the tractor back and forth to get the gear teeth offset so the shift lever will go into gear. The same thing needs to be done with a car, truck or anything that has a manual shift transmission or transaxle to prevent damage.
To replace a broken shift fork, first, remove the rod it attaches to. To do so, remove the transaxle from the tractor (this is much easier to do when using a platform work table), remove the front gear reduction housing, remove the rear end cover, then use a long drift (3/8" bendable steel rod) to drive the shifter rod forward from the transaxle case. Be sure to place a finger over the hole so the small steel ball and spring won't pop out and possibly get lost. Reassembly is in reverse order of removal.
To prevent the
gears from locking up again, first, make sure that the slots are properly
aligned and they're not flared out. Then place a bead of weld on each side
of the shift forks as shown in the photo to the right -> so they won't
spread out again. The weld will prevent the slots from spreading again and
also keep the clamp bolts from loosening.
And in high-torque engine tractors, the mainshaft (upper shaft) could become twisted, resulting in total lock up of all the gears. Contact A-1 Miller's Performance Enterprises for quality hardened gears, shafts, ring gears and other Cub Cadet transaxle components.
The Cause for Reverse to "Jump Out" of Gear -
If the transaxle jumps out of reverse, especially when backing up a slight grade (hill), this means either the shift forks are bent and need straightening and welding. Or the gear teeth on the reverse idler are worn and the gear itself needs to be replaced. The gear teeth on the 1st/reverse sliding gear suffers the same abuse, so it should be replaced, too. What cause this is when the operator don't come to a full stop before shifting into reverse. Instead, they grind the transmission into reverse, which wears off the gear teeth. The gear teeth loses their "squareness," and cannot stay engaged correctly. The same thing happens with the reverse idler gear in automotive transmissions. To replace the reverse idler and 1st/reverse gears, the entire transmission or transaxle must be completely disassembled. There is no other way to fix this.
By the way - all IH gear drive transaxles use the same shift forks from the International Cub Cadet "Original" garden tractor until MTD made the 3 piece aluminum case. And you use caution if using an aluminum housing transaxle for competitive pulling. Aluminum don't have the strength that the cast iron ones does. When pressure is applied to the housing (the gears pushing against each other under stress; the housing is what holds the gears together), the aluminum housing will sometimes crack or break.
Advertisement: (Prices are subject to change without notice.)
| Click here to contact A-1 Miller's Performance Enterprises to place an order, send your parts for repairing, and/or for FREE professional and honest technical customer service assistance and support and payment options. Please contact A-1 Miller's if you need a part or parts, or service(s) performed that's not listed or mentioned in this website. | |
 A-1 Miller's
Professional Repair Service - Repair your broken or "sloppy" IH Cub Cadet
garden tractor shifter assembly. NOTE: When sending your broken shafter
assembly to A-1 Miller's, please include the shift lever and shifter housing
so when performing the repair, the shift lever will be properly aligned with
the housing. A-1 Miller's
Professional Repair Service - Repair your broken or "sloppy" IH Cub Cadet
garden tractor shifter assembly. NOTE: When sending your broken shafter
assembly to A-1 Miller's, please include the shift lever and shifter housing
so when performing the repair, the shift lever will be properly aligned with
the housing.
|
|
  Shift Rail Steel Detent Ball and Detent Spring. Each part below
fits all gear-drive transaxles in Cub Cadet garden tractor models 70, 71,
72, 73, 86, 100, 102, 104, 106, 108, 122, 124, 126, 128, 580, 582, 800, 1000,
1050, 1200, 1220, 1320, 1330, 1420, 1535, 1604, 1606, 1720, 1730 and 1806. Shift Rail Steel Detent Ball and Detent Spring. Each part below
fits all gear-drive transaxles in Cub Cadet garden tractor models 70, 71,
72, 73, 86, 100, 102, 104, 106, 108, 122, 124, 126, 128, 580, 582, 800, 1000,
1050, 1200, 1220, 1320, 1330, 1420, 1535, 1604, 1606, 1720, 1730 and 1806.
|
|
   Oil Seals.
Fits Cub Cadet Garden Tractor Reduction Housing Input Pinion Shaft/Gears
(above È).
IMPORTANT - Before installing
any new seal, always apply oil or fiber-free grease inside the seal and on
the shaft to keep the rubber lubricated and cool until internal oil can reach
it. With no prior lubrication, the dry rubber will wear away from friction,
causing another oil leak. Do the job right the first time, and it won't have
to be done again for a long time. Oil Seals.
Fits Cub Cadet Garden Tractor Reduction Housing Input Pinion Shaft/Gears
(above È).
IMPORTANT - Before installing
any new seal, always apply oil or fiber-free grease inside the seal and on
the shaft to keep the rubber lubricated and cool until internal oil can reach
it. With no prior lubrication, the dry rubber will wear away from friction,
causing another oil leak. Do the job right the first time, and it won't have
to be done again for a long time.
Oil Seal. Fits International Cub Cadet "Original" Input Shaft/Gear. Dimensions: 3/4" I.D. x 1.756" O.D. x 3/8" height. High quality aftermarket. Replaces discontinued Cub Cadet part # IH-377959-R91. $16.00 each, plus shipping & handling. Oil Seals. Fits IH-built Cub Cadet Cast Iron Housing Reduction Housing Input Pinion Shaft/Gear.
Oil Seal. Fits MTD-built Cub Cadet Aluminum Housing Reduction Housing Input Pinion Shaft/Gear. Dimensions: 5/8" I.D. x 1.574" O.D. x 5/16" height. High quality aftermarket. Replaces discontinued Cub Cadet part # 721-0193. $16.00 each, plus shipping & handling. |
|
  5/8" I.D. External Circlip and Snap Ring. Each fits input shaft
in transaxle and creeper gear on all IH- and MTD-built Cub Cadet garden tractors.
Butts against ball bearing to prevent input shaft from moving rearward when
clutch pedal is depressed. 5/8" I.D. External Circlip and Snap Ring. Each fits input shaft
in transaxle and creeper gear on all IH- and MTD-built Cub Cadet garden tractors.
Butts against ball bearing to prevent input shaft from moving rearward when
clutch pedal is depressed.
|
|
 High-Speed Precision
Radial Ball Bearings. Fits IH- and MTD-built Cub Cadet cast iron and aluminum
gear reduction housings with OEM and aftermarket overdrive and underdrive
input pinion shaft with the integrated pinion gear and slide-on pinion gear.
Dimensions: .667"/17mm I.D. x 1.575"/40mm O.D. x .470"/12mm height. FYI
- All ball bearings have always been made to the metric dimensions. Where
applicable, the US and import manufacturers try to make them close to the
inch dimensions as possible. High-Speed Precision
Radial Ball Bearings. Fits IH- and MTD-built Cub Cadet cast iron and aluminum
gear reduction housings with OEM and aftermarket overdrive and underdrive
input pinion shaft with the integrated pinion gear and slide-on pinion gear.
Dimensions: .667"/17mm I.D. x 1.575"/40mm O.D. x .470"/12mm height. FYI
- All ball bearings have always been made to the metric dimensions. Where
applicable, the US and import manufacturers try to make them close to the
inch dimensions as possible.
|
|
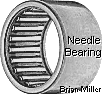
 Closed-End Needle
Bearing. Fits input shaft/pinion gear in transaxle of all clutch drive IH-
and MTD-built Cub Cadet garden tractors. Closed-End Needle
Bearing. Fits input shaft/pinion gear in transaxle of all clutch drive IH-
and MTD-built Cub Cadet garden tractors.
|
|
|
 One Piece Input
Shafts w/Integrated 12 Tooth Pinion Drive Gear. Each have an unworn spiral
pin hole. Each input shaft listed below fits Cub Cadet garden tractor models
70, 71, 72, 73, 86, 100, 102, 104, 106, 108, 122, 124, 126, 128, 580, 582,
800, 1000, 1050, 1200, 1535, 1604, 1606 and 1806, except models 1250, 1450
and 1650 with a hydrostatic disconnect attachment. One Piece Input
Shafts w/Integrated 12 Tooth Pinion Drive Gear. Each have an unworn spiral
pin hole. Each input shaft listed below fits Cub Cadet garden tractor models
70, 71, 72, 73, 86, 100, 102, 104, 106, 108, 122, 124, 126, 128, 580, 582,
800, 1000, 1050, 1200, 1535, 1604, 1606 and 1806, except models 1250, 1450
and 1650 with a hydrostatic disconnect attachment.
|
|
 One Piece Input
Shaft and Integrated 5%/13 Tooth Overdrive Pinion Drive Gear. Fits Cub Cadet
garden tractor models 70, 71, 72, 73, 86, 100, 102, 104, 106, 108, 122, 124,
126, 128, 580, 582, 800, 1000, 1050, 1200, 1535, 1604, 1606 and 1806. Speeds
up all transmission gears about one tooth about 5% for more ground speed.
1.241" diameter gear; use only with OEM Cub Cadet garden tractor 84 tooth
lower driven gear. Intended mainly for competition pulling, but can be used
for general lawn and garden work to slightly speed up tractor. Uses OEM .667"
/ 17mm ball bearing. NOTE: This is NOT the same as the 13 tooth pinion gear
that's used with the 10% and 26% overdrive gears listed below. They have
a different diameter. High quality aftermarket. $122.00 each, plus
shipping & handling. One Piece Input
Shaft and Integrated 5%/13 Tooth Overdrive Pinion Drive Gear. Fits Cub Cadet
garden tractor models 70, 71, 72, 73, 86, 100, 102, 104, 106, 108, 122, 124,
126, 128, 580, 582, 800, 1000, 1050, 1200, 1535, 1604, 1606 and 1806. Speeds
up all transmission gears about one tooth about 5% for more ground speed.
1.241" diameter gear; use only with OEM Cub Cadet garden tractor 84 tooth
lower driven gear. Intended mainly for competition pulling, but can be used
for general lawn and garden work to slightly speed up tractor. Uses OEM .667"
/ 17mm ball bearing. NOTE: This is NOT the same as the 13 tooth pinion gear
that's used with the 10% and 26% overdrive gears listed below. They have
a different diameter. High quality aftermarket. $122.00 each, plus
shipping & handling.
Replacement Splined Input Shaft for the 26%, 33%, 38%, 43% and 47% overdrive gears that accept the 13, 14, 15, 16 and 17 tooth slide-on pinion drive gears. Replace worn beyond specifications or damaged input shaft to match an overdrive and underdrive lower gears listed below. Uses same bearing, oil seal and retaining ring as OEM input shaft. High quality aftermarket. $142.00 each, plus shipping & handling.
Constant Mesh Overdrive and Underdrive Reduction Drive Gear Sets. Fits IH/MTD Cub Cadet Garden Tractor Transaxles. Precision CNC-ground, hardened, heat-treated and hardened gears. Smooth operation with no rattle or gear teeth clatter. The OEM 12 tooth input pinion gear can be replaced with a 13 tooth/5% pinion gear without replacing the bottom larger gear. For faster speeds, the OEM 12 tooth input pinion and reduction gears can be replaced with either 10%, 16%, 23%, 26%, 33%, 38%, 43% or 47% aftermarket overdrive pinion and reduction gears, or 10% and 20% underdrive pinion and reduction gears. The percentage is the amount the tractor speed is increased or decreased. Intended for competition pulling, but can be used for general lawn and garden work to speed up or slow down tractor. Use this Cub Cadet Gear Ratio Chart to determine which gears your tractor needs. (Open with Microsoft Excel or OpenOffice Calc and use Google Chrome web browser for a faster download of websites with large files.)
Underdrive Gear Sets. Decrease gear ratio for less ground speed.
|
|
 1st and Reverse 13 Tooth
Sliding Gear. Replace OEM gear with worn teeth to prevent tractor from jumping
out of reverse when backing up a heavy trailer, hill or ramp. Fits all IH-
and MTD-built Cub Cadet garden tractor clutch drive garden tractors, Cub
Lo-Boy models 154, 184 and 185, International Cub, Farmall Cub and Farmall
Cub Lo-Boy. New. High quality aftermarket. Replaces discontinued Cub Cadet
part # 917-3078. $75.00 each, plus shipping & handling. 1st and Reverse 13 Tooth
Sliding Gear. Replace OEM gear with worn teeth to prevent tractor from jumping
out of reverse when backing up a heavy trailer, hill or ramp. Fits all IH-
and MTD-built Cub Cadet garden tractor clutch drive garden tractors, Cub
Lo-Boy models 154, 184 and 185, International Cub, Farmall Cub and Farmall
Cub Lo-Boy. New. High quality aftermarket. Replaces discontinued Cub Cadet
part # 917-3078. $75.00 each, plus shipping & handling. |
 Reverse Idler 22 Tooth Gear
w/Bronze Bushing. Replace OEM gear with worn teeth to prevent tractor from
jumping out of reverse when backing up a hill or ramp. Fits all IH- and MTD-built
Cub Cadet garden tractor clutch drive garden tractors, Cub Lo-Boy models
154, 184 and 185, International Cub, Farmall Cub and Farmall Cub Lo-Boy.
New. High quality aftermarket. Replaces discontinued Cub Cadet part # 917-3188.
$75.00 each, plus shipping & handling. Reverse Idler 22 Tooth Gear
w/Bronze Bushing. Replace OEM gear with worn teeth to prevent tractor from
jumping out of reverse when backing up a hill or ramp. Fits all IH- and MTD-built
Cub Cadet garden tractor clutch drive garden tractors, Cub Lo-Boy models
154, 184 and 185, International Cub, Farmall Cub and Farmall Cub Lo-Boy.
New. High quality aftermarket. Replaces discontinued Cub Cadet part # 917-3188.
$75.00 each, plus shipping & handling. |
| Custom Upper
Cluster Slider Gears and Two Lower Stationary Gears. Fits IH/MTD Cub Cadet
garden tractor transaxles. Precision CNC-ground, hardened, heat-treated gears.
Smooth engagement with no rattle or gear teeth clatter. Gear sets include
one upper cluster (two gears made together) gears and two separate lower
gears. Intended for competition pulling, but can be used for general lawn
and garden work to speed up or slow down tractor in any particular gear.
High quality aftermarket.
FYI - The Cub Cadet garden tractor transaxle can be converted with 3 forward speed gears by swapping out the 1st, 2nd and 3rd speed gears, and retain reverse gear. Or it can be converted with 4 forward speed gears with no reverse gear. Listed are the most popular gear sets: (Upper teeth count.) 14/15, 14/16, 15/16, 15/17, 16/17, 16/18, 17/18, 17/19, 18/19, 18/20, 19/20, 19/21, 20/21, 20/22, 21/22, 21/23, 22/23, 22/24, 23/24, 23/25, 24/25, 24/26, 25/26, 25/27, 26/27. Other gear sets are also available; from 13 teeth to 28 teeth in any combination you desire. Tooth count on one upper cluster gear and matching bottom gear must add up to 52. Exception: for the upper 13 tooth cluster gear, reuse the OEM Cub Cadet 39 tooth lower (1st speed) lower gear. Use this Cub Cadet Gear Ratio Chart to determine which gears your tractor needs. If you wish to use a faster gear than the 28 tooth, then an overdrive gear set (listed above) will also need to be used. Any combination. $203.00 per set, plus shipping & handling. Custom Gears Installation Information: The aftermarket 2nd and 3rd gear set lower gears are wider than the Cub Cadet OEM lower gears. Therefore, the cone-shape spacer at the front of the lower pinion shaft will need to be narrowed about .050" so the pinion gear will mesh correctly with the ring gear. Exception: for the 13 tooth cluster gear, reuse the OEM Cub Cadet 39 tooth bottom gear. And if the upper gears are larger in diameter than the OEM gears, the shift fork may need grinding for clearance. Or if the gears are really big, a billet shift fork will need to be installed. Otherwise, 1st and reverse gears and everything else should remain the same in the transaxle. |
|
| Use this interactive
Cub Cadet Gear Ratio Chart or
the chart below Ê to determine which
gears your tractor may need. (Open this linked file with either
Microsoft
Excel or
OpenOffice
Calc and use
Google
Chrome web browser for a faster download of websites with large
files.) Remember - there's about a 600
RPM difference (reduction or increase) in gearing between one set of gears
with a particular number of teeth and another set of gears with one tooth
more or one tooth less.
|
|
 Top Shafts.
Fits IH-Built Cub Cadet Garden Tractors with the Gear-Drive Cast Iron Housing
Transaxle. This is the upper splined shaft for the sliding 1st/reverse and
2nd/3rd gears. Will not fit the MTD-built Cub Cadet garden tractors with
the aluminum housing transaxle. Top Shafts.
Fits IH-Built Cub Cadet Garden Tractors with the Gear-Drive Cast Iron Housing
Transaxle. This is the upper splined shaft for the sliding 1st/reverse and
2nd/3rd gears. Will not fit the MTD-built Cub Cadet garden tractors with
the aluminum housing transaxle.
|
|
| OEM Cub Cadet and Heavy Duty Aftermarket Ring and Pinion
Gear Sets. Fits IH-Built Cub Cadet garden tractor transaxles - NOTE: The
IH-built Cub Cadet garden tractor cast iron transaxle housing ring and pinion
gears will not fit the MTD-built Cub Cadet garden tractor aluminum transaxle
housing. Also, the OEM IH Cub Cadet ring or pinion gears will not properly
engage or mesh with the aftermarket heavy duty ring or pinion gears. Neither
can be used with the aftermarket ring and pinions because the aftermarket
ring and pinions have additional metal in the gear teeth area to hold up
to the extreme stress of pulling. And all IH-built Cub Cadet and
aftermarket ring and pinion gear sets have a 4.6:1 ratio.
OEM IH Cub Cadet Ring Gear ONLY. Fits Cub Cadet "Original", all IH-Built Cub Cadet garden tractors, Cub Lo-Boy and Farmall Cub International. Made of extremely hardened, heat-treated high quality steel. Used and in excellent condition with no chipped or broken teeth. OEM Cub Cadet part # IH-350787-R1. $50.00 each, plus shipping & handling. (When available.)
|
|
 IH-Built Cub Cadet
Garden Tractor IH-Built Cub Cadet
Garden Tractor  Light Duty, One
Piece "Thin Casting" Cast Iron Differential Carrier Assembly with Coarse
Spline Side (Spider) Gears. To be used with coarse spline axles (listed below).
Suitable for general lawn and garden usage, or in a competition pulling tractor
with 23x10.50-12 tires and 10" drawbar/hitch height. May break if used in
a competition pulling tractor with 26x12.00-12 size tires with a 13"
drawbar/hitch height. FYI - The bearings, ring gear and spider gears in
a thin-casting carrier will interchange with the thick-casting carrier and
MTD Cub Cadet fine spline carrier. Used and in excellent condition.
Discontinued Cub Cadet part # IH-350785-R92 (thin casting). Light Duty, One
Piece "Thin Casting" Cast Iron Differential Carrier Assembly with Coarse
Spline Side (Spider) Gears. To be used with coarse spline axles (listed below).
Suitable for general lawn and garden usage, or in a competition pulling tractor
with 23x10.50-12 tires and 10" drawbar/hitch height. May break if used in
a competition pulling tractor with 26x12.00-12 size tires with a 13"
drawbar/hitch height. FYI - The bearings, ring gear and spider gears in
a thin-casting carrier will interchange with the thick-casting carrier and
MTD Cub Cadet fine spline carrier. Used and in excellent condition.
Discontinued Cub Cadet part # IH-350785-R92 (thin casting).
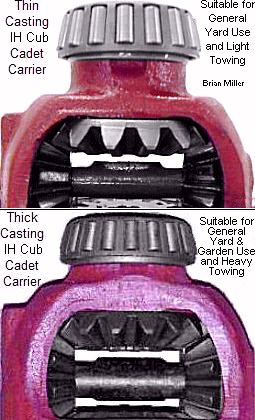
IH-Built Cub Cadet Garden Tractor
Heavy Duty, One Piece "Thick Casting" Cast Iron Differential Carrier Assembly
with Coarse Spline Side (Spider) Gears. To be used with coarse spline axles
(listed below). Suitable for general lawn and garden usage, or in a competition
pulling tractor with 23x10.50-12 tires and 10" drawbar/hitch height. May
break if used in a competition pulling tractor with 26x12.00-12 size tires
with a 13" drawbar/hitch height. FYI - The bearings, ring gear and spider
gears in a thin-casting carrier will interchange with the thick-casting carrier
and MTD Cub Cadet fine spline carrier. Used and in excellent condition.
Discontinued Cub Cadet part # IH-223472-C91 (thick casting).
 NOTE: To remove the ring gear
from any of the above carriers, center-drill the rivets with a 1/4" drill
bit halfway through, then drive them out with a quality made 1/4" roll pin
punch and a big hammer. Then use 5/16-24 UNF Allen head bolts that measures
2" in nominal length (measured from under the head to the end of the threads)
with a 3/4" shank/shoulder (unthreaded part) with grade 8 nuts and split
lock washers. Torque the nuts to 25 ft. lbs. each to secure the ring gear
on the carrier. And cut/grind off the projected threaded part of each bolt
next to the nuts. NOTE: To remove the ring gear
from any of the above carriers, center-drill the rivets with a 1/4" drill
bit halfway through, then drive them out with a quality made 1/4" roll pin
punch and a big hammer. Then use 5/16-24 UNF Allen head bolts that measures
2" in nominal length (measured from under the head to the end of the threads)
with a 3/4" shank/shoulder (unthreaded part) with grade 8 nuts and split
lock washers. Torque the nuts to 25 ft. lbs. each to secure the ring gear
on the carrier. And cut/grind off the projected threaded part of each bolt
next to the nuts. |
|
   Neoprene or Silicone
Rubber O-Ring Seal. Fits International Cub Cadet "Original" Garden Tractor
3-Bolt Axle Differential Bearing Flange. Dimensions: 3-1/8" I.D. x 3-3/8"
O.D. x 1/8" diameter. High quality aftermarket. Replaces discontinued Cub
Cadet part # IH-285723-R1. $2.50 each, plus shipping & handling. Neoprene or Silicone
Rubber O-Ring Seal. Fits International Cub Cadet "Original" Garden Tractor
3-Bolt Axle Differential Bearing Flange. Dimensions: 3-1/8" I.D. x 3-3/8"
O.D. x 1/8" diameter. High quality aftermarket. Replaces discontinued Cub
Cadet part # IH-285723-R1. $2.50 each, plus shipping & handling.
Oil Seal. Fits International Cub Cadet "Original" Garden Tractor 3-Bolt Axle Pinion Bearing Flange. Dimensions: 1" I.D. x 1.830" O.D. x .296" thickness. High quality aftermarket. Replaces discontinued Cub Cadet part # IH-610465-C92. $15.00 each, plus shipping & handling. IMPORTANT - Before installing any new seal, always apply oil or fiber-free grease inside the seal and on the shaft to keep the rubber lubricated and cool until internal oil can reach it. With no prior lubrication, the dry rubber will wear away from friction, causing another oil leak. Do the job right the first time, and it won't have to be done again for a long time. |
|
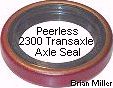 Rear Axle Shaft
Oil Seal. Fits Peerless model 2300 4-speed transaxle with 1" diameter rear
axle shafts. Fits Cub Cadet belt drive garden tractor models 482, 580, 582
Special, 1100, and other makes and models of garden tractors with the Peerless
2300 transaxle. Direct replacement with no machining required. Dimensions:
1" I.D. x 1-3/8" O.D. x 1/4" thickness.
IMPORTANT - Before installing
any new seal, always apply oil or fiber-free grease inside the seal and on
the shaft to keep the rubber lubricated and cool until internal oil can reach
it. With no prior lubrication, the dry rubber will wear away from friction,
causing another oil leak. Do the job right the first time, and it won't have
to be done again for a long time. Replaces Tecumseh/Peerless part # 788008.
Our part # 252277. $10.00 each, plus shipping & handling. Rear Axle Shaft
Oil Seal. Fits Peerless model 2300 4-speed transaxle with 1" diameter rear
axle shafts. Fits Cub Cadet belt drive garden tractor models 482, 580, 582
Special, 1100, and other makes and models of garden tractors with the Peerless
2300 transaxle. Direct replacement with no machining required. Dimensions:
1" I.D. x 1-3/8" O.D. x 1/4" thickness.
IMPORTANT - Before installing
any new seal, always apply oil or fiber-free grease inside the seal and on
the shaft to keep the rubber lubricated and cool until internal oil can reach
it. With no prior lubrication, the dry rubber will wear away from friction,
causing another oil leak. Do the job right the first time, and it won't have
to be done again for a long time. Replaces Tecumseh/Peerless part # 788008.
Our part # 252277. $10.00 each, plus shipping & handling. |
|
  Rear Axle Shaft Oil Seals. Fits IH Cub Cadet garden tractor
models 70, 72, 73, 86, 100, 102, 104, 105, 106, 107, 108, 109, 122, 124,
125, 126, 127, 128, 129, 147, 149, 169, 580, 582, 682, 782, 782D, 784, 800,
882, 982, 984, 986, 1000, 1200, 1210, 1211, 1250, 1450, 1650, including MWSC
Spool axles. Will not fit International Cub Cadet "Original" garden
tractor. Direct replacement with no machining required. Also fits
various other makes and models of garden tractor with 1" diameter axle shafts
and various garden tiller gearbox tine shaft. Dimensions: 1" I.D. x 1-1/2"
O.D. x 1/4" thickness.
IMPORTANT - Before installing
any new seal, always apply oil or fiber-free grease inside the seal and on
the shaft to keep the rubber lubricated and cool until internal oil can reach
it. With no prior lubrication, the dry rubber will wear away from friction,
causing another oil leak. Do the job right the first time, and it won't have
to be done again for a long time. Rear Axle Shaft Oil Seals. Fits IH Cub Cadet garden tractor
models 70, 72, 73, 86, 100, 102, 104, 105, 106, 107, 108, 109, 122, 124,
125, 126, 127, 128, 129, 147, 149, 169, 580, 582, 682, 782, 782D, 784, 800,
882, 982, 984, 986, 1000, 1200, 1210, 1211, 1250, 1450, 1650, including MWSC
Spool axles. Will not fit International Cub Cadet "Original" garden
tractor. Direct replacement with no machining required. Also fits
various other makes and models of garden tractor with 1" diameter axle shafts
and various garden tiller gearbox tine shaft. Dimensions: 1" I.D. x 1-1/2"
O.D. x 1/4" thickness.
IMPORTANT - Before installing
any new seal, always apply oil or fiber-free grease inside the seal and on
the shaft to keep the rubber lubricated and cool until internal oil can reach
it. With no prior lubrication, the dry rubber will wear away from friction,
causing another oil leak. Do the job right the first time, and it won't have
to be done again for a long time.
|
|
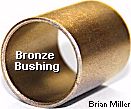 Bronze Axle Bushings.
Fits International Cub Cadet "Original" garden tractor, and IH Cub Cadet
garden tractor models 70, 71, 72, 73, 100, 102 and 122. (All other models
of Cub Cadet garden tractor axle housings originally came with needle bearings.)
For "Original" - hole for Zerk grease fitting
will need to be drill-aligned through bushing after installation. Direct
OEM replacement with no machining required. Dimensions: 1" I.D. x 1.125"
O.D. x 1" length. IMPORTANT: Before reinstalling axles, apply clean motor
oil, gear oil or fiber-free grease inside bushings or on axles for lubrication
and prevent premature wear of the bushings. Replaces discontinued Cub
Cadet part #'s IH-376259-R1, IH-376160-R1 (Cub Cadet "Original" rear axles
and clutch throw-out bushing), and discontinued Cub Cadet part # IH-384664-R2
(models 70, 71, 72, 73, 100, 102 and 122 axle bushing). $9.00/pair,
plus shipping & handling. Bronze Axle Bushings.
Fits International Cub Cadet "Original" garden tractor, and IH Cub Cadet
garden tractor models 70, 71, 72, 73, 100, 102 and 122. (All other models
of Cub Cadet garden tractor axle housings originally came with needle bearings.)
For "Original" - hole for Zerk grease fitting
will need to be drill-aligned through bushing after installation. Direct
OEM replacement with no machining required. Dimensions: 1" I.D. x 1.125"
O.D. x 1" length. IMPORTANT: Before reinstalling axles, apply clean motor
oil, gear oil or fiber-free grease inside bushings or on axles for lubrication
and prevent premature wear of the bushings. Replaces discontinued Cub
Cadet part #'s IH-376259-R1, IH-376160-R1 (Cub Cadet "Original" rear axles
and clutch throw-out bushing), and discontinued Cub Cadet part # IH-384664-R2
(models 70, 71, 72, 73, 100, 102 and 122 axle bushing). $9.00/pair,
plus shipping & handling.
|
|
 Needle-Roller
Axle Bearings to convert axle housings with 1" OEM bronze axle bushings
in IH Cub Cadet garden tractor models 70, 71, 72, 73, 100, 102 and 122, except
the International Cub Cadet "Original" garden tractor. Reduce friction and
free up horsepower in a high-speed pulling tractor! Made of high quality
heat-treated steel. Dimensions: 1" I.D. x 1.250" (1-1/4") O.D. x 3/4" length.
NOTE: Not a direct replacement for the OEM IH Cub Cadet needle bearings
because these have a smaller outside diameter. Therefore, axle housings with
a bronze bushing will need to be precisely bored to 1.250" to accept these
needle bearings. IMPORTANT: Before reinstalling axles, apply clean motor
oil, gear oil or fiber-free grease inside bearings or on axles for lubrication
and to prevent premature wear of the bearings. $15.00/pair, plus
shipping & handling. Needle-Roller
Axle Bearings to convert axle housings with 1" OEM bronze axle bushings
in IH Cub Cadet garden tractor models 70, 71, 72, 73, 100, 102 and 122, except
the International Cub Cadet "Original" garden tractor. Reduce friction and
free up horsepower in a high-speed pulling tractor! Made of high quality
heat-treated steel. Dimensions: 1" I.D. x 1.250" (1-1/4") O.D. x 3/4" length.
NOTE: Not a direct replacement for the OEM IH Cub Cadet needle bearings
because these have a smaller outside diameter. Therefore, axle housings with
a bronze bushing will need to be precisely bored to 1.250" to accept these
needle bearings. IMPORTANT: Before reinstalling axles, apply clean motor
oil, gear oil or fiber-free grease inside bearings or on axles for lubrication
and to prevent premature wear of the bearings. $15.00/pair, plus
shipping & handling.
|
|
  Bushings / Bearings and Oil Seals to install MTD Cub Cadet
garden tractor 30mm fine spline axles, Midwest Super Cub Axles, or with set
screw locking collars to install Ford Pinto Axles in IH Cub Cadet garden
tractor 1" aluminum or cast iron axle housings. Bushings are more suitable
for low-speed tractors, and needle bearings are suitable for high-speed tractors.
Axle housings must be precision-machined to accept these bushings, bearings
and seals. Dimensions of bushings and bearings: 1-3/16" I.D. x 1.500" O.D.
x 1" length. Dimensions of oil seals: 1-3/16" I.D. x 1.6875" O.D. x 1/4"
thickness. No Cub Cadet garden tractor originally came with these size axle
bushings and bearings. Each replaces MTD Cub Cadet part # 941-3033A (ball
bearing) and 941-3020A (oil seal).
IMPORTANT - Before installing
the axles, apply oil or fiber-free grease inside the seal and on the axle
shaft to keep the rubber lubricated and cool until internal oil can reach
it. With no prior lubrication, the dry rubber will wear away from friction,
causing an oil leak. Do the job right the first time, and it won't have to
be done again for a long time. Bushings / Bearings and Oil Seals to install MTD Cub Cadet
garden tractor 30mm fine spline axles, Midwest Super Cub Axles, or with set
screw locking collars to install Ford Pinto Axles in IH Cub Cadet garden
tractor 1" aluminum or cast iron axle housings. Bushings are more suitable
for low-speed tractors, and needle bearings are suitable for high-speed tractors.
Axle housings must be precision-machined to accept these bushings, bearings
and seals. Dimensions of bushings and bearings: 1-3/16" I.D. x 1.500" O.D.
x 1" length. Dimensions of oil seals: 1-3/16" I.D. x 1.6875" O.D. x 1/4"
thickness. No Cub Cadet garden tractor originally came with these size axle
bushings and bearings. Each replaces MTD Cub Cadet part # 941-3033A (ball
bearing) and 941-3020A (oil seal).
IMPORTANT - Before installing
the axles, apply oil or fiber-free grease inside the seal and on the axle
shaft to keep the rubber lubricated and cool until internal oil can reach
it. With no prior lubrication, the dry rubber will wear away from friction,
causing an oil leak. Do the job right the first time, and it won't have to
be done again for a long time.
|
|
 External Snap
Ring. Fits International Cub Cadet "Original" Garden Tractor Axles. 1" size.
Retains axle shaft in axle housing. External Snap
Ring. Fits International Cub Cadet "Original" Garden Tractor Axles. 1" size.
Retains axle shaft in axle housing.
 Axle Retaining E-Clip Snap Ring.
Fits IH- and MTD-built Cub Cadet garden tractors with 1" or 30mm fine
spline axles. 17mm size. Fits tractors with serial number 720000 and
above. Axle Retaining E-Clip Snap Ring.
Fits IH- and MTD-built Cub Cadet garden tractors with 1" or 30mm fine
spline axles. 17mm size. Fits tractors with serial number 720000 and
above.
|
|
 Rear Axle Shaft
Oil Seal. Fits MTD Cub Cadet garden tractor models 1340, 1440, 1535, 1541,
1641, 1782, 1860, 1861, 1862, 1863, 1864, 1882, 2082, 2084, 2086, 2130, 2135,
2140, 2145, 2146, 2150, 2155, 2160, 2165, 2176, 2182, 2185, 2186, 2206, 2284,
3206, 3208, 3235, 3240, 4814, 4815, 4816, 5234, 5252, 5416, 5418, 5254, 5264,
6284, 7252, 7254, 7264, 7284, 7304, GT3100, XT3-GSX, GT3200, GT3235 and XT3-GSX.
IMPORTANT - Before installing
any new seal, always apply oil or fiber-free grease inside the seal and on
the shaft to keep the rubber lubricated and cool until internal oil can reach
it. With no prior lubrication, the dry rubber will wear away from friction,
causing another oil leak. Do the job right the first time, and it won't have
to be done again for a long time. Rear Axle Shaft
Oil Seal. Fits MTD Cub Cadet garden tractor models 1340, 1440, 1535, 1541,
1641, 1782, 1860, 1861, 1862, 1863, 1864, 1882, 2082, 2084, 2086, 2130, 2135,
2140, 2145, 2146, 2150, 2155, 2160, 2165, 2176, 2182, 2185, 2186, 2206, 2284,
3206, 3208, 3235, 3240, 4814, 4815, 4816, 5234, 5252, 5416, 5418, 5254, 5264,
6284, 7252, 7254, 7264, 7284, 7304, GT3100, XT3-GSX, GT3200, GT3235 and XT3-GSX.
IMPORTANT - Before installing
any new seal, always apply oil or fiber-free grease inside the seal and on
the shaft to keep the rubber lubricated and cool until internal oil can reach
it. With no prior lubrication, the dry rubber will wear away from friction,
causing another oil leak. Do the job right the first time, and it won't have
to be done again for a long time.
|
|
 Internal (Wet) Brake Pads/Pucks and Neoprene Rubber O-Ring
Seal. Fits Cub Cadet garden tractor models 70, 71, 72, 73, 100, 102, 104,
105, 122, 123, 124, 125, 580, 582, 680, 682, 782, 784, 800, 1000, 1200, 1210,
1250, 1282, 1450, 1604, 1606, 1650, 1710, 1711 and 1712. IMPORTANT: Before
installing any new oil seal, always apply oil or fiber-free grease inside
the seal and on the shaft to keep the rubber seal lubricated and cool until
internal oil can reach it. With no prior lubrication, the dry rubber will
wear away, causing another oil leak. Do the job right the first time, and
it won't have to be done again. Internal (Wet) Brake Pads/Pucks and Neoprene Rubber O-Ring
Seal. Fits Cub Cadet garden tractor models 70, 71, 72, 73, 100, 102, 104,
105, 122, 123, 124, 125, 580, 582, 680, 682, 782, 784, 800, 1000, 1200, 1210,
1250, 1282, 1450, 1604, 1606, 1650, 1710, 1711 and 1712. IMPORTANT: Before
installing any new oil seal, always apply oil or fiber-free grease inside
the seal and on the shaft to keep the rubber seal lubricated and cool until
internal oil can reach it. With no prior lubrication, the dry rubber will
wear away, causing another oil leak. Do the job right the first time, and
it won't have to be done again.
|
|
 External/Axle Disc Brake Liner
Kit. Fits Cub Cadet garden tractor models 106, 107, 127 and 147 with H-H
Products type brake calipers. OEM Cub Cadet part # IH-544835-R91.
$251.85 per set (as shown), plus shipping & handling. External/Axle Disc Brake Liner
Kit. Fits Cub Cadet garden tractor models 106, 107, 127 and 147 with H-H
Products type brake calipers. OEM Cub Cadet part # IH-544835-R91.
$251.85 per set (as shown), plus shipping & handling. |
 External/Axle Disc Brake
Pad. Fits IH Cub Cadet garden tractor models 86, 108, 109, 128, 129, 149,
169, 800, 1000, 1200, 1250, 1450 and 1650. NOTE: These are sold each,
and not sold in pairs. Because sometimes one pad on the same axle will wear
more than the other. OEM Cub Cadet part # IH-548122-R2. $75.00
each, plus shipping & handling. External/Axle Disc Brake
Pad. Fits IH Cub Cadet garden tractor models 86, 108, 109, 128, 129, 149,
169, 800, 1000, 1200, 1250, 1450 and 1650. NOTE: These are sold each,
and not sold in pairs. Because sometimes one pad on the same axle will wear
more than the other. OEM Cub Cadet part # IH-548122-R2. $75.00
each, plus shipping & handling. |
    Gaskets, Rubber O-Ring Seals and Oil Seals. Fits International
Cub Cadet "Original" Garden Tractor Transaxle. Prices are subject to change
without notice. Gaskets, Rubber O-Ring Seals and Oil Seals. Fits International
Cub Cadet "Original" Garden Tractor Transaxle. Prices are subject to change
without notice.
|
|
 Gaskets and Axle
Oil Seals. Fits IH-Built Cub Cadet Garden Tractor Gear Drive Cast Iron Housing
Transaxles. Fits Cub Cadet garden tractor models 70, 71, 72, 73, 86, 100,
102, 104, 106, 108, 122, 124, 126, 128, 582, 680, 800, 1000 and 1200. Prices
are subject to change without notice. Gaskets and Axle
Oil Seals. Fits IH-Built Cub Cadet Garden Tractor Gear Drive Cast Iron Housing
Transaxles. Fits Cub Cadet garden tractor models 70, 71, 72, 73, 86, 100,
102, 104, 106, 108, 122, 124, 126, 128, 582, 680, 800, 1000 and 1200. Prices
are subject to change without notice.
|
|

 Gaskets and Axle Oil Seals. Fits
IH-Built Cub Cadet Garden Tractor Hydrostatic Drive Cast Iron Housing Transaxles,
Models 105, 107, 109, 123, 125, 127, 129, 147, 149, 169, 682, 782, 982, 1250,
1282, 1450 and 1650. NOTE: Gaskets that's not listed below are no longer
available from Cub Cadet or any other source. Use
clear RTV silicone adhesive sealant instead. Prices
are subject to change without notice. Gaskets and Axle Oil Seals. Fits
IH-Built Cub Cadet Garden Tractor Hydrostatic Drive Cast Iron Housing Transaxles,
Models 105, 107, 109, 123, 125, 127, 129, 147, 149, 169, 682, 782, 982, 1250,
1282, 1450 and 1650. NOTE: Gaskets that's not listed below are no longer
available from Cub Cadet or any other source. Use
clear RTV silicone adhesive sealant instead. Prices
are subject to change without notice.
|
|
 Gaskets and Axle Oil Seals. Fits MTD-Built Cub Cadet Garden
Tractor Gear Drive Aluminum Housing Transaxle, Models 580 582, 1050, 1535,
1604, 1606 and 1806. NOTE: Gaskets that's not listed below are no longer
available from Cub Cadet or any other source. Use
clear RTV silicone adhesive sealant instead. Prices
are subject to change without notice. Gaskets and Axle Oil Seals. Fits MTD-Built Cub Cadet Garden
Tractor Gear Drive Aluminum Housing Transaxle, Models 580 582, 1050, 1535,
1604, 1606 and 1806. NOTE: Gaskets that's not listed below are no longer
available from Cub Cadet or any other source. Use
clear RTV silicone adhesive sealant instead. Prices
are subject to change without notice.
|
|
 A-1 Miller's
Professional Gearbox Rebuild Service for Peerless (including most other makes
and models of right angle gearboxes) for Mower Deck or Cub Cadet belt-drive
garden tractor models 482, 580, 582 Special, 1100, 1204 and 1604 with the
Peerless model 2300 transaxle. We also rebuild most other makes and models
of right angle gearboxes used in garden tractors, on mower decks, and used
elsewhere, as long as replacement parts are available. Repair price varies
depending on which parts needs to be replaced and/or repaired.
$200.00± for parts and labor, plus return shipping & handling. A-1 Miller's
Professional Gearbox Rebuild Service for Peerless (including most other makes
and models of right angle gearboxes) for Mower Deck or Cub Cadet belt-drive
garden tractor models 482, 580, 582 Special, 1100, 1204 and 1604 with the
Peerless model 2300 transaxle. We also rebuild most other makes and models
of right angle gearboxes used in garden tractors, on mower decks, and used
elsewhere, as long as replacement parts are available. Repair price varies
depending on which parts needs to be replaced and/or repaired.
$200.00± for parts and labor, plus return shipping & handling. |
|
Oil Level Check and Drain Plugs with Tapered Threads and Square
Head listed below. A-1 Miller's oil drain plugs have a super strong rare
earth/neodymium magnet. Five times stronger than competitor's ceramic (ferrite)
magnet and resists demagnetization. Plugs listed below can be used on various
other makes and models of transmissions, transaxles, gearboxes and small
engine crankcases. Tapered threads requires no sealing gasket or sealant,
and threads will not strip out when tightened. To avoid cracking oil pan,
do not over-tighten! When in doubt, use
plumber's thread sealing tape to insure proper sealing
of threads to prevent a possible oil leak. Universal application. Magnet
attracts and removes
ferrous
metallic wear fragments from the motor oil or transmission/gearbox to reduce
engine or gear/bearing wear. Sometimes some of the ferrous wear fragments
settle to the bottom of the oil pan and do not drain out with the oil when
performing an oil change, even when the oil is hot. Magnetic drain plugs
are suitable for engines with splash oil lubrication (no oil pump/filter).
The engine, transmission, transaxle or gearbox will last much longer with
uncontaminated and cleaner oil. Remember - metal flake looks good in paint,
not in oil. 
FYI - If you don't know or can't find any information on the maximum oil quantity for any specific gear drive transmission, transaxle, right angle gearbox, or garden tiller sealed chaincase or gearbox, well, the unit in question is full when oil runs out of the oil level check/fill plug hole that's located halfway [of the drive axles or lower output shaft(s)] on the side(s), front or rear of the unit. All of these fill this way. When the unit is in motion, the lower gears in a transmission or transaxle picks up the oil and slings it on the upper gears, shafts and bearings to lubricate them. And in automotive rear ends, the ring gear picks up the oil and slings it on the pinion gear, spider gears, shafts and bearings to lubricate them. Due to high friction between the gear teeth in transmissions, transaxles, right angle gearboxes and garden tiller gearboxes, or an "open" (non-locking, free-spinning) rear end or in an automotive rear end with a Detroit Locker, SAE 90 weight gear oil must be used. But in an automotive Posi-Trac limited-slip differential, SAE 90W140 weight gear oil must be used to prevent chattering of the locking clutches going around turns. And due to much less friction of roller chain(s) on sprocket teeth in a sealed chaincase, 10W30, 10W40 or SAE 30 weight heavy duty motor oil can be safely used. In front-wheel-drive vehicles, the differential is typically built into the transmission or transaxle, and shares the same transmission fluid, rather it be SAE 90 weight gear oil for a manual shift transmission or ATF for an automatic transmission.  1/8" NPT Oil Level and Drain
Plugs. (0.405" O.D. tapered threads.) All MTD-built Cub Cadet garden tractor
aluminum housing creeper drives are packed with grease from the factory.
Therefore, for better lubrication and less wear inside the creeper drive,
install ordinary plug on opposite side of unit of shifter to serve as an
oil level check, and install magnetic plug on bottom of unit to attractive
metallic wear fragments and drain/change the oil. Entire creeper unit must
be completely disassembled and cleaned, a hole drilled midway on the side,
another hole drilled on the bottom, and both holes will need to be threaded
with an 1/8" NPT hand tap for the plugs. Then fill unit through the breather
opening with SAE 90 weight gear oil. $8.00 for both plugs, plus shipping
& handling. 1/8" NPT Oil Level and Drain
Plugs. (0.405" O.D. tapered threads.) All MTD-built Cub Cadet garden tractor
aluminum housing creeper drives are packed with grease from the factory.
Therefore, for better lubrication and less wear inside the creeper drive,
install ordinary plug on opposite side of unit of shifter to serve as an
oil level check, and install magnetic plug on bottom of unit to attractive
metallic wear fragments and drain/change the oil. Entire creeper unit must
be completely disassembled and cleaned, a hole drilled midway on the side,
another hole drilled on the bottom, and both holes will need to be threaded
with an 1/8" NPT hand tap for the plugs. Then fill unit through the breather
opening with SAE 90 weight gear oil. $8.00 for both plugs, plus shipping
& handling.
 1/4" NPT Magnetic Oil Drain Plug.
(0.540" O.D. tapered threads.) Fits various Briggs & Stratton, Kohler,
Tecumseh, and various other makes and models of small engines. A-1 Miller's
part. Replaces discontinued Kohler part # X-75-2. $5.00 each, plus
shipping & handling. 1/4" NPT Magnetic Oil Drain Plug.
(0.540" O.D. tapered threads.) Fits various Briggs & Stratton, Kohler,
Tecumseh, and various other makes and models of small engines. A-1 Miller's
part. Replaces discontinued Kohler part # X-75-2. $5.00 each, plus
shipping & handling.
 3/8" NPT Magnetic Oil Drain
Plugs. (0.675" O.D. tapered threads.) Fits various Briggs & Stratton,
Kohler, Tecumseh, and various other makes and models of small engines. 3/8" NPT Magnetic Oil Drain
Plugs. (0.675" O.D. tapered threads.) Fits various Briggs & Stratton,
Kohler, Tecumseh, and various other makes and models of small engines.
1/2" NPT Magnetic Oil Drain Plug. (0.840" O.D. tapered threads.) Fits side of oil pan on Kohler engine models K141, K160/K161, K181 and M8 engines, and oil drain on Cub Cadet garden tractor transaxles, various automotive manual shift transmissions, and various other makes and models of small engines. A-1 Miller's part. Not available from Kohler. $5.00 each, plus shipping & handling. 3/4" NPT Magnetic Oil Drain Plug. (1.050" O.D. tapered threads.) Fits various Briggs & Stratton, Kohler, Tecumseh, and various other makes and models of small engines. A-1 Miller's part. Not available from Kohler. $5.00 each, plus shipping & handling.  5/8" I.D. Fiber Sealing Gasket.
Fits OEM Kohler 3/8" NPT Oil Drain Plug with Hex Head. Replaces discontinued
Kohler part # 241063. $1.00 each, plus shipping & handling. 5/8" I.D. Fiber Sealing Gasket.
Fits OEM Kohler 3/8" NPT Oil Drain Plug with Hex Head. Replaces discontinued
Kohler part # 241063. $1.00 each, plus shipping & handling.
 3/4-10 UNC (Straight Threads)
Magnetic Oil Drain Plug. Use to replace OEM Kohler 3/8" NPT oil drain plug
with stripped threads in [aluminum] oil pan. Includes fiber sealing gasket.
NOTE: Threads in oil pan must be enlarged with a 3/4-10 UNC hand tap.
A-1 Miller's part. $5.00 each, plus shipping & handling. 3/4-10 UNC (Straight Threads)
Magnetic Oil Drain Plug. Use to replace OEM Kohler 3/8" NPT oil drain plug
with stripped threads in [aluminum] oil pan. Includes fiber sealing gasket.
NOTE: Threads in oil pan must be enlarged with a 3/4-10 UNC hand tap.
A-1 Miller's part. $5.00 each, plus shipping & handling. |
|
How to Replace a Broken Shift Fork in an IH Cub Cadet Garden Tractor Transaxle -
How to Replace a Leaking Rear Axle Oil Seal in a Cub Cadet Garden Tractor (except the International Cub Cadet "Original") - This is much easier to do on a platform work table. (Updated 4/26/20)
 Use an
oil seal puller tool (which works like a pry bar) to remove
(pry out) the leaking oil seal.
Use an
oil seal puller tool (which works like a pry bar) to remove
(pry out) the leaking oil seal.
How to Replace the Reduction Gears (Large Reduction Gear and Input Shaft/Pinion Gear) in an IH Cub Cadet Garden Tractor Transaxle - [Top of Page]
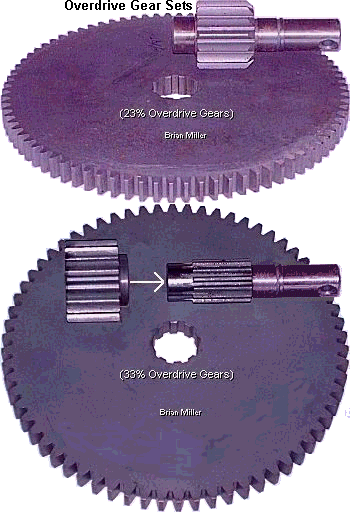 Drain the oil from the transaxle.
The 5/8" square head oil drain plug should be located on the bottom of
the transaxle case, between the rear tires, facing forward. But if no drain
plug is present, remove the rear cover and raise the front of the tractor
to drain the oil from the transaxle.
Drain the oil from the transaxle.
The 5/8" square head oil drain plug should be located on the bottom of
the transaxle case, between the rear tires, facing forward. But if no drain
plug is present, remove the rear cover and raise the front of the tractor
to drain the oil from the transaxle.
How to Change the Gears in an IH Cub Cadet Garden Tractor Transaxle -
To replace 2nd and 3rd speed gears, the entire transaxle must be removed from the tractor (this is much easier to do on a sturdy platform work table) and completely disassembled. But first, when you get the replacement gears, stack them on top of each other, arrange them in the order they go in the transmission, to see if the centers match up. Align them perfectly, too. If in fact they do match up, mark each one to avoid confusion during the installation process. After doing this, you can drain the oil from the transaxle. By the way - the transaxle, completely assembled, weighs 150 lb. So if you have trouble lifting it by yourself, ask someone to help. With the transaxle on a sturdy work bench, support it with wood blocks. Now, remove the reduction drive unit, then remove the rear cover. The rear differential unit (carrier assembly) must be removed first in order to replace the gears.
The procedure to remove the carrier assembly is as follows:
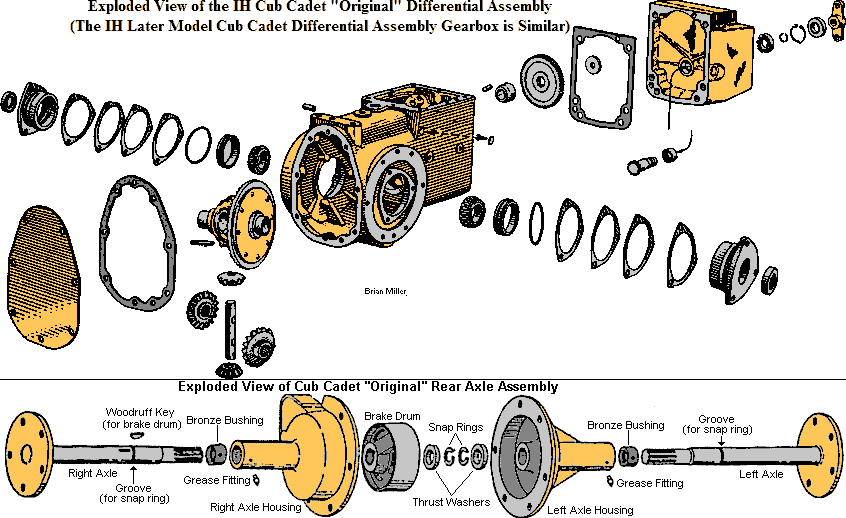
 To remove (and install) the
differential carrier, first remove both axles, then the axle housings and
then the 3-bolt bearing flanges from the transaxle housing. NOTE - Identify
the number and thickness of shims removed from the each flange for aid in
reassembly. It may be necessary remove the side bearing from the differential
carrier opposite the ring gear for ease of removal (and installation). Now
the differential carrier can be removed from the transaxle housing.
To remove (and install) the
differential carrier, first remove both axles, then the axle housings and
then the 3-bolt bearing flanges from the transaxle housing. NOTE - Identify
the number and thickness of shims removed from the each flange for aid in
reassembly. It may be necessary remove the side bearing from the differential
carrier opposite the ring gear for ease of removal (and installation). Now
the differential carrier can be removed from the transaxle housing.
Now, remove the shift lever/top cover assembly. Remove the shift fork retaining bolts. Rotate the shifter rails with pliers to unseat the detent balls. Using a long drift (or rod) from the differential end, drive out the shifter rails forward and out of the housing. CAUTION! Hold your fingers over the holes or insert a 1/4" roll pin punch into the detent bores to prevent the balls from flying out while the rails are being removed!
Remove the bolts from the main shaft bearing retainer and bump the main shaft and bearing forward and out of the housing. The upper 1st and 2nd/3rd sliding gears can be removed as the shaft is removed from the housing. Inspect the reverse idler gear for excessive wear or damage and replace it if necessary. Otherwise, the reverse idler gear doesn't need to be removed.
Remove the countershaft nut and bump the shaft rearward out of the housing. The lower gears and spacers can now be removed. Note the sequence of the spacers and gears for correct reassembly! Inspect all parts for wear, clean inside the housing and install the parts in reverse order of removal.
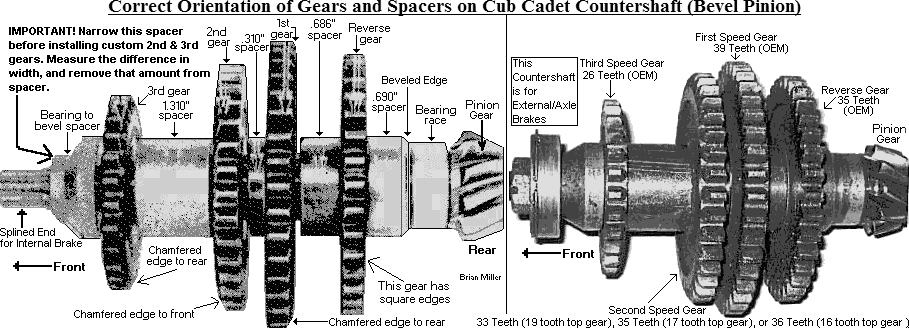
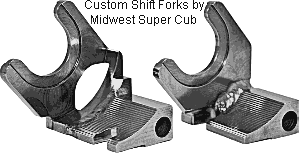 NOTE - When installing a
custom-made 2nd and 3rd speed gear set (especially
a 21 tooth and higher second speed gear), the shift fork and sometimes the
lower (inside) front portion of the transaxle housing may need grinding for
gear clearance and for the bottom 3rd gear clearance, because
the aftermarket lower 3rd gear is wider than the stock one. After
tightening the nut on the pinion shaft, rotate the shaft/gears by hand to
check for noise, adequate clearance and smooth rotation before permanently
installing! Also, before installing the shift lever cover, shift all the
gears by hand and check for correct bottom and top gear tooth alignment.
Being the center part between the 2nd and 3rd aftermarket
upper gears are larger in diameter, you'll probably need to grind out the
center "U" shape of the shift fork. Or if you wish, instead of grinding the
original shift forks for clearance, special-made shift forks that will clear
the 21 tooth and higher gears are available from Midwest Super Cub.
NOTE - When installing a
custom-made 2nd and 3rd speed gear set (especially
a 21 tooth and higher second speed gear), the shift fork and sometimes the
lower (inside) front portion of the transaxle housing may need grinding for
gear clearance and for the bottom 3rd gear clearance, because
the aftermarket lower 3rd gear is wider than the stock one. After
tightening the nut on the pinion shaft, rotate the shaft/gears by hand to
check for noise, adequate clearance and smooth rotation before permanently
installing! Also, before installing the shift lever cover, shift all the
gears by hand and check for correct bottom and top gear tooth alignment.
Being the center part between the 2nd and 3rd aftermarket
upper gears are larger in diameter, you'll probably need to grind out the
center "U" shape of the shift fork. Or if you wish, instead of grinding the
original shift forks for clearance, special-made shift forks that will clear
the 21 tooth and higher gears are available from Midwest Super Cub.
 The bottom 2nd and 3rd speed aftermarket pulling
gears are wider than the OEM gears. Therefore, the tapered spacer needs to
be narrowed about .060"±. But measure the thicknesses of the OEM gears
and aftermarket gears, then subtract the difference from the tapered spacer.
None of the other spacers will need to be narrowed. Remove metal from the
wide end of the tapered spacer. This way, it'll still allow plenty of room
for the tapered end not the interfere with the front bearing. When using
aftermarket gears, reducing the length of the front spacer will properly
align the bottom gears with the top gears, and it'll prevent pushing the
pinion gear too far back, which will throw off the backlash in the ring and
pinion gears. (The correct backlash of the ring and pinion gears is .003"
to .005".) For accuracy and trouble-free service, remove the metal from the
spacer by chucking it in a small metal lathe (with a self-centering 3-jaw
chuck). IMPORTANT: If you don't feel comfortable
using a metal lathe, please consult a professional and experienced machinist
with a lathe. But do not grind on the lower gear itself! And
because the lower 3rd gear is larger in diameter than the stock
one, slight grinding of inside the transmission housing may be needed.
The bottom 2nd and 3rd speed aftermarket pulling
gears are wider than the OEM gears. Therefore, the tapered spacer needs to
be narrowed about .060"±. But measure the thicknesses of the OEM gears
and aftermarket gears, then subtract the difference from the tapered spacer.
None of the other spacers will need to be narrowed. Remove metal from the
wide end of the tapered spacer. This way, it'll still allow plenty of room
for the tapered end not the interfere with the front bearing. When using
aftermarket gears, reducing the length of the front spacer will properly
align the bottom gears with the top gears, and it'll prevent pushing the
pinion gear too far back, which will throw off the backlash in the ring and
pinion gears. (The correct backlash of the ring and pinion gears is .003"
to .005".) For accuracy and trouble-free service, remove the metal from the
spacer by chucking it in a small metal lathe (with a self-centering 3-jaw
chuck). IMPORTANT: If you don't feel comfortable
using a metal lathe, please consult a professional and experienced machinist
with a lathe. But do not grind on the lower gear itself! And
because the lower 3rd gear is larger in diameter than the stock
one, slight grinding of inside the transmission housing may be needed.
After completion, rotate the gears by hand using the input shaft with the shift forks in the neutral position, the gears should turn freely and there should be no strange sounds. Shift all the gears into position and look at the gear teeth mesh. They should be perfectly aligned. If one or two isn't aligned, then a couple of spacers are in the wrong place. And if there is a noise, the only two things that could be causing it is the shift fork(s) wasn't ground enough to clear the gears or the lower inside portion of the transmission housing to clear the lower 3rd speed gear wasn't ground away enough.
And if you were wondering, ALL Cub Cadet garden tractor transaxles are offset to the right when sitting on the tractor or standing behind the tractor. They did this so the driveshaft will clear the steering box and so the driveshaft will be inline with the engine crankshaft centerline on the single cylinder Kohler engines.
How To Install Three (3) Forward Pulling Gears (with working reverse)
-
The two paragraphs below Ê was
written by Dan Floyd of Springfield, Missouri. His email address is:
jeep30dhf@yahoo.com.
Installing 3 forward pulling gears is exactly the same as the 4 gear setup (below Ê) with the exception of the reverse idler gear. Simply machine the opposite end from the spacer end of the reverse idler gear back approximately 1/4" and turn down the spacer end diameter a bit (to clear the gears). The reason for this is the gear will be moving back towards the transmission housing a bit. It is really very simple, especially if using the forks and spacers from Midwest Super Cub.
If you want to use your factory shift forks, you will only have to modify one. To do so, cut the forks off of the rail assembly and weld on new ones. I used a large, flat heat-treated washer with a side cut out to make one of mine after doing the first. Just place the gears in position with the rails in what gear it should be aligned the new fork. Tack weld it in place, then you can weld it on the bench to finish it. It isn't any big trick, no remachining the rails, no fancy gear grinding and no headaches. I did use an aftermarket spacer kit for the first transaxle I repaired. I kept the dimensions and made our own for the other installments. Their spacers let you use the original detents on the rails. Plain aluminum round stock can be used.
How To Install Four (4) Forward Pulling Gears (with no reverse) -
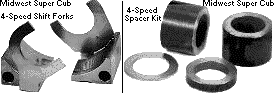 The
two forward gears that replaces the original 1st and reverse gears
installs pretty much the same way a custom set of 2nd and 3rd
gears are installed. Except they install and operate in reverse of
2nd and 3rd gears. To install a set of four (4) forward
gears, you'll need a set of special-made 4-speed shift forks and a 4-speed
gear spacer kit (see photos above È
or to the right ->) from an aftermarket manufacturer.
The
two forward gears that replaces the original 1st and reverse gears
installs pretty much the same way a custom set of 2nd and 3rd
gears are installed. Except they install and operate in reverse of
2nd and 3rd gears. To install a set of four (4) forward
gears, you'll need a set of special-made 4-speed shift forks and a 4-speed
gear spacer kit (see photos above È
or to the right ->) from an aftermarket manufacturer.
To install the gears, the transaxle must be completely disassembled. Then you'll need to remove the reverse idler gear, shaft and boss. Take a torch and carefully cut the boss off, then use a die grinder to grind it smooth. Also grind the casting flash (ragged edges). You also may have to grind the housing for gear clearance depending on the ratios that you choose. After all the grinding is done and the housing has been cleaned, repaint the bare metal and let dry before reassembly. (Paint prevents oil from seeping through the cast iron housing and making a mess on the outside.) Make sure that the oil holes that feed the bearings are clear. You could replace the shift detent springs with the stiffer YELLOW springs. They're about 3 times stronger than stock springs. Available from Vogel Manufacturing.
Listed below Ê are the dimensions for making the spacers on a 3- or 4-speed Cub Cadet garden tractor transaxle. Spacers listed in order going from the pinion bevel gear (lower shaft) towards nut: (Reverse gear - third or first - fourth gear, depending on gear selection.)
|
|
Cross Sectional View of IH Cub Cadet Transmission

Exploded View of Cub Cadet Garden Tractor Transmission Gears and
Components
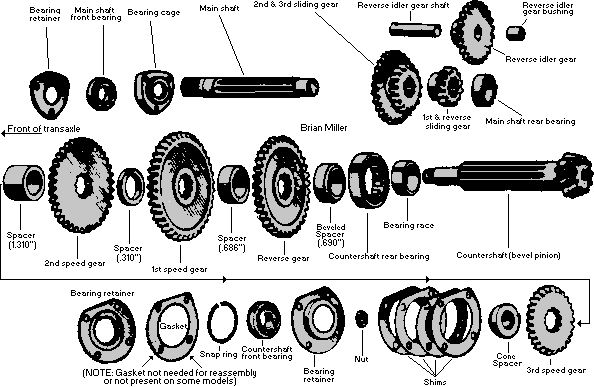
If your tractor sometimes "skips
a gear tooth" in the transaxle when pulling, this is caused by the flimsy
OEM stamped steel front pinion bearing retainers. They'll flex when placed
under a load. What happens is the lower stationary gears on the pinion gear/shaft
are being pushed forward from the pressure of the ring gear, causing the
bottom gears to become misaligned with the top gears, which allows them to
skip a tooth. This could also cause the ring and pinion gears to skip, chipping
a tooth on the ring gear, or breaking the ring gear.
To prevent "gear skipping" and possibly breaking a tooth off a gear or ruining the ring and pinion gears, you'll need to install a set of billet steel pinion bearing retainers on the bearing where the lower pinion shaft protrudes through the front of the transaxle case. You can get a new set of billet steel pinion bearing retainers from Midwest Super Cub (http://www.midwestsupercub.net/).
By the way - the reason the pinion gear is offset or positioned lower than the centerline of the ring gear (spiral bevel or hypoid gear design; like the IH-built Cub Cadet garden tractor ring and pinion gear teeth) is so both gear teeth can have contact 1-1/2 tooth at a time, making the gear teeth stronger and less prone to breaking in competition pulling than straight-cut or spur-cut gear teeth design (like the MTD-built Cub Cadet garden tractor ring and pinion gear teeth), which makes contact 1 tooth contact at a time. This is also why the cast iron gear teeth on Kohler's crankshafts and camshafts have angled teeth.
"Flipping" the Carrier in a Cub Cadet for a Reverse Rotation Engine - [Return To Previous Paragraph, Section or Website]
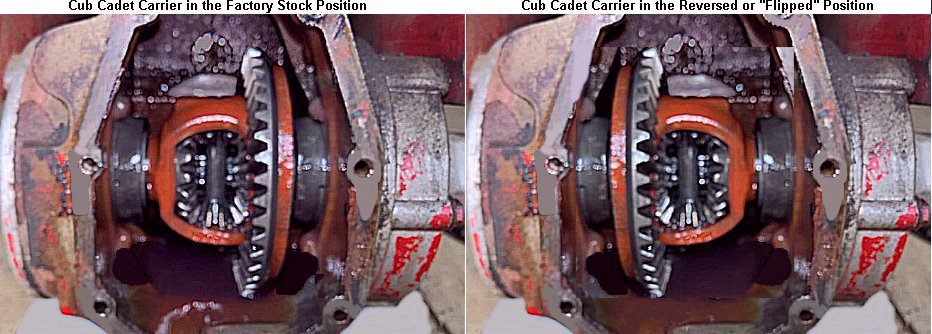 Do this for a reverse rotation
engine (engines that rotate counterclockwise when facing the flywheel), such
as a diesel, in a Cub Cadet.
Do this for a reverse rotation
engine (engines that rotate counterclockwise when facing the flywheel), such
as a diesel, in a Cub Cadet.
The "original" (belt to disc clutch/pulley drive) Cub Cadet garden tractor had the rear end differential carrier installed with the spider gears on the right of the ring gear (viewed with the operator sitting in the seat). The transmission gears turns in the same direction as the engine.
On the later model (direct disc clutch drive) Cub Cadet garden tractors, which utilize a gear reduction housing, IH installed the carrier in reverse. The spider gears are on the left of the ring gear. This made the transmission gears turn in the opposite direction as the engine. The early and later carriers, ring and pinion gears are identical and are made to do this.
You must "flip the carrier" if you want to use an engine when the crankshaft PTO end turns counterclockwise when it faces the transaxle. Otherwise, it'll have 3 reverse gears and 1 forward gear.
So if you want to install an engine that turns in the opposite direction on a Cub Cadet garden tractor, it's safe to flip a carrier to make your tractor go forward in the forward gears. And the ring and pinion gears will still mesh with no problem.
Using the MTD Cub Cadet Differential Carrier and Axles in an IH Cub Cadet Garden Tractor for Heavy Duty Use or Competition Pulling - [Top of Page]
This section explains which OEM Cub Cadet garden tractor differential carriers and axles are best to use for pulling, and how to machine two different automotive differential carriers and axles for installation into a Cub Cadet garden tractor transaxle.
Depending on the class your tractor is going to pull in and engine size/modifications, there are many variations in which clutch/driveshaft design and carrier/axles to use. Listed are the weakest to the strongest:
Rather if it's a clutch/gear drive or hydrostatic drive, the OEM one-piece differential carrier and coarse spline axles are the most fragile or vulnerable parts in the IH-built Cub Cadet garden tractor transaxle. The stock Cub Cadet differential carrier (the part that the ring gear is fastened onto) is made from inferior or weak cast iron material. When used for general lawn and garden use or competition pulling with the 23-10.50x12 lug tires and a 10" hitch height, the one-piece differential carrier and coarse spline axles should hold up just fine. But when used for garden tilling, snow removal (especially with tire chains), or competition pulling with 26-12.00x12 lug tires and a 13" hitch height when hooked to a very heavy sled on a biting track, they are likely to break.
What happens is this: when a tractor is pulling, and when the weight of the sled comes up on the tractor, force on the spider gears (side gears and differential pinion gears, the four angled gears that's inside the carrier) places extreme outward pressure on the differential carrier, causing it to explode without warning. To reduce the chances of this happening, read below Ê. Also, if you're running a lightweight pulling tractor (900 lb. w/driver) with a hitch height that's below the center line of the rear axle (10" hitch height), and small diameter rear tires (23x10.50-12), you don't have to worry about a stock carrier or axles breaking. The transfer weight of the tractor won't be placing that much strain on them.
What is the maximum horsepower recommended with a stock/OEM Cub Cadet garden tractor carrier?
I don't think that question has just one answer. Because it's not necessarily horsepower that breaks a stock IH Cub Cadet coarse spline carrier and axles. The combination of engine size and torque, gearing of the tractor, weight of the tractor, tire size, if the tires have cut tread or not, hitch height, weight of the sled and track conditions all play a part in rather if a stock carrier and axles will break or not. To put it plain and simple, a heavy tractor with 26-12.00x12 cut tread tires and a 13" hitch height that pulls in 1st gear on a biting track is murder on a stock carrier and axles.
Use a Heavy Duty, Thick-Casting One Piece IH Differential Carrier for Competitive Pulling in a Stock Cub Cadet Garden Tractor -
IH Cub Cadet garden tractors
originally came with a thin casting, then later, a thick casting cast iron
carrier. Both of these carriers have been known to break under pulling strain,
even when "strapped." The thin casting carrier is suitable for light lawn
and garden use, or for a competitive pulling tractor with a 10" drawbar height
and 23-10.50x12 cut-tread lug tires. Definitely not recommended for a competitive
pulling tractor with a 13" drawbar height and 26-12.00x12 cut- or
professional-tread pulling tires. And the thick casting carrier is more suitable
for heavy lawn and garden use, or for a competitive pulling tractor with
a 13" drawbar height and 23-10.50x12 cut-tread lug tires. Definitely not
recommended for a competitive pulling tractor with a 13" drawbar height and
26-12.00x12 cut- or professional-tread pulling tires. The early thick casting
carrier has coarse spline side gears for the coarse spline axles. And the
later thick casting carrier has fine spline side gears for the fine spline
axles. The thick casting carrier is the 4th strongest carrier available,
but not as strong as the two-piece MTD-built Cub Cadet fine spline, Chrysler
or Pinto carriers and axles. And the bearings, ring gear and spider gears
in a thin-casting carrier will interchange with the thick-casting and MTD
Cub Cadet carriers.
Weld the Spider Gears Together to Strengthen the Stock Cub Cadet Garden Tractor Differential Carrier -
A sure way to prevent a stock carrier from breaking is to weld the spider (side and pinion) gears together. I don't have a photo, but the spider gears are welded together where they make contact with each other. A welded or "locked" rear end will definitely provide superior pulling traction. But on the other hand, the tractor won't be as maneuverable as one with a free-spinning rear end. This means it would require a large area just to turn it around. Also, some extra weight (approximately 10 lb.) may be required on the front of the tractor to control it while going down the track. If one does decide to weld the spider gears, the carrier won't need a strap. Because under pulling stress, the spider gears wants to push outward, causing the differential carrier to break. But if the gears are welded, they can't push outward and break the carrier. Just weld the teeth together so they won't rotate on each other. And there's no need to remove the carrier out of the rear-end to weld the spider gears. You can reach in through the rear of the housing and weld side, then rotate the carrier and weld the other side. It's that simple. Use mild steel welding wire or rod to securely weld the spider gears together. Use some kind of metal shield to keep the welding splatter off the ring gear teeth. NOTE - welding of these gears is permanent! It cannot be undone!
A word
of caution before welding the spider gears: if there's inadequate weight
on the front of the tractor, a welded rear end could cause a high-speed pulling
tractor to wander from side to side on the track. Therefore, that's why most
pullers prefer an open (free spinning spider gears) rear end.
KEEP THIS IN MIND: If running
you're a 13" hitch height and 26x12.00-12 tires, isn't a "100% guarantee"
that stock [coarse spline] axles won't break. The above
È methods only lessens the chances of
them breaking. If you have a high horsepower engine, it's best to install
a re-machined automotive carrier and axles. Scroll down to find out what
it takes to machine an automotive carrier and axles yourself. And as far
I know, there's no posi-trac clutch packs for any carrier that can fit in
the Cub Cadet garden tractor transaxle. Therefore, the only way to make both
axles pull at the same time in a Cub Cadet is weld the spider gears together.
Using Coarse Spline IH Cub Cadet Garden Tractor Drive Axles -
 Anything with coarse splines
will twist or break a lot easier than anything with fine splines. That's
why the stock Cub Cadet axles twist or break easily, and that's also why
late-model automobiles use only fine splines throughout the entire driveline,
including the axles. Factory-hardened Cub Cadet coarse spline axles will
ALWAYS twist at the splines whenever too much torque is applied to them.
So when using coarse spline axles, try to use a set that's heat-treated to
the center. To check for this, drill into the center of the splined in. If
the drill bit cannot bore into the axle, then the center is heat-treated.
But if it bores into the axles, then the center is not heat-treated and the
axle may break easily.
Anything with coarse splines
will twist or break a lot easier than anything with fine splines. That's
why the stock Cub Cadet axles twist or break easily, and that's also why
late-model automobiles use only fine splines throughout the entire driveline,
including the axles. Factory-hardened Cub Cadet coarse spline axles will
ALWAYS twist at the splines whenever too much torque is applied to them.
So when using coarse spline axles, try to use a set that's heat-treated to
the center. To check for this, drill into the center of the splined in. If
the drill bit cannot bore into the axle, then the center is heat-treated.
But if it bores into the axles, then the center is not heat-treated and the
axle may break easily.
"Gun drilling" axles or making
them hollow lengthways with the splines are is not a "100% guarantee" that
they will not twist or break in competition pulling. Gun drilling a set of
stock axles for pulling do not work! I tried this on my personal stock pulling
tractor with stock axles, and the axles broke at the splines. The best thing
to do is install an MTD Cub Cadet garden tractor fine spline axles and carrier,
or a Dodge or Ford Pinto carrier and axles. In my personal experience as
a puller, gun drilling axles don't help to strengthen stock axles whatsoever.
In theory, you would think that this would work, but in reality, it doesn't.
But on a stock pulling tractor that has 23x10.50x12 lug tires and a 10" hitch
height, factory coarse spline axles and the thin casting factory carrier
shouldn't break.
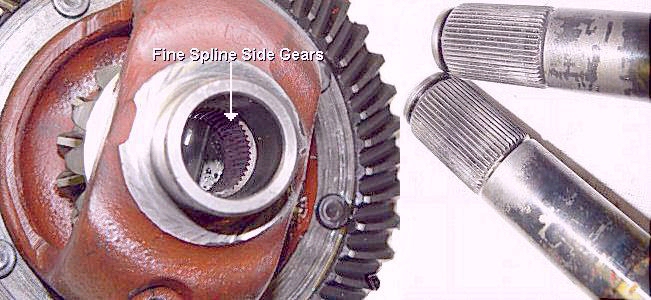 The IH-built Cub Cadet garden tractor one-piece carrier with
the fine spline side gears and 1" diameter fine spline axles came in some
of the later models 682, 782, 782D, 1282 and maybe a few others have them.
The later one-piece carrier have thicker metal for increased strength. This
carrier is about 75% stronger than the earlier one-piece coarse spline carriers.
These carriers and axles can be used in a stock pulling tractor. Only certain
carriers and axles in the red color Cub Cadet garden tractors are fine spline.
You can't tell from the outside. The rear cover must be removed and an axle
pulled to see if it has fine spline axles. As far as I know, the early model
IH 582's and all of the model IH 1282's came with these particular carrier
and axles. These came in IH Cub Cadet garden tractor models below serial
number 720,000 (models 582, 682, 782 and 1282).
The IH-built Cub Cadet garden tractor one-piece carrier with
the fine spline side gears and 1" diameter fine spline axles came in some
of the later models 682, 782, 782D, 1282 and maybe a few others have them.
The later one-piece carrier have thicker metal for increased strength. This
carrier is about 75% stronger than the earlier one-piece coarse spline carriers.
These carriers and axles can be used in a stock pulling tractor. Only certain
carriers and axles in the red color Cub Cadet garden tractors are fine spline.
You can't tell from the outside. The rear cover must be removed and an axle
pulled to see if it has fine spline axles. As far as I know, the early model
IH 582's and all of the model IH 1282's came with these particular carrier
and axles. These came in IH Cub Cadet garden tractor models below serial
number 720,000 (models 582, 682, 782 and 1282).

 At 720000, they kept the 1" fine spline axles and upgraded
the carrier to the 2 pc. These models go from the late red 82 series and
continue with all the models with that same body style (1811, 1806, 1210
etc). These models had the all aluminum transaxle housing but still had the
hex shape axle housings. This setup will drop right in an older Cast iron
rear without any machine work to the axle tubes. The ring gear needs swapped
over to the new carrier.
At 720000, they kept the 1" fine spline axles and upgraded
the carrier to the 2 pc. These models go from the late red 82 series and
continue with all the models with that same body style (1811, 1806, 1210
etc). These models had the all aluminum transaxle housing but still had the
hex shape axle housings. This setup will drop right in an older Cast iron
rear without any machine work to the axle tubes. The ring gear needs swapped
over to the new carrier.
Beginning at serial # 800,000 (for the 1990 model year) they changed the styling by changing the hood and grille to plastic. These models are often referred to as the "cyclops" series because they have a single headlight lens that covers the two bulbs. These models kept the same 2pc carrier but the outer end of the axle had its diameter increased to 30mm. These models have the larger round axle housings and use ball bearings at the outer end of the axle instead of the needle bearings. To use these axles and carrier in an older cast rear, the axle housings need bored out and larger bearings and seals put in.
The two-piece/bolt-together fine spline carrier and 30 millimeter (1-3/16")
fine spline axles were manufactured by MTD (Modern Tool & Die) and not
International Harvester. This carrier and axles will fit in the early [coarse
spline] IH Cub Cadet garden tractor transaxles, except the International
Cub Cadet "Original" garden tractor, with no modifications, with the exception
of swapping out the ring gear, carrier bearings and enlarging the axle housing
ends for larger bearings and oil seals for the bigger 30 mm axles.
 The carrier itself will fit
in the International Cub Cadet "Original" garden tractor (with the ring gear
swapped), but the fine spline axles won't work because the International
Cub Cadet "Original" use snap rings midway of the axles to retain them in
the housings, one axle has a Woodruff key slot for the brake drum, and both
axles have an oil seal in the 3-bolt flanges.
The carrier itself will fit
in the International Cub Cadet "Original" garden tractor (with the ring gear
swapped), but the fine spline axles won't work because the International
Cub Cadet "Original" use snap rings midway of the axles to retain them in
the housings, one axle has a Woodruff key slot for the brake drum, and both
axles have an oil seal in the 3-bolt flanges.
These fine spline units are found in all MTD-built Cub Cadet garden tractors manufactured after serial number xxxxxxxx720000 (1983 and later) and were used in the [spread frame] Cub Cadet garden tractors mostly with a twin cylinder engine. The serial number will probably have a long row of numbers, but if the last six numbers are higher than 720000, the tractor should have the fine spline carrier and axles. This includes all late model yellow and white gear- and hydrostatic-drive Cub Cadets with an aluminum transaxle case, except the model 582 Special, which have the Peerless 2300 series transaxle. (This particular transaxle is very tough when used for general yard and garden work, but one of the axles have been known to break when pulling competitively with 26-12.00x12 lug tires.) An easy way to identify the MTD fine spline axles is they have pressed-in automotive-style wheel studs w/lug nuts and not the screw-in lug bolts to fasten the wheels to the axle flange. The center of the flanges have that "automotive look" because the flanges are cast onto the axles and not welded. These may be quite as strong as the automotive carriers and axles. (See further down.)
The MTD-built Cub Cadet garden tractor bolt-together fine spline carrier & 30mm axles came in all tractors an aluminum transaxle housing. Available from 1982 to 1994. Including models: 580 (disc clutch drive), 582 (disc clutch drive), 680 (hydrostatic drive), 682 (hydrostatic drive), 782 (hydrostatic drive), 784 (hydrostatic drive), 982 (Onan; hydrostatic drive), 984 (hydrostatic drive), 986 (hydrostatic drive), 1050 (disc clutch drive), 1204, 1210, 1211, 1282 (hydrostatic drive), 1340, 1440, 1512, 1535 (disc clutch drive), 1540, 1541, 1572, 1604 (disc clutch drive), 1606 (disc clutch drive), 1641, 1710, 1711, 1712, 1772 (Diesel), 1782, 1806 (disc clutch drive), 1810, 1811, 1812, 1860, 1861, 1862, 1863, 1864, 1872, 1882, 1912, 1914, 2072, 2082, 2182 and 2284. Any Cub Cadet garden tractor that originally came with a cast iron transaxle housing, rather if it's a hydrostatic- or clutch-drive, doesn't have the bolt-together fine spline carrier and 30mm axles.
 The new style bolt-together MTD
fine spline carrier is much stronger than the older cast iron carrier and
the ends of the fine spline axles are much stronger than the old coarse spline
axles. There's no need to center-drill through the coarse spline axle splines
to strengthen the splines. The spline will still twist and break under pulling
force. In most cases, the ring gear may need to be swapped with an older
IH angle-cut gear teeth ring gear because the ring gear teeth on the hydrostatic
drive models of MTD Cub Cadet garden tractors are straight-cut. The old style
IH ring gears will bolt directly to the fine spline carrier with no
modifications, and the MTD side bearing caps (flanges) will also interchange
with the IH housing. They're a direct fit.
The new style bolt-together MTD
fine spline carrier is much stronger than the older cast iron carrier and
the ends of the fine spline axles are much stronger than the old coarse spline
axles. There's no need to center-drill through the coarse spline axle splines
to strengthen the splines. The spline will still twist and break under pulling
force. In most cases, the ring gear may need to be swapped with an older
IH angle-cut gear teeth ring gear because the ring gear teeth on the hydrostatic
drive models of MTD Cub Cadet garden tractors are straight-cut. The old style
IH ring gears will bolt directly to the fine spline carrier with no
modifications, and the MTD side bearing caps (flanges) will also interchange
with the IH housing. They're a direct fit.
Although the IH- and MTD-made 10-tooth pinion shafts will interchange between the IH- and MTD-built transaxles, it's best to install a ring gear with angled teeth from an IH carrier onto the two-piece MTD-made carrier. The reason being is angled gear teeth makes 1-1/2 teeth contact with each other, which is stronger, and the MTD straight-cut gears only makes contact with 1 tooth at a time, which is weaker. The more tooth contact is less prone to ring gear breakage. If the straight-cut tooth ring gear breaks under pulling strain, it's likely to break the flange on the carrier, too.
The splines on the fine spline IH and MTD axles are the same. The only difference is the IH axles are 1" in diameter the whole length of the axle, and the MTD axles are 30 mm (1.181" or close to 1-3/16") at the wheel flange. This means when using MTD axles with IH axle housings, the ends of the housings would need to be bored to accept 30mm I.D. or 1-3/16" bushings or needle bearings in order for them to work. The needle-roller bearings from the MTD housings can be reused and installed in the IH housings. But the oil seals should be purchased new. Also, either of the axle housings on the MTD Cub Cadet garden tractor transaxle won't work on an IH Cub Cadet garden tractor transaxle narrow side because the mounting flange is too wide for it to fit inside the tractor frame.
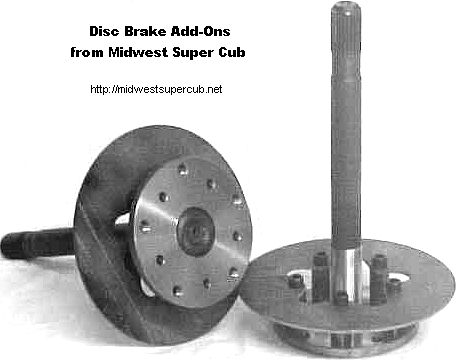 NOTE: When installing the
MTD fine spline, Chrysler, Pinto axles in an IH transaxle, and if the IH
Cub Cadet garden tractor has external axle [disc] brakes, the MTD or automotive
axles won't work because the MTD brake discs are too big in diameter, and
the automotive axles have no brake discs. Therefore,
Midwest
Super Cub offers aftermarket disc brake add-ons. Otherwise, an IH internal
brake transaxle would need to be installed in the tractor.
NOTE: When installing the
MTD fine spline, Chrysler, Pinto axles in an IH transaxle, and if the IH
Cub Cadet garden tractor has external axle [disc] brakes, the MTD or automotive
axles won't work because the MTD brake discs are too big in diameter, and
the automotive axles have no brake discs. Therefore,
Midwest
Super Cub offers aftermarket disc brake add-ons. Otherwise, an IH internal
brake transaxle would need to be installed in the tractor.
The coarse spline (IH-built) and fine spline (early IH-built and all MTD-built) Cub Cadet garden tractor differential carriers use the same [tapered] bearings and races, and the carriers are exactly the same width.
The splines on the 7-¼" Chrysler axles are much coarse (but still considered as "fine spline") and stronger than any fine spline Cub Cadet garden tractor axle. Therefore, when used in a highly modified garden pulling tractor, sometimes the splines in the [Cub Cadet] side (axle) gears will strip out. The side gears from a 7-¼" Chrysler carrier can be installed in a bolt-together fine spline MTD Cub Cadet garden tractor carrier. The side gears and axles from a 7-¼" Chrysler rear end will fit in a bolt-together fine spline carrier, and the Chrysler axles can be used, but the cavities in the carrier where the side gears rest will need to be machined (enlarged) to 1.501" so the side gears from the Chrysler will fit.
I believe that ALL fine spline axle/carrier tractors have external brakes. To install this type of carrier and axles in an internal brake transaxle, just knock out the wheel studs from the axles, remove the brake discs and reinstall the studs. You may need to swap out the ring gear, too.
Information about Using a Chrysler, Dodge or Plymouth Differential Carrier and Axles in a Cub Cadet Garden Tractor Transaxle - [Top of Page]
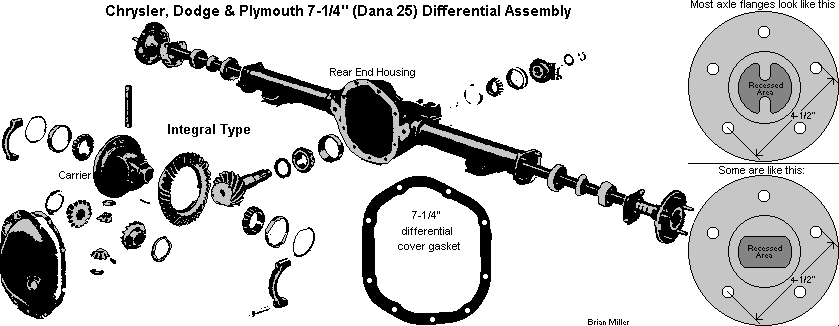 The heavy duty carrier and axles that most pullers prefer to
use in the IH-built Cub Cadet competition garden pulling tractor are out
of a Chrysler-family vehicle with a 7-1/4" / Dana 25 rear end. The 7-1/4"
Chrysler carrier and axles are extremely strong! When machined and installed
correctly, there's an extremely little chance that they will break in a IH-built
Cub Cadet competition garden pulling tractor, even with a 50+ c.i. Modified,
highly modified V-twin or a turbo-charged 3-cylinder Diesel engine.
The heavy duty carrier and axles that most pullers prefer to
use in the IH-built Cub Cadet competition garden pulling tractor are out
of a Chrysler-family vehicle with a 7-1/4" / Dana 25 rear end. The 7-1/4"
Chrysler carrier and axles are extremely strong! When machined and installed
correctly, there's an extremely little chance that they will break in a IH-built
Cub Cadet competition garden pulling tractor, even with a 50+ c.i. Modified,
highly modified V-twin or a turbo-charged 3-cylinder Diesel engine.
 The Chrysler 7-1/4" / Dana 25
differential assembly/rear end has a 7-¼" outside diameter ring gear,
9 bolts on the cover, and an oil filler/level plug on the rear cover. It's
a low performance differential unit that came in various Chrysler, Plymouth
and Dodge cars with a 4 cylinder, slant 6, and certain cars with a 318 CID
engine. Casting numbers are # 2070051, 3507881 and 3723675. These numbers
are not on an attached tag; they are cast on the rear end housing. This rear
end came in various rear-wheel-drive Chrysler, Plymouth and Dodge cars from
1960 to the early '80's, such as the 1960-1976 Plymouth Valiant, 1964-1971
Plymouth Barracuda, 1966-1967 Plymouth Belvedere II, 1966-1971 Dodge Charger,
1966-1971 Dodge Coronet, 1966-1971 Dodge Monaco, 1966-1971 Plymouth Belvedere,
1966-1971 Plymouth Satellite, 1966-1976 Dodge Dart, 1966-1978 Plymouth Fury,
1967-1971 Dodge Polara, 1967-1971 Plymouth GTX, 1968-1975 Plymouth Roadrunner,
1970 Plymouth Superbird, 1970-1971 Plymouth Cuda, 1970-1971 Dodge Challenger,
1970-1976 Plymouth Duster, 1971-1976 Plymouth Scamp, 1976-1980 Dodge Aspen,
1976-1980 Plymouth Volare, 1977-1981 Plymouth Gran Fury, 1977-1981 Chrysler
Lebaron, 1977-1981 Chrysler New Yorker, 1977-1981 Chrysler Newport, 1977-1981
Chrysler Town & Country, 1977-1981 Dodge Diplomat, 1979-1981 Dodge St.
Regis, 1980-1981 Chrysler Cordoba, 1980-1981 Dodge Mirada and 1981 Chrysler
Imperial. They were also used as the front differential/axle in the 4x4 Dodge
Dakota and Durango trucks. Some of the models listed may not be 100% accurate,
so use your best judgment when identifying a rear end in person. Due to the
more powerful MOPAR automotive engines being produced in recent times, production
of the Dana 25 / Chrysler 7.25" differential assembly ended in 1981.
The Chrysler 7-1/4" / Dana 25
differential assembly/rear end has a 7-¼" outside diameter ring gear,
9 bolts on the cover, and an oil filler/level plug on the rear cover. It's
a low performance differential unit that came in various Chrysler, Plymouth
and Dodge cars with a 4 cylinder, slant 6, and certain cars with a 318 CID
engine. Casting numbers are # 2070051, 3507881 and 3723675. These numbers
are not on an attached tag; they are cast on the rear end housing. This rear
end came in various rear-wheel-drive Chrysler, Plymouth and Dodge cars from
1960 to the early '80's, such as the 1960-1976 Plymouth Valiant, 1964-1971
Plymouth Barracuda, 1966-1967 Plymouth Belvedere II, 1966-1971 Dodge Charger,
1966-1971 Dodge Coronet, 1966-1971 Dodge Monaco, 1966-1971 Plymouth Belvedere,
1966-1971 Plymouth Satellite, 1966-1976 Dodge Dart, 1966-1978 Plymouth Fury,
1967-1971 Dodge Polara, 1967-1971 Plymouth GTX, 1968-1975 Plymouth Roadrunner,
1970 Plymouth Superbird, 1970-1971 Plymouth Cuda, 1970-1971 Dodge Challenger,
1970-1976 Plymouth Duster, 1971-1976 Plymouth Scamp, 1976-1980 Dodge Aspen,
1976-1980 Plymouth Volare, 1977-1981 Plymouth Gran Fury, 1977-1981 Chrysler
Lebaron, 1977-1981 Chrysler New Yorker, 1977-1981 Chrysler Newport, 1977-1981
Chrysler Town & Country, 1977-1981 Dodge Diplomat, 1979-1981 Dodge St.
Regis, 1980-1981 Chrysler Cordoba, 1980-1981 Dodge Mirada and 1981 Chrysler
Imperial. They were also used as the front differential/axle in the 4x4 Dodge
Dakota and Durango trucks. Some of the models listed may not be 100% accurate,
so use your best judgment when identifying a rear end in person. Due to the
more powerful MOPAR automotive engines being produced in recent times, production
of the Dana 25 / Chrysler 7.25" differential assembly ended in 1981.
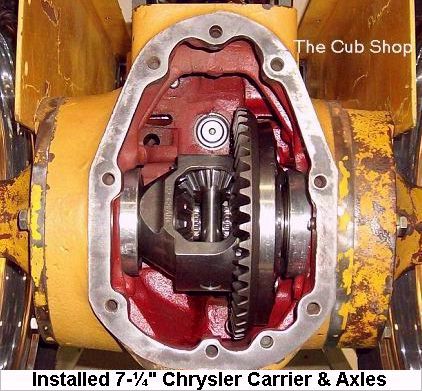
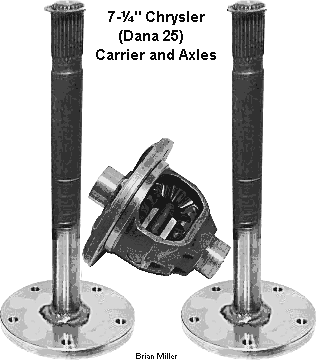 The newer (1978+/- and newer) have changed the casting. Some
are quite a bit wider and won't fit into the Cub Cadet garden tractor housing.
Some have the side gears offset from the centerline and the bearing cups
are odd looking. If installed in a Cub Cadet garden tractor transaxle, one
axle will be longer than the other. One axle will need to be shorter than
the other so they'll project out of the axle housings the same length. The
late '60's Dart, Valiants and early '70's Demons works best. They're the
ones with no ribs. The ones with the tall ribs, the knocked off ribs are
the junkers.
The newer (1978+/- and newer) have changed the casting. Some
are quite a bit wider and won't fit into the Cub Cadet garden tractor housing.
Some have the side gears offset from the centerline and the bearing cups
are odd looking. If installed in a Cub Cadet garden tractor transaxle, one
axle will be longer than the other. One axle will need to be shorter than
the other so they'll project out of the axle housings the same length. The
late '60's Dart, Valiants and early '70's Demons works best. They're the
ones with no ribs. The ones with the tall ribs, the knocked off ribs are
the junkers.
The rear end that's needed for use in a Cub Cadet garden tractor transaxle are ones with a 2.7:1 or lower ring and pinion gear ratio (2.76, 2.93, 3.23 and 3.55). Ones with a 2.22:1 or 2.4:1 ratio won't work because of ring gear flange offset location. The ratio can be found stamped into a small metal tag that's attached to one of the rear cover bolts. After founding the right rear end, the only the parts you'll need are the carrier with all spider gears intact and in good condition, the Timken roller bearings and races, and at least 15" of each axle (when measured from the spline end). The ring and pinion gears aren't needed.
 The Dana 30 carrier and axles
out of a Jeep and John Deere garden tractor models 140 above serial number
63,905, and all John Deere garden tractor models 300, 312, 314, 316 and 317
will also work in a Cub Cadet garden tractor transaxle. I have no detailed
information on how to make this type of carrier and axles work in a Cub Cadet
garden tractor. Somebody told me that he did it and it worked great. He gave
me no details either. I assume they go in similar as the Chrysler 7-1/4"
/ Dana 25 carrier and axles.
The Dana 30 carrier and axles
out of a Jeep and John Deere garden tractor models 140 above serial number
63,905, and all John Deere garden tractor models 300, 312, 314, 316 and 317
will also work in a Cub Cadet garden tractor transaxle. I have no detailed
information on how to make this type of carrier and axles work in a Cub Cadet
garden tractor. Somebody told me that he did it and it worked great. He gave
me no details either. I assume they go in similar as the Chrysler 7-1/4"
/ Dana 25 carrier and axles.
How to Machine and Install the Chrysler Carrier and Axles in a Cub Cadet Garden Tractor Transaxle -
The process to install a Chrysler-made automotive differential unit in a Cub Cadet garden tractor transaxle housing is fairly simple. It can become time consuming fitting all the parts and getting everything shimmed and clearances set. And as always, for trouble-free service, take your time when machining any rear end for use in a Cub Cadet garden tractor. Measure the parts/clearances with extreme accuracy before final installation.
Machine the Differential Carrier for Proper Fit: (Updated 12/23/08)
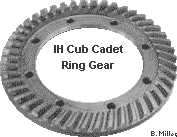 Remove
the Cub Cadet carrier and axles. Save the ring gear off the carrier because
it'll need to be installed on the automotive carrier. The stock Cub ring
gear is removed by drilling out the rivets. To remove the rivets, grind the
end off each rivet, then use a 1/4" roll pin punch and medium size hammer
to drive out the rivets, or drill the remaining rivets out with a 5/16" drill
bit. Removing the ring gear from the automotive carrier is the same process.
Remove
the Cub Cadet carrier and axles. Save the ring gear off the carrier because
it'll need to be installed on the automotive carrier. The stock Cub ring
gear is removed by drilling out the rivets. To remove the rivets, grind the
end off each rivet, then use a 1/4" roll pin punch and medium size hammer
to drive out the rivets, or drill the remaining rivets out with a 5/16" drill
bit. Removing the ring gear from the automotive carrier is the same process.
 The
inside of the [3 bolt] Cub Cadet bearing retainers will need to be machined
to accept the larger automotive bearing races. Also, the Chrysler carrier
is .100" wider than the Cub Cadet one. So either bore .050" deeper into each
retainer so the width of the carrier will have proper fit, or narrow the
Chrysler carrier .050" on each side. This is performed in a metal lathe (with
a self-centering 3-jaw chuck). IMPORTANT: If
you don't feel comfortable using a metal lathe, please consult a professional
and experienced machinist with a lathe. Or just order a set
of CNC machined steel bearing cups (retainers) from
Lakota Racing or
Midwest Super Cub, because the
OEM cast iron bearing retainers may break if not reinforced with a steel
cap. And when using the stock Cub Cadet shims, the carrier can be moved side
to side to reach the desired lash between the ring and pinion gears. It's
best to set the lash between .006" to .008".
The
inside of the [3 bolt] Cub Cadet bearing retainers will need to be machined
to accept the larger automotive bearing races. Also, the Chrysler carrier
is .100" wider than the Cub Cadet one. So either bore .050" deeper into each
retainer so the width of the carrier will have proper fit, or narrow the
Chrysler carrier .050" on each side. This is performed in a metal lathe (with
a self-centering 3-jaw chuck). IMPORTANT: If
you don't feel comfortable using a metal lathe, please consult a professional
and experienced machinist with a lathe. Or just order a set
of CNC machined steel bearing cups (retainers) from
Lakota Racing or
Midwest Super Cub, because the
OEM cast iron bearing retainers may break if not reinforced with a steel
cap. And when using the stock Cub Cadet shims, the carrier can be moved side
to side to reach the desired lash between the ring and pinion gears. It's
best to set the lash between .006" to .008".
By the way - back in the day when Cub Cadet machined their cast iron housing transaxles, shafts and gears, quality control wasn't as strict as it is today with the precision of CNC machines. The same is true with the Kohler cast iron engine blocks, camshafts and crankshafts. That's why the ring and pinion gear teeth require [steel] shims to set the clearance and back-lash, and the tapered bearings need to be shimmed to set the preload. And the camshaft and crankshaft require shimming (steel shims or various thicknesses of gaskets) to set the end-play clearances of either. Nowadays, thanks to the precision of CNC (Computer Numeric Control) machining, virtually all makes and models of transaxles, transmissions and engine blocks don't require shims... for anything! As a matter of fact, many of them don't even use or require gaskets. They use silicone sealant instead (except for the head gasket(s) on the engines). By the way - it's best to use Clear RTV Silicone Adhesive Sealant for three reasons: Gaskets don't always seal the imperfections and irregularities between two mating metals, especially thin metal covers; being Clear RTV Silicone Adhesive Sealant is an adhesive or glue, it bonds parts together, forming a leak-proof seal; and being it's clear, it makes for a clean and professional-looking repair job. When applied sparingly, it can't be easily seen or noticed between the parts. Also, engine heat has very little effect on silicone rubber. It can withstand up to 2,500 degrees heat.
Machine the Axles for Proper Fit:
 With the splined end of the axle
in the chuck of a metal lathe (with a self-centering 3-jaw chuck)
(IMPORTANT: If you don't feel comfortable using
a metal lathe, please consult a professional and experienced machinist with
a lathe.), turn the entire diameter down to 1.000" and use
the original bronze bushings or needle bearings in the Cub axle housings.
Unless they're worn or damaged, there's no need to do anything to the OEM
bushings or bearings in the housings. But do install new oil seals. The oil
seal size is 1" I.D. x 1-1/2" O.D. x 3/8" thick. The oil seals are part #
CR 9878 and National # 4712224. They're the same size seal that most garden
tiller tine shafts use and the 5hp V50, 6hp V60 and 7hp V70 Tecumseh vertical
shaft engines use on the PTO end of the crankshaft. But if you choose to
machine the axles down to 1.125" (1-1/8") in diameter instead, then install
either a 1.128" I.D. x 1" length bronze bushing or a Torrington roller bearing
# B-1816 or equivalent (for a 1-1/8" shaft) and the oil seal is a National
# CR11734 or equivalent (for a 1-1/8" shaft) in the axle housings. It doesn't
matter which brand of bushings, bearings or oil seals are used, just as long
as they're of high quality and the correct size. NOTE: The bronze bushings
will need to be removed and axle housings will need to be bored to accept
the over-sized needle bearings. To do this, you'll need to first measure
the outside diameter of the needle bearing housing, then bore the axle housings
.003" smaller for a press fit.
The Chrysler axles can have either
the E-clip snap rings or [1" or 1.125" I.D.] set screw collars (like for
the Pinto axles further down in this web page) to retain them in the carrier.
If the E-clip snap rings is used, in the lathe
(IMPORTANT: If you don't feel comfortable using
a metal lathe, please consult a professional and experienced machinist with
a lathe.), flip the axle end for end, and cut a .025" wide
snap ring groove in the splined area .250" from the end. If a set screw collar
is used, be sure to install a heat-treated washer between the collar and
housing to prevent the collar from wearing against the rough casting inside
the housing.
With the splined end of the axle
in the chuck of a metal lathe (with a self-centering 3-jaw chuck)
(IMPORTANT: If you don't feel comfortable using
a metal lathe, please consult a professional and experienced machinist with
a lathe.), turn the entire diameter down to 1.000" and use
the original bronze bushings or needle bearings in the Cub axle housings.
Unless they're worn or damaged, there's no need to do anything to the OEM
bushings or bearings in the housings. But do install new oil seals. The oil
seal size is 1" I.D. x 1-1/2" O.D. x 3/8" thick. The oil seals are part #
CR 9878 and National # 4712224. They're the same size seal that most garden
tiller tine shafts use and the 5hp V50, 6hp V60 and 7hp V70 Tecumseh vertical
shaft engines use on the PTO end of the crankshaft. But if you choose to
machine the axles down to 1.125" (1-1/8") in diameter instead, then install
either a 1.128" I.D. x 1" length bronze bushing or a Torrington roller bearing
# B-1816 or equivalent (for a 1-1/8" shaft) and the oil seal is a National
# CR11734 or equivalent (for a 1-1/8" shaft) in the axle housings. It doesn't
matter which brand of bushings, bearings or oil seals are used, just as long
as they're of high quality and the correct size. NOTE: The bronze bushings
will need to be removed and axle housings will need to be bored to accept
the over-sized needle bearings. To do this, you'll need to first measure
the outside diameter of the needle bearing housing, then bore the axle housings
.003" smaller for a press fit.
The Chrysler axles can have either
the E-clip snap rings or [1" or 1.125" I.D.] set screw collars (like for
the Pinto axles further down in this web page) to retain them in the carrier.
If the E-clip snap rings is used, in the lathe
(IMPORTANT: If you don't feel comfortable using
a metal lathe, please consult a professional and experienced machinist with
a lathe.), flip the axle end for end, and cut a .025" wide
snap ring groove in the splined area .250" from the end. If a set screw collar
is used, be sure to install a heat-treated washer between the collar and
housing to prevent the collar from wearing against the rough casting inside
the housing.
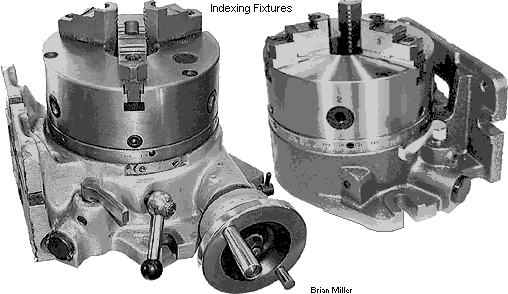
 Before
welding the axles to the flanges, the axles will need to be pressed in the
flanges. In the lathe (IMPORTANT: If you don't
feel comfortable using a metal lathe, please consult a professional and
experienced machinist with a lathe.), machine the ends of
the axles (opposite the splines) .003" larger than the hole in the flanges,
or bore a .003" smaller hole in the flanges. However it's done, just make
sure it'll be a press-fit. Fabricate two new flanges from scratch. For
precision, the five holes in the flanges (and wheel spacers) or the boring
process for the center of the automotive flanges should be performed in an
indexing fixture, super spacer or rotary table with a self-centering 3-jaw
chuck that's fastened on the table of a vertical milling machine.
Before
welding the axles to the flanges, the axles will need to be pressed in the
flanges. In the lathe (IMPORTANT: If you don't
feel comfortable using a metal lathe, please consult a professional and
experienced machinist with a lathe.), machine the ends of
the axles (opposite the splines) .003" larger than the hole in the flanges,
or bore a .003" smaller hole in the flanges. However it's done, just make
sure it'll be a press-fit. Fabricate two new flanges from scratch. For
precision, the five holes in the flanges (and wheel spacers) or the boring
process for the center of the automotive flanges should be performed in an
indexing fixture, super spacer or rotary table with a self-centering 3-jaw
chuck that's fastened on the table of a vertical milling machine.
Information about Using the 6-3/4" Ford Pinto and Mustang II, Mercury Bobcat and Capri Carrier and Axles in an IH Cub Cadet Garden Tractor Transaxle - [Top of Page]
 This particular carrier and
axles have a 6-3/4" outside diameter ring gear and 4 wheel studs in the
axle/wheel flanges. This axle assembly was used on 4-cylinder and some 6-cylinder
models of both the Pinto and Mustang II. The Ford Pinto, Mustang II, Mercury
Bobcat, and certain Mercury Capri models share interchangeable rear carriers
and axles. The interchangeability is a result of their shared platform and
components within Ford's subcompact car lineup of the 1970s. In this case,
the carriers and axles are largely interchangeable. You can identify this
version by the cover plate with bolts that is visible from the rear of the
vehicle. Although just as strong as the 7-1/4" Chrysler carrier and axles
mentioned above, the Pinto and Mustang II carrier and axles are actually
easier to install in a Cub Cadet transaxle because less machining is required,
and when machined and installed correctly, and used with the
ring gear snubber, they're just as strong the 7-1/4" Chrysler
unit. It should hold up well when used in a Cub Cadet competition garden
pulling tractor with a 50+ c.i. Modified, highly modified V-twin or a
turbo-charged 3-cylinder Diesel engine.
This particular carrier and
axles have a 6-3/4" outside diameter ring gear and 4 wheel studs in the
axle/wheel flanges. This axle assembly was used on 4-cylinder and some 6-cylinder
models of both the Pinto and Mustang II. The Ford Pinto, Mustang II, Mercury
Bobcat, and certain Mercury Capri models share interchangeable rear carriers
and axles. The interchangeability is a result of their shared platform and
components within Ford's subcompact car lineup of the 1970s. In this case,
the carriers and axles are largely interchangeable. You can identify this
version by the cover plate with bolts that is visible from the rear of the
vehicle. Although just as strong as the 7-1/4" Chrysler carrier and axles
mentioned above, the Pinto and Mustang II carrier and axles are actually
easier to install in a Cub Cadet transaxle because less machining is required,
and when machined and installed correctly, and used with the
ring gear snubber, they're just as strong the 7-1/4" Chrysler
unit. It should hold up well when used in a Cub Cadet competition garden
pulling tractor with a 50+ c.i. Modified, highly modified V-twin or a
turbo-charged 3-cylinder Diesel engine.
The 6-3/4" carrier and axles from certain models of a 1968-70 Ford Falcon, 1968-70 Ford LTD, 1977-79 Ford LTD II, 1970 Ford Maverick, 1968-70 Ford Mustang, 1974-78 Ford Mustang II, 1971-78 Ford Pinto, 1968-70 Ford Ranchero, 1968-70 Ford Torino, 1975-78 Mercury Bobcat, 1960-68 Mercury Comet, 1968-70 Mercury Cougar, 1968-76 Mercury Montego and 1978 Mercury Zephyr, including various other models not listed with a 4 cylinder or small 6 cylinder engine. The rear end is of the integral differential type, splines are smaller in diameter than the entire length of the axles, it has 6-3/4" diameter ring gear, 8 bolts on the cover, and the car originally came with a 4 cylinder or small 6 cylinder engine. And it's not the later model full size "Mustang" with a V8 engine, but rather the smaller body size "Mustang II" with a 4 cylinder engine. Also, certain Mustang II's came with an 8" diameter ring gear rear end with a welded-on cover and removable differential carrier, which would be more difficult to install in a Cub Cadet garden tractor transaxle because both the carrier and axles are much bigger.
Ford Pintos from 1971 to 1976 with a 4-cylinder engine used the 6-3/4" ring and pinion gears. Other Ford vehicles from the era also shared the 6-3/4" rear axle, including: 1965 Falcon and Mustang, 1974-1976 Mustang, 1979 Mustang (some four- and six-cylinder models) and the 1979-1982 Fairmont. The Mercury Bobcat also used a 6-3/4" ring and pinion gear for most of its production run, from 1974 through 1980.
The 6-3/4" ring and pinion gears were used in the Ford Mustang II from 1974 to 1978. This rear end was typically installed in models equipped with the 4-cylinder and some 6-cylinder engines. The easiest way to determine if a Mustang II has the smaller 6-3/4" rear end is to look at the differential from the rear of the car. 6-3/4" rear end: If the integral carrier differential has a removable, bolt-on cover, with visible bolts around its circumference, it is a 6-3/4" axle. If the differential cover is welded-on and the third member (or "pumpkin") is installed from the front, it's a Ford 8" rear end, which much bigger than the 6-3/4" rear end. Although an 8" or even a 9" Ford carrier and axles will also fit in a Cub Cadet garden tractor transaxle, a lot of machining is required. Contact Chuck or Kevin Vogel of Vogel Manufacturing for details on this.
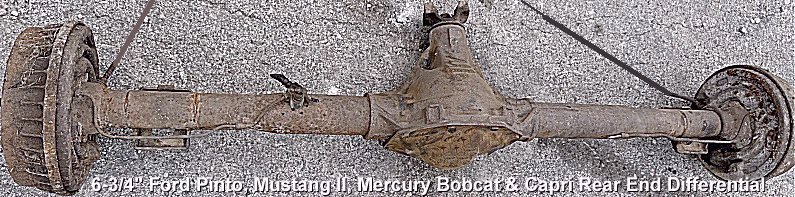


The below Ê was written on 01/19/02 by Jim Williams (jrwilliams@go-concepts.com (Jim Williams)) This is his experience with a Ford Pinto rear end.
| Hi folks. As for the year of the Pinto rear end, it was already out of
the car and they thought it was a '76? The axles were 1-1/8 inch at the splines.
To install the ring gear I had to machine the long end of the carrier for
the ring gear to fit. The Pinto ring gear faced the other direction on the
short end of the carrier. I had to do some clean up machining on the ring
gear on the mating surface's to get a machine fit, the bolt holes matched
and I used grade 8 cap bolts, I choose to use Allen head bolts and self locking
nuts.
I had to put the carrier and ring gear in unbolted as the carrier is longer and they would not fit inside bolted together I used the Pinto bearing for two reasons, 1- they are bigger than the Cub's and 2- the carrier housing was not thick enough where the bearing fit to turn down to fit the Cub bearings. We turned the inside of the bearing cups so we could get the Pinto bearings in plus I had to make the bearing cup on the long end of the carrier shorter as there was not enough meat on the carrier to set the bearing closer to the ring gear. Also machined the cup deeper, on the long end and due to the deeper bearings they are inside of the hole in the transsexual so the cup is stronger there due to the position of the cup. Had to use extra shims to get the right gear lash. I also made a cup plate of steel and bolted it on the outside of the short end of carrier cup to keep the bearing cup from breaking under stress. I also made the hole bigger in the axle housing as the axles were bigger and welded plates to the housings and installed wheel seals. I used a self aligning bearing plate with locking screw's instead of axle bushings and I made a small flat spot on the axles so as to lock the bearing plate to the axle. The bearing plates have grease fittings. I am well pleased with my setup and the tractor at 1150 lbs. rolls with very little effort due to the bearings on the axles. The axle flange's are Cubs and I cut the flange's off and machine a hole in the center and machined a shoulder on the axle so as to be able to weld the flange on both sides and also true up the flange's. I installed some wheel studs in the flange's instead of the Cub axle bolts. If anyone have any questions let A-1 Miller's know, I didn't think to take any photos. Hope this helps.
Information about which model of the Pinto rear end is best to use in the IH Cub Cadet garden tractor transaxle. (Created 11/14/01)
I did not machine the Pinto differential carrier to make it shorter. It seemed to A-1 Miller's that this would make the bearing surface area about 1/8" thinner due to the fact that the farther you go towards the ring gear the larger the hole becomes. I machined the bearing cup .900" on the long end of the differential, to make the bearing race go farther back into the cup. See photo #1. This made the area on the bearing cup that keeps the bearing from pushing out very thin. I then used a 3/8" thickness steel plate over the flange to give it support. See photo #2. This cup is on the opposite side of the ring gear, so there should not be much pressure pushing it out. When shimming the backlash, I had to remove all of the shims from the bearing cup on the ring gear side. I didn't use a dial indicator to check the backlash, but I think it will be okay. If I decide to move the ring gear closer to the pinion, I would have to add a shim behind the differential bearing or machine the flange on the bearing cup. By not shortening the differential, you must put the differential and ring gear in separate and bolt it together inside the rear end. - Todd O'Neill - My e-mail address is: oneills@svs.net (Todd O'Neill) |
How to Machine and Install a Pinto Carrier and Axles to Fit in a Cub Cadet Garden Tractor Transaxle -
As always, for trouble-free service, take your time when machining any rear end for use in a Cub Cadet garden tractor. Measure the parts/clearances with extreme accuracy before final installation.
Machine the Carrier for Proper Fit:
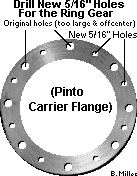 The
Cub Cadet garden tractor ring gear fastens on the opposite side of the flange
where the Pinto ring gear originally went. Don't use the original Pinto
ring gear bolt holes in the flange to fasten the Cub Cadet ring gear to.
They're too big and they don't line up properly. Also, the ring gear could
slip and/or break when under severe pressure if the Pinto ring gear holes
are used. Instead, align the ring gear on the flange so the holes are halfway
between the Pinto bolt holes, and clamp the ring gear on the flange. Now
drill new 5/16" holes into the flange (it's just soft metal) through the
ring gear holes for perfect alignment.
The
Cub Cadet garden tractor ring gear fastens on the opposite side of the flange
where the Pinto ring gear originally went. Don't use the original Pinto
ring gear bolt holes in the flange to fasten the Cub Cadet ring gear to.
They're too big and they don't line up properly. Also, the ring gear could
slip and/or break when under severe pressure if the Pinto ring gear holes
are used. Instead, align the ring gear on the flange so the holes are halfway
between the Pinto bolt holes, and clamp the ring gear on the flange. Now
drill new 5/16" holes into the flange (it's just soft metal) through the
ring gear holes for perfect alignment.
 Use
5/16" diameter grade 8 or stainless steel fine thread bolts with a 3/4" shoulder,
split lock washers and grade 8 nuts to secure the ring gear to the flange.
Torque the bolts to 35 ft. lb. This may seem kind of tight for 5/16" bolts,
but they must be this tight to prevent the ring gear from slipping and possibly
breaking.
Use
5/16" diameter grade 8 or stainless steel fine thread bolts with a 3/4" shoulder,
split lock washers and grade 8 nuts to secure the ring gear to the flange.
Torque the bolts to 35 ft. lb. This may seem kind of tight for 5/16" bolts,
but they must be this tight to prevent the ring gear from slipping and possibly
breaking.
 The flange on the Pinto carrier
is too large for the inside of the Cub Cadet ring gear (next to the gear
teeth) to fit, so the outer edge will need to be turned down (precision machined
in a lathe) exactly to 5.705". Don't machine it any smaller, or the
ring gear will be too loose on the carrier and not turn true with the carrier.
See photo to the right -> (IMPORTANT: If you
don't feel comfortable using a metal lathe, please consult a professional
and experienced machinist with a lathe.)
The flange on the Pinto carrier
is too large for the inside of the Cub Cadet ring gear (next to the gear
teeth) to fit, so the outer edge will need to be turned down (precision machined
in a lathe) exactly to 5.705". Don't machine it any smaller, or the
ring gear will be too loose on the carrier and not turn true with the carrier.
See photo to the right -> (IMPORTANT: If you
don't feel comfortable using a metal lathe, please consult a professional
and experienced machinist with a lathe.)
Machine the Axles for Proper Fit:
The large part of the axle will
need to be machined down to 1.125" (like the Chrysler axles), then in the
end of each [Cub Cadet] axle housing, use either a 1.128" I.D. x 1" length
bronze bushing or a Torrington needle bearing # B-1816 or equivalent (made
for a 1.125" diameter shaft) and the oil seal for the axle housing is a National
# CR11734 or equivalent (for a 1.125" diameter shaft). It doesn't matter
which brand of bushings, bearings or oil seals are used, just as long as
they're the right size.
NOTE: If you don't want to use the original bronze bushings, and if you wish to install needle bearings for less friction, you will need to remove the bronze bushings and the axle housings will need to be bored to accept the needle bearings. To do this, you'll need to measure the outside diameter of the needle bearing housing, then bore the axle housings .003" smaller for a press fit. Or, look for another set of axle housings off a later model Cub Cadet with the [1" I.D.] needle bearings already installed.
Fabricate
two new wheel flanges, or in the lathe (with a self-centering 3-jaw chuck),
machine the weld from the Cub Cadet axles next to the wheel flange, then
press the flanges onto the Pinto axles. True up each hub (in the lathe with
a 3-jaw chuck), then weld them onto the axles. For strength and durability,
weld each side of the hub. Discard the Cub Cadet axles, or keep them for
future use in a stock tractor. FYI - we've always used mild steel wire
welder to weld the wheel flanges to the axles. I weld them on both sides
of each flange and never had one break loose.
Now,
you need a couple of steel
locking set screw shaft collars to retain the axles in
the rear end. These collars measure 1" I.D. x 1-5/8" O.D. x 5/8" in thickness
and they have an Allen set screw. Be sure to install a hardened, heat-treated
washer between the collar and housing to prevent the collar from wearing
against the rough casting inside the housing.
 Drill
a small hole in each axle housing exactly 1-1/2" from the end of the housings,
and cut threads in each hole for either a very short 5/16" bolt or a
1/8" NPT Allen pipe plug. These holes will allow access
to the set screw in the collars. The short bolt or Allen pipe plug will block-off
the drilled holes in the housings to prevent dust/dirt from entering them
and to prevent internal oil from exiting the housings. Leave the original
Cub Cadet bronze bushings or needle bearings and oil seals intact, or install
new seals to prevent a possible oil leak. See the animated drawing below
for a better explanation. There's no need to install a grease fitting
in the holes because the oil in the transaxle will provide adequate lubrication
for the axle bushings or bearings.
How To Professionally
Cut New Threads or Clean Out/Straighten Already Existing Threads
Drill
a small hole in each axle housing exactly 1-1/2" from the end of the housings,
and cut threads in each hole for either a very short 5/16" bolt or a
1/8" NPT Allen pipe plug. These holes will allow access
to the set screw in the collars. The short bolt or Allen pipe plug will block-off
the drilled holes in the housings to prevent dust/dirt from entering them
and to prevent internal oil from exiting the housings. Leave the original
Cub Cadet bronze bushings or needle bearings and oil seals intact, or install
new seals to prevent a possible oil leak. See the animated drawing below
for a better explanation. There's no need to install a grease fitting
in the holes because the oil in the transaxle will provide adequate lubrication
for the axle bushings or bearings.
How To Professionally
Cut New Threads or Clean Out/Straighten Already Existing Threads

Advertisement: (Prices are subject to change without notice.)
| Click here to contact A-1 Miller's Performance Enterprises to place an order, send your parts for repairing, and/or for FREE professional and honest technical customer service assistance and support and payment options. Please contact A-1 Miller's if you need a part or parts, or service(s) performed that's not listed or mentioned in this website. |
Bronze Bushings, Oil Seals and
Locking Shaft Collar Kit for Retaining
Ford Pinto Axles in 1" IH Cub Cadet Garden Tractor Axle Housings. Length
of axles must be turned down to 1.1875". Bushing dimensions: 1-3/16" I.D.
x 1-1/2" O.D. x 1" length. Oil seal dimensions: 1-3/16" I.D. x 1-11/16" O.D.
x 1/4" thickness. Axle housings will need to be precision machined to accept
these bushings and seals. Collar dimensions: 1-3/16" I.D. x 2" O.D. w/Set
Screw. Collar made of mild steel. Bushings and seals same as above. NOTE:
To prevent premature wear to bushings and seals, apply clean motor oil, gear
oil or grease in bushings and seal lip and on axles before installing.
|
Remember, when installing an automotive rear end in a Cub Cadet garden tractor, it's important to install a steel (3-bolt) flange on the side of the transaxle that's closest to the ring gear (the right side, as viewed when sitting on the tractor). The reason for this is because under pulling stress, the pinion gear pushes against the ring gear. And the only thing keeping them together is the original 3-bolt cast iron flange, which could break. Or better yet, install 2 steel machined flanges, one for each side. Midwest Super Cub sells machined flanges for the Chrysler carrier. When using a Pinto carrier, install an 1/8" thickness steel plate over the original flange that's closest to the ring gear.
Torque all the 3/8" transaxle bolts to 24 ft. lbs., torque all the 5/16" bolts to 17 ft. lbs., and torque the 7/16" overdrive gear bolt and pinion nut to 75 ft. lbs. each. See below for specific torque values.
- Identification and Torque Specs of Most Commonly Used Grades of Bolts -
| Hardness è | No lines = Grade 3
 |
3 lines = Grade 5
 |
6 lines = Grade 8
 |
Stainless Steel / Special Alloy |
| Bolt Size â | Material: Low Carbon Steel. Tensile Strength: 85,000 p.s.i. (Low Strength) | Material: Medium Carbon Steel, Tempered. Tensile Strength: 120,000 p.s.i. (Medium Strength) | Material: Medium Carbon Alloy Steel, Quenched and Tempered. Tensile Strength: 150,000 p.s.i. (High Strength) | 18-8 [304] Stainless Steel Tensile Strength: 130,000 p.s.i. |
1/4-20 (C) 1/4-28 (F) 5/16-18 (C) 5/16-24 (F) 3/8-16 (C) 3/8-24 (F) 7/16-14 (C) 7/16-20 (F) 1/2-13 (C) 1/2-20 (F) 9/16-12 (C) 9/16-18 (F) 5/8-11 (C) 5/8-18 (F) 3/4-10 (C) 3/4-16 (F) |
70 in. lb. / 6 ft. lb. 85 in. lb. / 7 ft. lb. 150 in. lb. / 13 ft. lb. 165 in. lb. / 14 ft. lb. 260 in. lb. / 22 ft. lb. 300 in. lb. / 25 ft. lb. ------------- 35 ft. lb. ------------- 45 ft. lb. ------------- 50 ft. lb. ------------- 70 ft. lb. ------------- 75 ft. lb. ------------ 100 ft. lb. ------------ 110 ft. lb. ------------ 140 ft. lb. ------------ 150 ft. lb. ------------ 200 ft. lb. |
115 in. lb. / 10 ft. lb. 140 in. lb. / 12 ft. lb. 250 in. lb. / 21 ft. lb. 270 in. lb. / 23 ft. lb. ------------- 35 ft. lb. ------------- 40 ft. lb. ------------- 55 ft. lb. ------------- 75 ft. lb. ------------- 80 ft. lb. ------------ 105 ft. lb. ------------ 125 ft. lb. ------------ 165 ft. lb. ------------ 180 ft. lb. ------------ 230 ft. lb. ------------ 245 ft. lb. ------------ 325 ft. lb. |
165 in. lb. / 14 ft. lb. 200 in. lb. / 17 ft. lb. 350 in. lb. / 29 ft. lb. ------------ 30 ft. lb. ------------ 50 ft. lb. ------------ 60 ft. lb. ------------ 80 ft. lb. ------------ 105 ft. lb. ------------ 115 ft. lb. ------------ 165 ft. lb. ------------ 175 ft. lb. ------------ 230 ft. lb. ------------ 260 ft. lb. ------------ 330 ft. lb. ------------ 350 ft. lb. ------------ 470 ft. lb. |
165 in. lb. / 14 ft. lb. 200 in. lb. / 17 ft. lb. 350 in. lb. / 29 ft. lb. ------------ 35 ft. lb. ------------ 58 ft. lb. ------------ 69 ft. lb. ------------ 98 ft. lb. ------------ 110 ft. lb. ------------ 145 ft. lb. ------------ 160 ft. lb. ------------ 200 ft. lb. ------------ 220 ft. lb. ------------ 280 ft. lb. ------------ 310 ft. lb. ------------ 490 ft. lb. ------------ 530 ft. lb. |
How to Install New Rear Axle Bushings or Needle Bearings and Oil Seals in a Cub Cadet Garden Tractor -
The following is how to install new rear axle bushings
and oil seals in the International Cub Cadet "Original" garden tractor. (They're
different than later model Cub Cadet garden tractors.) (This is much
easier to do on a platform
work table.)
|
The following is how to install new rear axle bushings or needle bearings
and oil seals in a later model IH Cub Cadet garden tractor. The same applies
to all hydrostatic and clutch drive models. (This is much easier to do
on a platform work table.)
|
How to Make a Hydrostatic Drive Garden Tractor a Competitive Pulling Tractor - [Top of Page]

 Replace the OEM Cub Cadet Charge Pump Relief Spring
(by-pass/pressure relief spring) with one that's twice as stiff or much stiffer
than the original so when the tractor (hydrostatic system) is under a severe
strain, oil pressure will not by-pass the hydraulic motor and return or circulate
back to the hydraulic pump. In other words, doing this will allow much more
oil pressure to be applied to the hydraulic motor. On Cub Cadet garden tractor
models with a PORTED pump, the Charge Pump Relief Spring is located under
the plug on the LEFT SIDE of the hydrostatic pump housing. And on NON-PORTED
pumps, the spring is located under the plug in the CENTER of the hydrostatic
pump housing. See photos below Ê. Also,
the use of [heavier velocity] SAE 30 weight hydraulic oil will help increase
the pressure. And the tractor will definitely need a healthy or bigger engine,
preferably one that's built to the max to increase the torque.
Replace the OEM Cub Cadet Charge Pump Relief Spring
(by-pass/pressure relief spring) with one that's twice as stiff or much stiffer
than the original so when the tractor (hydrostatic system) is under a severe
strain, oil pressure will not by-pass the hydraulic motor and return or circulate
back to the hydraulic pump. In other words, doing this will allow much more
oil pressure to be applied to the hydraulic motor. On Cub Cadet garden tractor
models with a PORTED pump, the Charge Pump Relief Spring is located under
the plug on the LEFT SIDE of the hydrostatic pump housing. And on NON-PORTED
pumps, the spring is located under the plug in the CENTER of the hydrostatic
pump housing. See photos below Ê. Also,
the use of [heavier velocity] SAE 30 weight hydraulic oil will help increase
the pressure. And the tractor will definitely need a healthy or bigger engine,
preferably one that's built to the max to increase the torque.
 The hydrostatic drive unit will
also need a fan mounted on the driveshaft to keep the unit cool and prevent
wear to the unit from excessive heat. Plastic fan blades tend to crack and
break off after some time from heat being transferred from the hydro unit
when the engine is turned off. But
metal fans (steel or aluminum) seem to last forever and
heat from the hydro unit has no effect on them. And no Cub Cadet garden tractor
originally came from the factory with a
metal fan on the driveshaft. So if you want to use a
metal fan on the driveshaft, chance are, will need to be
installed with the use of a
WELDAHUB hub adapter of the appropriate size, or some other
kind of hub adapter. Metal fans and WELDAHUB hub adapters of various sizes
are available online and at most hardware stores, and farm and home stores.
I've adapted a metal fan for use in a Cub Cadet and John Deere garden tractor
before. It is possible and it works great!
The hydrostatic drive unit will
also need a fan mounted on the driveshaft to keep the unit cool and prevent
wear to the unit from excessive heat. Plastic fan blades tend to crack and
break off after some time from heat being transferred from the hydro unit
when the engine is turned off. But
metal fans (steel or aluminum) seem to last forever and
heat from the hydro unit has no effect on them. And no Cub Cadet garden tractor
originally came from the factory with a
metal fan on the driveshaft. So if you want to use a
metal fan on the driveshaft, chance are, will need to be
installed with the use of a
WELDAHUB hub adapter of the appropriate size, or some other
kind of hub adapter. Metal fans and WELDAHUB hub adapters of various sizes
are available online and at most hardware stores, and farm and home stores.
I've adapted a metal fan for use in a Cub Cadet and John Deere garden tractor
before. It is possible and it works great!

Removing a Rear Wheel from the Axle on a Riding Mower or Lawn Tractor (when the wheel slides on the axle) - (Added 6/11/15) [Top of Page]
If soaking the axle with penetrating oil overnight won't loosen the wheel, may have to use an oxy-acetylene welding torch to heat the hub. If this won't loosen the wheel from the axle, raise the rear of the rider in the air, and use a long steel rod and a big hammer from the inside of the frame of the rider to drive the wheel off the axle. But doing this could cause the axle retaining snap ring inside the transaxle to become dislodged. If this happens, the transaxle will need to be removed from the tractor (this is much easier to do on a platform work table), disassembled and the snap ring reinstalled on the axle, or install a new snap ring. (Been there, done that... several times... had no choice.... only way to remove the wheel.) It'll be nice if manufacturers would apply water-proof grease on the axles before installing the wheels. It'll make life much easier for the repairman.
Adapting a Motorcycle Engine in a Garden Tractor for Pulling - (Added 8/3/16) [Top of Page]
If you plan to pull with chain drive motorcycle engine, it'll be best to run the chain back to the input shaft on a heavy duty right angle gearbox mounted midway in the garden tractor frame, then use another chain/sprocket to connect to the output shaft on the garden tractor transaxle's input shaft & use the clutch in the motorcycle engine to propel the vehicle. But if you plan to use a shaft-drive motorcycle engine, connect the driveshaft to the input shaft on a heavy duty right angle gearbox, then use a chain/sprocket to connect to the output shaft on the garden tractor transaxle's input shaft & use the clutch in the motorcycle engine to propel the vehicle. By using the motorcycle's transmission gears, plus the transmission gears in the garden tractor, this will give you multiple choices of which gearing to pull in.
 To place an order, send your item(s) for repairing, and/or
for customer service assistance, and FREE honest and accurate technical support,
please contact: A-1 Miller's Performance Enterprises, 12091 N Route B,
Hallsville, MO (Missouri) 65255-9604 USA. Please call in your order or send
an email with a list parts you need and your contact information.
To place an order, send your item(s) for repairing, and/or
for customer service assistance, and FREE honest and accurate technical support,
please contact: A-1 Miller's Performance Enterprises, 12091 N Route B,
Hallsville, MO (Missouri) 65255-9604 USA. Please call in your order or send
an email with a list parts you need and your contact information.
 Phone: 1-573-881-7229 (cell;
call, text or leave voicemail). Please call Monday-Friday, 9am to 5pm, Central
time zone, except holidays. If no answer, please try again later.
Phone: 1-573-881-7229 (cell;
call, text or leave voicemail). Please call Monday-Friday, 9am to 5pm, Central
time zone, except holidays. If no answer, please try again later.
 E-mail:
pullingtractor@aol.com. A-1 Miller's
shop is open to the public Monday-Friday, 9am to 5pm, Central time zone,
with an appointment on weekends, except holidays. If you're the kind of person
who don't trust delivery/shipping companies (mis)handling your high-dollar
and fragile merchandise, you can make the long drive to A-1 Miller's new
shop (click image to the right) to personally purchase parts, or drop off
and/or pick up your carburetor, clutch assembly, and/or other parts for repairing
and/or rebuilding. Or visit our new shop to drop off your parts. Please contact
us before coming so we'll be at our shop waiting for your arrival. When you
visit our shop, you will be dealing directly with the owner for the best
customer service. "The road to a [trusted] friend's house (or shop) is
never long." Don't sacrifice quality workmanship for distance.
Payment Options below.
Photos
of our new building/shop are posted here!
12091 N Route B, Hallsville, MO - Google Maps.
[Return To Previous Paragraph, Section
or Website]
E-mail:
pullingtractor@aol.com. A-1 Miller's
shop is open to the public Monday-Friday, 9am to 5pm, Central time zone,
with an appointment on weekends, except holidays. If you're the kind of person
who don't trust delivery/shipping companies (mis)handling your high-dollar
and fragile merchandise, you can make the long drive to A-1 Miller's new
shop (click image to the right) to personally purchase parts, or drop off
and/or pick up your carburetor, clutch assembly, and/or other parts for repairing
and/or rebuilding. Or visit our new shop to drop off your parts. Please contact
us before coming so we'll be at our shop waiting for your arrival. When you
visit our shop, you will be dealing directly with the owner for the best
customer service. "The road to a [trusted] friend's house (or shop) is
never long." Don't sacrifice quality workmanship for distance.
Payment Options below.
Photos
of our new building/shop are posted here!
12091 N Route B, Hallsville, MO - Google Maps.
[Return To Previous Paragraph, Section
or Website]
Payment Options, and We Ship to Canada and
Worldwide 
Item(s) in a package or cushioned envelope weighing less than 1 lb. is sent
by US Postal Service Airmail Letter Post for a 4-7 days delivery. Packaged
item(s) weighing over 1 lb. and up to 66 lb. is sent by US Postal Service
Airmail Parcel Post for a 4-10 days delivery. I cannot use the US Postal
Services' Flat Rate Priority Mail envelopes and boxes to ship outside U.S.
territories. Item(s) weighing over 67 lbs. or more is sent by FedEx Ground
or equivalent services. We try to keep our shipping cost to customers within
reason. Therefore, we don't ship our products in a fancy-looking package
with our company name and/or logo on it because most customers will just
toss it in the trash after they remove the contents. And being there is no
USPS tracking number outside the US, all I can do is make sure I write your
address correctly on the customs form and on your package.
My websites are not set up to process orders and accept payments. Therefore, I will need your name, complete and correct postal mailing address and phone number. And for payment options, I accept cash (in person), USPS Postal Money Orders, cashier's checks and business checks. I do not accept credit/debit cards. Or to make a payment to me through PayPal, please click this link: https://www.paypal.com (username: pullingtractor@aol.com). And please use PayPal's "Friends and Family" option to ensure that I receive the full amount or add 3% to the total amount to cover PayPal's processing surcharge. I also accept Venmo (username: Pullingtractor) and Cash App (username: pullingtractor) please add 2% for Cash App's surcharge as well). And be sure to mention a description of what the payment is for with your full name, postal address, phone number and email address. If sending a money order or cashier's check, please include a note in the envelope with your name, complete mailing address, phone number, email address and a description of what the payment is for. I'll make a note of your order when I have all your information, and I may have to order some of the parts on your list, which should take a few days to come in, but I will send everything to you as soon as the parts are in stock after I receive your payment.


Return To Previous Website | Top of Page | Copyright © 1996-Present. This website created, designed and maintained by A-1 Miller's Performance Enterprises
 Oil Seal. Fits IH-built
Cub Cadet Garden Tractor Cast Iron Housing Creeper Drive and fits IH-built
Cub Cadet Garden Tractor Hydrostatic Drive Pump on models 105, 107, 109,
123, 125, 127, 129, 147, 149, 680, 682, 782, 782D, 784, 882, 982, 984, 986,
1210, 1250, 1282, 1340, 1450, 1512, 1650, 1810, 1811, 1812, 1860, 1862, 1882,
2082, 2182 and 2284. Also fits various automotive 4WD transfer case shifter
shaft. IMPORTANT: Apply oil or grease inside seal and on shaft before
installing. The oil seals listed below are the exact same size. Just different
part numbers and prices. Dimensions: .625" I.D. x 1.1275" O.D. x .250" height.
Oil Seal. Fits IH-built
Cub Cadet Garden Tractor Cast Iron Housing Creeper Drive and fits IH-built
Cub Cadet Garden Tractor Hydrostatic Drive Pump on models 105, 107, 109,
123, 125, 127, 129, 147, 149, 680, 682, 782, 782D, 784, 882, 982, 984, 986,
1210, 1250, 1282, 1340, 1450, 1512, 1650, 1810, 1811, 1812, 1860, 1862, 1882,
2082, 2182 and 2284. Also fits various automotive 4WD transfer case shifter
shaft. IMPORTANT: Apply oil or grease inside seal and on shaft before
installing. The oil seals listed below are the exact same size. Just different
part numbers and prices. Dimensions: .625" I.D. x 1.1275" O.D. x .250" height.
 Small Size Neoprene Rubber
O-Ring Seal. Fits in groove of shift lever on IH-built and MTD-built garden
tractor creeper drives. IMPORTANT: Apply oil or grease before installing
in creeper drive. Dimensions: 1/4" I.D. x 3/8" O.D. x 1/16" diameter. High
quality aftermarket. Replaces discontinued Cub Cadet part # 721-3012.
$1.00 each, plus shipping & handling.
Small Size Neoprene Rubber
O-Ring Seal. Fits in groove of shift lever on IH-built and MTD-built garden
tractor creeper drives. IMPORTANT: Apply oil or grease before installing
in creeper drive. Dimensions: 1/4" I.D. x 3/8" O.D. x 1/16" diameter. High
quality aftermarket. Replaces discontinued Cub Cadet part # 721-3012.
$1.00 each, plus shipping & handling. Medium Size Neoprene Rubber
O-Ring Seal. Fits on outer shift lever on IH-built cast iron housing creeper
drive. IMPORTANT: Apply oil or grease before installing in creeper
drive. Dimensions: 3/8" I.D. x 1/2" O.D. x 1/16" diameter. High quality
aftermarket. Replaces discontinued Cub Cadet part # 721-3008. $1.00
each, plus shipping & handling.
Medium Size Neoprene Rubber
O-Ring Seal. Fits on outer shift lever on IH-built cast iron housing creeper
drive. IMPORTANT: Apply oil or grease before installing in creeper
drive. Dimensions: 3/8" I.D. x 1/2" O.D. x 1/16" diameter. High quality
aftermarket. Replaces discontinued Cub Cadet part # 721-3008. $1.00
each, plus shipping & handling. Coiled/Spiral Roll Pin.
Fits splined carrier in IH Cub Cadet creeper drive and International Cub
Cadet "Original" garden tractor driveshaft splined direct drive coupling.
3/16" diameter x 3/4" length.
Coiled/Spiral Roll Pin.
Fits splined carrier in IH Cub Cadet creeper drive and International Cub
Cadet "Original" garden tractor driveshaft splined direct drive coupling.
3/16" diameter x 3/4" length.
 Coiled/Spiral Roll Pin.
Fits splined carrier in IH Cub Cadet creeper drive and behind main pressure
spring in Cub Cadet Original driveshaft (OEM 3/32" hole must be drilled out
[enlarged] to 3/16"). 3/16" diameter x 1" length.
Coiled/Spiral Roll Pin.
Fits splined carrier in IH Cub Cadet creeper drive and behind main pressure
spring in Cub Cadet Original driveshaft (OEM 3/32" hole must be drilled out
[enlarged] to 3/16"). 3/16" diameter x 1" length.
 Creeper Drive Mounting Gasket.
Fits all IH-built Cub Cadet Garden Tractors.
Creeper Drive Mounting Gasket.
Fits all IH-built Cub Cadet Garden Tractors.
 Creeper Drive Mounting and
End Plate Gasket. Fits MTD-built Cub Cadet Garden Tractors. (2 required.)
Creeper Drive Mounting and
End Plate Gasket. Fits MTD-built Cub Cadet Garden Tractors. (2 required.)
 17mm External Bearing Retainer
Compression/Snap Ring. Fits OEM Cub Cadet and aftermarket 17mm (.667") diameter
input pinion shaft with an integrated 10, 11, 12, 13, 14 or 15 tooth drive
gear. Made of high strength carbon steel. High quality aftermarket. Replaces
discontinued Cub Cadet part #'s IH-384709-R1 and 716-0143.
17mm External Bearing Retainer
Compression/Snap Ring. Fits OEM Cub Cadet and aftermarket 17mm (.667") diameter
input pinion shaft with an integrated 10, 11, 12, 13, 14 or 15 tooth drive
gear. Made of high strength carbon steel. High quality aftermarket. Replaces
discontinued Cub Cadet part #'s IH-384709-R1 and 716-0143.

 Replacement One Piece Input
Shaft with an Integrated Pinion Drive Gear for the 10%, 16%, 23% Overdrive
Gear Sets and 10% and 20% Underdrive Gear Sets. High quality aftermarket.
$105.00 each, plus shipping & handling.
Replacement One Piece Input
Shaft with an Integrated Pinion Drive Gear for the 10%, 16%, 23% Overdrive
Gear Sets and 10% and 20% Underdrive Gear Sets. High quality aftermarket.
$105.00 each, plus shipping & handling.
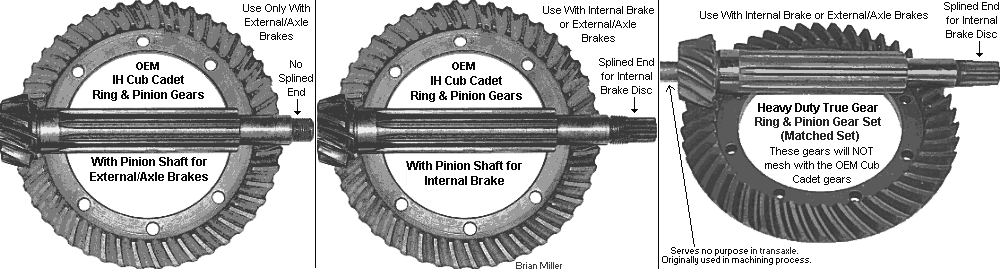
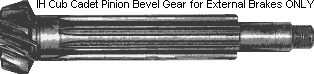 OEM IH Cub Cadet Pinion Countershaft
Bevel Gear for External (Axle) Brakes ONLY. (Shorter shaft w/o splines.)
Made of extremely hardened, heat-treated high quality steel. Used and in
excellent condition with no chipped or broken teeth. OEM Cub Cadet part #
IH-351531-R1. $50.00 each, plus shipping & handling. (When
available.)
OEM IH Cub Cadet Pinion Countershaft
Bevel Gear for External (Axle) Brakes ONLY. (Shorter shaft w/o splines.)
Made of extremely hardened, heat-treated high quality steel. Used and in
excellent condition with no chipped or broken teeth. OEM Cub Cadet part #
IH-351531-R1. $50.00 each, plus shipping & handling. (When
available.)
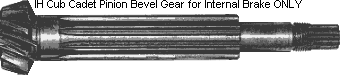 OEM IH Cub Cadet Pinion Countershaft
Bevel Gear for Internal Brake or External (Axle) Brakes. (Longer shaft
w/splines.) Made of extremely hardened, heat-treated high quality steel.
Used and in excellent condition with no chipped or broken teeth. No Cub Cadet
part number available. $50.00 each, plus shipping & handling.
(When available.)
OEM IH Cub Cadet Pinion Countershaft
Bevel Gear for Internal Brake or External (Axle) Brakes. (Longer shaft
w/splines.) Made of extremely hardened, heat-treated high quality steel.
Used and in excellent condition with no chipped or broken teeth. No Cub Cadet
part number available. $50.00 each, plus shipping & handling.
(When available.) MTD-Built Cub Cadet Garden Tractor
Two-Piece/Bolt-Together Cast Iron Fine Spline Differential Carrier Assembly.
Use with 1" or 30mm fine spline axles (listed below). Without ring gear.
Suitable for a Hot Stock class competition pulling tractor with 26x12.00-12
size tires with a 13" drawbar/hitch height. FYI - The bearings, ring gear
and spider gears in a thin-casting carrier will interchange with the
thick-casting carrier and MTD Cub Cadet fine spline carrier. Discontinued
Cub Cadet part # 717-3217.
MTD-Built Cub Cadet Garden Tractor
Two-Piece/Bolt-Together Cast Iron Fine Spline Differential Carrier Assembly.
Use with 1" or 30mm fine spline axles (listed below). Without ring gear.
Suitable for a Hot Stock class competition pulling tractor with 26x12.00-12
size tires with a 13" drawbar/hitch height. FYI - The bearings, ring gear
and spider gears in a thin-casting carrier will interchange with the
thick-casting carrier and MTD Cub Cadet fine spline carrier. Discontinued
Cub Cadet part # 717-3217.

 Needle-Roller Axle Bearings to replace damaged or worn 1" OEM
needle bearings in IH Cub Cadet garden tractor models 86, 104, 105, 106,
107, 108, 109, 123, 125, 128, 129, 147, 149, 169, 800, 1000, 1200, 1250,
1450 and 1650 axle housings. (All other models of Cub Cadet garden tractor
axle housings originally came with bronze bushings.) These needle bearings
are a direct replacement for the OEM IH Cub Cadet 1-5/16" O.D. axle needle
bearings. Can also be installed in the International Cub Cadet "Original"
garden tractor axle housings after machining with lubricating hole in bearing
aligned with OEM
Needle-Roller Axle Bearings to replace damaged or worn 1" OEM
needle bearings in IH Cub Cadet garden tractor models 86, 104, 105, 106,
107, 108, 109, 123, 125, 128, 129, 147, 149, 169, 800, 1000, 1200, 1250,
1450 and 1650 axle housings. (All other models of Cub Cadet garden tractor
axle housings originally came with bronze bushings.) These needle bearings
are a direct replacement for the OEM IH Cub Cadet 1-5/16" O.D. axle needle
bearings. Can also be installed in the International Cub Cadet "Original"
garden tractor axle housings after machining with lubricating hole in bearing
aligned with OEM  This was originally written
by Todd O'Neill. He had some problems installing a Ford Pinto rear end. Through
his investigation, he have found the following:
This was originally written
by Todd O'Neill. He had some problems installing a Ford Pinto rear end. Through
his investigation, he have found the following: