 Information about Kohler Cylinder
Heads
Information about Kohler Cylinder
Heads
Information about Kohler Cylinder
Heads
Information about Kohler Cylinder
Heads
 Available Soon - Detailed Illustrated Plans
on How to Construct Professional Pulling Sleds
Available Soon - Detailed Illustrated Plans
on How to Construct Professional Pulling Sleds
 and F
and F  keys on
your keyboard simultaneously to open the Find or Search dialog box in your
web browser. And being I have no
apprentice to update and pay for my websites so they'll
continue to be on the Internet, they will be removed forever when I'm no
longer around. Scroll down this website or click/tap the links below to
jump down to...
keys on
your keyboard simultaneously to open the Find or Search dialog box in your
web browser. And being I have no
apprentice to update and pay for my websites so they'll
continue to be on the Internet, they will be removed forever when I'm no
longer around. Scroll down this website or click/tap the links below to
jump down to...
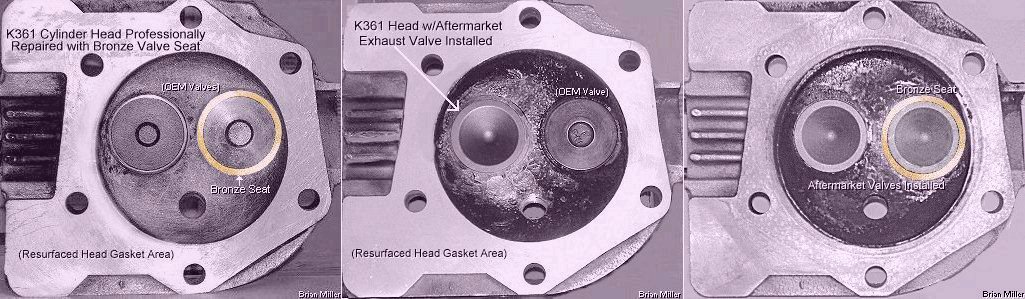
A-1 Miller's Professional Valve Seat Repair Service for Kohler Engine Model K361 Cylinder Head |
How to Permanently Fix a Warped Cylinder Head on an OHV Engine |
Identification of Kohler K-series and Magnum Single Cylinder Engine Cylinder Heads
Cylinder heads for the AIR-COOLED Kohler engine models K141, K160/K161, K181 and M8 - NOTE: If it's repairable and reusable, do not discard your cylinder head or other older Kohler engine parts. Most discontinued OEM Kohler parts in good, reusable, repairable or rebuildable condition are hard to find nowadays, and nothing works better than the original part(s) the engine is designed for.
 The cylinder head used on Kohler
K-series engine models K141, K160/K161,
KV161, K181 and Magnum M8.
The first air-cooled head was introduced in 1952 on the K141. Being there
are 14 different part numbers for these heads, they are virtually the same
with very little difference. The OEM Kohler part numbers for these heads
are: 230402-S, 230403-S, 230990-S, 231200-S, A-230770-S, 41 015 01-S, 41
015 02-S (most common), 41 015 04-S, 41 015 06-S, 41 015 07-S, 41 015 08-S
and 41 015 09-S. These heads are discontinued from Kohler. These heads should
not be milled in an attempt to raise the compression to increase engine power
output because the valves are already very close to the head when they are
at full lift. All that can be done to these heads is resurface it on a wide,
flat
belt- or disc-sander/grinder to remove any warpage
and restore flatness to prevent a blown or leaking head gasket. Remember
- always wear a
face mask or
air respirator mask to prevent from inhaling the sanding
and aluminum material, and do the repair job right the first time and it
won't have to be done again for a long time.
The cylinder head used on Kohler
K-series engine models K141, K160/K161,
KV161, K181 and Magnum M8.
The first air-cooled head was introduced in 1952 on the K141. Being there
are 14 different part numbers for these heads, they are virtually the same
with very little difference. The OEM Kohler part numbers for these heads
are: 230402-S, 230403-S, 230990-S, 231200-S, A-230770-S, 41 015 01-S, 41
015 02-S (most common), 41 015 04-S, 41 015 06-S, 41 015 07-S, 41 015 08-S
and 41 015 09-S. These heads are discontinued from Kohler. These heads should
not be milled in an attempt to raise the compression to increase engine power
output because the valves are already very close to the head when they are
at full lift. All that can be done to these heads is resurface it on a wide,
flat
belt- or disc-sander/grinder to remove any warpage
and restore flatness to prevent a blown or leaking head gasket. Remember
- always wear a
face mask or
air respirator mask to prevent from inhaling the sanding
and aluminum material, and do the repair job right the first time and it
won't have to be done again for a long time.
Cylinder heads for the vintage LIQUID-COOLED Kohler engine models L160/L161 and L181 -
 The vintage Kohler engine models
L160/L161 and L181 are a liquid-cooled version with the same combustion chamber
as Kohler's air-cooled engine models K141, K160/K161 and K181. Just like
with most automotive engines, these liquid-cooled engines require
anti-freeze/water mix with a water pump and radiator to maintain the engine
operating temperature. The L160/L161 and L181 engines were obviously used
in extreme heat desert-like conditions for long periods of time to prevent
overheating of the engine. The liquid-cooled Kohler engine model L160/L161
with specification numbers 4149F, 4150F, 4152E, 4166F, 4167F, 4168E, 4168G,
4168H, 4173E, 4192E, 4194F, 4195F, 4199G, 4199H, 41101F, 41109F, 4110F, 41117F,
41131F and 41137F are listed as generator (power plant) engines, and the
liquid-cooled Kohler engine model L181 with specification numbers 42583H,
42594H, 42597H, 42626H, 42723H, 42745H, 42746H are also listed as generator
(power plant) engines. These are very rare engines.
Go here to see a complete
Liquid-Cooled Kohler L160/L161 or L181 Engine. If anyone have information
or additional photos regarding these engines that they would like to share
in this website, please let me know
and I will post it/them in this article with your name for full credit.
The vintage Kohler engine models
L160/L161 and L181 are a liquid-cooled version with the same combustion chamber
as Kohler's air-cooled engine models K141, K160/K161 and K181. Just like
with most automotive engines, these liquid-cooled engines require
anti-freeze/water mix with a water pump and radiator to maintain the engine
operating temperature. The L160/L161 and L181 engines were obviously used
in extreme heat desert-like conditions for long periods of time to prevent
overheating of the engine. The liquid-cooled Kohler engine model L160/L161
with specification numbers 4149F, 4150F, 4152E, 4166F, 4167F, 4168E, 4168G,
4168H, 4173E, 4192E, 4194F, 4195F, 4199G, 4199H, 41101F, 41109F, 4110F, 41117F,
41131F and 41137F are listed as generator (power plant) engines, and the
liquid-cooled Kohler engine model L181 with specification numbers 42583H,
42594H, 42597H, 42626H, 42723H, 42745H, 42746H are also listed as generator
(power plant) engines. These are very rare engines.
Go here to see a complete
Liquid-Cooled Kohler L160/L161 or L181 Engine. If anyone have information
or additional photos regarding these engines that they would like to share
in this website, please let me know
and I will post it/them in this article with your name for full credit.
Kohler manufactured five different cylinder heads for the K241, M10, K301, M12, K321 and M14 K-series and Magnum engines through the years - NOTE: If it's repairable and reusable, do not discard your cylinder head or other older Kohler engine parts. Most discontinued OEM Kohler parts in good, reusable, repairable or rebuildable condition are hard to find nowadays, and nothing works better than the original part(s) the engine is designed for.
The First Generation Cylinder Head That Originally Came on the Early K241 Engine -
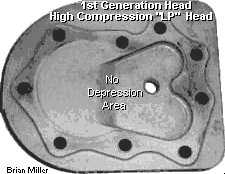 This cylinder head was manufactured
by Kohler from the early 1960s until 1971 and was available only on the engine
model K241 before engine serial number 3184999. It has a heart-shaped and
wedge-contoured combustion chamber and is now known as the high compression,
"LP head." The spark plug is centered in the combustion chamber. This particular
head was originally made for and came on the very early K241 engines. It'll
also work on the Magnum engine model M10, M12 engines and the early K321
engine with a 1-1/8" exhaust valve. But being the later K321 engines have
a larger exhaust valve (1-3/8"), the exhaust area in the head would need
to be machined out for use with the bigger exhaust valve. And because of
its high compression ratios, if this head is used on a K301 or K321 engine,
Premium, race gas, E-85 or methanol fuels must be used, or the engine will
overheat and wear out prematurely. The compression ratio is 7:1 when used
on a K241 and M10 and 8.6:1 when used on a K301 or M12. If this head was
used on a K321 and M14, it would yield a 9:1 compression ratio. And LP heads
did not come on nor will they fit the K341 engines. This head requires 2-1/4"
length bolts with no mounting bracket(s) under the bolt, and 2-1/2" length
bolts with [gas tank] mounting bracket or other bracket(s) under the bolt.
And due to early technology and design of the combustion chamber, the majority
of the expanding gases or combustion pressure is placed over the valves instead
of the piston, resulting in lower engine performance. The number embossed
on this head is 235461. Cub Cadet part # is IH-385303-R1. It is no longer
available from Kohler or new from any other source.
This cylinder head was manufactured
by Kohler from the early 1960s until 1971 and was available only on the engine
model K241 before engine serial number 3184999. It has a heart-shaped and
wedge-contoured combustion chamber and is now known as the high compression,
"LP head." The spark plug is centered in the combustion chamber. This particular
head was originally made for and came on the very early K241 engines. It'll
also work on the Magnum engine model M10, M12 engines and the early K321
engine with a 1-1/8" exhaust valve. But being the later K321 engines have
a larger exhaust valve (1-3/8"), the exhaust area in the head would need
to be machined out for use with the bigger exhaust valve. And because of
its high compression ratios, if this head is used on a K301 or K321 engine,
Premium, race gas, E-85 or methanol fuels must be used, or the engine will
overheat and wear out prematurely. The compression ratio is 7:1 when used
on a K241 and M10 and 8.6:1 when used on a K301 or M12. If this head was
used on a K321 and M14, it would yield a 9:1 compression ratio. And LP heads
did not come on nor will they fit the K341 engines. This head requires 2-1/4"
length bolts with no mounting bracket(s) under the bolt, and 2-1/2" length
bolts with [gas tank] mounting bracket or other bracket(s) under the bolt.
And due to early technology and design of the combustion chamber, the majority
of the expanding gases or combustion pressure is placed over the valves instead
of the piston, resulting in lower engine performance. The number embossed
on this head is 235461. Cub Cadet part # is IH-385303-R1. It is no longer
available from Kohler or new from any other source.
This Kohler cylinder head with the numbers 235461 embossed in it is designed for the K241, K301 and early K321 engines with the small (1-1/8") exhaust valve. To use this head on a newer K321 engine with the larger (1-3/8") exhaust valve, the valve shrouding area in the head will need to be milled out for adequate clearance.
NOTE: This particular head was originally designed many years ago ONLY for the K241 engine because these engines have low compression due to their small bore and short stroke. The only reason anyone would put one of these heads on a bigger engine today is to attempt to get more power out of it. Also, people found that the LP head worked better than a newer low compression head on an engine burning liquefied petroleum (propane) gas. LP gas is a high octane fuel (about 110-115 octane). Therefore, it burns more thoroughly and produces more power in a high compression engine. That's why these heads are known today as the "LP head." Also, the LP head, when used on any size engine including the K241, have been known to cause detonation (pinging) nowadays even with 93 octane Premium gas. That's why Kohler stopped making them. They replaced them with the "dished" head. Ê However, high octane race gas, E-85 or methanol fuels can be safely used with the LP head.
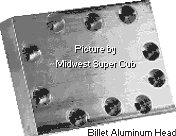
If you want to use an LP head on your engine, the genuine OEM Kohler LP head is no longer available from Kohler or any other source. They haven't been made since the early 1960s. They were discontinued when the K301 engine came into production, because this engine requires a lower compression head. So if you need an LP head, remember, they came only on the very early K241 engines equipped with the starter/generator and no indention on the side of the block for the upper mount gear starter. But if you can't find an LP head at all or for a reasonable price, what you could do is cast an aluminum head just like the LP head. A Kohler-replicated LP head can be CNC-machined from billet aluminum, but if you prefer a head that's close to the genuine product, first, you'll need an OEM LP head in good condition to use as a mold or pattern. For more information on this subject and a how-to video, click here: Melting Cans With The Mini Metal Foundry - YouTube.
The Second Generation Cylinder Head for Kohler Engine Models K241, K301 and K321 -
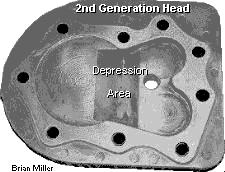 The second type of head manufactured
by Kohler has a heart-shaped and a depression area in the combustion chamber.
It has improved technology over the earlier LP head. Kohler engine engineers
made the depression area for a special reason and it helps engines to produce
more torque and horsepower than the LP head at any RPM. This head was installed
on Kohler's K241 and K301 engines, before the K321 engine went into production.
It's a good head. It flows good and with increased compression. The "hump"
directs the incoming air/fuel toward the piston at higher RPM.
The second type of head manufactured
by Kohler has a heart-shaped and a depression area in the combustion chamber.
It has improved technology over the earlier LP head. Kohler engine engineers
made the depression area for a special reason and it helps engines to produce
more torque and horsepower than the LP head at any RPM. This head was installed
on Kohler's K241 and K301 engines, before the K321 engine went into production.
It's a good head. It flows good and with increased compression. The "hump"
directs the incoming air/fuel toward the piston at higher RPM.
Unlike the sought-after, but misidentified LP head, the depression area places the majority of the expanding gases or combustion pressure over the piston instead over of the valves, which produces more engine power and torque. The spark plug is centered in the combustion chamber. It was lowered in compression and was made for both the K241 and K301 engines, but would not work on the K321 or M14 engine because of its' larger exhaust valve (it was manufactured before the K321 engine went into production) unless reduce the size of the exhaust valve on a K321 to a 1.125" (same as a K241 and K301) This can be accomplished by installing a valve seat insert in the block for the smaller valve. By the way - this type of head is not officially a "high compression head" because it has a depression in the combustion chamber. It is however, 'slightly higher' in compression than the newer style heads, but it's not a "high compression" or even an "LP head," but the next best to it. The compression ratio is 5.4:1 when used on a K241 and 6.6:1 when used on a K301. If this head was used on a K321 (the exhaust circumference area would need to be machined larger), it would yield a 7:1 compression ratio. By the way - Kohler no longer makes this type of head.
NOTE: The older head like this has the tall bolt hole bosses. And the newer head with the same combustion chamber and spark plug location have the bolt hole bosses lowered in the head. The shorter bosses allows air from the flywheel pass through the fins on the head with less blockage/restrictions for better cooling with less head warpage. The early heads with the tall bolt holes with no mounting brackets or plates under the bolt heads require 2-1/4" length bolts, and engines with a [gas tank] mounting bracket or other brackets/plates require 2-1/2" length bolts. The head with the recessed bosses require 3/4" tall spacers on the head bolts (and longer bolts) when using a gas tank bracket or other kind of mounting bracket. The reason Kohler redesigned the head with low bosses is so more air can flow over the head bolts instead of around the bosses for better cooling of the head.
The Third Generation Cylinder Head for Kohler Engine Models K241, K301 and K321 -
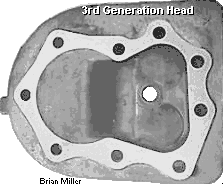 The third head manufactured
by Kohler has a low compression (depressed) D-shaped combustion chamber.
And unlike the sought-after, but misidentified LP head, the depression area
places the majority of the expanding gases or combustion pressure over the
piston instead over of the valves, which produces more engine power and torque.
The spark plug is centered in the combustion chamber. It'll work on the K241,
M10, K301, M12, K321 and M14 engines because the exhaust valve area was made
bigger. (It was manufactured when the K321 engine went into production.)
The compression ratio is 5:1 when used on a K241 or M10, 6.1:1 when used
on a K301 or M12, and 6.6:1 when used on a K321 or M14. This head requires
1-1/2" length bolts. The reason Kohler lowered the bolt hole bosses is to
allow more air to flow over the fins for better cooling of the engine. By
the way - Kohler no longer makes this type of head either. If you want to
use one of these, look for a good used one. They came on the later model
K241, K301 and K321 engines. OEM Kohler part # 237827-S.
The third head manufactured
by Kohler has a low compression (depressed) D-shaped combustion chamber.
And unlike the sought-after, but misidentified LP head, the depression area
places the majority of the expanding gases or combustion pressure over the
piston instead over of the valves, which produces more engine power and torque.
The spark plug is centered in the combustion chamber. It'll work on the K241,
M10, K301, M12, K321 and M14 engines because the exhaust valve area was made
bigger. (It was manufactured when the K321 engine went into production.)
The compression ratio is 5:1 when used on a K241 or M10, 6.1:1 when used
on a K301 or M12, and 6.6:1 when used on a K321 or M14. This head requires
1-1/2" length bolts. The reason Kohler lowered the bolt hole bosses is to
allow more air to flow over the fins for better cooling of the engine. By
the way - Kohler no longer makes this type of head either. If you want to
use one of these, look for a good used one. They came on the later model
K241, K301 and K321 engines. OEM Kohler part # 237827-S.
NOTE: The older head like this has the tall bolt hole bosses. And the newer head with the same combustion chamber and spark plug location has the bolt hole bosses recessed in the head for better cooling. The early heads with the tall bolt holes with no mounting brackets or plates under the bolt heads require 2-1/4" length bolts, and engines with a [gas tank] mounting bracket or other brackets/plates require 2-1/2" length bolts. The head with the recessed bosses require 3/4" tall spacers on the head bolts (and longer bolts) when using a gas tank bracket or other kind of mounting bracket. The reason Kohler redesigned the head with low bosses is so more air can flow over the head bolts instead of around the bosses for better cooling of the head.
The Fourth Generation and Newest Style Cylinder Head for Kohler Engine Models K241, K301, K321, M10, M12 and M14 -
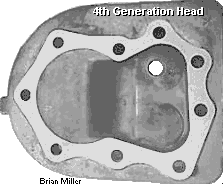 The newest style head manufactured
by Kohler is much like the previous one, but has the spark plug located directly
over the exhaust valve. There are two reasons why Kohler did this:
The newest style head manufactured
by Kohler is much like the previous one, but has the spark plug located directly
over the exhaust valve. There are two reasons why Kohler did this:
Again, unlike the sought-after, but misidentified LP head, the depression area places the majority of the expanding gases or combustion pressure over the piston instead over of the valves, which produces more engine power and torque. The compression ratios and mounting bolt lengths are the same as the previous head. By the way - these type of heads are available from Kohler and are the newest ones made. They come on Magnum engines, too.
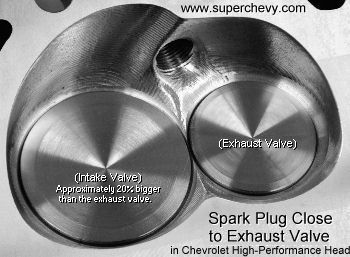
By the way - the Chevrolet V8 performance racing cylinder heads have the spark plug tip moved toward the exhaust valve for improved performance. It works. The plugs are angled so the tip is closer to the exhaust valve, and so the porcelain part will clear the exhaust header pipes. There's no reason to angle the spark plug in a Kohler head.
NOTE: The fourth generation head will interchange on the K241, M10, K301, M12, K321 and M14 engines. It doesn't matter about the spark plug location, except for pulling purposes. For pulling, it's best to have the spark plug directly over the exhaust valve. The only exception is the very early K241 "LP" head. It has a smaller combustion chamber which will allow the engine to have a higher compression ratio, and shouldn't be used on the K301, M12, K321 and M14 engines for general yard work. It should be used for pulling purposes only using high octane gas, E-85 or methanol fuel. The reason for this is because the compression will be so high, the engine will run too hot for low octane gas, and severe damage to the engine may result.
The Cylinder Head That Comes on Kohler Engine Models K341 and M16 -
Kohler continued the 4th generation head design to this one for the same reasons as the above head...
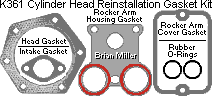
The Cylinder Head for Kohler Over Head Valve Engine Model K361 -
Kohler Cylinder Head Identification and Cub Cadet Applications: Kohler K-series engine model K241. OEM Kohler part # 235461, Cub Cadet part # IH-385303-R1. LP head; Discontinued. Originally came on the 1965 and earlier Cub Cadet model 100, and other makes and models of garden tractors and small engine equipment. Requires 2-1/4" length bolts (Kohler part # 271077 - Discontinued from Kohler) with no mounting bracket(s) under the bolt head, and 2-1/2" length bolts (Kohler part # 235175-S) with [gas tank] mounting bracket or other mounting brackets/plates under the bolt head. Kohler K-series engine model K241. OEM Kohler part #'s 236546-S. Either head originally came on various Cub Cadet models 100, 102, 104, 105, 106, 107, 108, 109 or 1000, and other makes and models of garden tractors and small engine equipment. This head is no longer available from Kohler. Requires 2-1/4" length bolts (Kohler part # 271077 - Discontinued from Kohler) with no mounting bracket(s) under the bolt head, and 2-1/2" length bolts (Kohler part # 235175-S) with [gas tank] mounting bracket or other mounting brackets/plates under the bolt head. Kohler K-series engine models K301 and K321. OEM Kohler part #'s 237670-S (Discontinued from Kohler; or 237827-S. Either head originally came on various Cub Cadet models 122, 123, 124, 125, 126, 127, 128, 129, 147, 149, 680, 1200, 1250, 1282 or 1450, and other makes and models of garden tractors and small engine equipment. Both heads require 1-1/2" length bolts, w/centered spark plug). Kohler K-series engine model K341 (including M16 Magnum engine). OEM Kohler part # 45 015 09-S. Originally came on Cub Cadet models 169 and 1650, and other makes and models of garden tractors and small engine equipment. Requires 1-1/2" length bolts (OEM Kohler part # 25 086 115-S), w/offset spark plug hole. Kohler Magnum engine model M10. OEM Kohler part #'s 237670, 47 015 05-S. Originally came on Cub Cadet model 1050. Requires 1-1/2" length bolts (OEM Kohler part # 25 086 115-S), w/offset spark plug hole. Kohler Magnum engine models M12 and M14. OEM Kohler part # 47 015 06-S. (Discontinued from Kohler; Requires 1-1/2" length bolts (OEM Kohler part # 25 086 115-S), w/offset spark plug hole.)
Compression Ratios for Factory Stock Kohler K-series and Magnum Engines with an OEM Kohler Cylinder Head are as follows:
Kohler K-Series and Magnum Engine Spark Plug and Head Bolt Torque Values and Sequences [Return To Previous Section or Website]
If the torque value(s) are shown only in inch pounds (in. lb.), and the only tool you have is a torque wrench that shows in foot pounds (ft. lb.), you can convert inch pounds into foot pounds by dividing the torque value by 12. Example: if the value is shown in 420 in. lb., then divide 420 by 12 = 35 ft. lb. When replacing the head bolts, always use grade 8 bolts or heat-treated steel studs with grade 8 nuts and hardened flat washers to equally distribute the load. Because stainless steel bolts have the same strength as grade 5 bolts. Which means if stainless steel or grade 5 bolts are used, the threads may stretch over time, causing a compression leak and/or a warped head, which can cause a burned-out gasket and/or burned-out or warped head. [Return To Previous Section or Website]
Did you know that installing two spark plugs per cylinder doesn't help
to increase the power output of an engine whatsoever? Simply because
one plug will be running hot (exhaust side) and the other will be cool (intake
side). Engine power is generated from the heat source, because heat is how
an engine produces power. When the
spark plug in the cylinder
head is located over (flathead) or close to (OHV) the exhaust valve,
Grind away any sharp edges (after milling head, milling out combustion chamber and/or factory casting flash) within the combustion chamber, and polish the entire combustion chamber, including around the valves and top of the piston, to a high luster (smooth as glass, if possible) to help increase power and torque, especially at higher RPM or at wide open throttle. Removing sharp edges prevents hot spots, which can cause detonation and/or pre-ignite the incoming fuel, and polishing reflects heat and prevents the majority of it from being absorbed into the metals. Go here for more information on this subject.
Be sure to check the valve clearance before milling a head! If a lot of metal is removed from the head, then milling of the valve cavity to clear the head may also need to be done. In most cases with a stock-lift cam, there should be adequate clearance once a stock OEM head is milled. Always check the clearance with the valves at full lift before milling a head! To learn how to do this, scroll down or Click or tap here. Milling of the head will increase the compression ratio about 3/4 of a point. And depending on engine size, this will definitely, without a doubt, add about 1-3 more horsepower and more torque. The engine will have a "snappier" response when the throttle is opened suddenly, and if the engine is in good running condition, it will literally "pull you back in the seat" of a garden tractor when the engine is quickly accelerated. To learn what else can be done to a stock engine to increase it's power output, Click or tap here.
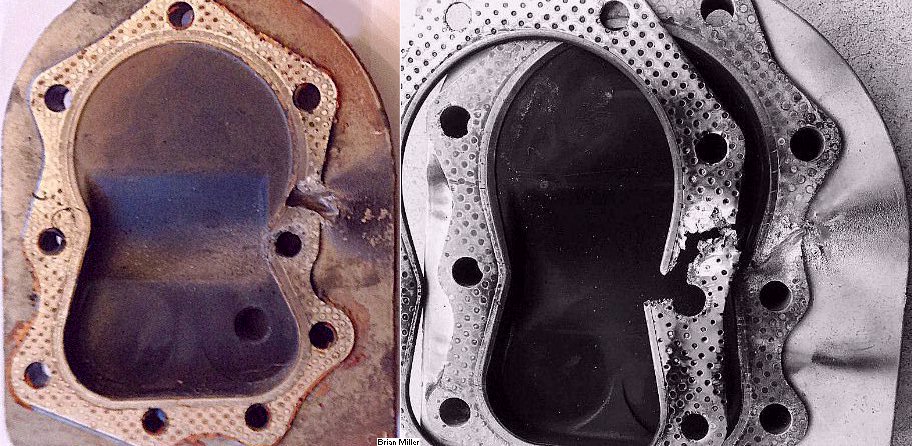
A used metal-shielded head gasket can be reused if it is in good condition and not bent, distorted or burned-out. To reuse it, clean it thoroughly with a spinning wire wheel, then coat it evenly with ordinary aluminum or silver color spray paint (available at Walmart or virtually any hardware store), reinstall the gasket, and tighten the head bolts or nuts (with studs) to the correct torque specs. Normal operating engine combustion heat will melt the aluminum/silver paint, creating an absolutely perfect seal. And if a new, metal-shielded head gasket has light surface rust from sitting in storage, the rust can be removed with a spinning wire wheel, and then the gasket can be coated with the same aluminum or silver color spray paint. It'll still be a usable gasket, only with a much better appearance (and sealing quality). This will not work with heavily-rusted head gaskets. And did you know that aluminum paint was first applied on used head gaskets to reassemble engines that was in the American World War 2 fighter planes? Aluminum paint was used because at the time there was a shortage of new head gaskets. This is part of the reason why most Americans don't speak German or Japanese today. (Hitler said he was going to dance on the White House steps.)
When to Use a Copper Head Gasket - [Top of Page]
If the deck (top) of the engine block and cylinder head gasket surface are perfectly flat, and if the valves have adequate head clearance at full lift, and if the piston doesn't come flush with the top of the block, or if the head is milled for a pop-out piston, then a head gasket isn't really necessary. Just use the copper silicone as described above È. When using copper/silicone only as a head to block sealant, it'll be like using a dried "liquid" copper head gasket. The absence of a head gasket will prevent the head from warping when the head bolts or nuts with studs are torqued to specs. The head and block will have positive metal to metal contact with the silicone filling in any irregularities or imperfections between the two metals. The copper particles will transfer the heat. But if the piston pops out of the cylinder, the clearance between the piston and head will need to have a safety margin of minimum .030" due to rod stretch and crankshaft flex at very high RPM. And yes, when precision-balanced, even a cast iron crankshaft will flex a few thousands of an inch at high RPM without breaking. The clearances over each valve when at full lift will need to be checked, too.
Removing a Broken-Off Tap - A threading tap that has broken off in an engine block or metal casting can be very difficult to remove. About all I can tell you is to either take your block to a reputable machine shop to have the tap removed, or go here and try to do it yourself: https://www.google.com/?gws_rd=ssl#q=removing+broken+tap+from+hole. Actually, it's best to use a TAPER hand tap to cut new threads and clean out existing threads. If used correctly, a TAPER tap is less likely to break off. Click or tap here to learn how to cut new threads, the professional way. And OEM Kohler head bolts don't need to be retorqued again after the engine gets hot. Also, as long as there's plenty of metal on the hex head (due to being rusted away), they can be reused many times. The OEM Kohler head bolts are actually harder than hardware store grade 8 bolts and the threads don't stretch on them whatsoever. Personally, I always try to reuse Kohler head bolts on my engine builds whenever possible. To repair broken-off head bolt(s)...
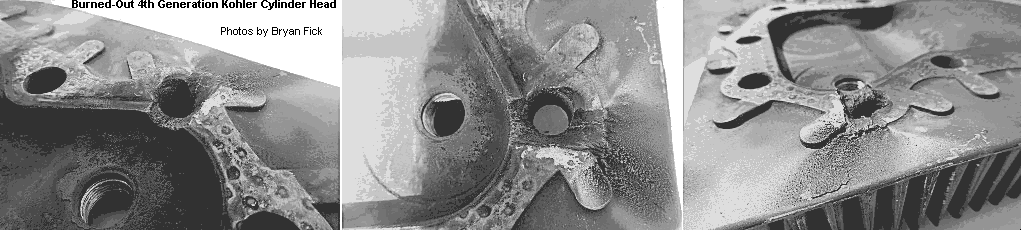
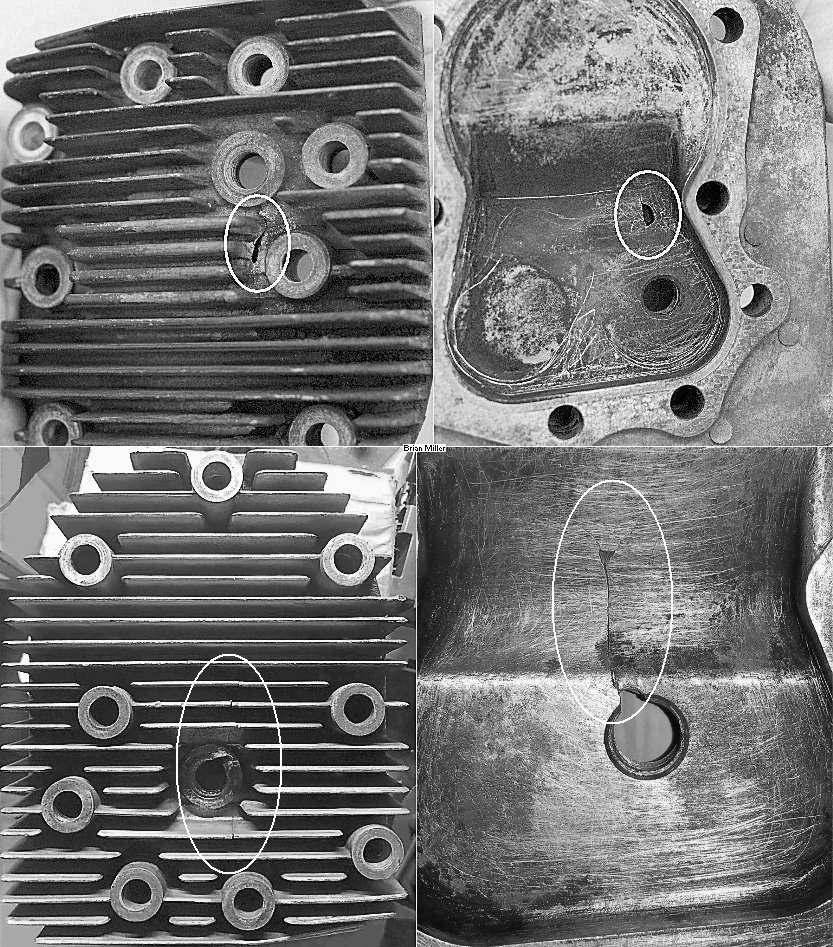
If a small engine cylinder head is burned out (usually close to the exhaust valve), if it's burned out where the gasket seals, as long as there's no cracks in the head, it can be successfully welded up, machined flat, the bolt hole redrilled and be put back into service. The following items are what causes cylinder head burn-out...
Advertisement: (Nowadays, prices are subject to change without notice.)
How to Remove Carbon Deposits from the Combustion Chamber in a Cylinder Head -
How to Make a New Spark Plug Hole - [Top of Page]
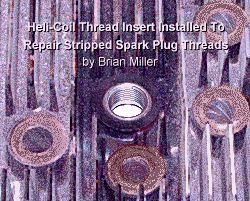
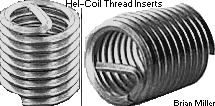
How to Repair a Stripped 14mm Spark Plug Hole - [Top of Page]
The Heli-Coil insert doesn't require threadlocker because its "spring-like" expands outward against the threads in the hole, keeping it intact in the head. Or contact a-1 Miller's Performance Enterprises if you are not able to repair stripped spark plug threads. As the last resort, if the stripped spark plug threads hole in an aluminum head are too large for a Heli-Coil thread insert, the hole can be successfully welded-up with aluminum welding, machined (milled) flush with the surface of the head, then drilled perpendicular with the head, and new spark plug threads tapped for installation of the spark plug.
How to check for proper valve clearance between the valves and cylinder head...
How to make modeling clay (Play-Doh):
Directions: Thoroughly mix flour, salt and cream of tartar or alum. Boil liquids together. Pour in dry ingredients and stir together. Knead and add flour as needed. [Return To Previous Paragraph] È
When machining the valve cavities in an OEM stock head or in a billet head when installing a cam with more valve lift, use the following clearances:
FYI - I've milled several stock heads as much as 1/8" and they did well
at the pulls. However, using methanol on a cool day could blow the combustion
chamber out on a stock head that's been excessively milled for valve clearance.
I've had this happen on my 12hp Super-Stock pulling tractor once. I was going
down the track, engine running excellent, then all of a sudden "PUFF!" went
the head.
About Installing Bigger Valves in the K361 Engine Cylinder Head - On the K361's cylinder head, the stock valve head diameters are: intake - 1.438"; exhaust - 1.400". The exhaust valve is already plenty big enough, even for high RPM. But there's not that much room in the combustion chamber to install a bigger intake valve because a bigger seat would need to be installed first. The outside diameter of the seat is always larger than the diameter of the valve head. The biggest intake valve that can be installed would be about 1.5", which really wouldn't give the engine that much more performance. For more noticeable performance, the intake valve needs to be about 20% bigger than the exhaust valve, which would make it 1.68". And this is way too big for the K361 head.
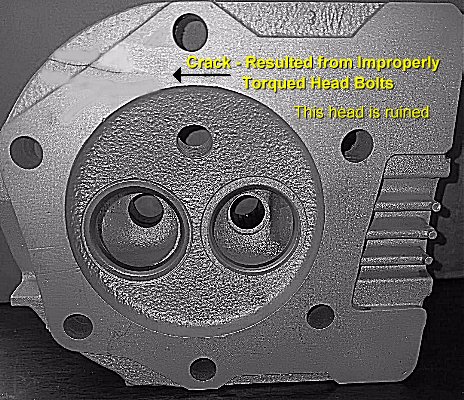
How to Permanently Fix a Warped Cylinder Head on an OHV Engine - [Top of Page] If an OHV aluminum block engine blows blue/gray smoke out the exhaust upon start up then quits smoking after a while, and/or if crankcase oil is forced out the oil fill tube or crankcase breather assembly, this is likely the sign of a warped cylinder head, which results in a blown or "not sealing" head gasket. This is caused by the aluminum warping a few thousands of an inch from normal operating heat when the engine is ran for the first time. In other words, the metal "takes shape." This is normal for ALL internal combustion engines, but happens most with aluminum block engines due to thin metal in certain areas. What causes the oil burning or oil loss is upon the downward stroke of the piston, vacuum within the combustion chamber draws or sucks crankcase oil in the gap between the head and gasket, and then upon the upward stroke of the piston, compression within the combustion chamber forces part of the compressed air into the crankcase, which builds up inside the crankcase, and the air pressure eventually forces oil out the oil filler tube or crankcase breather assembly. To fix permanently this, remove the head, resurface it on a wide, flat belt- or disc-sander/grinder to remove the warpage and restore flatness, install a new head gasket, torque the head bolts to specifications in the correct sequence, and readjust the valve clearances to manufacturer's specifications. Once this is fixed, the head(s) should not warp again. If you don't have your own sander/grinder, most automotive machine shops and woodworkers have one. Remember - always wear a face mask and/or air respirator mask to prevent from inhaling the sanding and aluminum material, and do the repair job right the first time and it won't have to be done again later.
How to Remove a Broken Off Head Bolt - [Top of Page] Use a "centering drill," which is a stubby drill bit that creates a hole exactly in the center of a stud. Then use a 5/16" carbide-tip drill bit to drill the broken stud out, and then use a 3/8-16 UNC (coarse thread) tap to clean the bolt holes. If you feel this is too much for you, you can take your engine to a reputable machine shop and have them do this for you.
Payment Options, and We Ship to Canada and
Worldwide My websites are not set up to process orders and accept payments. Therefore, I will need your name, complete and correct postal mailing address and phone number. And for payment options, I accept cash (in person), USPS Postal Money Orders, cashier's checks and business checks. I do not accept credit/debit cards. Or to make a payment to me through PayPal, please click this link: https://www.paypal.com (username: pullingtractor@aol.com). And please use PayPal's "Friends and Family" option to ensure that I receive the full amount or add 3% to the total amount to cover PayPal's processing surcharge. I also accept Venmo (username: Pullingtractor) and Cash App (username: pullingtractor) please add 2% for Cash App's surcharge as well). And be sure to mention a description of what the payment is for with your full name, postal address, phone number and email address. If sending a money order or cashier's check, please include a note in the envelope with your name, complete mailing address, phone number, email address and a description of what the payment is for. I'll make a note of your order when I have all your information, and I may have to order some of the parts on your list, which should take a few days to come in, but I will send everything to you as soon as the parts are in stock after I receive your payment.
Return To Previous Website | Top of Page | Copyright © 1996-Present. This website created, designed and maintained by A-1 Miller's Performance Enterprises |
||||||||||||||||||||||||||||||||||||||||||||||||||||
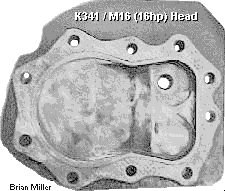 The K341 cylinder head is separate
from the heads above. This head has the depression and D-shaped combustion
chamber. It has the spark plug located directly over the exhaust valve. The
compression ratio is 7.4:1. It requires 1-1/2" length bolts. And there are
no "LP" type K341 cylinder heads. And ALL K341 and M16 cylinder heads
have the spark plug located over the exhaust valve, no exceptions. OEM Kohler
part # 45 015 03-S, 45 015 04-S, 45 015 06-S or 45 015 09-S. This head too,
has the spark plug located directly over the exhaust valve.
The K341 cylinder head is separate
from the heads above. This head has the depression and D-shaped combustion
chamber. It has the spark plug located directly over the exhaust valve. The
compression ratio is 7.4:1. It requires 1-1/2" length bolts. And there are
no "LP" type K341 cylinder heads. And ALL K341 and M16 cylinder heads
have the spark plug located over the exhaust valve, no exceptions. OEM Kohler
part # 45 015 03-S, 45 015 04-S, 45 015 06-S or 45 015 09-S. This head too,
has the spark plug located directly over the exhaust valve.

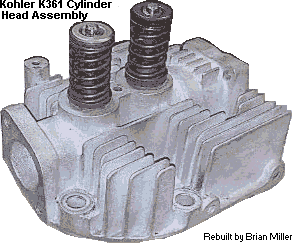 The K361 cylinder head is in a class all by itself. This particular
valves-in-head is installed on the
The K361 cylinder head is in a class all by itself. This particular
valves-in-head is installed on the
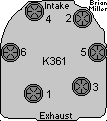

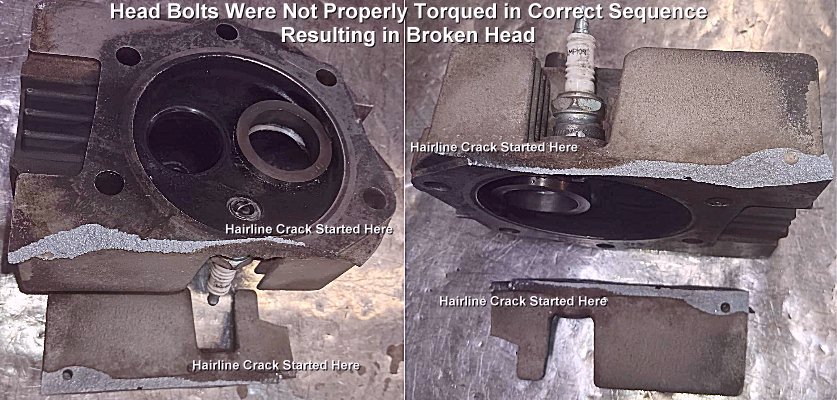
 ALWAYS lubricate threads with motor oil, and
gently torque head bolts/nuts in a cross-pattern sequence so the head will
not become warped or to prevent from cracking the head!
ALWAYS lubricate threads with motor oil, and
gently torque head bolts/nuts in a cross-pattern sequence so the head will
not become warped or to prevent from cracking the head!
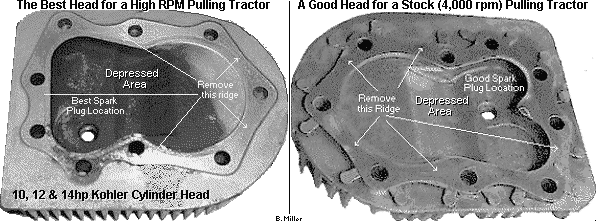 A good head for a Stock pulling
tractor with the engine running around 4,000 RPM would be the one with the
spark plug located in the center of the combustion chamber. And the best
head to use for a high RPM pulling tractor would be the one with the spark
plug located over the exhaust valve.
A good head for a Stock pulling
tractor with the engine running around 4,000 RPM would be the one with the
spark plug located in the center of the combustion chamber. And the best
head to use for a high RPM pulling tractor would be the one with the spark
plug located over the exhaust valve.
 this maintains the majority
of the heat in the combustion chamber in one area. When heat is maintained
in one particular area in any given combustion chamber, the increase in power
will be much greater, especially at high RPM. Burning fuel
within a combustion chamber will "find" or locate the main heat source. The
fuel will burn more thoroughly, allowing the engine to produce more power
at any RPM. If the plug is located in the center of the combustion chamber,
the incoming fuel could splash against the plug's tip and cause the engine
to misfire or run erratic at high speed, especially when burning
this maintains the majority
of the heat in the combustion chamber in one area. When heat is maintained
in one particular area in any given combustion chamber, the increase in power
will be much greater, especially at high RPM. Burning fuel
within a combustion chamber will "find" or locate the main heat source. The
fuel will burn more thoroughly, allowing the engine to produce more power
at any RPM. If the plug is located in the center of the combustion chamber,
the incoming fuel could splash against the plug's tip and cause the engine
to misfire or run erratic at high speed, especially when burning


 If an engine has a leaking head
gasket, then this means either the head bolts are loose or the cylinder head
is warped and needs to be resurfaced on a wide, flat
If an engine has a leaking head
gasket, then this means either the head bolts are loose or the cylinder head
is warped and needs to be resurfaced on a wide, flat
 Regardless of the thickness
of a copper head gasket, these should only be used with a machined billet
cylinder head and for competition pulling. If a copper head gasket is used
with an OEM Kohler cylinder head, it would most likely leak compression between
the head bolts, even when copper silicone is used. This is because all OEM
heads are much thinner than the thicker billet heads, and when the head bolts
(or nuts w/studs) are torqued to specs, the OEM head will flex and press
down a few thousandths of an inch where the head bolts are, and with a copper
head gasket, it will not "clamp down" entirely against the gasket between
the head bolts. When used with the OEM Kohler "cushiony" head gasket, the
OEM Kohler head doesn't necessarily become warped, it just flexes or bends,
then retains its "straightness" when the bolts are loosened. Therefore, it's
best to use the OEM Kohler head gasket with an OEM head to compensate for
the flexing or bending to help it seal better, even for competition pulling.
Regardless of the thickness
of a copper head gasket, these should only be used with a machined billet
cylinder head and for competition pulling. If a copper head gasket is used
with an OEM Kohler cylinder head, it would most likely leak compression between
the head bolts, even when copper silicone is used. This is because all OEM
heads are much thinner than the thicker billet heads, and when the head bolts
(or nuts w/studs) are torqued to specs, the OEM head will flex and press
down a few thousandths of an inch where the head bolts are, and with a copper
head gasket, it will not "clamp down" entirely against the gasket between
the head bolts. When used with the OEM Kohler "cushiony" head gasket, the
OEM Kohler head doesn't necessarily become warped, it just flexes or bends,
then retains its "straightness" when the bolts are loosened. Therefore, it's
best to use the OEM Kohler head gasket with an OEM head to compensate for
the flexing or bending to help it seal better, even for competition pulling.
 For dirty or rusted engine blocks,
to prevent a blown or leaking head gasket, besides resurfacing the head(s)
and cleaning the deck of the block, due to dirt/debris that gets accumulated
in the threads for the head bolts, the threads may need to be cleaned out
with the appropriate size tap (5/16-18 UNC (coarse thread) for Kohler engine
models K141, K161/K160, K181, L160/L161, L181 and M8 engines; and 3/8-16
UNC (coarse thread) for Kohler engine models K241, M10, K301, M12, K321,
M14, K341, M16 and K361 engines) to get the head to fully compress the gasket
when the bolts are torqued to specs. It's best to use a TAPER hand tap. A
TAPER tap cleans threads more thoroughly [than a PLUG tap] and is less likely
to break off in the block when in use. Then a PLUG tap can be used to clean
the bolt holes deeper. Be sure the threads on the bolts are clean, too. And
to obtain the proper torque, apply clean motor oil on the threads before
installing and torquing the bolts to specs. This should be done with any
engine, lawn & garden, farm, heavy equipment or automotive.
For dirty or rusted engine blocks,
to prevent a blown or leaking head gasket, besides resurfacing the head(s)
and cleaning the deck of the block, due to dirt/debris that gets accumulated
in the threads for the head bolts, the threads may need to be cleaned out
with the appropriate size tap (5/16-18 UNC (coarse thread) for Kohler engine
models K141, K161/K160, K181, L160/L161, L181 and M8 engines; and 3/8-16
UNC (coarse thread) for Kohler engine models K241, M10, K301, M12, K321,
M14, K341, M16 and K361 engines) to get the head to fully compress the gasket
when the bolts are torqued to specs. It's best to use a TAPER hand tap. A
TAPER tap cleans threads more thoroughly [than a PLUG tap] and is less likely
to break off in the block when in use. Then a PLUG tap can be used to clean
the bolt holes deeper. Be sure the threads on the bolts are clean, too. And
to obtain the proper torque, apply clean motor oil on the threads before
installing and torquing the bolts to specs. This should be done with any
engine, lawn & garden, farm, heavy equipment or automotive.

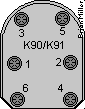
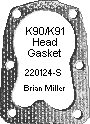 Cylinder head gasket. Fits
Kohler flathead engine models K90/K91. Approximately .050" compressed thickness.
Doesn't need to be retorqued again once hot.
Cylinder head gasket. Fits
Kohler flathead engine models K90/K91. Approximately .050" compressed thickness.
Doesn't need to be retorqued again once hot. 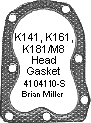 Cylinder head gasket. Fits
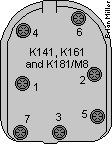
Kohler K-series and Magnum flathead engine models K141, K160, K161, K181
and M8. Approximately .050" compressed thickness. Doesn't need to be retorqued
again once hot.
Cylinder head gasket. Fits
Kohler K-series and Magnum flathead engine models K141, K160, K161, K181
and M8. Approximately .050" compressed thickness. Doesn't need to be retorqued
again once hot. 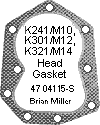 Cylinder head gasket. Fits
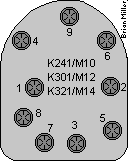
Kohler K-series and Magnum flathead engine models K241, M10, K301, M12, K321
and M14. Approximately .050" compressed thickness. Doesn't need to be retorqued
once hot.
Cylinder head gasket. Fits
Kohler K-series and Magnum flathead engine models K241, M10, K301, M12, K321
and M14. Approximately .050" compressed thickness. Doesn't need to be retorqued
once hot.  Cylinder head gasket. Fits
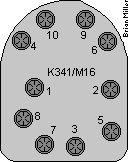
Kohler K-series and Magnum flathead engine models K341 and M16. Approximately
.050" compressed thickness. Doesn't need to be retorqued again once hot.
Cylinder head gasket. Fits
Kohler K-series and Magnum flathead engine models K341 and M16. Approximately
.050" compressed thickness. Doesn't need to be retorqued again once hot.
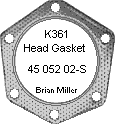 Cylinder head gasket. Fits
Kohler engine model K361. Approximately .050" compressed thickness with steel
fire ring. Doesn't need to be retorqued again once hot.
Cylinder head gasket. Fits
Kohler engine model K361. Approximately .050" compressed thickness with steel
fire ring. Doesn't need to be retorqued again once hot.
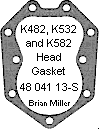 Cylinder head gasket. Fits
Kohler opposed twin cylinder engine models K482, K532 and K582. Approximately
.050" compressed thickness. Doesn't need to be retorqued again once hot.
Cylinder head gasket. Fits
Kohler opposed twin cylinder engine models K482, K532 and K582. Approximately
.050" compressed thickness. Doesn't need to be retorqued again once hot.
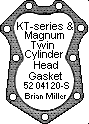 Cylinder head gasket. Fits
Kohler KT-series and Magnum opposed twin cylinder engine models MV16, KT17,
KT17 Series II, KT19, KT19 Series II, M18, MV18, M20 and MV20. Approximately
.050" compressed thickness. Doesn't need to be retorqued again once hot.
Cylinder head gasket. Fits
Kohler KT-series and Magnum opposed twin cylinder engine models MV16, KT17,
KT17 Series II, KT19, KT19 Series II, M18, MV18, M20 and MV20. Approximately
.050" compressed thickness. Doesn't need to be retorqued again once hot.
 Cylinder Head Gasket. Fits
Kohler engine models K660 and K661. Approximately .050" compressed thickness.
Torque head bolts to 15-20 ft. lb. / 180-240 in. lb. Doesn't need to be retorqued
again once hot.
Cylinder Head Gasket. Fits
Kohler engine models K660 and K661. Approximately .050" compressed thickness.
Torque head bolts to 15-20 ft. lb. / 180-240 in. lb. Doesn't need to be retorqued
again once hot.
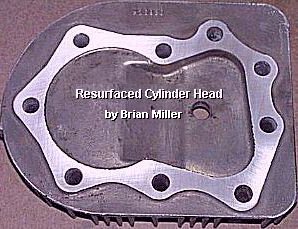 A-1 Miller's
Professional Repair Service - Resurface air-cooled small engine flathead
or OHV cylinder head on wide, flat
A-1 Miller's
Professional Repair Service - Resurface air-cooled small engine flathead
or OHV cylinder head on wide, flat
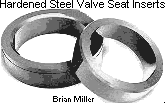 Professionally replace loose and/or broken OEM valve seat with
a new high quality aftermarket hardened steel seat insert. $200.00 each
for labor and new seat, plus return shipping & handing.
Professionally replace loose and/or broken OEM valve seat with
a new high quality aftermarket hardened steel seat insert. $200.00 each
for labor and new seat, plus return shipping & handing.
 Use a narrow, steel blade putty
knife (with a stiff blade) or paint scraper to remove the carbon deposits
from the combustion chamber (and from around the valves and from the top
of the piston). Be sure the putty knife or scraper has a sharp edge, too.
Don't worry about scratching the surface of the combustion chamber either.
The tiny scratches will cause no problems. If the putty knife or scraper
can't easily remove the carbon, soak the head in plain water at room temperature
for a few days. This will soften the carbon and then it should be a lot easier
to remove.
Use a narrow, steel blade putty
knife (with a stiff blade) or paint scraper to remove the carbon deposits
from the combustion chamber (and from around the valves and from the top
of the piston). Be sure the putty knife or scraper has a sharp edge, too.
Don't worry about scratching the surface of the combustion chamber either.
The tiny scratches will cause no problems. If the putty knife or scraper
can't easily remove the carbon, soak the head in plain water at room temperature
for a few days. This will soften the carbon and then it should be a lot easier
to remove.
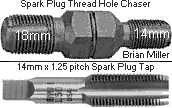 When
making a new hole and cutting threads for the spark plug, use a 1/2" drill
bit (for 14mm threads) to bore the hole, then use a 14mm x 1.25 pitch spark
plug tap to cut the threads. Be sure to drill the hole and cut the threads
When
making a new hole and cutting threads for the spark plug, use a 1/2" drill
bit (for 14mm threads) to bore the hole, then use a 14mm x 1.25 pitch spark
plug tap to cut the threads. Be sure to drill the hole and cut the threads
 If 14mm spark plug threads are stripped-out in a cylinder head,
a stainless steel
If 14mm spark plug threads are stripped-out in a cylinder head,
a stainless steel
 How
to locate where to machine the cylinder head for the valves...
How
to locate where to machine the cylinder head for the valves...
 If the crankshaft rotates freely
after 360º, remove the head and use the depth gauge on a dial or digital
If the crankshaft rotates freely
after 360º, remove the head and use the depth gauge on a dial or digital


 Phone: 1-573-881-7229 (cell;
call, text or leave voicemail). Please call Monday-Friday, 9am to 5pm, Central
time zone, except holidays. If no answer, please try again later.
Phone: 1-573-881-7229 (cell;
call, text or leave voicemail). Please call Monday-Friday, 9am to 5pm, Central
time zone, except holidays. If no answer, please try again later.
 E-mail: