|
|
|
Educating and Inspiring Small Engine, Lawn & Garden, and Garden
Pulling Tractor Enthusiasts Since 1996. Where Science and Common Sense Come
Together for Safety and Improved Engine/Tractor Performance |
A-1
Miller's Performance Enterprises - Parts & Services
Webstore |  Available Soon - Detailed Illustrated Plans
on How to Construct a Professional Pull-Back and Self-Propelled Garden
Tractor/Small Wheel Mini Rod Pulling Sleds
Available Soon - Detailed Illustrated Plans
on How to Construct a Professional Pull-Back and Self-Propelled Garden
Tractor/Small Wheel Mini Rod Pulling Sleds
Nowadays, prices are subject to change without notice. Click
Refresh to see any
changes or updates. Optimized for 1152 x 864 computer screen resolution.
To search for a word or phrase in any of my websites, press the CTRL
 and F
and F  keys on
your keyboard simultaneously to open the Find or Search dialog box in your
web browser. And being I have no
apprentice to update and pay for my websites so they'll
continue to be on the Internet, they will be removed forever when I'm no
longer around. Scroll down this website or click/tap the links below to
jump down to...
keys on
your keyboard simultaneously to open the Find or Search dialog box in your
web browser. And being I have no
apprentice to update and pay for my websites so they'll
continue to be on the Internet, they will be removed forever when I'm no
longer around. Scroll down this website or click/tap the links below to
jump down to...
How to widen the frame rails on a narrow frame Cub Cadet garden tractor for use of a gear starter |
First of all, the flywheels on Kohler K-series and Magnum engine models K241, M10, K301, M12, K321, M14, K341, M16 and K361 will interchange, because the tapers and keyway widths are the same. The only difference is the type of starter and ignition system used. Some engines with a rope starter have magneto ignition and a 9-1/2" flywheel with no ring gear; other engines with a starter/generator and battery ignition, use either a 8" or 9-1/2" flywheel with no gear ring; some early engines with magneto ignition have a 9-1/2" flywheel with no ring gear; while most later K-series engines have battery ignition, and a 9-1/2" ring gear flywheel with internal magnets for an alternator charging system. Also, all Kohler Magnum M10-M16 engines use the same flywheel. The Kohler KT-series opposed twin cylinder flathead engine models KT17, KT17 series 2, KT19, KT19 series 2 and KT21 (which is a snowmobile engine) use the same flywheel. And the Kohler Magnum opposed twin cylinder flathead engine models M18 and M20 use the same flywheel.
Four types of flywheels were used on the K241-K361 K-series Kohler engines. They are as follows:
- From 1960 to 1973, many of the K241 and K301 engines came with an 8" diameter flywheel. The engine had battery-powered ignition, and a starter/generator provided the cranking source to start the engine and then it produced the power source to recharge the battery and power any electrical accessories. These were popular with the narrow- and wide-frame (with solid-mounted engine) IH Cub Cadet garden tractors.
- Very few of the early K241 and K301 engines came with a 9-1/2" diameter flywheel with an unmachined edge for a starter ring gear, and there's no way to install a ring gear. These engines had a magneto ignition system. There's two magnets attached to inside the flywheel, the ignition coil is fastened on a stator to the bearing plate and a rope was used on a large notched pulley that's attached to the flywheel to crank the engine. There is no battery and no charging system involved. These were used on self-contained, stand-alone engine units, such as truck-mounted air compressors, generator/welders, water pumps, etc., and they were popular with the U.S. Military because there was no recoil starter and very few ignition parts to give trouble. Certain ignition coils are no longer available from Kohler for these engines.
- Another 9-1/2" diameter flywheel with an unmachined edge for a starter ring gear was also used on very few of the early K241 and K301 engines. There's no magnets inside the flywheel and no [magneto] stator. The engine had battery-powered ignition, and a starter/generator provided the cranking source to start the engine and then it produced the power source to recharge the battery and power any electrical accessories. These are popular with certain models of Case garden tractors.
-
 In 1974, the K241-K361 engines
came with a 9-1/2" diameter flywheel with a machined edge for a starter ring
gear and a ring of magnets for the alternator charging system on the inside.
The engine had battery-powered ignition, and a small, gear type starter motor
cranks the engine to start it and an alternator charging system produced
the power source to recharge the battery and power any electrical accessories.
These were popular with the wide-frame "Quiet Line" IH-built Cub Cadet garden
tractors and certain spread-frame MTD-built Cub Cadet garden tractors.
In 1974, the K241-K361 engines
came with a 9-1/2" diameter flywheel with a machined edge for a starter ring
gear and a ring of magnets for the alternator charging system on the inside.
The engine had battery-powered ignition, and a small, gear type starter motor
cranks the engine to start it and an alternator charging system produced
the power source to recharge the battery and power any electrical accessories.
These were popular with the wide-frame "Quiet Line" IH-built Cub Cadet garden
tractors and certain spread-frame MTD-built Cub Cadet garden tractors.
And the K-series and Magnum flywheels have the same overall dimensions. The only difference is, the K-series flywheel has integrated fins (fan blades) and the Magnum flywheel use a bolt-on plastic fan blade unit, and it has an integrated magnet for the solid state ignition. The starter ring gear will also interchange between the two flywheels. As a matter of fact, the ring gear on Kohler engine models K241, M10, K301, M12, K321, M14, K341, M16, K361, KT17, KT17 Series 2, KT19, KT19 Series 2, KT21, MV16, M18, MV18, M20 and MV20 will all interchange. These have the same number of gear teeth and the same dimensions.
FYI - A cast iron flywheel with a broken off fin (fan blade) will definitely run out of balance, and cause the entire engine to vibrate badly. At higher RPM (up to 4,000 RPM), the severe vibration could also cause the sheet metal to crack at the mounting bolt holes, and in rare cases, possibly cause the crankshaft to break at the rod journal. To statically (not spinning or in motion; at rest) put the flywheel back in balance, if the entire fin is broken off, simply break off the fin directly opposite of the broken fin with a hammer. But if only part of the fin is chipped off, use an angled hand grinder or a reciprocating saw / saw saw to remove about the same amount of chipped off material from the opposite fin. Try to make the fins match each other to maintain proper balance. The flywheel should still be safe to use, and the remaining intact fins will provide plenty of fresh air to adequately cool the engine. But the best way to put the flywheel 100% back in balance is to have it dynamically precision spin-balanced with an automotive Flywheel/Crankshaft balancing machine.
The Safe and Correct Way to Remove a Small Engine Flywheel -
 (Added 5/16/18) On a Kohler
K-series engine with a 5/8" threaded crankshaft stud and with a starter/generator
that comes in an IH-built Cub Cadet garden tractor, sometimes the aluminum
clutch hub adapter that's mounted in front of the flywheel can be very stubborn
to remove. This part must be removed before the flywheel shroud can be removed.
So to safely remove the hub without damaging it, use the same harmonic balancer
puller tool as shown below Ê to remove
the hub that is used to remove the flywheel, except use two long 1/4" coarse
thread grade 8 bolts with flat washers.
(Added 5/16/18) On a Kohler
K-series engine with a 5/8" threaded crankshaft stud and with a starter/generator
that comes in an IH-built Cub Cadet garden tractor, sometimes the aluminum
clutch hub adapter that's mounted in front of the flywheel can be very stubborn
to remove. This part must be removed before the flywheel shroud can be removed.
So to safely remove the hub without damaging it, use the same harmonic balancer
puller tool as shown below Ê to remove
the hub that is used to remove the flywheel, except use two long 1/4" coarse
thread grade 8 bolts with flat washers.
After the hub is removed, sometimes the 1/4" steel dowel pin will remain in the flywheel. This pin only purpose is to prevent the hub from slipping on the flywheel when engine power (torque) is applied. Anyway, when the pin gets stuck, either use locking Vise-Grips to remove the pin, or drive the pin out from the backside of the flywheel with a steel punch and hammer. When the pin is removed, it'll be a good idea to drill-out or enlarge the hole in the flywheel to 17/64" to prevent the pin from being stuck (again) if the hub needs to be removed again. If the pin fits loose in the hub, use high strength liquid threadlocker to secure the pin in the hub. And do not drill-out or enlarge the 5/8" hole in the hub! It must fit on the 5/8" crankshaft stud snug to prevent the hub from wobbling and running out of balance on the crankshaft.
To remove the flywheel from a Kohler (or virtually any) small engine, remember, the retaining nut or bolt have right-hand threads. And there's either 5/16-18 UNC (coarse thread) (small flywheels) or 3/8-16 UNC (coarse thread) (large flywheels) bolt holes for use with grade 8 bolts with a flat washer and a quality-made gear puller to remove the flywheel from the crankshaft. A hand tap may need to be used to clean the dirt and debris from the threads in the bolt holes. Remove the flywheel with a quality-made automotive harmonic balancer/vibration damper puller tool (Lisle Corporation makes a quality puller) that have fine threads and with a heavy duty 1/2" impact wrench (with a large capacity [minimum 30 gallon] air compressor reservoir tank) to literally "pop" the flywheel off the crankshaft taper. Be sure the puller bolt is centered on the crankshaft, too. Avoid using an low-quality imported puller because it might move sideways when under pressure and break off the stud or bend the bolt. Use the protective cap that's supplied with the puller to prevent from damaging the threads on the end of the crankshaft. Apply grease or motor oil on the threads of the center threaded shaft to increase the pulling torque. The puller tool require either two 5/16" or two 3/8" diameter grade 8 coarse thread bolts with a thick flat washer under each bolt head so the head won't pull through the puller's slots. And use bolts that's long enough so the threads can penetrate the entire length of the threaded holes in the flywheel to prevent the threads from being pulled out. Use a tap to clean the threads in the flywheel if necessary. And although some flywheels are stubborn to remove, just remember, it'll eventually come off. It's not made on the crankshaft!

Personally, I use a heavy duty 1/2" impact wrench running off of 150 psi of pressure with a 60 gallon air compressor tank and a Lisle harmonic balancer puller with grade 8 bolts w/flat washers threaded deep into the flywheel threads to remove Kohler flywheels. I ain't never had one that was so stubborn it took a lot of effort to remove. My set up pops them off every time with very little effort! You can hear the impact wrench when it gets under a severe strain, it starts to slow down and then POW, the flywheel pops loose.
 On most aluminum block engines,
such as Briggs & Stratton, Tecumseh, etc., a
flywheel knock-off tool can be used to remove the flywheel.
You can get a knock-off tool at virtually any place that sells small engine
parts, and they come in 4 different sizes: 1/2" hole for older B&S engines,
7/16-20 UNF, 1/2-20 UNF (fine thread) and 5/8-18 UNF.
On most aluminum block engines,
such as Briggs & Stratton, Tecumseh, etc., a
flywheel knock-off tool can be used to remove the flywheel.
You can get a knock-off tool at virtually any place that sells small engine
parts, and they come in 4 different sizes: 1/2" hole for older B&S engines,
7/16-20 UNF, 1/2-20 UNF (fine thread) and 5/8-18 UNF.
To use the knock-off tool, for an older B&S engine with the crankshaft that has a long unthreaded shaft that protrudes into the starter clutch, the tool is placed on the end of the shaft, and for all other engines with a threaded stud on the end of the crankshaft, the tool is threaded onto the stud. A crowbar or pry bar is wedged under the flywheel against the engine block to provide extra leverage (and to prevent breaking the rod journal on the crankshaft if it's cast iron or bending the crankshaft if it's steel), then a 2-3 lb. hammer is used to sharply strike the tool perpendicular to literally "pop" the flywheel free from the crankshaft taper. To prevent from damaging the threads in the tool and on the crankshaft stud, always thread the tool all the way on the stud, and then back it off 1/2 turn. And don't strike the knock-off tool at an angle, or the stud on the crankshaft could get bent or break off!
But on flywheels with no threaded holes to use the automotive harmonic balancer/vibration damper puller tool, a knock-off tool of the correct thread size with a pry bar wedged under the flywheel and a 2-3 lb. hammer can be used to remove the flywheel. Be sure to strike the tool perpendicular, too!
 The Incorrect and Dangerous Way To Remove A
Small Engine Flywheel -
The Incorrect and Dangerous Way To Remove A
Small Engine Flywheel -
Most Kohler crankshafts are made of somewhat brittle cast iron material. So NEVER hit or strike the end of the crankshaft with a big hammer to remove a flywheel! And DO NOT attempt to use a wrecking bar (crowbar) to "pry" the flywheel off the crankshaft! Also, never use a large [2 or 3 jaw] outside-jaw gear puller to remove a flywheel. Doing any of these could damage the crankshaft and/or possibly crack or break the flywheel in half. AND DEFINITELY DO NOT USE A KNOCK-OFF TOOL WITH A BIG HAMMER ON A KOHLER CRANKSHAFT WITH THE 5/8" STUD TO REMOVE THE FLYWHEEL! Being the crank is made entirely of cast iron, the stub will likely break off!
A true story: One of my customers brought his walk-behind rotary lawn
mower with a 3.5hp Tecumseh engine (model LAV35) to A-1 Miller's just to
have the flywheel removed. When I had the mower on my work table to remove
the flywheel, I noticed the flywheel was wobbly but still tight on the
crankshaft. Then I found that the crankshaft was broken in two at the connecting
rod journal. I thought, "This is odd."  So
I called my customer to tell him about this, and he said his neighbor tried
to "pop" the flywheel off with a 10 lb. sledge hammer. (This obviously happened
with the mower on the ground and the threaded end of the crankshaft was hit
by the hammer at full swing.) Reminds A-1 Miller's of the old joke: "Hold
my beer and watch this!"
So
I called my customer to tell him about this, and he said his neighbor tried
to "pop" the flywheel off with a 10 lb. sledge hammer. (This obviously happened
with the mower on the ground and the threaded end of the crankshaft was hit
by the hammer at full swing.) Reminds A-1 Miller's of the old joke: "Hold
my beer and watch this!" 
About Crankshafts Breaking at High RPM -
A stock crankshaft should be fine as long as the engine isn't over-revved for a long period of time, which could cause it to go into harmonic vibrations, which would cause it to break in two. But if dynamically precision spin-balanced, a cast or billet steel crankshaft should survive as high as 7,000 RPM for a long time if they've been precision-balanced to the connecting rod and piston assembly using a dynamic balancing machine. Some cast cranks break, and steel crankshafts are prone to breaking, too. When they do break, it's usually due to: being in an engine that broke the connecting rod and the rotating assembly came to a "sudden stop", and the flywheel kept wanting to spin, but cracked the crank instead; an out of balance flywheel (even CNC-machined steel flywheels should be dynamically precision spin-balanced); and/or an out of balance starter pulley on the PTO end (which should also be precision-balanced). An out of balanced flywheel or pulley will cause the crankshaft to flex a few thousands of an inch at high RPM. When they flex, this causes metal fatigue, which creates a microscopic crack next to the rod journal, and they eventually break. Kind of like bending a piece of wire back and forth by hand, until it eventually breaks. I heard that the Magnum crankshafts are tougher than the old K-series cranks when precision-balanced. And when a crankshaft breaks at high RPM, it can also break a cast cam or bend a billet steel cam, which could crack the engine block at the cam pin on the flywheel side.
Always Use a Heavy Steel Flywheel on a Pulling Tractor Engine That Turns at 4,000 RPM or at Open RPM!

 A heavier-than-stock, custom-made,
machined steel
flywheel
will add more torque, "grunt" or "pushing power" to an engine when pulling
a heavy load. The centrifugal force of a high-speed heavy spinning flywheel
generate large inertial forces that help an engine maintain its RPM. Plus,
the heavy flywheel adds torque to an engine. A light-weight steel or an aluminum
flywheel will cause an engine to lose a lot of power toward the end of a
pull. Light-weight flywheels are actually made for high speed racing
applications, such as for drag racing or race cars. A lightweight flywheel
works best for circle track racing because they allow the engine to accelerate
quickly and regain the RPM faster after coming out of the turns. A heavy
flywheel will "bog" down a race engine and make it sluggish upon acceleration.
A heavier-than-stock, custom-made,
machined steel
flywheel
will add more torque, "grunt" or "pushing power" to an engine when pulling
a heavy load. The centrifugal force of a high-speed heavy spinning flywheel
generate large inertial forces that help an engine maintain its RPM. Plus,
the heavy flywheel adds torque to an engine. A light-weight steel or an aluminum
flywheel will cause an engine to lose a lot of power toward the end of a
pull. Light-weight flywheels are actually made for high speed racing
applications, such as for drag racing or race cars. A lightweight flywheel
works best for circle track racing because they allow the engine to accelerate
quickly and regain the RPM faster after coming out of the turns. A heavy
flywheel will "bog" down a race engine and make it sluggish upon acceleration.
The smaller (8") steel flywheels require that a billet pulley be installed on the PTO end of the crankshaft and a starter cart w/V-belt be used to crank the engine to start it. (Which can be a major inconvenience if you have no assistance.) And the bigger (9-1/2") steel flywheels will accept a ring gear and can be used with a gear starter fastened on the side of the engine block. (Which I think is much more convenient.) Also, the heavier (31 lb.) 9" flywheel is more suitable for stock engines that turn around 4,000 RPM, and the lighter (19 lb.) 9-1/2" steel flywheel is ideal for engines that run at wide open throttle.
Pulling tractors on the other hand need ground speed (momentum) to do well in a pull, with the use of a heavier-than-stock flywheel. Once a heavy flywheel is spinning, it's hard to stop it or slow it down. A heavy flywheel may somewhat cause a [stock] engine to rev up slower, but once it's revved up, and because of the greater momentum force or increase of weight in the rotating mass, it'll "hold" the RPM longer, allowing a tractor to pull the sled right out the gate.
Remember, there's only two things to be gained by using a heavy steel flywheel; 1: the safety of steel versus cast iron, and 2: the increase in rotating mass with use of a heavier-than-stock flywheel. This means that a heavy flywheel will help an engine to produce more torque at higher RPM, which is very important for a pulling engine. A heavy flywheel (heavier-than-stock) will, without a doubt, will add more lugging power to an engine. That's why they're used on the large farm tractors. By the way - the average 9-1/2" diameter OEM (Original Equipment Manufacturer) cast iron flywheel for the single cylinder K241-K361 Kohler K-series engines with the starter ring gear and full integrated fins (fan blades) weighs 23-24 lbs.
By the way - covering a shiny (new) billet steel flywheel with clear gloss enamel acrylic coating will help identify it visually as made of steel. Otherwise, if it's covered with colored paint, it'll be somewhat difficult to tell right away rather if it's a factory cast iron or steel flywheel. The enamel coating will also help protect the steel flywheel from rusting over time. (I think a nicely painted pulling engine looks good with a shiny [clear coated] steel flywheel.) Actually, the best way to determine if an engine has either a cast iron or steel flywheel (if they look the same) is to tap it with a small hammer or wrench. Cast iron will make a "clunk" sound, and steel will have a high pitch ring to it.
 By the way - the flywheels for
Kohler K-series and Magnum engine models K241, M10, K301, M12, K321, M14,
K341, M16 and K361 will interchange because they all have the same size taper
on the crankshaft and in the flywheel, and most of them have two or four
threaded holes for driving accessories, and for using an automotive harmonic
balancer/vibration damper puller tool to remove the flywheel from the crankshaft.
Also, the same flywheel ring gear (gear starter) for Kohler engine models
K241, M10, K301, M12, K321, M14, K341, M16, K361, KT17, KT17 series 2, KT19,
KT19 series 2, MV16, M18, MV18, M20 and MV20 will interchange. They are all
identical.
By the way - the flywheels for
Kohler K-series and Magnum engine models K241, M10, K301, M12, K321, M14,
K341, M16 and K361 will interchange because they all have the same size taper
on the crankshaft and in the flywheel, and most of them have two or four
threaded holes for driving accessories, and for using an automotive harmonic
balancer/vibration damper puller tool to remove the flywheel from the crankshaft.
Also, the same flywheel ring gear (gear starter) for Kohler engine models
K241, M10, K301, M12, K321, M14, K341, M16, K361, KT17, KT17 series 2, KT19,
KT19 series 2, MV16, M18, MV18, M20 and MV20 will interchange. They are all
identical.
And adding a heavy pulley on the PTO end of the crankshaft would help add torque to the engine at high RPM. But if/when the engine bogs down upon launch at the starting line or several feet from the starting line, it may be hard to get it to rev back up due to the extra spinning weight. So you gain one thing, but may lose another.
NEVER INSTALL A DIRTY OR OILY FLYWHEEL
ON A DIRTY OR OILY
CRANKSHAFT!
 Before
installing the
flywheel
on a crankshaft,
always
thoroughly clean both tapers with a clean cloth or shop towel (white in color,
to see the dirt) to remove any dirt, oil or debris from the crankshaft taper
and most importantly, inside the flywheel taper. It's okay to use
brake parts
cleaner,
electrical contact
cleaner,
cleaning
solvent or
paint
thinner to clean the tapers
because these products leave no oily residue when they dry. And use
emery
cloth to remove any light
rust on the surface of the tapers. Clean both tapers thoroughly. This is
very important because there must be direct metal-to-metal contact between
the tapers for a 100% secure adhesion or bonding of the two parts. Because
the flywheel must keep up with the rapid acceleration (torque or driving
force) of the piston via the crankshaft.
DO NOT
APPLY
Before
installing the
flywheel
on a crankshaft,
always
thoroughly clean both tapers with a clean cloth or shop towel (white in color,
to see the dirt) to remove any dirt, oil or debris from the crankshaft taper
and most importantly, inside the flywheel taper. It's okay to use
brake parts
cleaner,
electrical contact
cleaner,
cleaning
solvent or
paint
thinner to clean the tapers
because these products leave no oily residue when they dry. And use
emery
cloth to remove any light
rust on the surface of the tapers. Clean both tapers thoroughly. This is
very important because there must be direct metal-to-metal contact between
the tapers for a 100% secure adhesion or bonding of the two parts. Because
the flywheel must keep up with the rapid acceleration (torque or driving
force) of the piston via the crankshaft.
DO NOT
APPLY
 ANTI-SEIZE LUBRICANT, OIL OR GREASE ON THE CRANKSHAFT AND
FLYWHEEL TAPERS FOR EASY REMOVAL OF THE FLYWHEEL LATER!
This applies to all aluminum, cast
iron or steel flywheels with a tapered fit on the
crankshaft. Here's
a YouTube video link on this:
Can I use Anti-Seize On A Small Engine
Flywheel? If a flywheel
with a taper needs to be removed for whatever reason, it's supposed to be
difficult to remove. Anti-seize lubricant works great for the threads on
bolts in certain situations, but NOT for flywheels and crankshaft tapers.
For assurance,
high strength liquid
threadlocker
(Red Loctite, Permatex or equivalent) can be
applied on the flywheel and crankshaft tapers to prevent the flywheel from
slipping on the crankshaft. Thorough cleaning of the tapers should still
be performed even with the use of the threadlocker. Be sure to allow the
threadlocker to fully cure (dry/harden) overnight at room temperature before
starting the engine because if the threadlocker is not dry and still in liquid
form, the flywheel could slip or loosen on the crankshaft.
ANTI-SEIZE LUBRICANT, OIL OR GREASE ON THE CRANKSHAFT AND
FLYWHEEL TAPERS FOR EASY REMOVAL OF THE FLYWHEEL LATER!
This applies to all aluminum, cast
iron or steel flywheels with a tapered fit on the
crankshaft. Here's
a YouTube video link on this:
Can I use Anti-Seize On A Small Engine
Flywheel? If a flywheel
with a taper needs to be removed for whatever reason, it's supposed to be
difficult to remove. Anti-seize lubricant works great for the threads on
bolts in certain situations, but NOT for flywheels and crankshaft tapers.
For assurance,
high strength liquid
threadlocker
(Red Loctite, Permatex or equivalent) can be
applied on the flywheel and crankshaft tapers to prevent the flywheel from
slipping on the crankshaft. Thorough cleaning of the tapers should still
be performed even with the use of the threadlocker. Be sure to allow the
threadlocker to fully cure (dry/harden) overnight at room temperature before
starting the engine because if the threadlocker is not dry and still in liquid
form, the flywheel could slip or loosen on the crankshaft.
If the threadlocker is used, an acetylene torch will be required to soften the threadlocker in order to remove the flywheel. If the flywheel needs to be removed later, use a quality gear puller and a heavy duty 1/2" impact wrench or some muscle. Any oil, dirt or debris trapped in the tapers, or even anti-seize, will, without a doubt, allow the flywheel to slip or rock back and forth on the crankshaft, in which will shear the key, wallow out both keyways and possibly crack or break the flywheel and/or crankshaft. Dirt/oil on the tapers is the main reason why most custom-made billet steel high-performance crankshafts break. And if the flywheel use a Cub Cadet garden tractor or billet aluminum clutch hub adapter, be sure to install the [1-3/8" o.d.] thick flat washer under the retaining nut or bolt and then torque the nut or bolt to the proper specs.
NOTE: As long as the rotating clutch components are trued-up in a metal lathe to minimize vibration, and the wide, thick washer is used inside the hub to secure the hub to the flywheel, and the flywheel retaining nut or bolt properly torqued, the OEM (Original Equipment Manufacturer) cast aluminum clutch hub have been proven to hold up to a wide open throttle pulling engine. IMPORTANT: If you don't feel comfortable using a metal lathe, please consult a professional and experienced machinist with a lathe.
A cast
iron flywheel with a crack in it, even a small crack, should never
be used on any engine!
 Oil, grease, dirt or any kind
of debris in the flywheel taper and/or on the crankshaft taper, or even an
overtorqued nut or bolt, could cause the center in a cast iron flywheel to
crack in the keyway or the threaded stud of the crankshaft to break off.
Cast iron flywheels always crack at the weakest point, which is at the keyway.
If the crack is welded, and when the flywheel is installed on the crankshaft,
and the nut or bolt is torqued to specs, the taper would still split next
to the weld. But steel flywheels don't crack (or break). For a steel flywheel,
visit
Midwest Super Cub's website.
Oil, grease, dirt or any kind
of debris in the flywheel taper and/or on the crankshaft taper, or even an
overtorqued nut or bolt, could cause the center in a cast iron flywheel to
crack in the keyway or the threaded stud of the crankshaft to break off.
Cast iron flywheels always crack at the weakest point, which is at the keyway.
If the crack is welded, and when the flywheel is installed on the crankshaft,
and the nut or bolt is torqued to specs, the taper would still split next
to the weld. But steel flywheels don't crack (or break). For a steel flywheel,
visit
Midwest Super Cub's website.
A crack in a flywheel will cause an engine to vibrate severely, plus it'll be noisy. (It'll make a "clunk, clunk" sound at idle.) The crack will get worse over time, causing the flywheel to split in half at high RPM. If this happens, the two halves could cause severe bodily injury or possibly death if they were to become airborne and strike an innocent bystander.
The only valuable part on a cast iron flywheel with a crack in the keyway would be the starter ring gear. It can be installed on a [good] cast flywheel or a steel flywheel. Cast iron flywheels that's in good condition works great up to 4,000 RPM. (The factory setting of maximum RPM for virtually all small gas engines, including all of Kohler engines is 3,600.) Above 4,000 RPM, a steel flywheel is highly recommended for safety.
To minimize damage to the keyways, do not use a steel flywheel key. A heat-treated hardened key would be even a worse thing to use. An soft aluminum (4041 hardness) key works best. To keep a keyway in a cast flywheel from splitting, it's best to use soft aluminum key. The reason for this is if the connecting rod breaks resulting in instant crankshaft lockup, the soft key will prevent damage to the flywheel and crankshaft. The aluminum key will shear in two, allowing the flywheel to slip on the crankshaft, preventing damage to either the flywheel or crankshaft. A steel key will cause a cast iron flywheel to crack or break, or if a flywheel loosens on the crankshaft, it'll wallow out the keyways. But if an aluminum V-belt starter pulley with ignition timing degree marks is installed on the PTO end of the crankshaft, there's really no need to install a flywheel key. The only reason most small engines use a flywheel key is to time the ignition, and not to prevent the flywheel from slipping on the crankshaft.
The Best Way to Torque the Flywheel Retaining Bolt or Nut - [Top of Page]

Personally, I use a heavy duty 1/2" impact wrench to lightly snug the flywheel nut or bolt against the flywheel, then I finish torquing it with a torque wrench. The flywheel won't rotate with the impact wrench. If an impact wrench isn't available, and if the flywheel has a starter ring gear, clamp Vise Grips on the edge of the ring gear, allow it to bump against the bolt boss on the bearing plate and then the flywheel nut or bolt can be loosened to be removed, or when installing, torqued to specs. But if the flywheel doesn't have a ring gear, clamp the Vise Grips on the PTO end of the crankshaft, install a long bolt in one of the bolt holes on the PTO end of the block, and allow the Vise Grips to bump against the bolt to loosen or torque the flywheel nut or bolt. As easy and simple as this may be, do not place a steel bar through the fins of the flywheel to loosen or torque the bolt or nut! Being the fins are made of brittle cast iron, doing this could cause a fin to break off. If a fin breaks off, this will cause the flywheel to be dangerously out of balance, and the engine will vibrate badly.
With the tapers clean, and when the flywheel nut or bolt is tightened or torqued to specs, the "squeezing" action of the flywheel taper actually "grips" it to the crankshaft, guaranteeing 100% metal to metal contact, and torque the 3/8" bolt to 40 ft. lb. or 15/16" nut to 65 ft. lb. Do not use an impact wrench because this may overtighten the bolt/nut and cause the flywheel to crack/split at the keyway slot. And OEM Kohler's flywheel castle nut is self tightening, requiring no lock washer. But use a split lock washer on the bolt, and use a new grade 8 bolt, nothing less.
Shielding of the Flywheel is Important!
I remember years ago, I was reading a club's rules, and it stated that all tractors must have a steel flywheel, and it must be shielded 360º with minimum 1/4" thick steel. I asked one of the pullers of the club, "why shield a steel flywheel? It's not going to break." And he told me: "There's a possibility that the end of the crankshaft could break off."
Actually, it's not rare that this kind of thing happens. It's happened to various pullers. The end of a crankshaft, despite if it's steel or cast iron, can break off next to the flywheel. It's a slight possibility. But then again, it could happen. Like the old saying goes: "A bad apple will spoil the bunch." And remember Murphy's Law? Must be prepared for the unexpected. So need to shield them flywheels folks, before a catastrophe happens.
Below
Ê are the results of a OEM Kohler cast
iron flywheel that is out-of-balance, with a crack in the keyway, a broken-off
fin, and/or when spun at
wide
open throttle
 Due to its brittle material, a cast iron flywheel
(altered or unaltered) shouldn't be used on an engine that runs higher than
4,000 RPM or at
wide
open throttle. Due to the combination of severe centrifugal force and
normal engine vibration, the flywheel could explode, making shrapnel, and
the shards could cause serious injury or possible death to a bystander. The
Kohler Magnum plastic flywheel fan shouldn't be ran above 4,000 RPM either,
because it can explode, too. And NEVER use an
automotive tire bubble balancer to balance a flywheel!
Also, make sure the flywheel has all the internal magnets intact (for the
charging system) or remove the magnets altogether if using no charging system.
And do not spin a cast flywheel (on the engine) no faster than 4,000 RPM!
Or better yet, install a billet steel flywheel and an electric fan to cool
the engine. Check out this video:
Farmall
1206 Breaks in Half when flywheel Explodes - YouTube and check out other
YouTube videos of
flywheels
exploding. This is why shielding the flywheel (and clutch assembly)
360º with heavy plate metal is so important!
Due to its brittle material, a cast iron flywheel
(altered or unaltered) shouldn't be used on an engine that runs higher than
4,000 RPM or at
wide
open throttle. Due to the combination of severe centrifugal force and
normal engine vibration, the flywheel could explode, making shrapnel, and
the shards could cause serious injury or possible death to a bystander. The
Kohler Magnum plastic flywheel fan shouldn't be ran above 4,000 RPM either,
because it can explode, too. And NEVER use an
automotive tire bubble balancer to balance a flywheel!
Also, make sure the flywheel has all the internal magnets intact (for the
charging system) or remove the magnets altogether if using no charging system.
And do not spin a cast flywheel (on the engine) no faster than 4,000 RPM!
Or better yet, install a billet steel flywheel and an electric fan to cool
the engine. Check out this video:
Farmall
1206 Breaks in Half when flywheel Explodes - YouTube and check out other
YouTube videos of
flywheels
exploding. This is why shielding the flywheel (and clutch assembly)
360º with heavy plate metal is so important!
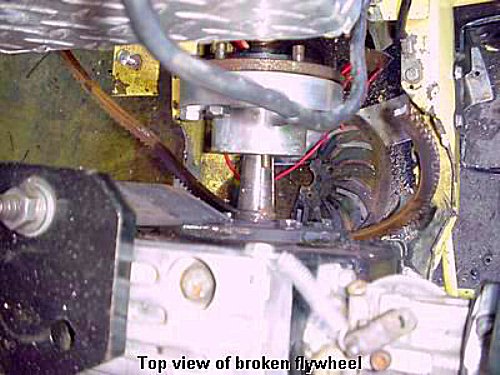
The photos below Ê are the results of a 9-1/2" diameter cast iron Kohler flywheel when it was spun at wide open throttle in a competition garden pulling tractor. This was a very serious accident that could have been a life-threatening tragedy. Remember: a well-constructed and precision-balanced steel flywheel is cheap compared to hospital bills, rehabilitation or funeral costs and not to mention the seemingly never-ending lawsuits! For a steel flywheel, visit Midwest Super Cub's website.
The guy (name withheld) had just recently bought the Pro Stock motor. He already had the clutch setup on the Kohler opposed twin he was running. According to what a friend of his told A-1 Miller's (that also has a Pro tractor) the guy called him and asked would it be ok just to start the motor so he could hear it run. He was told not to turn it over 3,000 RPM. There is no question the guy knew he needed a steel flywheel and safety shields on the tractor before pulling it. I am confident those measures would have been on it before he pulled it the first time. There "was" someone standing by the tractor - the guy that owns it. He was working the throttle standing right in-line with the cast iron flywheel. You can see what it did to the air filter. Apparently it hit the carburetor and filter on its way to hitting him. It wasn't his leg that got the brunt of the piece of flywheel!
He just got too eager to find out what he had purchased and made a bad decision. It's an injury that will be with him the rest of his life. The point of putting these photos on this site is so other pullers would not make the same mistake. I'm confident he is embarrassed by his actions...but he didn't have to share those photos, ya know. I admire him for sharing these photos, and he's still suffering from the accident. - Story by Ron Ethridge
 |
 |
 |
 |
 |
 |
 |
 |
 |
 |
 |
 |
It's highly recommended
that all flywheels, despite the material it's made of, be
dynamically precision spin-balanced with
an
automotive Flywheel/Crankshaft balancing machine. The same
machine to balance a crankshaft can be used to balance a flywheel, too. And
never use an automotive tire balancer or "bubble balancer" to balance a flywheel!
They are NOT precision enough for a flywheel!
Advertisement: (Prices are subject to change without notice.) (Updated 7/9/18)
| Click here to contact A-1 Miller's Performance Enterprises to place an order, send your parts for repairing, and/or for FREE professional and honest technical customer service assistance and support and payment options. Please contact A-1 Miller's if you need a part or parts, or service(s) performed that's not listed or mentioned in this website. | |
 High
Quality Small Engine Inductive Tachometer/Hour Meter with Replaceable
Battery. A tachometer is required for monitoring and/or setting the
maximum speed of a small engine, which is normally 3,200 or 3,600 RPM (depending
on type of carburetor), to prevent from over-revving and possible damage
to the engine or dangerous flywheel explosion. Very accurate, vibration-proof
and weatherproof construction. Can be surface-mounted and secured with two
screws to monitor engine RPM, or hand-held to set engine RPM. Large 3/8 inch
LCD display. Works with magneto or battery-powered ignition systems by selecting
engine type by programming S1 and S2 buttons. If tachometer does not turn
on automatically as soon as engine starts, press and hold the two buttons
at the same time. Instructions included. Reads up to 99,999 RPM. Hour
meter reads up to 9999:59 hours/minutes. Programmable maintenance hour setting
with service icon, a service reminder when to change oil or other maintenance.
Can be manually reset to Zero hours. Easy installation: Single wire wraps
around spark plug wire and secured with two supplied nylon zip-ties. No wire
terminal connections required. Includes replaceable CR2450 battery. Dimensions:
2" wide x 1-3/4" depth x 3/4" height. $25.00 each, plus shipping &
handling. Click here to print
out instructions. Please let me know if you're
interested in purchasing this item and I'll give you the total amount with
shipping and payment options. High
Quality Small Engine Inductive Tachometer/Hour Meter with Replaceable
Battery. A tachometer is required for monitoring and/or setting the
maximum speed of a small engine, which is normally 3,200 or 3,600 RPM (depending
on type of carburetor), to prevent from over-revving and possible damage
to the engine or dangerous flywheel explosion. Very accurate, vibration-proof
and weatherproof construction. Can be surface-mounted and secured with two
screws to monitor engine RPM, or hand-held to set engine RPM. Large 3/8 inch
LCD display. Works with magneto or battery-powered ignition systems by selecting
engine type by programming S1 and S2 buttons. If tachometer does not turn
on automatically as soon as engine starts, press and hold the two buttons
at the same time. Instructions included. Reads up to 99,999 RPM. Hour
meter reads up to 9999:59 hours/minutes. Programmable maintenance hour setting
with service icon, a service reminder when to change oil or other maintenance.
Can be manually reset to Zero hours. Easy installation: Single wire wraps
around spark plug wire and secured with two supplied nylon zip-ties. No wire
terminal connections required. Includes replaceable CR2450 battery. Dimensions:
2" wide x 1-3/4" depth x 3/4" height. $25.00 each, plus shipping &
handling. Click here to print
out instructions. Please let me know if you're
interested in purchasing this item and I'll give you the total amount with
shipping and payment options.
Wiring Instructions:
Wiring is the same for the hall effect and inductive proximity sensors. Certain proximity sensors have an LED (Light Emitting Diode), which flashes when in close proximity of target. If the proximity sensor is wired incorrectly, the LED will illuminate at all times.
|
|
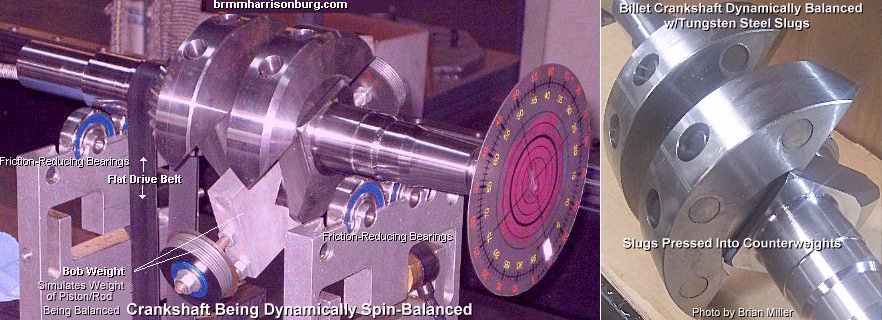
Precision Dynamic Spin-Balance
Service - If your engine vibrates a lot or more than normal, and
if the parasitic accessories or attachments are not broken or out-of-balance,
then chances are, the rotating assembly (crankshaft, connecting rod and piston
assembly, and/or flywheel) needs to be precision balanced.
|
|
|
|
A-1 Miller's Crankshaft Machine Repair
Service - (Added 2/3/21)
|
|
 Flywheel Retaining
Nuts for threaded stud on end of K-series and steel crankshafts. IMPORTANT:
Apply thin coat of motor oil on threads of crankshaft before installing nut
then torque each to 65 ft. lbs. Flywheel Retaining
Nuts for threaded stud on end of K-series and steel crankshafts. IMPORTANT:
Apply thin coat of motor oil on threads of crankshaft before installing nut
then torque each to 65 ft. lbs.
|
|
 Flywheel Retaining Bolt and
Washer Kit. Fits Kohler and various other makes and models of small engines
with a 3/8" threaded hole in flywheel end of crankshaft. Includes: 3/8-24
UNF grade 8 bolt, split lock washer and extra thick flat washer. IMPORTANT:
Apply thin coat of motor oil in threads of bolt, then torque to 40 ft. lb.
High quality aftermarket. Replaces OEM Kohler part #'s 25 068 04, 25 068
24, 47 086 16, 47 086 18, 52 068 25 (bolt) and 12 468 03-S, 52 114 02, 52
468 15 (washer). $5.00 per kit, plus shipping & handling. Flywheel Retaining Bolt and
Washer Kit. Fits Kohler and various other makes and models of small engines
with a 3/8" threaded hole in flywheel end of crankshaft. Includes: 3/8-24
UNF grade 8 bolt, split lock washer and extra thick flat washer. IMPORTANT:
Apply thin coat of motor oil in threads of bolt, then torque to 40 ft. lb.
High quality aftermarket. Replaces OEM Kohler part #'s 25 068 04, 25 068
24, 47 086 16, 47 086 18, 52 068 25 (bolt) and 12 468 03-S, 52 114 02, 52
468 15 (washer). $5.00 per kit, plus shipping & handling. |
 Safety Retaining Bolt and
Washer Kit for Starter Pulley on PTO end of crankshaft or Harmonic Balancer
on automotive crankshaft (mini rod). Prevents starter pulley or harmonic
balancer from dislodging on crankshaft, and becoming an airborne projectile,
which can cause serious injury to a bystander or spectator. Kit includes:
3/8-24 UNF or 7/16-28 UNF grade 8 bolt, split lock washer and 1-3/8" O.D.
flat washer. Please indicate if you need the kit for a 3/8" or 7/16" bolt.
A-1 Miller's aftermarket parts. $5.00 per kit, plus shipping &
handling. Safety Retaining Bolt and
Washer Kit for Starter Pulley on PTO end of crankshaft or Harmonic Balancer
on automotive crankshaft (mini rod). Prevents starter pulley or harmonic
balancer from dislodging on crankshaft, and becoming an airborne projectile,
which can cause serious injury to a bystander or spectator. Kit includes:
3/8-24 UNF or 7/16-28 UNF grade 8 bolt, split lock washer and 1-3/8" O.D.
flat washer. Please indicate if you need the kit for a 3/8" or 7/16" bolt.
A-1 Miller's aftermarket parts. $5.00 per kit, plus shipping &
handling. |
 Extra Thick
Flywheel / Aluminum Hub Adapter Retaining Washers. A must to secure flywheel
and prevent OEM Cub Cadet or billet aluminum hub adapter breakage. Each made
of steel and measures approximately 1/4" thick x 1-1/4" o.d. Extra Thick
Flywheel / Aluminum Hub Adapter Retaining Washers. A must to secure flywheel
and prevent OEM Cub Cadet or billet aluminum hub adapter breakage. Each made
of steel and measures approximately 1/4" thick x 1-1/4" o.d.
|
|
 Step Washer Adapter. Use this part to center the
OEM Cub Cadet or OEM John Deere cast aluminum clutch hubs, or the billet
aluminum clutch hub with a 5/8" hole to a crankshaft with the 3/8" bolt on
later model Kohler K-series and all Magnum engines. Professionally machined
by A-1 Miller's to fit perfectly inside OEM cast aluminum clutch hub adapters.
A must to prevent severe wobble/vibration and prevent hub breakage and/or
driveshaft/clutch breakage. [Return
To Previous Section, Paragraph or Website]
Step Washer Adapter. Use this part to center the
OEM Cub Cadet or OEM John Deere cast aluminum clutch hubs, or the billet
aluminum clutch hub with a 5/8" hole to a crankshaft with the 3/8" bolt on
later model Kohler K-series and all Magnum engines. Professionally machined
by A-1 Miller's to fit perfectly inside OEM cast aluminum clutch hub adapters.
A must to prevent severe wobble/vibration and prevent hub breakage and/or
driveshaft/clutch breakage. [Return
To Previous Section, Paragraph or Website]
|
|
 Square Aluminum
Flywheel/Crankshaft Key. Made of 6061 medium-grade hardness alloy aluminum.
Fits Kohler engine models K141, K160, K161, K181, M8, K241, K301, K321, K341,
K361, KT17, KT17 Series II, KT19, KT19 Series II, MV16, M18, MV18, M20 and
MV20 made in 1973 and later. Helps prevent damage of keyway in crankshaft
and/or prevents the possibility of cracking/breaking of factory cast iron
flywheel due to sudden crankshaft lock-up in the event of connecting rod
failure. Dimensions: 3/16" square x 1-3/8" length. IMPORTANT: Thoroughly
clean tapers inside flywheel and on crankshaft before installing flywheel!
A-1 Miller's part. Replaces Kohler [steel key] part # X-286-17-S.
$5.00 each, plus shipping & handling. Square Aluminum
Flywheel/Crankshaft Key. Made of 6061 medium-grade hardness alloy aluminum.
Fits Kohler engine models K141, K160, K161, K181, M8, K241, K301, K321, K341,
K361, KT17, KT17 Series II, KT19, KT19 Series II, MV16, M18, MV18, M20 and
MV20 made in 1973 and later. Helps prevent damage of keyway in crankshaft
and/or prevents the possibility of cracking/breaking of factory cast iron
flywheel due to sudden crankshaft lock-up in the event of connecting rod
failure. Dimensions: 3/16" square x 1-3/8" length. IMPORTANT: Thoroughly
clean tapers inside flywheel and on crankshaft before installing flywheel!
A-1 Miller's part. Replaces Kohler [steel key] part # X-286-17-S.
$5.00 each, plus shipping & handling.
|
|
Flywheel / Aluminum Hub Retaining Washers. A thick, wide washer
is a must to secure flywheel and prevent clutch/driveshaft aluminum hub adapter
breakage! Each made of steel and measures 1-1/4" o.d. x approximately 1/4"
thick.
|
|
Steel Adapter
Step-Washer for installing Cub Cadet cast aluminum clutch hub with 5/8" center
hole to Kohler Magnum crankshaft with a 3/8" bolt. A must to center hub and
prevent hub breakage! NOTE: As long as the rotating clutch components
are trued-up in a metal lathe to minimize vibration, and the wide, thick
washer is used inside the hub to secure the hub to the flywheel, and the
flywheel retaining nut or bolt properly torqued, the OEM cast aluminum clutch
hub is capable of holding up to a wide open throttle pulling engine.
|
|
 1/4" Steel Dowel
Pin for aluminum clutch hub. 3/4. Secures above hub to flywheel to prevent
slippage. 1/4" Steel Dowel
Pin for aluminum clutch hub. 3/4. Secures above hub to flywheel to prevent
slippage.
|
|

 High Quality, Reliable and Durable Digital Tachometer/Proximity
Sensor Kits. A tachometer is required in setting the correct engine RPM,
which is normally 3,200 or 3,600 RPM (depending on type of carburetor), to
prevent from over-revving and possible damage to the engine or dangerous
flywheel explosion. Choice of a RED or
BLUE numeric display. Will work with
most small engines or multi-cylinder automotive engines, gas or diesel. Very
accurate, vibration-proof and weatherproof construction. The great thing
about this type of tachometer is that it needs no setup or programming. Displays
accurate RPM as soon as the engine cranks over to start. Displays up to 9,999
RPM. Tachometer returns to zero [0000] when engine is shut down. Can be used
for lawn & garden equipment or competition pulling engines. Designed
to be permanently mounted to monitor engine RPM at all times. Tachometer
can be in-dash or panel-mounted. This precision digital tachometer operates
with external power and on the same principle as my
High Quality, Reliable and Durable Digital Tachometer/Proximity
Sensor Kits. A tachometer is required in setting the correct engine RPM,
which is normally 3,200 or 3,600 RPM (depending on type of carburetor), to
prevent from over-revving and possible damage to the engine or dangerous
flywheel explosion. Choice of a RED or
BLUE numeric display. Will work with
most small engines or multi-cylinder automotive engines, gas or diesel. Very
accurate, vibration-proof and weatherproof construction. The great thing
about this type of tachometer is that it needs no setup or programming. Displays
accurate RPM as soon as the engine cranks over to start. Displays up to 9,999
RPM. Tachometer returns to zero [0000] when engine is shut down. Can be used
for lawn & garden equipment or competition pulling engines. Designed
to be permanently mounted to monitor engine RPM at all times. Tachometer
can be in-dash or panel-mounted. This precision digital tachometer operates
with external power and on the same principle as my
 Aluminum Set Screw Locking Collar
w/Embedded Magnet. Use with hall effect proximity sensors only. $30.00
each, plus shipping & handling.
Aluminum Set Screw Locking Collar
w/Embedded Magnet. Use with hall effect proximity sensors only. $30.00
each, plus shipping & handling.
 Prices are subject to change
without notice.
Prices are subject to change
without notice.
 NOTE: When shipping your
crankshaft, connecting rod and piston assembly, and/or flywheel to
NOTE: When shipping your
crankshaft, connecting rod and piston assembly, and/or flywheel to
 Drill and tap flywheel end of
Kohler K-series crankshaft for installation of 3/8" bolt when threads on
integrated 5/8" stud are damaged beyond rethreading or when 5/8" stud breaks
off. No need to purchase another high-dollar, hard to find crankshaft. Precision
work performed in large metal lathe. Hardware include: 3/8-24 UNF grade 8
bolt, split lock washer and 3/8" x 5/8"
Drill and tap flywheel end of
Kohler K-series crankshaft for installation of 3/8" bolt when threads on
integrated 5/8" stud are damaged beyond rethreading or when 5/8" stud breaks
off. No need to purchase another high-dollar, hard to find crankshaft. Precision
work performed in large metal lathe. Hardware include: 3/8-24 UNF grade 8
bolt, split lock washer and 3/8" x 5/8"  Drill and tap flywheel end of
Kohler K-series crankshaft for installation of 5/8" threaded steel stud when
threads on integrated 5/8" stud are damaged beyond rethreading or when 5/8"
stud breaks off (too short). No need to purchase another high-dollar, hard
to find crankshaft. Precision work performed in large metal lathe. Hardware
includes: Installation of 5/8-18 UNF stud, self-locking flywheel retaining
nut and extra thick flat washer. $75.00 for parts and labor, plus
return shipping & handling.
Drill and tap flywheel end of
Kohler K-series crankshaft for installation of 5/8" threaded steel stud when
threads on integrated 5/8" stud are damaged beyond rethreading or when 5/8"
stud breaks off (too short). No need to purchase another high-dollar, hard
to find crankshaft. Precision work performed in large metal lathe. Hardware
includes: Installation of 5/8-18 UNF stud, self-locking flywheel retaining
nut and extra thick flat washer. $75.00 for parts and labor, plus
return shipping & handling.
 Rectangular Steel
Flywheel/Crankshaft Key. Fits Kohler engine models K241, K301 and K321 made
in 1972 and earlier with the 8" diameter flywheel and starter/generator.
Also fits Kohler engine models K330/K331. Dimensions: 3/16" wide x 1/4" tall
x 1-3/8" length. IMPORTANT: Thoroughly clean tapers inside flywheel and
on crankshaft before installing flywheel!
Rectangular Steel
Flywheel/Crankshaft Key. Fits Kohler engine models K241, K301 and K321 made
in 1972 and earlier with the 8" diameter flywheel and starter/generator.
Also fits Kohler engine models K330/K331. Dimensions: 3/16" wide x 1/4" tall
x 1-3/8" length. IMPORTANT: Thoroughly clean tapers inside flywheel and
on crankshaft before installing flywheel!
 Square Steel Flywheel/Crankshaft
Keys. Fits Kohler engine models K141, K160, K161, K181, M8, K241, K301, K321,
K341, K361, KT17, KT17 Series II, KT19, KT19 Series II, MV16, M18, MV18,
M20 and MV20 made in 1973 and later. Dimensions: 3/16" square x 1-3/8" length.
IMPORTANT: Thoroughly clean tapers inside flywheel and on crankshaft before
installing flywheel!
Square Steel Flywheel/Crankshaft
Keys. Fits Kohler engine models K141, K160, K161, K181, M8, K241, K301, K321,
K341, K361, KT17, KT17 Series II, KT19, KT19 Series II, MV16, M18, MV18,
M20 and MV20 made in 1973 and later. Dimensions: 3/16" square x 1-3/8" length.
IMPORTANT: Thoroughly clean tapers inside flywheel and on crankshaft before
installing flywheel!
 Woodruff (Semicircular) Steel
Flywheel/Crankshaft Key. Fits most OHV aluminum block Kohler engines. Dimensions:
3/16" wide x 5/8" length. IMPORTANT: Thoroughly clean tapers inside flywheel
and on crankshaft before installing flywheel!
Woodruff (Semicircular) Steel
Flywheel/Crankshaft Key. Fits most OHV aluminum block Kohler engines. Dimensions:
3/16" wide x 5/8" length. IMPORTANT: Thoroughly clean tapers inside flywheel
and on crankshaft before installing flywheel!
How to Install the Ring Gear on a Flywheel - [Top of Page] [Return To Previous Paragraph, Section or Website]
The same flywheel ring gear (gear starter) for Kohler engine models K241, M10, K301, M12, K321, M14, K341, M16, K361, KT17, KT17 Series 2, KT19, KT19 Series 2, MV16, M18, MV18, M20 and MV20 will interchange. They are all identical. To swap a starter ring gear from one flywheel to another, first of all, Kohler don't sell just the ring gear by itself. You will need to acquire a used or new flywheel with a good ring gear on it.
-


 To remove the ring
gear from a flywheel, it's not necessary to heat it with a torch. Instead,
place the flywheel with the fins facing up on a steel top work table, bench
or concrete floor, then use a drift punch tool or steel rod and a 2-3 lb.
hammer to remove the ring gear from the flywheel. Gently tap equally around
the entire circumference of the gear to avoid distorting or bending it. It
should eventually fall off.
To remove the ring
gear from a flywheel, it's not necessary to heat it with a torch. Instead,
place the flywheel with the fins facing up on a steel top work table, bench
or concrete floor, then use a drift punch tool or steel rod and a 2-3 lb.
hammer to remove the ring gear from the flywheel. Gently tap equally around
the entire circumference of the gear to avoid distorting or bending it. It
should eventually fall off.
- To install the ring gear on a flywheel, position the flywheel with the fins facing down on a fire-proof steel top work table, bench or concrete floor, and place the ring gear on the flywheel with the beveled edge of the gear teeth facing upward. This allows the starter gear teeth to engage more easily without causing damage or wear to either gear teeth.
- The best and quickest way to install the ring on the flywheel is with an oxy-acetylene torch. By the way - a propane torch won't get hot enough to expand the ring gear. Anyway, slowly direct the flame 360º on the ring gear itself and avoid heating the charging magnets inside the flywheel. Allow it to expand until it drops down on the flywheel's machined edge. This process should only take a few minutes. Once it drops in place, it'll have a loose fit until it cools. Allow it to air-cool. Do not cool it with water! Once cooled, it'll have a tight, secure fit on the flywheel. Do not use a hammer for assistance! Using a hammer will bend the ring gear out of shape and ruin it.
- Click here to watch various YouTube videos of this process: How to swap or flip a ring gear off a flywheel - YouTube (https://www.youtube.com/results?search_query=How+to+swap+or+flip+a+ring+gear+off+a+flywheel).
How to Widen the Frame Rails on a Narrow Frame Cub Cadet Garden Tractor to Use a Large Flywheel with a Gear Starter - (This is much easier to do on a platform work table.)

 On a competition garden pulling tractor, it's best to use a
gear starter with the larger diameter flywheel, because a starter/generator
will rob the engine of valuable horsepower, which needs to be put through
the rear tires. It'll be better to spin the tires than the starter/generator.
As an added bonus, the bigger (heavy, steel) flywheel will add horsepower
and torque to the engine at high RPM.
On a competition garden pulling tractor, it's best to use a
gear starter with the larger diameter flywheel, because a starter/generator
will rob the engine of valuable horsepower, which needs to be put through
the rear tires. It'll be better to spin the tires than the starter/generator.
As an added bonus, the bigger (heavy, steel) flywheel will add horsepower
and torque to the engine at high RPM.
The larger 9-1/2" diameter flywheel with a starter ring gear, larger K-series bearing plate and K-series flywheel housing can be installed on any K241-K361 Kohler engine for use with the gear starter, as long as there's an indentation in the block just above the starter motor's mounting holes (when using the upper-mount type starter). (The small flywheel is 8" in diameter.) If the engine is being installed in a narrow frame Cub Cadet garden tractor models 70, 71, 72, 73, 100, 102, 104, 106, 122, 124 or 126, the frame rails must be widened to accept the larger flywheel, bearing plate and flywheel housing. No charging system is required or recommended for a pulling tractor because it'll rob horsepower and add unnecessary weight and extra wiring. Read below for information on how to convert a narrow frame Cub Cadet garden tractor.
If you want to do away with the old, heavy, battery draining, power-robbing starter/generator on a narrow frame Cub Cadet garden tractor and install a lightweight gear starter along with the larger 9-1/2" diameter geared flywheel on a Kohler engine, you'll have to widen the frame rails. To do this, with the engine removed, cut a slot halfway down into the frame where the front of the flywheel shroud sits. For the rear cut, measure 17" back from the front of the frame (to where the metal bends for the clutch cover), and then make the cut there. Then using a large pipe wrench or very large Crescent wrench (I found either of these work great), bend or spread the frame rails outward 11" from the front of the frame. Use a (large) flywheel shroud as a gauge to determine how wide the rails will need to be. This will eliminate having to put the engine in and take it out again. Spread the frame 5" forward (towards front of tractor) from where the slot was cut. Check to see that the frame rails are bent upward from spreading out the metal. (Hold a straight edge tool under each frame rail to check for straightness.) If the widening process was performed correctly, then they shouldn't be bent. If they are bent, they will need to be straightened so the driveshaft/clutch will be in correct alignment with the engine. It'll be best to securely weld two full-length 1/4" thick x 1-1/2" wide steel pieces under each frame rail to reduce the chance of bending. Then securely weld a 1/8" thickness mild steel gusset plate (angle reinforcement brace) into each wedge/cut) opening. A Magnum flywheel housing and bearing plate would require a lot more widening of the frame rails to install in a narrow frame Cub Cadet garden tractor.
Widening the frame rails as mentioned above and then properly welding in the gussets (reinforcement angle braces) shouldn't weaken it. But make sure that the frame is in fact straight before welding in the gussets. Because sometimes it can bend during the process of widening the frame. To prevent the frame from bending overtime when doing ground-pounding wheelies, weld in the gussets on both the inside and outside of the frame. Put down a good bead of weld, too. If the frame is bent, only slightly, this will interfere with the operation and proper alignment of the clutch and driveshaft. The Cub Cadet garden tractor model 147 is the only narrow frame tractor that came from the factory with widened places in the frame for the large flywheel. This is also the last narrow frame Cub Cadet manufactured before the wide frame models were produced. There's no need to widen the frame rails on a wide frame Cub Cadet garden tractor models 86, 108, 128, 800, 1000 and 1200, because the large flywheel and gear starter will clear the rails.
The parts needed to convert a K241-K341 Kohler K-series engine with a starter/generator into a gear starter are as follows:
- Large diameter (9-1/2") K-series cast or steel flywheel with a starter ring gear.
- Large diameter K-series bearing plate that's designed for flywheel above and a K-series gear starter and charging stator.
- K-series flywheel shroud for flywheel, bearing plate and starter above (for either an upper-mount or lower mount gear starter).
- K-series gear starter. (Upper mount only on K241-K341 engines for Cub Cadet garden tractors.)
- Starter solenoid (if your particular tractor/equipment require one).
- Charging system w/stator and solid state voltage rectifier/regulator. (If tractor is not used solely for competition pulling.)
To install a gear starter on a K241-K341 Kohler engine in a narrow frame Cub Cadet garden tractor ...
- The engine will need to be removed.
- The frame rails will need to be cut and widened (enough to clear the [9-1/2"] flywheel shroud), and a couple of gusset plates will need to be welded in for strength.
- Install the large diameter bearing plate, (9-1/2") flywheel with a starter ring gear and flywheel shroud on the engine.
- A gear starter motor will need to be bolted on the side of the engine block. The block will need to have an indentation for the starter.
- Then there's the wiring, starter solenoid and push-button starter switch that needs to be installed.
But if you prefer to use the starter/generator when pulling, remember this: the generator part require less than 1hp of engine power to charge a fully drained battery. Therefore, if you were to install an OFF/ON toggle switch to turn off the field windings in the starter/generator, this will prevent it from charging the battery. Which will allow the engine to produce more power.
After installing the flywheel shroud and if the hub adapter, flywheel or starter cup grass screen makes contact with or scrapes part of the shroud on one side. This means the big hole in the shroud is out-of-alignment with the centerline of the crankshaft. It needs to be tweaked to put it in alignment. Sometimes I have the same problem with my customer's engines. To fix it, install all the mounting bolts in the shroud, but leave them loose, then place a soft 2x4 board against the shroud, and then hit the board with a big hammer or heavy rubber hammer to force the shroud over until it's centered with the screen. This is the only way I know how to fix it. I don't know how they get out of alignment in the first place, unless it came that way from the factory and haven't been noticed before. Heck, when rebuilding and/or reassembling an engine, you tend to notice a lot of new things about it. It's kind of like painting your own house on the outside. The owner don't notice maybe a cracked window, loose siding, etc., until they get up-close with it.
Installing a 10-16hp Single Cylinder Kohler Magnum Engine in an Older Cub Cadet Garden Tractor -
With the flanges on a Kohler Magnum engine model M10, M12, M14 or M16 block cut off and with a narrow Kohler/Cub Cadet oil pan installed, the Magnum will install in a spread-frame Cub Cadet garden tractor with little to no modifications. But it won't fit in a narrow- or wide-frame Cub Cadet garden tractor, because the Magnum flywheel shroud and bearing plate are too wide to fit between the frame rails, even when the frame rails on a narrow frame Cub Cadet garden tractor are widened. Therefore, a large flywheel shroud, bearing plate and upper mount gear starter from an older K241-K341 Kohler K-series engine will need to be installed on the Magnum engine and then the Magnum should install in a narrow- or wide-frame Cub Cadet garden tractor with little to no modifications.

 To place an order, send your item(s) for repairing, and/or
for customer service assistance, and FREE honest and accurate technical support,
please contact: A-1 Miller's Performance Enterprises, 12091 N Route B,
Hallsville, MO (Missouri) 65255-9604 USA. Please call in your order or send
an email with a list parts you need and your contact information.
To place an order, send your item(s) for repairing, and/or
for customer service assistance, and FREE honest and accurate technical support,
please contact: A-1 Miller's Performance Enterprises, 12091 N Route B,
Hallsville, MO (Missouri) 65255-9604 USA. Please call in your order or send
an email with a list parts you need and your contact information.
 Phone: 1-573-881-7229 (cell;
call, text or leave voicemail). Please call Monday-Friday, 9am to 5pm, Central
time zone, except holidays. If no answer, please try again later.
Phone: 1-573-881-7229 (cell;
call, text or leave voicemail). Please call Monday-Friday, 9am to 5pm, Central
time zone, except holidays. If no answer, please try again later.
 E-mail:
pullingtractor@aol.com. A-1 Miller's
shop is open to the public Monday-Friday, 9am to 5pm, Central time zone,
with an appointment on weekends, except holidays. If you're the kind of person
who don't trust delivery/shipping companies (mis)handling your high-dollar
and fragile merchandise, you can make the long drive to A-1 Miller's new
shop (click image to the right) to personally purchase parts, or drop off
and/or pick up your carburetor, clutch assembly, and/or other parts for repairing
and/or rebuilding. Or visit our new shop to drop off your parts. Please contact
us before coming so we'll be at our shop waiting for your arrival. When you
visit our shop, you will be dealing directly with the owner for the best
customer service. "The road to a [trusted] friend's house (or shop) is
never long." Don't sacrifice quality workmanship for distance.
Payment Options below.
Photos
of our new building/shop are posted here!
12091 N Route B, Hallsville, MO - Google Maps.
[Return To Previous Paragraph, Section
or Website]
E-mail:
pullingtractor@aol.com. A-1 Miller's
shop is open to the public Monday-Friday, 9am to 5pm, Central time zone,
with an appointment on weekends, except holidays. If you're the kind of person
who don't trust delivery/shipping companies (mis)handling your high-dollar
and fragile merchandise, you can make the long drive to A-1 Miller's new
shop (click image to the right) to personally purchase parts, or drop off
and/or pick up your carburetor, clutch assembly, and/or other parts for repairing
and/or rebuilding. Or visit our new shop to drop off your parts. Please contact
us before coming so we'll be at our shop waiting for your arrival. When you
visit our shop, you will be dealing directly with the owner for the best
customer service. "The road to a [trusted] friend's house (or shop) is
never long." Don't sacrifice quality workmanship for distance.
Payment Options below.
Photos
of our new building/shop are posted here!
12091 N Route B, Hallsville, MO - Google Maps.
[Return To Previous Paragraph, Section
or Website]
Payment Options, and We Ship to Canada and
Worldwide 
Item(s) in a package or cushioned envelope weighing less than 1 lb. is sent
by US Postal Service Airmail Letter Post for a 4-7 days delivery. Packaged
item(s) weighing over 1 lb. and up to 66 lb. is sent by US Postal Service
Airmail Parcel Post for a 4-10 days delivery. I cannot use the US Postal
Services' Flat Rate Priority Mail envelopes and boxes to ship outside U.S.
territories. Item(s) weighing over 67 lbs. or more is sent by FedEx Ground
or equivalent services. We try to keep our shipping cost to customers within
reason. Therefore, we don't ship our products in a fancy-looking package
with our company name and/or logo on it because most customers will just
toss it in the trash after they remove the contents. And being there is no
USPS tracking number outside the US, all I can do is make sure I write your
address correctly on the customs form and on your package.
My websites are not set up to process orders and accept payments. Therefore, to place an order with me, please call either number above or send an email with a list of parts you need, with your name, complete and correct postal mailing address and phone number. For payment options, I accept cash (in person), USPS Postal Money Orders, cashier's checks, business checks, MasterCard, VISA, Discover, American Express (please add 2.5% to the total amount for the credit/debit card processor's surcharge). If paying with a credit/debit card, please call me at either number above. Or to make a payment to me through PayPal, please click this link: https://www.paypal.com. Or use Cash App (username: pullingtractor) or Venmo (username: Pullingtractor) to make a payment to me. And be sure to mention a description of what the payment is for with your full name, postal address, phone number and email address. If sending a money order or cashier's check, please include a note in the envelope with your name, complete mailing address, phone number, email address and a description of what the payment is for. I'll make a note of your order when I have all your information, and I may have to order some of the parts on your list, which should take a few days to come in, but I will send everything to you as soon as I have the parts in stock after I receive your payment.


Return To Previous Website | Top of Page | Copyright © 1996-Present. This website created, designed and maintained by A-1 Miller's Performance Enterprises