
 Important
Information About the IH Cub Cadet Garden Tractor Oil Pan
Important
Information About the IH Cub Cadet Garden Tractor Oil Pan
Important
Information About the IH Cub Cadet Garden Tractor Oil Pan
Important
Information About the IH Cub Cadet Garden Tractor Oil Pan
Educating and Inspiring Small Engine, Lawn & Garden, and Garden
Pulling Tractor Enthusiasts Since 1996. Where Science and Common Sense Come
Together for Safety and Improved Engine/Tractor Performance |
A-1
Miller's Performance Enterprises - Parts & Services
Webstore |  Available Soon - Detailed Illustrated Plans
on How to Construct a Professional Pull-Back and Self-Propelled Garden
Tractor/Small Wheel Mini Rod Pulling Sleds
Available Soon - Detailed Illustrated Plans
on How to Construct a Professional Pull-Back and Self-Propelled Garden
Tractor/Small Wheel Mini Rod Pulling Sleds
Nowadays, prices are subject to change without notice. Click
Refresh to see any
changes or updates. Optimized for 1152 x 864 computer screen resolution.
To search for a word or phrase in any of my websites, press the CTRL
 and F
and F  keys on
your keyboard simultaneously to open the Find or Search dialog box in your
web browser. And being I have no
apprentice to update and pay for my websites so they'll
continue to be on the Internet, they will be removed forever when I'm no
longer around.
keys on
your keyboard simultaneously to open the Find or Search dialog box in your
web browser. And being I have no
apprentice to update and pay for my websites so they'll
continue to be on the Internet, they will be removed forever when I'm no
longer around.
Normal High Speed or Wide Open Throttle Engine Vibration in Competition Pulling Can Cause an Oil Pan to Loosen and Possibly Break!
 To prevent the oil pan from becoming
loose under a competition pulling situation, if necessary, first have the
flywheel and crankshaft
and piston/connecting rod assembly dynamically
and precision spin-balanced, and DO NOT USE AN OIL PAN GASKET! Instead
of a gasket, apply a thin bead of
clear RTV silicone adhesive sealant between the block and
pan, then torque the bolts (use grade 8 bolts
with split lock washers) to 35 ft. lbs. The absence of the gasket will allow
direct metal-to-metal contact, which keeps the bolts securely tight, with
the silicone sealant filling in any imperfections and irregularities between
the two metals, eliminating oil leaks. By the way - it's best to use
Clear RTV Silicone Adhesive Sealant for three reasons:
Gaskets don't always seal the imperfections and irregularities between two
mating metals, especially thin metal covers; being
Clear RTV Silicone Adhesive Sealant is an adhesive or glue,
it bonds parts together, forming a leak-proof seal; and being it's clear,
it makes for a clean and professional-looking repair job. When applied sparingly,
it can't be easily seen or noticed between the parts. Also, engine heat has
very little effect on silicone rubber. It can withstand up to 2,500 degrees
heat.
To prevent the oil pan from becoming
loose under a competition pulling situation, if necessary, first have the
flywheel and crankshaft
and piston/connecting rod assembly dynamically
and precision spin-balanced, and DO NOT USE AN OIL PAN GASKET! Instead
of a gasket, apply a thin bead of
clear RTV silicone adhesive sealant between the block and
pan, then torque the bolts (use grade 8 bolts
with split lock washers) to 35 ft. lbs. The absence of the gasket will allow
direct metal-to-metal contact, which keeps the bolts securely tight, with
the silicone sealant filling in any imperfections and irregularities between
the two metals, eliminating oil leaks. By the way - it's best to use
Clear RTV Silicone Adhesive Sealant for three reasons:
Gaskets don't always seal the imperfections and irregularities between two
mating metals, especially thin metal covers; being
Clear RTV Silicone Adhesive Sealant is an adhesive or glue,
it bonds parts together, forming a leak-proof seal; and being it's clear,
it makes for a clean and professional-looking repair job. When applied sparingly,
it can't be easily seen or noticed between the parts. Also, engine heat has
very little effect on silicone rubber. It can withstand up to 2,500 degrees
heat.
On a Cub Cadet garden tractor, the only thing that fastens the engine block to the tractor frame is the oil pan. When choosing which oil pan material to use for competitive pulling, an OEM Kohler cast aluminum oil pan can be safely used on a stock pulling tractor that will not run over 4,000 RPM. It's best to install stainless steel Heli-Coil thread inserts in the mounting holes of an aluminum oil pan to prevent stripping the soft threads. And a cast iron, billet aluminum or machined steel oil pan should be used on an engine that will operate at very high RPM or at wide open throttle.
On a Kohler competition pulling engine that turns well above 4,000 RPM, at high RPM or at wide open throttle, the oil pan could loosen because the gasket acts like a cushion between the engine block and oil pan. At high RPM, normal engine vibration (caused by crankshaft side thrust, which is unavoidable in a single cylinder engine) can cause the engine block and oil pan to "shift" against each other a few thousands of an inch, allowing the gasket to flatten out overtime. When this happens, the bolts that fasten the pan to the block loosens. But the bolts don't actually rotate to loosen, they just lose their torque or tightness against the pan because of the flattened gasket. Which could crack or break the oil pan on one corner where the metal is thin and weakest. And applying liquid threadlocker on the oil pan retaining bolt threads will not help because if the gasket flattens out, although the bolts will not rotate to loosen, the oil pan will still loosen.
Advertisement: (Prices are subject to change without notice.)
| Click here to contact A-1 Miller's Performance Enterprises to place an order, send your parts for repairing, and/or for FREE professional and honest technical customer service assistance and support and payment options. Please contact A-1 Miller's if you need a part or parts, or service(s) performed that's not listed or mentioned in this website. |
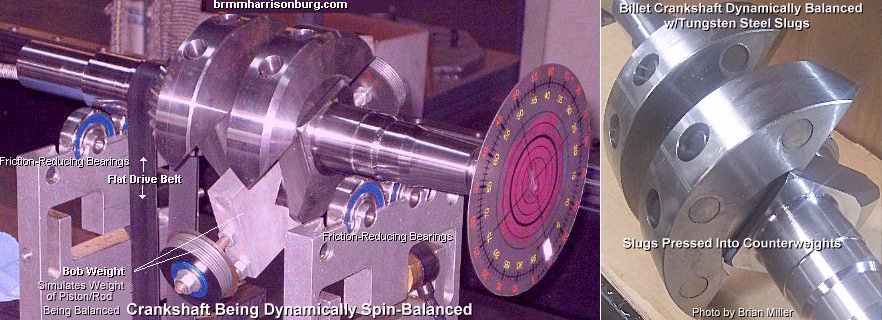 Precision,
Dynamic Flywheel and Crankshaft Spin-Balancing Service. To balance
the rotating assembly, the crankshaft, piston/rings, pin, clips, connecting
rod and bearing inserts (if applicable) are all required. The flywheel is
balanced separately. Precision,
Dynamic Flywheel and Crankshaft Spin-Balancing Service. To balance
the rotating assembly, the crankshaft, piston/rings, pin, clips, connecting
rod and bearing inserts (if applicable) are all required. The flywheel is
balanced separately.
IMPORTANT - When sending your flywheel and/or rotating assembly to A-1 Miller's for balancing, package everything securely so the items won't get damaged in shipping and please include a note in the box with your name, mailing address, phone number (in case I have any questions) and a description of what you want done. When shipping heavy parts, it's best to put a slightly smaller box inside a larger box, to double the strength and integrity of the package. Because the clumsy "gorillas" or incompetent and uncaring workers that work for certain delivery services mishandle the heavy packages and don't care. And when the work is completed, I'll either call or email you an invoice with the total including shipping & handling. [Return to Previous Section, Paragraph or Website] |
FYI - If oil leaks from an engine, transmission/transaxle or steering box, causing an oily mess on a concrete floor, mineral spirits (paint thinner) can be used to dry out the oil. Just pour some thinner on the oil, use a broom to thoroughly mix the thinner with the oil, and eventually the oil will dry with no signs of it ever being on the floor. Because of its low volatile flammability, paint thinner also works great as a cleaning solvent, which is used to clean oily or greasy mechanical parts.
By the way - it's a good idea to use split lock washers on ALL fasteners, to prevent other parts on the tractor from becoming loose later. And if you're concerned about driveshaft misalignment or clutch pin binding when not using an oil pan gasket, install a 1/32" (.030") thickness steel shim at each mounting hole between the oil pan and tractor frame. This will maintain proper driveshaft alignment with the engine so the clutch parts will last longer. So if somebody recommends using an oil pan gasket on a competition pulling engine that's going to turn well above 4,000 RPM, don't do it! Don't take chances! You could be sorry. Because sometimes listening to the wrong person can be very costly.
The Cub Cadet "Quiet Line" rubber ISO-mounted engine garden tractor models 680, 800, 1000, 1200, 1250, 1450, 1650 are notorious for cracking the cast aluminum oil pan because the pan fastens to two rails, which are independently mounted on rubber and are isolated from the main tractor frame. If the oil pan bolts aren't securely tightened, and due to normal engine vibration, sometimes the pan will develop a hair-line crack or break off at the corner, where the metal is the weakest, especially with an oil pan gasket. I've also seen them crack and . The same can happen with a cast iron oil pan. What happens is when a gasket is used, and when the pan bolts are tightened, the person who assembled the engine tightened the bolt on the corner on the PTO end of the block, then tightened the opposing bolt at the flywheel end of the block, and then tightened the other two remaining bolts. The first bolt that was tightened crushed the gasket, which caused a small, hair-line crack in the corner of the pan. Some people torque them with a gasket the wrong way. The correct sequence for torquing oil pan bolts is to lightly tighten one bolt on the flywheel end, then lightly tighten the bolt at the opposite corner on the PTO end, then lightly tighten another bolt, then lightly tighten the last bolt. Finally, torque each bolt to 35 ft. lbs. This procedure distributes equal pressure of each bolt without bending, warping or cracking the pan. Or better yet, just use clear RTV silicone adhesive sealant with no gasket. With no gasket, the pan will make direct contact with the block and they're be no bending, warping, cracking or breaking of the pan when the bolts are securely tightened. By the way - it's best to use Clear RTV Silicone Adhesive Sealant for three reasons: Gaskets don't always seal the imperfections and irregularities between two mating metals, especially thin metal covers; being Clear RTV Silicone Adhesive Sealant is an adhesive or glue, it bonds parts together, forming a leak-proof seal; and being it's clear, it makes for a clean and professional-looking repair job. When applied sparingly, it can't be easily seen or noticed between the parts. Also, engine heat has very little effect on silicone rubber. It can withstand up to 2,500 degrees heat.
Identification of Kohler Engine Blocks -
 Garden tractors that originally
came from the factory with a straight or narrow base Kohler engine block
are: IH-built and MTD-built Cub Cadet garden tractors, J.I. Case, John Deere
(models 112, 110 and early model 210 with the Kohler K241 engine. Model 112
serial number 100,001 – 250,000, model 110 serial number 250,001 and
up with the Kohler K241 engine, and 210 up to serial number 95,261), some
Ford, some Jacobsen and Springfield. (The oil pan used on the John Deere
and Springfield Kohler-equipped garden tractors are made of cast iron, identical
to the early Cub Cadet/K241 flat bottom oil pan.)
Garden tractors that originally
came from the factory with a straight or narrow base Kohler engine block
are: IH-built and MTD-built Cub Cadet garden tractors, J.I. Case, John Deere
(models 112, 110 and early model 210 with the Kohler K241 engine. Model 112
serial number 100,001 – 250,000, model 110 serial number 250,001 and
up with the Kohler K241 engine, and 210 up to serial number 95,261), some
Ford, some Jacobsen and Springfield. (The oil pan used on the John Deere
and Springfield Kohler-equipped garden tractors are made of cast iron, identical
to the early Cub Cadet/K241 flat bottom oil pan.)
And garden tractors that originally came from the factory with a flanged or wide base Kohler engine block are: Ariens, Wheel Horse, some Ford, some Jacobsen, Gravely, New Holland, Sears Suburban, Engineering Products Co. (Economy models) and Allis Chalmers. No Cub Cadet garden tractor originally came with a wide base Kohler engine block.
A flanged or wide base single cylinder Kohler engine block is made for the wide or large [2 quart] rectangular oil pan. These blocks can be converted for use with a narrow Cub Cadet garden tractor (or certain models of John Deere) oil pan, so the engine can fit inside the frame rails of a Cub Cadet garden tractor. Below is how to do the conversion.
 Removing a Broken-Off
Tap - A threading tap that has broken off in an engine block or metal
casting can be very difficult to remove. About all I can tell you is to either
take your block to a reputable machine shop to have the tap removed, or go
here and try to do it yourself:
https://www.google.com/?gws_rd=ssl#q=removing+broken+tap+from+hole.
Actually, it's best to use a TAPER hand tap to cut new threads and clean
out existing threads. If used correctly, a TAPER tap is less likely to break
off. Click or tap here
to learn how to cut new threads, the professional way.
Removing a Broken-Off
Tap - A threading tap that has broken off in an engine block or metal
casting can be very difficult to remove. About all I can tell you is to either
take your block to a reputable machine shop to have the tap removed, or go
here and try to do it yourself:
https://www.google.com/?gws_rd=ssl#q=removing+broken+tap+from+hole.
Actually, it's best to use a TAPER hand tap to cut new threads and clean
out existing threads. If used correctly, a TAPER tap is less likely to break
off. Click or tap here
to learn how to cut new threads, the professional way.
Install an oil pan that's made for a narrow base engine block, such as a Cub Cadet garden tractor or certain models of John Deere garden tractors. (See below Ê)
For pulling applications, apply a thin bead of clear RTV silicone adhesive sealant when fastening the pan to the block. Otherwise, for general lawn and garden use, use a gasket and the silicone to lessen the chance of any oil leaks. By the way - it's best to use Clear RTV Silicone Adhesive Sealant for three reasons: Gaskets don't always seal the imperfections and irregularities between two mating metals, especially thin metal covers; being Clear RTV Silicone Adhesive Sealant is an adhesive or glue, it bonds parts together, forming a leak-proof seal; and being it's clear, it makes for a clean and professional-looking repair job. When applied sparingly, it can't be easily seen or noticed between the parts. Also, engine heat has very little effect on silicone rubber. It can withstand up to 2,500 degrees heat.
How to Weld Steel to Cast Iron...
To identify a Cub Cadet garden tractor oil pan, first of all, they're exactly 1-1/16" tall. The pan to tractor frame holes measures exactly 4-15/16" x 7-5/8". From the base of the Cub Cadet pan to the centerline of the crankshaft for the K241-K361 Kohler engines, the measurement (height) is exactly 4.750" (4-3/4"). And with a wide base oil pan, it measures 6.125" (6-1/8"). These measurements are with the compressed (.030" thickness) oil pan gasket installed.
Cub Cadet garden tractor oil pans have either a flat bottom or deep sump. The flat bottom pans are originally made for the K241 engine, but will work with no problem on the K301, K321, K341 and K361 engines, but half of the oil dipper on the connecting rod must be cut off. The deep sump ones are suitable for stroker engines. The flat bottom pan holds 1 quart of oil, and the deep sump one holds 1-1/2 quarts. If a deep sump oil pan is used on an engine that originally came with a flat bottom oil pan, the oil dipper on the connecting rod will be too short and won't be able to splash as much oil to thoroughly lubricate the parts.
The length of the dipper on the connecting rod when shortened must be no shorter than 1-5/8" in length, when measured from the bottom of the rod cap to the end of the dipper. And a short dipper will help to increase the engine power. If a K241 Kohler engine has a small, flat bottom Cub Cadet oil pan, the connecting rod has short dipper. But if it has a large, wide base pan, the rod has a long dipper. The K301-K361 engines all come with a deep sump oil pan, as well as a large, wide base oil pan. Therefore, their connecting rods have a long dipper.
If it's an oil pan that's designed for a Cub Cadet garden tractor, then the shallow and deep oil pans are the same (except for the oil quantity) and will fit virtually all models of Cub Cadet garden tractors. A longer dipper on the connecting rod is not really necessary, but it will provide better lubrication if the oil level were to get low. And the oil level full mark on the oil dipstick will register the same regardless of the type of oil pan is used.
If an oil pan has the drain plug in the wrong location, another drain plug can be installed by finding an area on the pan where the metal is thicker than the surrounding area. These places are specially made by the factory to drill and cut threads for the oil drain plug.
Oil Refill Quantities for Older Kohler Engines - IMPORTANT: Make sure the correct oil dipstick is used and it's calibrated correctly! *NOTE: Add 1/8 quart for a competition pulling tractor with a lowered front-end that have a single cylinder longitudinal engine.
Engine Model(s) |
Engine Model(s) |
Engine Model(s)* |
Engine Model(s)* |
Engine Model(s) |
Engine Model(s) |
Engine Model(s) |
| K90/K91 | K141, K160/K161, K181, L160/L161, L181 and M8 | K241A, M10, K301A, M12, K321A, M14, K341A, M16 | K241, M10, K301, M12, K321, M14, K341, M16, K361 | KT17 (first design), KT17 Series II, KT19 (first design), KT19 Series II, KT21, M18, M20 | MV16, MV18, MV20 |
K482, K532, K582, K660/K662 |
| 3/4 Quart | 1-1/4 Quarts (Full mark is 3/8" above oil pan gasket.) | 1 Quart for engines with a flat bottom narrow base oil pan. 1-1/2 Quarts for engines with a deep sump narrow base oil pan. (Full mark is 3/8" above oil pan gasket.) | 2 Quarts for engines with a wide base oil pan. (Full mark 3/8" above oil pan gasket.) | 1 Quart without oil filter | 1-1/2 Quarts with oil filter. | 1-1/4 Quarts without oil filter | 1-3/4 Quarts with oil filter. |
3 Quarts | Add 1/2 quart for K482, K4532, K582 when replacing filter. Add 1 quart for K660/K662 when replacing filter. |
The best way I found to clean old gasket material from the oil pan and other flat surface engine parts is with a large flat coarse file with the pan (or part) gently clamped in a large bench vise. Be careful not to file off the metal!

 To place an order, send your item(s) for repairing, and/or
for customer service assistance, and FREE honest and accurate technical support,
please contact: A-1 Miller's Performance Enterprises, 12091 N Route B,
Hallsville, MO (Missouri) 65255-9604 USA. Please call in your order or send
an email with a list parts you need and your contact information.
To place an order, send your item(s) for repairing, and/or
for customer service assistance, and FREE honest and accurate technical support,
please contact: A-1 Miller's Performance Enterprises, 12091 N Route B,
Hallsville, MO (Missouri) 65255-9604 USA. Please call in your order or send
an email with a list parts you need and your contact information.
 Phone: 1-573-881-7229 (cell;
call, text or leave voicemail). Please call Monday-Friday, 9am to 5pm, Central
time zone, except holidays. If no answer, please try again later.
Phone: 1-573-881-7229 (cell;
call, text or leave voicemail). Please call Monday-Friday, 9am to 5pm, Central
time zone, except holidays. If no answer, please try again later.
 E-mail:
pullingtractor@aol.com. A-1 Miller's
shop is open to the public Monday-Friday, 9am to 5pm, Central time zone,
with an appointment on weekends, except holidays. If you're the kind of person
who don't trust delivery/shipping companies (mis)handling your high-dollar
and fragile merchandise, you can make the long drive to A-1 Miller's new
shop (click image to the right) to personally purchase parts, or drop off
and/or pick up your carburetor, clutch assembly, and/or other parts for repairing
and/or rebuilding. Or visit our new shop to drop off your parts. Please contact
us before coming so we'll be at our shop waiting for your arrival. When you
visit our shop, you will be dealing directly with the owner for the best
customer service. "The road to a [trusted] friend's house (or shop) is
never long." Don't sacrifice quality workmanship for distance.
Payment Options below.
Photos
of our new building/shop are posted here!
12091 N Route B, Hallsville, MO - Google Maps.
[Return To Previous Paragraph, Section
or Website]
E-mail:
pullingtractor@aol.com. A-1 Miller's
shop is open to the public Monday-Friday, 9am to 5pm, Central time zone,
with an appointment on weekends, except holidays. If you're the kind of person
who don't trust delivery/shipping companies (mis)handling your high-dollar
and fragile merchandise, you can make the long drive to A-1 Miller's new
shop (click image to the right) to personally purchase parts, or drop off
and/or pick up your carburetor, clutch assembly, and/or other parts for repairing
and/or rebuilding. Or visit our new shop to drop off your parts. Please contact
us before coming so we'll be at our shop waiting for your arrival. When you
visit our shop, you will be dealing directly with the owner for the best
customer service. "The road to a [trusted] friend's house (or shop) is
never long." Don't sacrifice quality workmanship for distance.
Payment Options below.
Photos
of our new building/shop are posted here!
12091 N Route B, Hallsville, MO - Google Maps.
[Return To Previous Paragraph, Section
or Website]
Payment Options, and We Ship to Canada and
Worldwide 
Item(s) in a package or cushioned envelope weighing less than 1 lb. is sent
by US Postal Service Airmail Letter Post for a 4-7 days delivery. Packaged
item(s) weighing over 1 lb. and up to 66 lb. is sent by US Postal Service
Airmail Parcel Post for a 4-10 days delivery. I cannot use the US Postal
Services' Flat Rate Priority Mail envelopes and boxes to ship outside U.S.
territories. Item(s) weighing over 67 lbs. or more is sent by FedEx Ground
or equivalent services. We try to keep our shipping cost to customers within
reason. Therefore, we don't ship our products in a fancy-looking package
with our company name and/or logo on it because most customers will just
toss it in the trash after they remove the contents. And being there is no
USPS tracking number outside the US, all I can do is make sure I write your
address correctly on the customs form and on your package.
My websites are not set up to process orders and accept payments. Therefore, to place an order with me, please call either number above or send an email with a list of parts you need, with your name, complete and correct postal mailing address and phone number. For payment options, I accept cash (in person), USPS Postal Money Orders, cashier's checks, business checks, MasterCard, VISA, Discover, American Express (please add 2.5% to the total amount for the credit/debit card processor's surcharge). If paying with a credit/debit card, please call me at either number above. Or to make a payment to me through PayPal, please click this link: https://www.paypal.com. Or use Cash App (username: pullingtractor) or Venmo (username: Pullingtractor) to make a payment to me. And be sure to mention a description of what the payment is for with your full name, postal address, phone number and email address. If sending a money order or cashier's check, please include a note in the envelope with your name, complete mailing address, phone number, email address and a description of what the payment is for. I'll make a note of your order when I have all your information, and I may have to order some of the parts on your list, which should take a few days to come in, but I will send everything to you as soon as I have the parts in stock after I receive your payment.


Return To Previous Website | Top of Page | Copyright © 1996-Present. This website created, designed and maintained by A-1 Miller's Performance Enterprises