 A-1 Miller's Performance Enterprises Webstore
of Electrical Parts
 A-1 Miller's Performance Enterprises Webstore
of Electrical Parts
Nowadays, prices are subject to change without notice. Click
Refresh to see any
changes or updates. Optimized for 1152 x 864 computer screen resolution.
To search for a word or phrase in any of my websites, press the CTRL
 and F
and F  keys on
your keyboard simultaneously to open the Find or Search dialog box in your
web browser. Scroll down this website or click/tap the links below to
jump down to...
| FYI - All aftermarket parts offered in this website are of very high quality and come with an unconditional guarantee. As a matter of fact, the aftermarket parts are just as good or better quality than most OEM Kohler parts. However, certain OEM Kohler and aftermarket parts are no longer available, but might still be available from a source in new old stock. | |||||||
Vibration-Proof Surface-Mount Small Engine Tachometers/Hour Meters |
Durable/Reinforced Electric Competition Pulling Engine Cooling Fan |
Killswitch, Ignition/Lights/Auxiliary Switches, Starter Switches and Electrical Accessory Switches |
|||||
Click here to contact A-1 Miller's Performance Enterprises to place an order, send your parts for repairing, and/or for FREE professional and honest technical customer service assistance and support and payment options. Please contact A-1 Miller's if you need a part or parts, or service(s) performed that's not listed or mentioned in this website. Prices are subject to change without notice.
 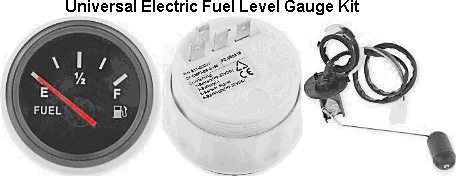 Universal Electric Fuel Level Gauge Kit. 2" gauge can
be mounted in dash of tractor, vehicle or in control panel of equipment.
Use a 2"
hole saw and power drill or
annular cutter to cut hole in dash or panel. Fuel level
reading on gauge can be adjusted or corrected for shallow to deep tanks to
13-1/2" by shortening float rod. Includes wiring harness and instructions.
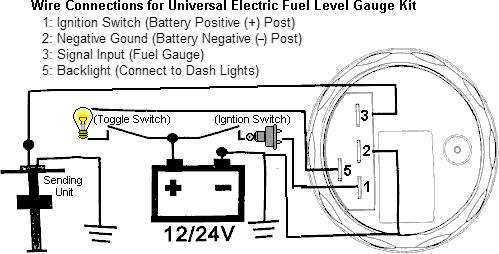
Operates with 9-36 volts DC. Wire Connections - 1-> Ignition Switch (Battery
Positive (+) Post); 2-> Negative Ground (Battery Negative (—) Post);
3-> Signal Input (Fuel Gauge); 5-> Illuminated Backlight (Connect to
Instrument Cluster or Dash Lights). Complete Kit. $45.00
each, plus shipping & handling. Universal Electric Fuel Level Gauge Kit. 2" gauge can
be mounted in dash of tractor, vehicle or in control panel of equipment.
Use a 2"
hole saw and power drill or
annular cutter to cut hole in dash or panel. Fuel level
reading on gauge can be adjusted or corrected for shallow to deep tanks to
13-1/2" by shortening float rod. Includes wiring harness and instructions.
Operates with 9-36 volts DC. Wire Connections - 1-> Ignition Switch (Battery
Positive (+) Post); 2-> Negative Ground (Battery Negative (—) Post);
3-> Signal Input (Fuel Gauge); 5-> Illuminated Backlight (Connect to
Instrument Cluster or Dash Lights). Complete Kit. $45.00
each, plus shipping & handling. |
|
 High
Quality Small Engine Inductive Tachometer/Hour Meter with Replaceable
Battery. A tachometer is required for monitoring and/or setting the
maximum speed of a small engine, which is normally 3,200 or 3,600 RPM (depending
on type of carburetor), to prevent from over-revving and possible damage
to the engine or dangerous flywheel explosion. Very accurate, vibration-proof
and weatherproof construction. Can be surface-mounted and secured with two
screws to monitor engine RPM, or hand-held to set engine RPM. Large 3/8 inch
LCD display. Works with magneto or battery-powered ignition systems by selecting
engine type by programming S1 and S2 buttons. If tachometer does not turn
on automatically as soon as engine starts, press and hold the two buttons
at the same time. Instructions included. Reads up to 99,999 RPM. Hour
meter reads up to 9999:59 hours/minutes. Programmable maintenance hour setting
with service icon, a service reminder when to change oil or other maintenance.
Can be manually reset to Zero hours. Easy installation: Single wire wraps
around spark plug wire and secured with two supplied nylon zip-ties. No wire
terminal connections required. Includes replaceable CR2450 battery. Dimensions:
2" wide x 1-3/4" depth x 3/4" height. $25.00 each, plus shipping &
handling. Click here to print
out instructions. Please let me know if you're
interested in purchasing this item and I'll give you the total amount with
shipping and payment options. High
Quality Small Engine Inductive Tachometer/Hour Meter with Replaceable
Battery. A tachometer is required for monitoring and/or setting the
maximum speed of a small engine, which is normally 3,200 or 3,600 RPM (depending
on type of carburetor), to prevent from over-revving and possible damage
to the engine or dangerous flywheel explosion. Very accurate, vibration-proof
and weatherproof construction. Can be surface-mounted and secured with two
screws to monitor engine RPM, or hand-held to set engine RPM. Large 3/8 inch
LCD display. Works with magneto or battery-powered ignition systems by selecting
engine type by programming S1 and S2 buttons. If tachometer does not turn
on automatically as soon as engine starts, press and hold the two buttons
at the same time. Instructions included. Reads up to 99,999 RPM. Hour
meter reads up to 9999:59 hours/minutes. Programmable maintenance hour setting
with service icon, a service reminder when to change oil or other maintenance.
Can be manually reset to Zero hours. Easy installation: Single wire wraps
around spark plug wire and secured with two supplied nylon zip-ties. No wire
terminal connections required. Includes replaceable CR2450 battery. Dimensions:
2" wide x 1-3/4" depth x 3/4" height. $25.00 each, plus shipping &
handling. Click here to print
out instructions. Please let me know if you're
interested in purchasing this item and I'll give you the total amount with
shipping and payment options.
Wiring Instructions:
Wiring is the same for the hall effect and inductive proximity sensors. Certain proximity sensors have an LED (Light Emitting Diode), which flashes when in close proximity of target. If the proximity sensor is wired incorrectly, the LED will illuminate at all times.
|
Durable/Reinforced Electric Competition Pulling Engine Cooling Fan - Click here to contact A-1 Miller's Performance Enterprises to place an order, send your parts for repairing, and/or for FREE professional and honest technical customer service assistance and support and payment options. Please contact A-1 Miller's if you need a part or parts, or service(s) performed that's not listed or mentioned in this website. [Top of Page]
Superior Quality, High Velocity 12 Volt Auxiliary Engine Cooling Fan. Use an electric fan to cool a competition garden tractor pulling engine with a steel flywheel and no cooling fins. Unlike fan blades that's fastened to the flywheel, an electric fan will not produce drag and rob power from the engine. Install fan with motor forward of blades (for maximum velocity) aimed toward exhaust area of engine. Fasten fan housing on a sturdy angle steel support brace with 1/4" bolts, flat washers, lock washers and nuts, in front of engine or behind grille in a garden tractor. See photos to the right and below. No need to mount fan housing on rubber grommets; these will serve no purpose whatsoever. Fan motor is 100% secured and reinforced to plastic housing to withstand severe engine vibration to prevent fan motor from loosening and become inoperable when pulling. Distinctive feature by A-1 Miller's. NOTE: These fans are designed to be run for a short while only. If they are ran continuously, they may burn up. Draws 2.6 amps, produces 145 CFM. Measures 3" diameter and 5" length. IMPORTANT: It's recommended that the fan not be run while pulling because due to normal engine vibration, the brush holders inside motor could break. Turn fan on ONLY between pull-offs or when tuning engine. $40.00 each, plus shipping & handling.
|
Killswitch, Ignition/Lights/Auxiliary, Starter Switches and Electrical Accessory Switches - Click here to contact A-1 Miller's Performance Enterprises to place an order, send your parts for repairing, and/or for FREE professional and honest technical customer service assistance and support and payment options. Please contact A-1 Miller's if you need a part or parts, or service(s) performed that's not listed or mentioned in this website. [Top of Page]
  Break-Away / Grounding-Type Safety Kill Switch with
Pull-Pin. Use for competition pulling only; mount on rear of tractor.
When the pin pulled, it grounds the ignition coil from producing spark. If
using with a self-energizing magneto or electronic/solid state ignition systems:
Connect one wire to the chassis ground, and connect the other wire to the
points/condenser wire or to the kill terminal on the solid state ignition
coil/module. If using with a battery-powered ignition system: Connect one
wire to the chassis ground, and connect the other wire to the coil negative
(–) terminal. NOTE: With battery-powered ignition, as soon as pin
is pulled (engine will die), manually shut off ignition switch right away
to prevent possible damage to the ignition coil and electronic ignition module
if equipped with crank trigger ignition. This type of switch does not
disable power to the
electric fuel pump on a pulling tractor. It must be
shut-off manually by the ignition switch or an OFF-ON toggle switch. Break-Away / Grounding-Type Safety Kill Switch with
Pull-Pin. Use for competition pulling only; mount on rear of tractor.
When the pin pulled, it grounds the ignition coil from producing spark. If
using with a self-energizing magneto or electronic/solid state ignition systems:
Connect one wire to the chassis ground, and connect the other wire to the
points/condenser wire or to the kill terminal on the solid state ignition
coil/module. If using with a battery-powered ignition system: Connect one
wire to the chassis ground, and connect the other wire to the coil negative
(–) terminal. NOTE: With battery-powered ignition, as soon as pin
is pulled (engine will die), manually shut off ignition switch right away
to prevent possible damage to the ignition coil and electronic ignition module
if equipped with crank trigger ignition. This type of switch does not
disable power to the
electric fuel pump on a pulling tractor. It must be
shut-off manually by the ignition switch or an OFF-ON toggle switch.
|
||
    High Quality Universal Switches. Designed for use with
Self-Energizing Magneto Ignition, Solid State Ignition, OEM Solid State
Ignition (SSI) for Tecumseh's Cast Iron Block Engines, or with OEM Kohler
Breakerless Ignition. These can be used on virtually any small engine
installed on lawn and garden equipment, garden tillers, go-karts, chainsaws,
log splitters, portable air compressors, portable generators/welders, portable
water pumps, etc. with a magneto or solid state ignition, and a recoil/rope
starter or a push-button starter switch, if engine is equipped with an
electric starter.
Very durable, tough switches. High Quality Universal Switches. Designed for use with
Self-Energizing Magneto Ignition, Solid State Ignition, OEM Solid State
Ignition (SSI) for Tecumseh's Cast Iron Block Engines, or with OEM Kohler
Breakerless Ignition. These can be used on virtually any small engine
installed on lawn and garden equipment, garden tillers, go-karts, chainsaws,
log splitters, portable air compressors, portable generators/welders, portable
water pumps, etc. with a magneto or solid state ignition, and a recoil/rope
starter or a push-button starter switch, if engine is equipped with an
electric starter.
Very durable, tough switches.
|
||
   High Quality Universal
Switches for Battery-Powered Ignition and Electrical Accessories. Very durable,
tough switches. Either can be used for ignition, lights,
electric fuel
pump, electric PTO clutch, etc. When used for ignition, use with
push-button starter switch (listed below). Terminals or wires on switches
listed below makes contact when in the ON position. Can be used on virtually
anything that have a battery-powered ignition or electrical system, such
as: garden tractors, go-karts, competition pulling tractors, small motorized
vehicles, mini-rods, hot-rods, farm tractors, automobiles, etc. Each can
be mounted in dashboard, instrument panel, engine control panel, etc. High Quality Universal
Switches for Battery-Powered Ignition and Electrical Accessories. Very durable,
tough switches. Either can be used for ignition, lights,
electric fuel
pump, electric PTO clutch, etc. When used for ignition, use with
push-button starter switch (listed below). Terminals or wires on switches
listed below makes contact when in the ON position. Can be used on virtually
anything that have a battery-powered ignition or electrical system, such
as: garden tractors, go-karts, competition pulling tractors, small motorized
vehicles, mini-rods, hot-rods, farm tractors, automobiles, etc. Each can
be mounted in dashboard, instrument panel, engine control panel, etc.
|
||
 High Quality Universal
Push-Button Switches. Each can be mounted in pedestal, dashboard, instrument
panel, engine control panel, flywheel shroud, etc. High Quality Universal
Push-Button Switches. Each can be mounted in pedestal, dashboard, instrument
panel, engine control panel, flywheel shroud, etc.
|
||
   High Quality Universal 3-Position OFF-ON-START MAGNETO
Ignition Key Switch. Designed specifically for Self-Energizing Magneto
Ignition, Solid State Ignition, OEM Solid State Ignition (SSI) for Tecumseh's
Cast Iron Block Engines, or with OEM Kohler Breakerless Ignition. Can
be used for various makes and models of riding mowers, lawn & garden
tractors, garden tractors and various small engine equipment with magneto
or solid state ignition. Identification of 5 blade terminals: B =
Battery (+); G = Ground (terminal is grounded to body of switch);
L = Lights (use a separate OFF-ON switch connected to this terminal
to power an electric PTO clutch); M = Magneto (Ignition); S
= Solenoid (small terminal). Key positions: OFF position makes contact with
M+G; IGNITION position makes contact with B+L; START position makes contact
with B+S. Each terminal identified for correct wiring connections. IMPORTANT:
Use with a starter solenoid/relay to crank the engine to prevent burning
out internal contacts in switch. NOTE: If engine is equipped with an
alternator/stator charging system, the center terminal on the voltage
rectifier/regulator connects to the positive (+) battery post. If using an
ammeter/amp gauge, connect the gauge/meter to the positive (+) battery post,
then to the B terminal on the switch. Trace the wires on your tractor/equipment
to see if they match the terminals on this switch. If they don't match, the
plug-in spade connectors/wires can be rearranged in the plastic connector
housing to match the corresponding terminals on the switch. To do this, use
a small flat blade screwdriver to depress the locking tab/tang so the plug-in
connector can be pulled out from the plastic connector housing. Bend the
locking tab/tang up slightly before reinserting it in the plastic connector
so it will be secured in place. Or for a universal application, use #250
slip-on female spade crimp-type wire connectors. Requires 5/8" diameter mounting
hole. High Quality Universal 3-Position OFF-ON-START MAGNETO
Ignition Key Switch. Designed specifically for Self-Energizing Magneto
Ignition, Solid State Ignition, OEM Solid State Ignition (SSI) for Tecumseh's
Cast Iron Block Engines, or with OEM Kohler Breakerless Ignition. Can
be used for various makes and models of riding mowers, lawn & garden
tractors, garden tractors and various small engine equipment with magneto
or solid state ignition. Identification of 5 blade terminals: B =
Battery (+); G = Ground (terminal is grounded to body of switch);
L = Lights (use a separate OFF-ON switch connected to this terminal
to power an electric PTO clutch); M = Magneto (Ignition); S
= Solenoid (small terminal). Key positions: OFF position makes contact with
M+G; IGNITION position makes contact with B+L; START position makes contact
with B+S. Each terminal identified for correct wiring connections. IMPORTANT:
Use with a starter solenoid/relay to crank the engine to prevent burning
out internal contacts in switch. NOTE: If engine is equipped with an
alternator/stator charging system, the center terminal on the voltage
rectifier/regulator connects to the positive (+) battery post. If using an
ammeter/amp gauge, connect the gauge/meter to the positive (+) battery post,
then to the B terminal on the switch. Trace the wires on your tractor/equipment
to see if they match the terminals on this switch. If they don't match, the
plug-in spade connectors/wires can be rearranged in the plastic connector
housing to match the corresponding terminals on the switch. To do this, use
a small flat blade screwdriver to depress the locking tab/tang so the plug-in
connector can be pulled out from the plastic connector housing. Bend the
locking tab/tang up slightly before reinserting it in the plastic connector
so it will be secured in place. Or for a universal application, use #250
slip-on female spade crimp-type wire connectors. Requires 5/8" diameter mounting
hole.
|
||
  Universal Wiring Harness with Plastic Connector Housing
and Slide-On Connectors. Replace damaged entire connector, terminals
and wiring, use as new wiring harness on a custom-made project, or use this
part when converting from Breakerless Ignition to battery-powered
points/condenser ignition. Fits universal OFF-ON-START key switches listed
above and other key switches with same terminal configuration. Three terminals
in this part will also fit the OEM Cub Cadet garden tractor OFF-ON-START
key switch listed above. 18" length color-coded wires for easy identification.
$13.00 each, plus shipping & handling. Universal Wiring Harness with Plastic Connector Housing
and Slide-On Connectors. Replace damaged entire connector, terminals
and wiring, use as new wiring harness on a custom-made project, or use this
part when converting from Breakerless Ignition to battery-powered
points/condenser ignition. Fits universal OFF-ON-START key switches listed
above and other key switches with same terminal configuration. Three terminals
in this part will also fit the OEM Cub Cadet garden tractor OFF-ON-START
key switch listed above. 18" length color-coded wires for easy identification.
$13.00 each, plus shipping & handling.
Electrical Plastic Connector Housing Only. Replace damaged connector housing when the brass slide-on spade crimp wire connectors (listed below) are in good condition. Fits universal OFF-ON-START key switches listed above and other key switches with same terminal configuration. Three slots in this part will also fit the OEM Cub Cadet garden tractor OFF-ON-START key switch listed above. Requires 1/4" width slide-on brass spade crimp wire connectors with locking tab/tang below. $8.00 each, plus shipping & handling.
|
||
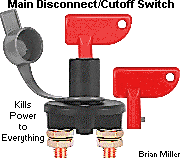 OFF-ON
Main/Master Disconnect/Cutoff Switch with Removable Key. Use this 100
amp capacity switch to disable all power throughout the equipment to prevent
sabotage an/or an accidental electrical short that could burn up the wiring
system or entire equipment. Useful when equipment is not used for a period
of time to prevent a slow drain on the battery, prevent short circuits when
performing electrical service on equipment, or for a pulling tractor to prevent
accidental starts or to prevent sabotage at the pull sites by disgruntled
pullers. Connect between negative (–) battery post and equipment ground.
Copper terminals with brass hex nuts for improved continuity. Comes with
protective weather cap and two removable nylon key locks. Mounting hardware
not included. $19.00 each, plus shipping & handling.
[Return to previous paragraph, section
or website] OFF-ON
Main/Master Disconnect/Cutoff Switch with Removable Key. Use this 100
amp capacity switch to disable all power throughout the equipment to prevent
sabotage an/or an accidental electrical short that could burn up the wiring
system or entire equipment. Useful when equipment is not used for a period
of time to prevent a slow drain on the battery, prevent short circuits when
performing electrical service on equipment, or for a pulling tractor to prevent
accidental starts or to prevent sabotage at the pull sites by disgruntled
pullers. Connect between negative (–) battery post and equipment ground.
Copper terminals with brass hex nuts for improved continuity. Comes with
protective weather cap and two removable nylon key locks. Mounting hardware
not included. $19.00 each, plus shipping & handling.
[Return to previous paragraph, section
or website] |
Universal Starter Solenoids/Relays | FYI - Solenoids and relays are used in a starting circuit or any electrical component that draws a lot of amps, as well as horn and blower motor circuits, to prevent excessive current from flowing through a low amperage switch, which can cause it to burn out. Click here to contact A-1 Miller's Performance Enterprises to place an order, send your parts for repairing, and/or for FREE professional and honest technical customer service assistance and support and payment options. Please contact A-1 Miller's if you need a part or parts, or service(s) performed that's not listed or mentioned in this website. [Top of Page]
 Light Duty, 3 Terminal,
12 Volt Plastic Casing Starter Solenoid/Relay. Universal Usage. Suitable
for lawn and garden equipment, and stock competition pulling engines. Prevents
burning out a manual light-duty push button switch and eliminates need for
a heavy duty switch in a custom wiring circuit. Intermittent duty. Use to
temporarily activate any maximum 80 amp capacity electrical accessory. If
continually energized for long period of time, plastic body may melt. Internally
grounded through mounting base. Studs: 10-32 UNF, 1/4-20 UNC.. High quality
aftermarket. Grounded mounting base. Wiring connections: Small terminal connects
to key switch or momentary push button switch to energize solenoid. One large
terminal connects to positive (+) battery post, and the other large terminal
connects to starter motor, horn, kill switch pull motor on sled, etc. Light Duty, 3 Terminal,
12 Volt Plastic Casing Starter Solenoid/Relay. Universal Usage. Suitable
for lawn and garden equipment, and stock competition pulling engines. Prevents
burning out a manual light-duty push button switch and eliminates need for
a heavy duty switch in a custom wiring circuit. Intermittent duty. Use to
temporarily activate any maximum 80 amp capacity electrical accessory. If
continually energized for long period of time, plastic body may melt. Internally
grounded through mounting base. Studs: 10-32 UNF, 1/4-20 UNC.. High quality
aftermarket. Grounded mounting base. Wiring connections: Small terminal connects
to key switch or momentary push button switch to energize solenoid. One large
terminal connects to positive (+) battery post, and the other large terminal
connects to starter motor, horn, kill switch pull motor on sled, etc.
|
  Loop-Type Cable/Wire/Hose Clamps. Use to secure throttle or
choke cables, or for safe routing of electrical wire(s), battery cable, small
remote fuel primer hose or bundle of wires along frame. Each requires 3/16"
mounting screw. Loop-Type Cable/Wire/Hose Clamps. Use to secure throttle or
choke cables, or for safe routing of electrical wire(s), battery cable, small
remote fuel primer hose or bundle of wires along frame. Each requires 3/16"
mounting screw.
|
Conversion Kit for Kohler engine models K241, K301, K321 or K341 to Convert from the Tediousness Recoil/Rope Start to the Convenience of an Electric Gear Starter. Click here to contact A-1 Miller's Performance Enterprises to place an order, send your parts for repairing, and/or for FREE professional and honest technical customer service assistance and support and payment options. Please contact A-1 Miller's if you need a part or parts, or service(s) performed that's not listed or mentioned in this website. [Top of Page]
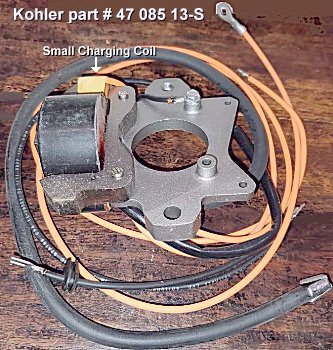 Magneto Armature Ignition
Stator/Coil with Small Charging Coil. Fits various Kohler engines with
stator/coil mounted on bearing plate underneath flywheel with two magnets
inside flywheel. Common with various generator engines. Coil has 1.0 ohm
internal primary resistor. NOTE: This coil should produce a stronger spark
when used with the Universal Solid State Electronic
Ignition Module. Or the engine could be
converted to battery-powered
ignition.
How
magneto coils generate a spark. IMPORTANT: Use a new copper
core/non-resistor AC Delco, Autolite or Champion spark plug of the correct
type gapped at .025" for longer coil life. Use of a
resistor type spark plug
will void warranty. Magneto Armature Ignition
Stator/Coil with Small Charging Coil. Fits various Kohler engines with
stator/coil mounted on bearing plate underneath flywheel with two magnets
inside flywheel. Common with various generator engines. Coil has 1.0 ohm
internal primary resistor. NOTE: This coil should produce a stronger spark
when used with the Universal Solid State Electronic
Ignition Module. Or the engine could be
converted to battery-powered
ignition.
How
magneto coils generate a spark. IMPORTANT: Use a new copper
core/non-resistor AC Delco, Autolite or Champion spark plug of the correct
type gapped at .025" for longer coil life. Use of a
resistor type spark plug
will void warranty.
|
| Conversion Kit for Kohler engine models K241, K301, K321 or K341 to
Convert from the Tediousness Recoil/Rope Start to the Convenience of an Electric
Gear Starter. Very useful in cold weather when most Kohler engines are
harder to start. Can be used for virtually any lawn and garden equipment,
including log splitters, air compressors, generators/welders, water pumps,
etc. NOTE: The early K241 and K301 engines must have a curved indentation
above the two bolt holes on the right side of the block (when facing the
flywheel) to install the upper mount starter motor. Also needed, but
not included with kit listed below: minimum #16 gauge (AWG) stranded copper
wire w/crimp terminals (length?) to connect the small terminal on the solenoid
to the supplied push button starter switch; minimum #8 gauge (AWG) red insulated
stranded copper wire w/crimp terminals (length?) to connect the gear starter
to one of the large terminals on the solenoid; minimum #8 gauge (AWG) red
insulated stranded copper wire w/crimp terminals (length?) to connect the
positive (+) battery post directly to the other large terminal on the solenoid;
minimum #8 gauge (AWG) black insulated stranded copper wire w/crimp terminals
(length?) to connect the negative (–) battery post directly to
engine/chassis ground; and a (preferably new) fully charged
12 volt minimum 350 CCA battery, or a
12 volt portable jump start/battery booster.
Kit Includes:
Additional Required Wiring for Conversion Kit listed above... Please specify if any of the listed below are needed and the length of each wire.
|
High Torque Starter Motor and Rebuilds - Click here to contact A-1 Miller's Performance Enterprises to place an order, send your parts for repairing, and/or for FREE professional and honest technical customer service assistance and support and payment options. Please contact A-1 Miller's if you need a part or parts, or service(s) performed that's not listed or mentioned in this website. [Top of Page]
| A-1 Miller's Professional Repair Service - Replace worn drive end OEM bushing with a new bronze bushing in YOUR small engine gear starter. Starter motor must be in good condition with no burnt windings, damage or broken magnets. $35.00 for parts and labor, plus return shipping & handling. | ||
 High Torque
Gear Starter Motors. Fits Kohler engine models K141, K161 and K181. 12 volt
negative ground. All starter motors are high torque nowadays. They have 20%
more wire windings than the early OEM Kohler starter, giving it 20% more
cranking power. Draws less amps; a smaller size battery can be used. Cranks
engine about twice as fast and draws less amps than an ordinary starter.
But with a
broken compression release, a direct-drive high torque starter may not be
able to crank the engine. It'll be best to adjust the valve clearances, repair
the compression release mechanism or replace the cam with a working compression
release. FYI - The aftermarket starter motors I
sell are the same as OEM Kohler starters. Kohler just place a big markup
on theirs because it comes in a Kohler brand box and the starter has the
Kohler name stamped on it. Kohler part # 41 098 08-S. High Torque
Gear Starter Motors. Fits Kohler engine models K141, K161 and K181. 12 volt
negative ground. All starter motors are high torque nowadays. They have 20%
more wire windings than the early OEM Kohler starter, giving it 20% more
cranking power. Draws less amps; a smaller size battery can be used. Cranks
engine about twice as fast and draws less amps than an ordinary starter.
But with a
broken compression release, a direct-drive high torque starter may not be
able to crank the engine. It'll be best to adjust the valve clearances, repair
the compression release mechanism or replace the cam with a working compression
release. FYI - The aftermarket starter motors I
sell are the same as OEM Kohler starters. Kohler just place a big markup
on theirs because it comes in a Kohler brand box and the starter has the
Kohler name stamped on it. Kohler part # 41 098 08-S.
|
||
 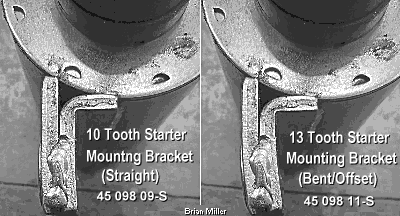 10 and 13 Tooth Upper Mount High Torque Gear Starter Motors.
(Mounting bolts are below starter motor.) Each fits Kohler K-series engine
models K241, K301, K321, K341 and K361. The only difference between the 10
tooth and 13 tooth starters are, on the 10 tooth, the welded mounting bracket
is straight, and on the 13 tooth, the bracket is slightly bent outward so
the starter gear can properly engage with the flywheel gear. 12 volt negative
ground. All new starter motors are high torque nowadays. These have 20% more
wire windings than the early OEM Kohler starter, giving them 20% more cranking
power. Cranks engine about twice as fast and draws less amps than an ordinary
old-style starter. It'll crank the engine with less effort. Therefore, a
smaller battery can be used. The 10 tooth starter provides 13% more cranking
torque than the 13 tooth starter, and the 13 tooth starter cranks the engine
30% faster than the 10 tooth starter. The 13 tooth starter is best to be
used with a working compression release. But with
a broken compression release, a direct-drive high torque starter may not
be able to crank over the engine past the compression stroke. Therefore,
it'll be best to adjust the valve clearances, repair the compression release
mechanism, replace the cam with a working compression release or use the
gear reduction (Toyota) starter. FYI - The aftermarket starters
offered here are the same quality as the OEM Kohler starters. Kohler just
place a big markup on theirs because it comes in a box with the Kohler name
on it and the starter has the Kohler name stamped on it. NOTE: To
install the upper mount starter on an early K241 and K301 engine, the block
must have the curved (inward) indentation above the two bolt holes on the
right side (when facing the flywheel). Otherwise, a starter/generator will
need to be installed. 10 and 13 Tooth Upper Mount High Torque Gear Starter Motors.
(Mounting bolts are below starter motor.) Each fits Kohler K-series engine
models K241, K301, K321, K341 and K361. The only difference between the 10
tooth and 13 tooth starters are, on the 10 tooth, the welded mounting bracket
is straight, and on the 13 tooth, the bracket is slightly bent outward so
the starter gear can properly engage with the flywheel gear. 12 volt negative
ground. All new starter motors are high torque nowadays. These have 20% more
wire windings than the early OEM Kohler starter, giving them 20% more cranking
power. Cranks engine about twice as fast and draws less amps than an ordinary
old-style starter. It'll crank the engine with less effort. Therefore, a
smaller battery can be used. The 10 tooth starter provides 13% more cranking
torque than the 13 tooth starter, and the 13 tooth starter cranks the engine
30% faster than the 10 tooth starter. The 13 tooth starter is best to be
used with a working compression release. But with
a broken compression release, a direct-drive high torque starter may not
be able to crank over the engine past the compression stroke. Therefore,
it'll be best to adjust the valve clearances, repair the compression release
mechanism, replace the cam with a working compression release or use the
gear reduction (Toyota) starter. FYI - The aftermarket starters
offered here are the same quality as the OEM Kohler starters. Kohler just
place a big markup on theirs because it comes in a box with the Kohler name
on it and the starter has the Kohler name stamped on it. NOTE: To
install the upper mount starter on an early K241 and K301 engine, the block
must have the curved (inward) indentation above the two bolt holes on the
right side (when facing the flywheel). Otherwise, a starter/generator will
need to be installed.
|
||
 High Torque
Lower Mount Gear Starter Motors. (Mounting bolts are above starter motor.)
Fits certain Kohler engine models K241, K301, K321 and K341 engines. 12 volt
negative ground. All new starter motors are high torque nowadays. They have
20% more wire windings than the early OEM Kohler starter, giving it 20% more
cranking power. Cranks engine about twice as fast and draws less amps than
an ordinary starter; a smaller battery can be used.
But with a
broken compression release, a direct-drive high torque starter may not be
able to crank the engine. It'll be best to adjust the valve clearances, repair
the compression release mechanism or replace the cam with a working compression
release. FYI - The aftermarket starter motors I
sell are the same as OEM Kohler starters. Kohler just place a big markup
on theirs because it comes in a box with the Kohler name on it and the starter
has the Kohler name stamped on it. High Torque
Lower Mount Gear Starter Motors. (Mounting bolts are above starter motor.)
Fits certain Kohler engine models K241, K301, K321 and K341 engines. 12 volt
negative ground. All new starter motors are high torque nowadays. They have
20% more wire windings than the early OEM Kohler starter, giving it 20% more
cranking power. Cranks engine about twice as fast and draws less amps than
an ordinary starter; a smaller battery can be used.
But with a
broken compression release, a direct-drive high torque starter may not be
able to crank the engine. It'll be best to adjust the valve clearances, repair
the compression release mechanism or replace the cam with a working compression
release. FYI - The aftermarket starter motors I
sell are the same as OEM Kohler starters. Kohler just place a big markup
on theirs because it comes in a box with the Kohler name on it and the starter
has the Kohler name stamped on it.
|
||
 High Torque
Gear Starter Motors for Kohler Magnum engine models M8, M10, M12, M14 and
M16 engines. 12 volt. All new starter motors are high torque nowadays. They
have 20% more wire windings than the early OEM Kohler starter, giving it
20% more cranking power. Cranks engine about twice as fast and draws less
amps than an ordinary starter; a smaller battery can be used. Length: 7-1/4";
mounting studs: two 1/4"-20; O.D. housing: 3-1/16"; center to center mount:
2-1/2"'.
But with a
broken compression release, a direct-drive high torque starter may not be
able to crank the engine. It'll be best to adjust the valve clearances, repair
the compression release mechanism or replace the cam with a working compression
release. FYI - The aftermarket starter motors I
sell are the same as OEM Kohler starters. Kohler just place a big markup
on theirs because it comes in a box with the Kohler name on it and the starter
has the Kohler name stamped on it. High Torque
Gear Starter Motors for Kohler Magnum engine models M8, M10, M12, M14 and
M16 engines. 12 volt. All new starter motors are high torque nowadays. They
have 20% more wire windings than the early OEM Kohler starter, giving it
20% more cranking power. Cranks engine about twice as fast and draws less
amps than an ordinary starter; a smaller battery can be used. Length: 7-1/4";
mounting studs: two 1/4"-20; O.D. housing: 3-1/16"; center to center mount:
2-1/2"'.
But with a
broken compression release, a direct-drive high torque starter may not be
able to crank the engine. It'll be best to adjust the valve clearances, repair
the compression release mechanism or replace the cam with a working compression
release. FYI - The aftermarket starter motors I
sell are the same as OEM Kohler starters. Kohler just place a big markup
on theirs because it comes in a box with the Kohler name on it and the starter
has the Kohler name stamped on it.
|
||
 High Torque
Gear Starter Motors. Fits Kohler opposed twin engine models MV16, KT17, KT17
Series II, KT19, KT19 Series II, KT21, M18, MV18, M20 and MV20. 12 volt negative
ground. All new starter motors are high torque nowadays. They have 20% more
wire windings than the early OEM Kohler starter, giving it 20% more cranking
power. Cranks engine about twice as fast and draws less amps than an ordinary
starter; a smaller battery can be used. Due to their low compression, the
Kohler opposed twin cylinder engines do not have a compression release, nor
do they need one. FYI - The aftermarket starter motors I sell are the
same as OEM Kohler starters. Kohler just place a big markup on theirs because
it comes in a box with the Kohler name on it and the starter has the Kohler
name stamped on it. High Torque
Gear Starter Motors. Fits Kohler opposed twin engine models MV16, KT17, KT17
Series II, KT19, KT19 Series II, KT21, M18, MV18, M20 and MV20. 12 volt negative
ground. All new starter motors are high torque nowadays. They have 20% more
wire windings than the early OEM Kohler starter, giving it 20% more cranking
power. Cranks engine about twice as fast and draws less amps than an ordinary
starter; a smaller battery can be used. Due to their low compression, the
Kohler opposed twin cylinder engines do not have a compression release, nor
do they need one. FYI - The aftermarket starter motors I sell are the
same as OEM Kohler starters. Kohler just place a big markup on theirs because
it comes in a box with the Kohler name on it and the starter has the Kohler
name stamped on it.
|
||
 High Torque
Gear Starter Motors for Kohler engine models K482, K532 and K582. NOTES:
(1) Additional 6.6mm unthreaded hole in additional DE mounting position,
(1) 5.9mm unthreaded hole in CE frame, 1/4-20 threaded battery terminal,
128.2mm magnetic field case length, rubber skirt drive. 12 volt. All new
starter motors are high torque nowadays. They have 20% more wire windings
than the early OEM Kohler starter, giving it 20% more cranking power. Draws
less amps; a smaller battery can be used. Cranks engine about twice as fast
and draws less amps than an ordinary starter.
But with a
broken compression release, a direct-drive high torque starter may not be
able to crank the engine. It'll be best to adjust the valve clearances, repair
the compression release mechanism or replace the cam with a working compression
release. FYI - The aftermarket starter motors I
sell are the same as OEM Kohler starters. Kohler just place a big markup
on theirs because it comes in a box with the Kohler name on it and the starter
has the Kohler name stamped on it. High Torque
Gear Starter Motors for Kohler engine models K482, K532 and K582. NOTES:
(1) Additional 6.6mm unthreaded hole in additional DE mounting position,
(1) 5.9mm unthreaded hole in CE frame, 1/4-20 threaded battery terminal,
128.2mm magnetic field case length, rubber skirt drive. 12 volt. All new
starter motors are high torque nowadays. They have 20% more wire windings
than the early OEM Kohler starter, giving it 20% more cranking power. Draws
less amps; a smaller battery can be used. Cranks engine about twice as fast
and draws less amps than an ordinary starter.
But with a
broken compression release, a direct-drive high torque starter may not be
able to crank the engine. It'll be best to adjust the valve clearances, repair
the compression release mechanism or replace the cam with a working compression
release. FYI - The aftermarket starter motors I
sell are the same as OEM Kohler starters. Kohler just place a big markup
on theirs because it comes in a box with the Kohler name on it and the starter
has the Kohler name stamped on it.
|
||
 High Torque 12
Volt Gear Starter Motors with Solenoid Shift. Fits Kohler V-twin engine models
CH25, CH620, CH621, CH640, CH641, CH670, CH680, CH682, CH730, CH732, CH735,
CH740, CH742, CH745, CH750, CH752, CH940, CH960, CH980, CH1000, CV620, CV640,
CV670, CV680, CV682, CV730, CV730, CV732, CV740, CV742, CV745, CV750, CV752,
CV940, CV960, CV980, CV1000, ECH630, ECH650, ECH680, ECH730, ECH740, ECH749,
ECH940, ECH980, ECV630, ECV650, ECV680, ECV730, ECV740, ECV749, ECV850, ECV860,
ECV870, ECV880, ECV940, ECV980, ELH775, EZT715, EZT725, EZT740, EZT750, FCV740,
KT715, LH630, LH640, LH685, LH690, LH750, LH755, LH775, LV680, PCH680, PCH740,
PCV680, PCV740, PCV850, PCV860, ZT710, ZT720, ZT730 and ZT740. NOTES: 10-tooth
drive starter. All new starter motors are high torque nowadays. They have
20% more wire windings than the early OEM Kohler starter, giving it 20% more
cranking power. Draws less amps; a smaller battery can be used. Cranks engine
about twice as fast and draws less amps than an ordinary starter.
But with a broken
compression release, a direct-drive high torque starter may not be able to
crank the engine. It'll be best to adjust the valve clearances, repair the
compression release mechanism or replace the cam with a working compression
release. FYI - The aftermarket starter motors I
sell are the same as OEM Kohler starters. Kohler just place a big markup
on theirs because it comes in a box with the Kohler name on it and the starter
has the Kohler name stamped on it. High Torque 12
Volt Gear Starter Motors with Solenoid Shift. Fits Kohler V-twin engine models
CH25, CH620, CH621, CH640, CH641, CH670, CH680, CH682, CH730, CH732, CH735,
CH740, CH742, CH745, CH750, CH752, CH940, CH960, CH980, CH1000, CV620, CV640,
CV670, CV680, CV682, CV730, CV730, CV732, CV740, CV742, CV745, CV750, CV752,
CV940, CV960, CV980, CV1000, ECH630, ECH650, ECH680, ECH730, ECH740, ECH749,
ECH940, ECH980, ECV630, ECV650, ECV680, ECV730, ECV740, ECV749, ECV850, ECV860,
ECV870, ECV880, ECV940, ECV980, ELH775, EZT715, EZT725, EZT740, EZT750, FCV740,
KT715, LH630, LH640, LH685, LH690, LH750, LH755, LH775, LV680, PCH680, PCH740,
PCV680, PCV740, PCV850, PCV860, ZT710, ZT720, ZT730 and ZT740. NOTES: 10-tooth
drive starter. All new starter motors are high torque nowadays. They have
20% more wire windings than the early OEM Kohler starter, giving it 20% more
cranking power. Draws less amps; a smaller battery can be used. Cranks engine
about twice as fast and draws less amps than an ordinary starter.
But with a broken
compression release, a direct-drive high torque starter may not be able to
crank the engine. It'll be best to adjust the valve clearances, repair the
compression release mechanism or replace the cam with a working compression
release. FYI - The aftermarket starter motors I
sell are the same as OEM Kohler starters. Kohler just place a big markup
on theirs because it comes in a box with the Kohler name on it and the starter
has the Kohler name stamped on it.
|
||
 High Torque Gear
Starter Motor for Briggs & Stratton 14, 16, 18 and 20hp Opposed Twin
Cylinder Engines. 12 volt. All new starter motors are high torque nowadays.
They have 15% more wire windings than the short version starter, giving it
15% more cranking power. Draws less amps; a smaller battery can be used.
Cranks engine about twice as fast and draws less amps than an ordinary starter.
FYI - The aftermarket starter motors I sell are the same as OEM Briggs
& Stratton starters. Briggs just place a big markup on theirs because
it comes in a box with their name on it and the starter has the Briggs &
Stratton logo stamped on it. High Torque Gear
Starter Motor for Briggs & Stratton 14, 16, 18 and 20hp Opposed Twin
Cylinder Engines. 12 volt. All new starter motors are high torque nowadays.
They have 15% more wire windings than the short version starter, giving it
15% more cranking power. Draws less amps; a smaller battery can be used.
Cranks engine about twice as fast and draws less amps than an ordinary starter.
FYI - The aftermarket starter motors I sell are the same as OEM Briggs
& Stratton starters. Briggs just place a big markup on theirs because
it comes in a box with their name on it and the starter has the Briggs &
Stratton logo stamped on it.
|
Voltage Regulator, Diodes, Voltage Rectifiers/Regulators, Charging Stators, and Internal Flywheel Charging Magnets - Click here to contact A-1 Miller's Performance Enterprises to place an order, send your parts for repairing, and/or for FREE professional and honest technical customer service assistance and support and payment options. Please contact A-1 Miller's if you need a part or parts, or service(s) performed that's not listed or mentioned in this website. [Top of Page]
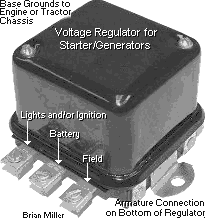 Analog 15 Amp
Voltage Regulator for 12 Volt Starter/Generators. If the charging system
continues to charge with no gradual moving back of the needle to zero on
an analog ammeter/amp gauge (if installed) while the
engine is running, this will put too much voltage throughout the entire
electrical system, which could eventually burn up the ignition coil, battery,
burn out light bulbs, burn up the electric PTO clutch, burn up the electronic
ignition control module (crank trigger ignition)
and burn up the any other electrical components. With the terminals facing
you, they read: L = Lights | Bat = Battery | F = Field, A = Armature (on
the bottom). L connects to the Lights (if equipped); Bat connects to the
ignition switch, which connects to the battery positive (+) post; F connects
to the Field terminal on the starter/generator; and A connects to the Armature
terminal on the starter/generator. The frame of the regulator must be securely
grounded to the engine, tractor or equipment through the mounting bolts,
which connects to the battery negative (–) post. NOTE: Cannot be
substituted for use with the alternator/stator charging system. Analog 15 Amp
Voltage Regulator for 12 Volt Starter/Generators. If the charging system
continues to charge with no gradual moving back of the needle to zero on
an analog ammeter/amp gauge (if installed) while the
engine is running, this will put too much voltage throughout the entire
electrical system, which could eventually burn up the ignition coil, battery,
burn out light bulbs, burn up the electric PTO clutch, burn up the electronic
ignition control module (crank trigger ignition)
and burn up the any other electrical components. With the terminals facing
you, they read: L = Lights | Bat = Battery | F = Field, A = Armature (on
the bottom). L connects to the Lights (if equipped); Bat connects to the
ignition switch, which connects to the battery positive (+) post; F connects
to the Field terminal on the starter/generator; and A connects to the Armature
terminal on the starter/generator. The frame of the regulator must be securely
grounded to the engine, tractor or equipment through the mounting bolts,
which connects to the battery negative (–) post. NOTE: Cannot be
substituted for use with the alternator/stator charging system.
|
|
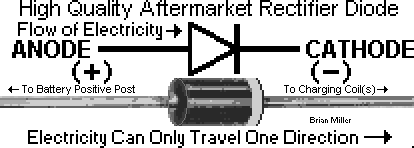   Two Wire Rectifier
Diodes. The 3- and 4-amp diodes can be used in a 12 volt non-regulated small
engine alternator/stator charging system to convert alternating current (AC)
to direct current (DC) to recharge the battery and/or power low-amperage
DC electrical accessories, such as LED lights, small electric motors, etc.
A diode is not required for
filament light bulbs, fluorescent and/or an electric PTO
clutch. The 1 amp diode can be used on an engine with a small charging coil
next to the magneto ignition coil on the stator to energize the field windings
in a direct-drive 120/240 volt AC portable generator powered by a small engine
or for a belt-driven
automotive alternator that's powered by a small engine so the
alternator/generator will produce electricity as soon as the engine starts.
IMPORTANT - Install the diode with the silver stripe toward the generator's
field windings. And do not overload the amperage of the diode or it may burn
up. Two Wire Rectifier
Diodes. The 3- and 4-amp diodes can be used in a 12 volt non-regulated small
engine alternator/stator charging system to convert alternating current (AC)
to direct current (DC) to recharge the battery and/or power low-amperage
DC electrical accessories, such as LED lights, small electric motors, etc.
A diode is not required for
filament light bulbs, fluorescent and/or an electric PTO
clutch. The 1 amp diode can be used on an engine with a small charging coil
next to the magneto ignition coil on the stator to energize the field windings
in a direct-drive 120/240 volt AC portable generator powered by a small engine
or for a belt-driven
automotive alternator that's powered by a small engine so the
alternator/generator will produce electricity as soon as the engine starts.
IMPORTANT - Install the diode with the silver stripe toward the generator's
field windings. And do not overload the amperage of the diode or it may burn
up.
FYI - Briggs & Stratton engines have either one or two OEM alternator stators and they are joined together in two half circles under the flywheel. Some engines only come with one half stator. Each half produce 3 amps of power & 14 volts @ 3,600 RPM. If an engine comes with two stators joined together, one half produces AC, which is used to power the lights and electric PTO clutch. And the other half also produce AC, but is connected to a minimum 3 amp/14 volt diode, which is used to only recharge the battery. Under normal yard use, 3 amps is not enough to overcharge and burn up the battery. If both stator halves are wired together from the factory (as they are on certain engines), they will produce 6 amps of AC power and a 6 amp electronic/solid state voltage rectifier/regulator is used to power the lights, electric PTO clutch and recharge the battery. |
|
 Electronic/Solid
State Voltage Rectifier/Regulator for Old Style 10 Amp Output 12 Volt Alternator
Charging Stators (listed below). If the charging system continues to generate
full charge with no gradual moving back of the needle to zero on an analog
ammeter/amp gauge (if installed) while the engine
is running, the excessive overcharging may eventually burn out the primary
windings in the ignition coil, burn up the electronic ignition control module
(crank trigger), burn up the battery, burn
out light bulbs, electric PTO clutch, and any other electrical accessories.
These will also work with virtually any 15 or 20 amp small engine
alternator/stator charging system. Orientation of terminals are "three in
a row" (AC | BAT+ | AC). NOTE: Cannot be substituted for use with the
starter/generator charging system. FYI: After many years of use and
for reasons unknown (even to me), the old-style 10 amp charging system is
notorious for generating very few amps, about 3 amps more or less maximum
at full governed engine speed, and I have no idea why. I believe this is
why the 10 amp stator was a short-lived item that was discontinued from Kohler
and replaced with the more reliable 15 or 20 amp stator charging system,
which works much better and is still in use on many makes and models of small
engines today. So if your engine has the 10 amp charging system and it only
generates a few amps, it may need to be upgraded with the new-style 15 or
20 charging system. Electronic/Solid
State Voltage Rectifier/Regulator for Old Style 10 Amp Output 12 Volt Alternator
Charging Stators (listed below). If the charging system continues to generate
full charge with no gradual moving back of the needle to zero on an analog
ammeter/amp gauge (if installed) while the engine
is running, the excessive overcharging may eventually burn out the primary
windings in the ignition coil, burn up the electronic ignition control module
(crank trigger), burn up the battery, burn
out light bulbs, electric PTO clutch, and any other electrical accessories.
These will also work with virtually any 15 or 20 amp small engine
alternator/stator charging system. Orientation of terminals are "three in
a row" (AC | BAT+ | AC). NOTE: Cannot be substituted for use with the
starter/generator charging system. FYI: After many years of use and
for reasons unknown (even to me), the old-style 10 amp charging system is
notorious for generating very few amps, about 3 amps more or less maximum
at full governed engine speed, and I have no idea why. I believe this is
why the 10 amp stator was a short-lived item that was discontinued from Kohler
and replaced with the more reliable 15 or 20 amp stator charging system,
which works much better and is still in use on many makes and models of small
engines today. So if your engine has the 10 amp charging system and it only
generates a few amps, it may need to be upgraded with the new-style 15 or
20 charging system.
|
|

|
|
 1/4" Width Slide-On Brass
Spade Crimp Wire Connector with Locking Tab/Tang. Replace damaged brass
connector(s) to insure 100% electrical connections. Fits plastic housing
electrical connectors used on most Off-Ignition-Start key switches, voltage
rectifier/regulators, head lights, etc. FYI - Solder or use
terminal crimping pliers to secure new brass connector
on wire. To remove old slide-on brass connector from plastic housing, depress
locking tab/tang on connector from the wire end with a small flat blade
screwdriver, and pull connector out of housing. Before installing the new
connector, make sure locking tab/tang is slightly bent outward, and then
slide connector into plastic housing in the correct position until it locks/snaps
in place. This part was never available separately from Kohler.
$1.40 each, plus shipping & handling. 1/4" Width Slide-On Brass
Spade Crimp Wire Connector with Locking Tab/Tang. Replace damaged brass
connector(s) to insure 100% electrical connections. Fits plastic housing
electrical connectors used on most Off-Ignition-Start key switches, voltage
rectifier/regulators, head lights, etc. FYI - Solder or use
terminal crimping pliers to secure new brass connector
on wire. To remove old slide-on brass connector from plastic housing, depress
locking tab/tang on connector from the wire end with a small flat blade
screwdriver, and pull connector out of housing. Before installing the new
connector, make sure locking tab/tang is slightly bent outward, and then
slide connector into plastic housing in the correct position until it locks/snaps
in place. This part was never available separately from Kohler.
$1.40 each, plus shipping & handling. |
 Plastic Housing Electrical
Connector. Fits old style 10 amp and new style 15/20 amp voltage
rectifier/regulators (listed below). Replace damaged/melted connector when
the brass slide-on spade crimp wire connectors are in good condition. Requires
1/4" width slide-on brass spade crimp wire connector with locking tab/tang.
OEM Kohler part # 25 155 41-S. $5.20 each, plus shipping & handling. Plastic Housing Electrical
Connector. Fits old style 10 amp and new style 15/20 amp voltage
rectifier/regulators (listed below). Replace damaged/melted connector when
the brass slide-on spade crimp wire connectors are in good condition. Requires
1/4" width slide-on brass spade crimp wire connector with locking tab/tang.
OEM Kohler part # 25 155 41-S. $5.20 each, plus shipping & handling. |
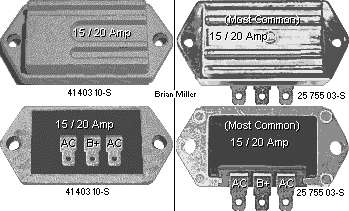 Electronic/Solid
State Voltage Rectifiers/Regulators for New-Style 12 Volt 15/20 Amp Output
Alternator/Stator Charging Stators (listed below). If the charging system
continues to charge with no gradual moving back of the needle to zero on
an analog ammeter/amp gauge (if installed) while the
engine is running, this will put too much voltage throughout the entire
electrical system, which could eventually burn up the ignition coil, battery,
burn out light bulbs, burn up the electric PTO clutch, burn up the electronic
ignition control module (crank trigger ignition)
and burn up the any other electrical components. Each listed below work the
same. These voltage rectifier/regulators are small, compact and have the
same mounting hole spacing, and fit many 8 thru 24hp Kohler engine models
with a 15 or 20 amp alternator/stator charging stator under the flywheel.
For various makes and models of small engines with a 30 amp stator, instead
of using a 30 amp NOS (and high dollar) replacement voltage rectifier/regulator
(discontinued Kohler part # 277063-S), two 15/20 amp voltage
rectifiers/regulators wired in parallel can be used. Each listed below mounts
in the rectangular hole in the Kohler flywheel shroud with ribs facing the
flywheel for better cooling of the unit. If it's mounted elsewhere with no
cool air blowing over it, it could overheat and prematurely burn up. These
can be substituted for use on virtually any 15 or 20 amp garden tractor,
motorcycle, etc., alternator/stator charging system. Orientation of terminals
are "three in a row" (AC - BAT+ - AC). NOTE: These cannot be substituted
for use with the starter/generator charging system. Electronic/Solid
State Voltage Rectifiers/Regulators for New-Style 12 Volt 15/20 Amp Output
Alternator/Stator Charging Stators (listed below). If the charging system
continues to charge with no gradual moving back of the needle to zero on
an analog ammeter/amp gauge (if installed) while the
engine is running, this will put too much voltage throughout the entire
electrical system, which could eventually burn up the ignition coil, battery,
burn out light bulbs, burn up the electric PTO clutch, burn up the electronic
ignition control module (crank trigger ignition)
and burn up the any other electrical components. Each listed below work the
same. These voltage rectifier/regulators are small, compact and have the
same mounting hole spacing, and fit many 8 thru 24hp Kohler engine models
with a 15 or 20 amp alternator/stator charging stator under the flywheel.
For various makes and models of small engines with a 30 amp stator, instead
of using a 30 amp NOS (and high dollar) replacement voltage rectifier/regulator
(discontinued Kohler part # 277063-S), two 15/20 amp voltage
rectifiers/regulators wired in parallel can be used. Each listed below mounts
in the rectangular hole in the Kohler flywheel shroud with ribs facing the
flywheel for better cooling of the unit. If it's mounted elsewhere with no
cool air blowing over it, it could overheat and prematurely burn up. These
can be substituted for use on virtually any 15 or 20 amp garden tractor,
motorcycle, etc., alternator/stator charging system. Orientation of terminals
are "three in a row" (AC - BAT+ - AC). NOTE: These cannot be substituted
for use with the starter/generator charging system.
|
|
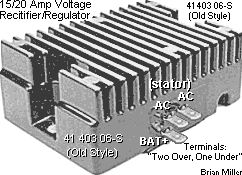 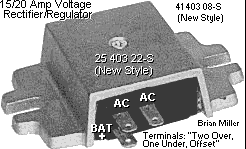 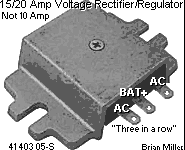 Electronic/Solid
State Voltage Rectifiers/Regulators for New-Style 12 Volt 15/20 Amp Output
Alternator Charging Stators (listed below). If the charging system continues
to charge with no gradual moving back of the needle to zero on an analog
ammeter/amp gauge (if installed) while the engine
is running, this will put too much voltage throughout the entire electrical
system, which could eventually burn up the ignition coil, battery, burn out
light bulbs, burn up the electric PTO clutch, burn up the electronic ignition
control module (crank trigger ignition) and
burn up the any other electrical components. Each listed below work the same.
Each have same mounting holes and fit many 8 thru 24hp Kohler engines with
a 15 amp alternator charging stator under the flywheel. These can be substituted
for use on virtually any 15 or 20 amp garden tractor, motorcycle, etc.,
alternator/stator charging system. The "two over, one under offset" plastic
wiring connector no longer available from Kohler. NOTE: Cannot be substituted
for use with the starter/generator charging system. Electronic/Solid
State Voltage Rectifiers/Regulators for New-Style 12 Volt 15/20 Amp Output
Alternator Charging Stators (listed below). If the charging system continues
to charge with no gradual moving back of the needle to zero on an analog
ammeter/amp gauge (if installed) while the engine
is running, this will put too much voltage throughout the entire electrical
system, which could eventually burn up the ignition coil, battery, burn out
light bulbs, burn up the electric PTO clutch, burn up the electronic ignition
control module (crank trigger ignition) and
burn up the any other electrical components. Each listed below work the same.
Each have same mounting holes and fit many 8 thru 24hp Kohler engines with
a 15 amp alternator charging stator under the flywheel. These can be substituted
for use on virtually any 15 or 20 amp garden tractor, motorcycle, etc.,
alternator/stator charging system. The "two over, one under offset" plastic
wiring connector no longer available from Kohler. NOTE: Cannot be substituted
for use with the starter/generator charging system.
|
|
|
|
Internal Flywheel Charging Magnets - Click here to contact A-1 Miller's Performance Enterprises to place an order, send your parts for repairing, and/or for FREE professional and honest technical customer service assistance and support and payment options. Please contact A-1 Miller's if you need a part or parts, or service(s) performed that's not listed or mentioned in this website. [Top of Page]
  Internal Flywheel Charging Magnets for 5-1/2" Diameter Alternator
Charging Systems. Fits aluminum and cast iron block single and twin cylinder
Kohler engine models K141, K161, K181, K241, K301, K321, K341, K361, KT17,
KT17 Series II, KT19, KT19 Series II, M8, M10, M12, M14, M16, MV16, M18,
MV18, M20, MV20, K482, K532, K582, CH1000, CH11-CH26, CH430, CH450, CH620-CH682,
CH730-CH752, CH940, CH980, CV1000, CV11-CV25, CV430-CV493, CV620-CV682, CV725,
CV730-CV940, CV960, CV980, ECV630-ECV680, ECV730-ECV749, ECV630-ECV680,
ECV730-ECV749, ECV850-ECV880, ECV940, ECV980, FCV740, KT610, KT620, KT715-KT745,
LH430, LH640-LH690, LH750, LH755, LV625-LV680, PCH680, PCH740, PCV680, PCV740,
PCV850, PCV860, SV470-SV480, SV530-SV590, SV600-SV620, SV710-SV740, SV810-SV840,
TH16, TH18, TH575, ZT710-ZT740, except various early John Deere with a single
cylinder Kohler engine with the 4-1/4"± charging stator, and larger
Tecumseh engines. Magnet(s) may come in 3/4" or 7/8" height, but will work
the same. Comes with magnetic poles identified. Not available separate from
Kohler or Tecumseh. All magnets are used and in excellent condition.
Click or tap here to
learn how to identify the magnetic pole positions and how to reinstall or
replace the charging magnets in a Kohler or Tecumseh flywheel. Internal Flywheel Charging Magnets for 5-1/2" Diameter Alternator
Charging Systems. Fits aluminum and cast iron block single and twin cylinder
Kohler engine models K141, K161, K181, K241, K301, K321, K341, K361, KT17,
KT17 Series II, KT19, KT19 Series II, M8, M10, M12, M14, M16, MV16, M18,
MV18, M20, MV20, K482, K532, K582, CH1000, CH11-CH26, CH430, CH450, CH620-CH682,
CH730-CH752, CH940, CH980, CV1000, CV11-CV25, CV430-CV493, CV620-CV682, CV725,
CV730-CV940, CV960, CV980, ECV630-ECV680, ECV730-ECV749, ECV630-ECV680,
ECV730-ECV749, ECV850-ECV880, ECV940, ECV980, FCV740, KT610, KT620, KT715-KT745,
LH430, LH640-LH690, LH750, LH755, LV625-LV680, PCH680, PCH740, PCV680, PCV740,
PCV850, PCV860, SV470-SV480, SV530-SV590, SV600-SV620, SV710-SV740, SV810-SV840,
TH16, TH18, TH575, ZT710-ZT740, except various early John Deere with a single
cylinder Kohler engine with the 4-1/4"± charging stator, and larger
Tecumseh engines. Magnet(s) may come in 3/4" or 7/8" height, but will work
the same. Comes with magnetic poles identified. Not available separate from
Kohler or Tecumseh. All magnets are used and in excellent condition.
Click or tap here to
learn how to identify the magnetic pole positions and how to reinstall or
replace the charging magnets in a Kohler or Tecumseh flywheel.
|

Available Soon - Detailed Illustrated Plans on How to Construct a Professional Pull-Back and Self-Propelled Garden Tractor/Small Wheel Mini Rod Pulling Sleds (Weight Transfer Machines) - [Top of Page]
 FYI - I'm getting closer to
completing my sled plans. But being I have lots of work to do in my shop,
I work on designing my sled plans in my spare time. As soon as my plans with
an inventory list of parts to use and with illustrations are perfected, I'll
post the announcement in my websites. And as for prices of the pull-back
sled and self-propelled sled plans, I'm not sure yet. Make me an offer and
I'll consider it. And remember - Perfection takes time. If it's worth having,
it's worth waiting for. It'll be money well spent. Contact
information below.
Complete Narrowed Automotive Rear End/Differential for Use in Garden Tractor Pulling Sled - [Top of Page]
Details Include -
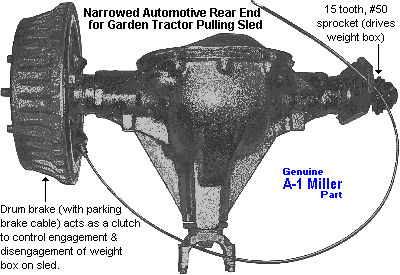 When connected to an automotive
3- or 4-speed manual transmission, this narrowed rear end controls the movement
of the weight box in a garden tractor pulling sled (weight transfer machine).

 To place an order, send your item(s) for repairing, and/or
for customer service assistance, and FREE honest and accurate technical support,
please contact: A-1 Miller's Performance Enterprises, 12091 N Route B,
Hallsville, MO (Missouri) 65255-9604 USA. Please call in your order or send
an email with a list parts you need and your contact information.
 Phone: 1-573-881-7229 (cell;
call, text or leave voicemail). Please call Monday-Friday, 9am to 5pm, Central
time zone, except holidays. If no answer, please try again later.
 E-mail:
pullingtractor@aol.com. A-1 Miller's
shop is open to the public Monday-Friday, 9am to 5pm, Central time zone,
with an appointment on weekends, except holidays. If you're the kind of person
who don't trust delivery/shipping companies (mis)handling your high-dollar
and fragile merchandise, you can make the long drive to A-1 Miller's new
shop (click image to the right) to personally purchase parts, or drop off
and/or pick up your carburetor, clutch assembly, and/or other parts for repairing
and/or rebuilding. Or visit our new shop to drop off your parts. Please contact
us before coming so we'll be at our shop waiting for your arrival. When you
visit our shop, you will be dealing directly with the owner for the best
customer service. "The road to a [trusted] friend's house (or shop) is
never long." Don't sacrifice quality workmanship for distance.
Payment Options below.
Photos
of our new building/shop are posted here!
12091 N Route B, Hallsville, MO - Google Maps.
[Return To Previous Paragraph, Section
or Website]
Payment Options, and We Ship to Canada and
Worldwide 
Item(s) in a package or cushioned envelope weighing less than 1 lb. is sent
by US Postal Service Airmail Letter Post for a 4-7 days delivery. Packaged
item(s) weighing over 1 lb. and up to 66 lb. is sent by US Postal Service
Airmail Parcel Post for a 4-10 days delivery. I cannot use the US Postal
Services' Flat Rate Priority Mail envelopes and boxes to ship outside U.S.
territories. Item(s) weighing over 67 lbs. or more is sent by FedEx Ground
or equivalent services. We try to keep our shipping cost to customers within
reason. Therefore, we don't ship our products in a fancy-looking package
with our company name and/or logo on it because most customers will just
toss it in the trash after they remove the contents. And being there is no
USPS tracking number outside the US, all I can do is make sure I write your
address correctly on the customs form and on your package.
My websites are not set up to process orders and accept payments. Therefore, to place an order with me, please call either number above or send an email with a list of parts you need, with your name, complete and correct postal mailing address and phone number. For payment options, I accept cash (in person), USPS Postal Money Orders, cashier's checks, business checks, MasterCard, VISA, Discover, American Express (please add 2.5% to the total amount for the credit/debit card processor's surcharge). If paying with a credit/debit card, please call me at either number above. Or to make a payment to me through PayPal, please click this link: https://www.paypal.com. Or use Cash App (username: pullingtractor) or Venmo (username: Pullingtractor) to make a payment to me. And be sure to mention a description of what the payment is for with your full name, postal address, phone number and email address. If sending a money order or cashier's check, please include a note in the envelope with your name, complete mailing address, phone number, email address and a description of what the payment is for. I'll make a note of your order when I have all your information, and I may have to order some of the parts on your list, which should take a few days to come in, but I will send everything to you as soon as I have the parts in stock after I receive your payment.
Return To Previous Website | Top of Page | Copyright © 1996-Present. This website created, designed and maintained by A-1 Miller's Performance Enterprises