
 Putting
the Brakes on an IH Cub Cadet Garden Tractor
Putting
the Brakes on an IH Cub Cadet Garden Tractor
Putting
the Brakes on an IH Cub Cadet Garden Tractor
Putting
the Brakes on an IH Cub Cadet Garden Tractor
 Overstocked Kohler Engine Parts & Cub Cadet Garden Tractor
Parts | Available Soon - Detailed
Illustrated Plans on How to Construct Professional Pulling Sleds
Overstocked Kohler Engine Parts & Cub Cadet Garden Tractor
Parts | Available Soon - Detailed
Illustrated Plans on How to Construct Professional Pulling Sleds
Nowadays, prices are subject to change without notice. (Click Refresh to see any changes or updates.) Optimized for 1024 x 768 computer screen resolution. To search for a word or phrase in any of my websites, press CTRL and F on your keyboard simultaneously to open the Find or Search dialog box in your web browser. And being I have no apprentice to update and pay for my websites so they'll continue to be on the Internet, they will be removed forever when I'm no longer around.
If you want go, you gotta have whoa. There's no question about it. For safety, it's best to repair or replace worn brake parts and adjust them if needed.
For Safety, Separate the Brake and Clutch Pedal Operations and Use a Custom Hand-Operated Brake Instead of the Foot Brake - (updated 6/9/25)
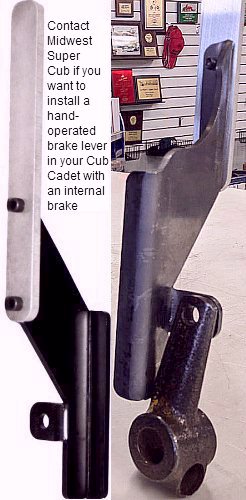 Many professional Cub Cadet garden tractor competition
pullers prefer to use a hand brake because they run an extremely stiff pressure
spring on the driveshaft to prevent clutch slippage. When they depress the
clutch/brake pedal to apply the brakes, the stiff spring must fully compress,
which makes it very hard to easily apply the brakes. The hand brake makes
it effortlessly and much safer to apply the brakes. It requires a lot less
muscle (in the arm) to stop the tractor.
Many professional Cub Cadet garden tractor competition
pullers prefer to use a hand brake because they run an extremely stiff pressure
spring on the driveshaft to prevent clutch slippage. When they depress the
clutch/brake pedal to apply the brakes, the stiff spring must fully compress,
which makes it very hard to easily apply the brakes. The hand brake makes
it effortlessly and much safer to apply the brakes. It requires a lot less
muscle (in the arm) to stop the tractor.
When safely rolling the tractor off or out of a trailer, sometimes this requires great effort with your leg muscles to depress the clutch/brake pedal to apply the brakes, especially by hand (arm muscles). To make this much easier and safer, separate the brake and the clutch pedal operations by disconnecting the brake linkage from the clutch/brake pedal cross shaft, and fabricate a long upright lever (with an adjustable linkage) on the right side of the steering column support pedestal which can be easily and effortlessly pulled back (rearward) by hand to apply the brakes. The clutch/brake pedal will then become just the "clutch pedal," and the lever will be the "brake lever." This would also make it much safer and easier to fully stop or slow the tractor down a steep hill or when unloading the tractor down the ramp(s) of a utility trailer or platform work table. Also, a "parking brake" lock mechanism can be installed on the brake lever-to-tractor frame to securely lock the brakes in position to prevent the tractor from rolling or coasting when the tractor is out of gear and the engine running.
Cub Cadet garden tractors that have the brakes integrated with the clutch/brake pedal, when applying the brakes on a competition pulling tractor that has an extremely stiff clutch pressure spring (on the driveshaft), great effort is required (strong leg muscles) to overcome and compress the clutch spring before the brakes can be fully applied. I don't have any photos of the hand brake (yet), but to make it work, fabricate a 3/4" diameter cross-shaft next to the original clutch/brake cross-shaft, mount it between the tractor frame rails and allow it to rotate slightly. The brake lever is then positioned on the right side of the tractor (if you're right-handed), and it can be made to a comfortable length (height) and it's securely welded to the cross-shaft. Then a bellcrank or short lever is installed or welded to the cross-shaft with an adjustable link (turnbucket) which connects to the brake lever on the transaxle. The adjustable link is used to set the proper position of the lever. Install an extension spring to allow the pressure to be taken off the brakes when the lever is released.
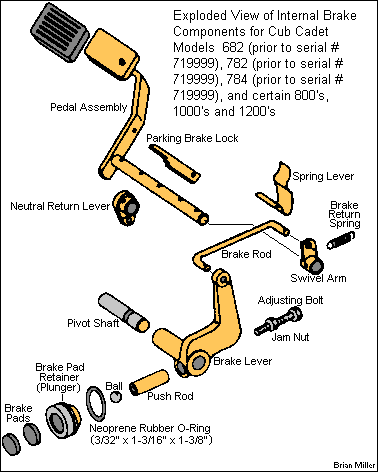
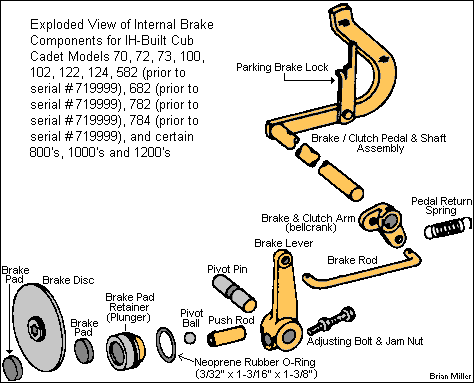 If your IH Cub Cadet model
70,
72,
73,
100,
102,
122,
124,
582 (prior to serial # 719999),
682 (prior to serial # 719999),
782 (prior to serial # 719999),
784 (prior to serial # 719999), and the early
800,
1000 and
1200 models have an internal brake assembly like the one
shown to the right ->, the adjustment is easily made by loosening the
jam nut on the square-head bolt and rotating the bolt clockwise. Make the
adjustment when there's a slight drag on the brake pads and disc when the
clutch/brake pedal is about 3/4 depressed, then tighten the jam nut.
If your IH Cub Cadet model
70,
72,
73,
100,
102,
122,
124,
582 (prior to serial # 719999),
682 (prior to serial # 719999),
782 (prior to serial # 719999),
784 (prior to serial # 719999), and the early
800,
1000 and
1200 models have an internal brake assembly like the one
shown to the right ->, the adjustment is easily made by loosening the
jam nut on the square-head bolt and rotating the bolt clockwise. Make the
adjustment when there's a slight drag on the brake pads and disc when the
clutch/brake pedal is about 3/4 depressed, then tighten the jam nut.
If you can't get the brake to stop the tractor at all by tightening the square-head brake adjustment bolt, and you are sure that the adjustment bolt is pushing against the brake push rod firmly when the pedal is depressed, then the brake pad retainer (plunger) is obviously frozen/rusted in the reduction housing. This is common for tractors that was stored in a high humility environment or sat outside in damp weather for many years.
 Remove the square head adjustment
screw from the lever.
Remove the square head adjustment
screw from the lever.
 DO NOT ATTEMPT TO
DRIVE OUT THE PIN WITHOUT FIRST THOROUGHLY HEATING THE LEVER AND/OR YOKES
BECAUSE BEING THE YOKES ARE MADE OF BRITTLE CAST IRON, THIS WILL LIKELY CAUSE
ONE OR BOTH OF THEM TO BREAK OFF, THEN IT IT/THEY WILL NEED TO BE WELDED
BACK ON.
DO NOT ATTEMPT TO
DRIVE OUT THE PIN WITHOUT FIRST THOROUGHLY HEATING THE LEVER AND/OR YOKES
BECAUSE BEING THE YOKES ARE MADE OF BRITTLE CAST IRON, THIS WILL LIKELY CAUSE
ONE OR BOTH OF THEM TO BREAK OFF, THEN IT IT/THEY WILL NEED TO BE WELDED
BACK ON.
How to Free-Up a Frozen/Rusted-In Brake Pad Retainer (Plunger) -
This happens when a tractor is left outside in damp weather for many years, which causes the brake pad retainer (plunger) to get rusted in the bore. To free the plunger, remove the transaxle from the tractor, and from inside the reduction gear box housing, remove the large reduction gear, then use a large, flat cold chisel and big hammer between the plunger and brake disc to drive the plunger forward. Use Liquid Wrench to dissolve the rust around the retainer. The brake disc may get scored or scratched from use of the chisel, but this is the only way I know how to do this. Once the plunger is removed from the reduction housing, the scratches on the brake disc can be removed and smoothed over with a fine file. Before reinstalling the plunger, clean the rust from the plunger, install a new rubber O-ring and new brake pads if needed, and remove the rust from the plunger bore with a small, automotive wheel cylinder hone tool, then apply clean motor oil, gear oil or grease on the O-ring, plunger and inside the bore so the brake will work flawlessly for many years.
To replace this type of brake, first remove the transaxle from the tractor. Then, remove the square head bolt, drive out the rocker shaft and remove the cast brake arm. Try tapping on the piston and use penetrating oil on it to free it. Often, the transaxle will have to be removed from the tractor and the reduction housing removed to drive the brake pad retainer out from inside and clean up the bore and retainer. If you go that far, replace both pads/pucks with new ones, they are cheap. On reassembly, coat the outside of the piston with a thin layer of motor oil.
If the brake pad retainer is rusted and stuck in place, here's how to fix this...
 Parts for this job will involve
a new "O" ring for the retainer that the cast rod and shaft pushes on, a
reduction gear housing gasket or use
clear RTV silicone adhesive sealant and 2 new brake
pads/pucks. Use only OEM (Original Equipment Manufacturer) material when
replacing the brake pads/pucks. FYI - I'm not an OEM (Original Equipment
Manufacturer) Cub Cadet parts dealer. Cub Cadet won't let A-1 Miller's become
a dealer because there's already one in my area. (It's another way how big
businesses support other big businesses, or how the rich help the rich get
richer.) Besides, competition from different dealers in the same area help
keep prices low. I think this is unfair business practice because by allowing
only one dealer in a wide-spread area can have them gouge (overcharge)
unsuspecting customers on parts and/or repair costs. They probably laugh
all the way to the bank after every sale, too.
Parts for this job will involve
a new "O" ring for the retainer that the cast rod and shaft pushes on, a
reduction gear housing gasket or use
clear RTV silicone adhesive sealant and 2 new brake
pads/pucks. Use only OEM (Original Equipment Manufacturer) material when
replacing the brake pads/pucks. FYI - I'm not an OEM (Original Equipment
Manufacturer) Cub Cadet parts dealer. Cub Cadet won't let A-1 Miller's become
a dealer because there's already one in my area. (It's another way how big
businesses support other big businesses, or how the rich help the rich get
richer.) Besides, competition from different dealers in the same area help
keep prices low. I think this is unfair business practice because by allowing
only one dealer in a wide-spread area can have them gouge (overcharge)
unsuspecting customers on parts and/or repair costs. They probably laugh
all the way to the bank after every sale, too.
The internal brake is preferred by most Cub Cadet owners and pullers over the external disc setup, and are normally almost totally trouble-free because the parts stay cleaner than the external brakes.
Only the early Cub Cadets (models
70,
72,
73,
100,
102,
122,
124,
582,
682,
782,
784 (prior to serial # 720000), and certain
800,
1000 and
1200's) were equipped with an internal brake. The Cub Cadet
engineers realized later that people were hauling heavy (fully loaded,
automotive-type) trailers around their property (farms) with these tractors,
and the small internal brake pads couldn't stop the tractor and trailer well,
especially when going down a steep hill. Nor does it have the ability to
"park" well (with a heavy trailer) downward or upward on a steep hillside.
That's why Cub Cadet converted to the external disc/axle brake system, as
described further down in this web page. External disc/axle brakes have more
contact area, permitting the external brakes to hold about 5 times better
than the internal brake.
How to Replace the Internal (Wet) Brake Pads/Pucks in an IH Cub Cadet Garden Tractor Transaxle -
 Acquire new brake pads from
A-1 Miller's Performance Enterprises or your
local Cub Cadet dealer.
Acquire new brake pads from
A-1 Miller's Performance Enterprises or your
local Cub Cadet dealer.
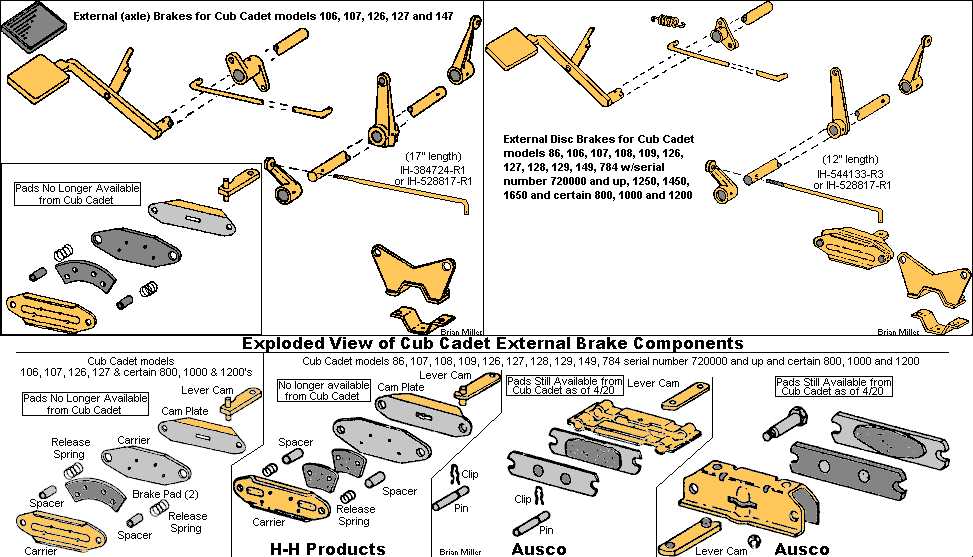
 The external/axle disc brakes
on Cub Cadet models
86,
106,
107,
108,
109,
126,
127,
128,
129,
149, 784 w/serial number 720000 and up,
1250,
1450,
1650 and certain
800,
1000 and
1200's are much easier to service than the internal brake
models above. Unlike the internal brake, a piece of .125" thickness 6061
(medium hardness) aluminum will work. Use highly adhesive glue or countersink
some 3/16" aluminum rivets or flat-head brass bolts to fasten the aluminum
in place.
The external/axle disc brakes
on Cub Cadet models
86,
106,
107,
108,
109,
126,
127,
128,
129,
149, 784 w/serial number 720000 and up,
1250,
1450,
1650 and certain
800,
1000 and
1200's are much easier to service than the internal brake
models above. Unlike the internal brake, a piece of .125" thickness 6061
(medium hardness) aluminum will work. Use highly adhesive glue or countersink
some 3/16" aluminum rivets or flat-head brass bolts to fasten the aluminum
in place.
The front brake pads that's made for a 1998-2001 Chevrolet S10 2wd pickup can be used in place of the OEM (Original Equipment Manufacturer) pads for these type of brakes. This is the flat pad with slotted ends. They're available at virtually any auto parts store. The thickness of a new OEM Cub Cadet brake pad is .100". The automotive pads are thicker.
The automotive brake pads to use are the riveted-on type. Grind the backs off the rivets. The two top rivet holes should line up enough to get two screws through them. Then turn the pads over, and from the back side, use a drill bit to go through the Cub backing plate. Drill through the pad and turn it over. Counter sink the holes to install two more screws.
Also, I have no information on how to mount the S10 brake pads on a Cub Cadet. Somebody gave A-1 Miller's this information and I posted it here. Use the information here to the best of your knowledge.
Also, seasoned oak wood or 6061 aluminum can be used as external brake friction
material for a Cub Cadet. But only if the tractor doesn't go any faster
than factory gearing!
NEVER use wood or aluminum as brake friction
material in a high speed (above 20 mph) vehicle or in an automobile! The
reason being, due to severe friction, wood will burn and aluminum
will melt!
To adjust these type of brakes, there's an adjusting rod going forward from each axle end. You'll need to remove them, clean the dirt and paint from the threads with a threading die, a wire brush or a wire wheel, then reinstall them. Place the brake pedal with the hold down lever in place then adjust them to where each axle has the same amount of braking.
Advertisement: (Prices are subject to change without notice.)
| Click here to contact A-1 Miller's Performance Enterprises to place an order, send your parts for repairing, and/or for FREE professional and honest technical customer service assistance and support and payment options. Please contact A-1 Miller's if you need a part or parts, or service(s) performed that's not listed or mentioned in this website. | ||
 Internal (Wet) Brake Pads/Pucks and Neoprene Rubber O-Ring
Seal. Fits Cub Cadet garden tractor models 70, 71, 72, 73, 100, 102, 104,
105, 122, 123, 124, 125, 580, 582, 680, 682, 782, 784, 800, 1000, 1200, 1210,
1250, 1282, 1450, 1604, 1606, 1650, 1710, 1711 and 1712. IMPORTANT: Before
installing any new oil seal, always apply oil or fiber-free grease inside
the seal and on the shaft to keep the rubber seal lubricated and cool until
internal oil can reach it. With no prior lubrication, the dry rubber will
wear away, causing another oil leak. Do the job right the first time, and
it won't have to be done again. Internal (Wet) Brake Pads/Pucks and Neoprene Rubber O-Ring
Seal. Fits Cub Cadet garden tractor models 70, 71, 72, 73, 100, 102, 104,
105, 122, 123, 124, 125, 580, 582, 680, 682, 782, 784, 800, 1000, 1200, 1210,
1250, 1282, 1450, 1604, 1606, 1650, 1710, 1711 and 1712. IMPORTANT: Before
installing any new oil seal, always apply oil or fiber-free grease inside
the seal and on the shaft to keep the rubber seal lubricated and cool until
internal oil can reach it. With no prior lubrication, the dry rubber will
wear away, causing another oil leak. Do the job right the first time, and
it won't have to be done again.
|
Internal Brake VS External Brake Transaxles -
Many professional pullers prefer to use the internal brake transaxle so the rear wheels can be set closer to the tractor frame, allowing for a narrower wheelbase. This require the driver to lean less when heading toward the boundary line, and the tractor can pull more straight down the track.
To convert a Cub Cadet external brake transaxle into an internal brake design, a front gear reduction housing, brake pad retainer, brake link, brake lever, push rod, pivot pin, brake pads, disc and the lower main shaft, off/out of an internal brake transaxle are required. The opposite will need to be done when converting a Cub Cadet internal brake transaxle into an external brake design. It's exactly easier (and less costly) to acquire an entire internal or external brake transaxle (in good condition, of course), install it, and fabricate or install the required brake linkage. All IH Cub Cadet tractor frames, except the "Original", are made for use with either transaxle.
 To place an order, send your item(s) for repairing, and/or
for customer service assistance, and FREE honest and accurate technical support,
please contact: A-1 Miller's Performance Enterprises, 12091 N Route B,
Hallsville, MO (Missouri) 65255-9604 USA. Please call in your order or send
an email with a list parts you need and your contact information.
To place an order, send your item(s) for repairing, and/or
for customer service assistance, and FREE honest and accurate technical support,
please contact: A-1 Miller's Performance Enterprises, 12091 N Route B,
Hallsville, MO (Missouri) 65255-9604 USA. Please call in your order or send
an email with a list parts you need and your contact information.
 Phone: 1-573-881-7229 (cell;
call, text or leave voicemail). Please call Monday-Friday, 9am to 5pm, Central
time zone, except holidays. If no answer, please try again later.
Phone: 1-573-881-7229 (cell;
call, text or leave voicemail). Please call Monday-Friday, 9am to 5pm, Central
time zone, except holidays. If no answer, please try again later.
 E-mail:
pullingtractor@aol.com. A-1 Miller's
shop is open to the public Monday-Friday, 9am to 5pm, Central time zone,
with an appointment on weekends, except holidays. If you're the kind of person
who don't trust delivery/shipping companies (mis)handling your high-dollar
and fragile merchandise, you can make the long drive to A-1 Miller's new
shop (click image to the right) to personally purchase parts, or drop off
and/or pick up your carburetor, clutch assembly, and/or other parts for repairing
and/or rebuilding. Or visit our new shop to drop off your parts. Please contact
us before coming so we'll be at our shop waiting for your arrival. When you
visit our shop, you will be dealing directly with the owner for the best
customer service. "The road to a [trusted] friend's house (or shop) is
never long." Don't sacrifice quality workmanship for distance.
Payment Options below.
Photos
of our new building/shop are posted here!
12091 N Route B, Hallsville, MO - Google Maps.
[Return To Previous Paragraph, Section
or Website]
E-mail:
pullingtractor@aol.com. A-1 Miller's
shop is open to the public Monday-Friday, 9am to 5pm, Central time zone,
with an appointment on weekends, except holidays. If you're the kind of person
who don't trust delivery/shipping companies (mis)handling your high-dollar
and fragile merchandise, you can make the long drive to A-1 Miller's new
shop (click image to the right) to personally purchase parts, or drop off
and/or pick up your carburetor, clutch assembly, and/or other parts for repairing
and/or rebuilding. Or visit our new shop to drop off your parts. Please contact
us before coming so we'll be at our shop waiting for your arrival. When you
visit our shop, you will be dealing directly with the owner for the best
customer service. "The road to a [trusted] friend's house (or shop) is
never long." Don't sacrifice quality workmanship for distance.
Payment Options below.
Photos
of our new building/shop are posted here!
12091 N Route B, Hallsville, MO - Google Maps.
[Return To Previous Paragraph, Section
or Website]
Payment Options, and We Ship to Canada and
Worldwide 
Item(s) in a package or cushioned envelope weighing less than 1 lb. is sent
by US Postal Service Airmail Letter Post for a 4-7 days delivery. Packaged
item(s) weighing over 1 lb. and up to 66 lb. is sent by US Postal Service
Airmail Parcel Post for a 4-10 days delivery. I cannot use the US Postal
Services' Flat Rate Priority Mail envelopes and boxes to ship outside U.S.
territories. Item(s) weighing over 67 lbs. or more is sent by FedEx Ground
or equivalent services. We try to keep our shipping cost to customers within
reason. Therefore, we don't ship our products in a fancy-looking package
with our company name and/or logo on it because most customers will just
toss it in the trash after they remove the contents. And being there is no
USPS tracking number outside the US, all I can do is make sure I write your
address correctly on the customs form and on your package.
My websites are not set up to process orders and accept payments. Therefore, I will need your name, complete and correct postal mailing address and phone number. And for payment options, I accept cash (in person), USPS Postal Money Orders, cashier's checks and business checks. I do not accept credit/debit cards. Or to make a payment to me through PayPal, please click this link: https://www.paypal.com (username: pullingtractor@aol.com). And please use PayPal's "Friends and Family" option to ensure that I receive the full amount or add 3% to the total amount to cover PayPal's processing surcharge. I also accept Venmo (username: Pullingtractor) and Cash App (username: pullingtractor) please add 2% for Cash App's surcharge as well). And be sure to mention a description of what the payment is for with your full name, postal address, phone number and email address. If sending a money order or cashier's check, please include a note in the envelope with your name, complete mailing address, phone number, email address and a description of what the payment is for. I'll make a note of your order when I have all your information, and I may have to order some of the parts on your list, which should take a few days to come in, but I will send everything to you as soon as the parts are in stock after I receive your payment.


Return To Previous Website | Top of Page | Copyright © 1996-Present. This website created, designed and maintained by A-1 Miller's Performance Enterprises